
With the latest Home Assistant release, you can now have an entirely local AI that helps you control your smart home. This is made possible by the integration of Home Assistant Assist and Ollama. Let’s explore how this setup works, its pros and cons, and whether it’s usable at this stage. I’ll also share how to set it up, so you can try it out yourself. Let’s dive in!
Table of Contents
Setting Up Home Assistant and Ollama
Step 1: Preparing the Environment
First, ensure you have Home Assistant up and running. Any Home Assistant installation type will do.
If you don’t have Home Assistant yet, then register for my upcoming Home Assistant webinar where we will talk about different installation types and their pros and cons. It’s free, and you can find the link below:
https://automatelike.pro/webinar
Tired of Reading? Watch My YouTube Video!
If you prefer watching a video over reading, check out my YouTube video on this topic. It covers everything discussed here and provides a visual walkthrough of the setup process.
Step 2: Running Ollama Locally
Then you need to start the Ollama on a device that is in the same network as your Home Assistant
- Set Up Ollama: Download the Ollama client from the Ollama website. It’s available for Windows, Linux, and Mac. I’m using a Mac with an M1 processor and it is working decent enough on it for tests and playing.
After downloading Ollama, start the project. You should see a cute Ollama icon indicating that it’s running (at least I see it on Mac, I’m pretty sure it’s the same on Windows and probably on Linux).
Next, expose your Ollama setup to your local network so Home Assistant can connect to it:
- Export to Host: Use the export command to make Ollama accessible over your local network. Follow the instructions for your OS on this link:
https://github.com/ollama/ollama/blob/main/docs/faq.md#how-do-i-configure-ollama-server - Restart your Ollama app
- Set IP and Port: Typically, you’ll use your laptop’s IP address and a default port (e.g., 11434).
Step 3: Integrating Ollama with Home Assistant
To integrate Ollama with Home Assistant:
- Add the Ollama Integration:
- Go to Settings > Devices & Services.
- In the bottom right corner, select the Add Integration button.
- From the list, select Ollama.
- Or instead of the all three steps above click on this My Home Assistant link
- Type IP and Port: Enter the IP address and port of the device where Ollama is running. The default Ollama port is 11434 and as example my laptop IP is 192.168.8.38 and this is what I entered:

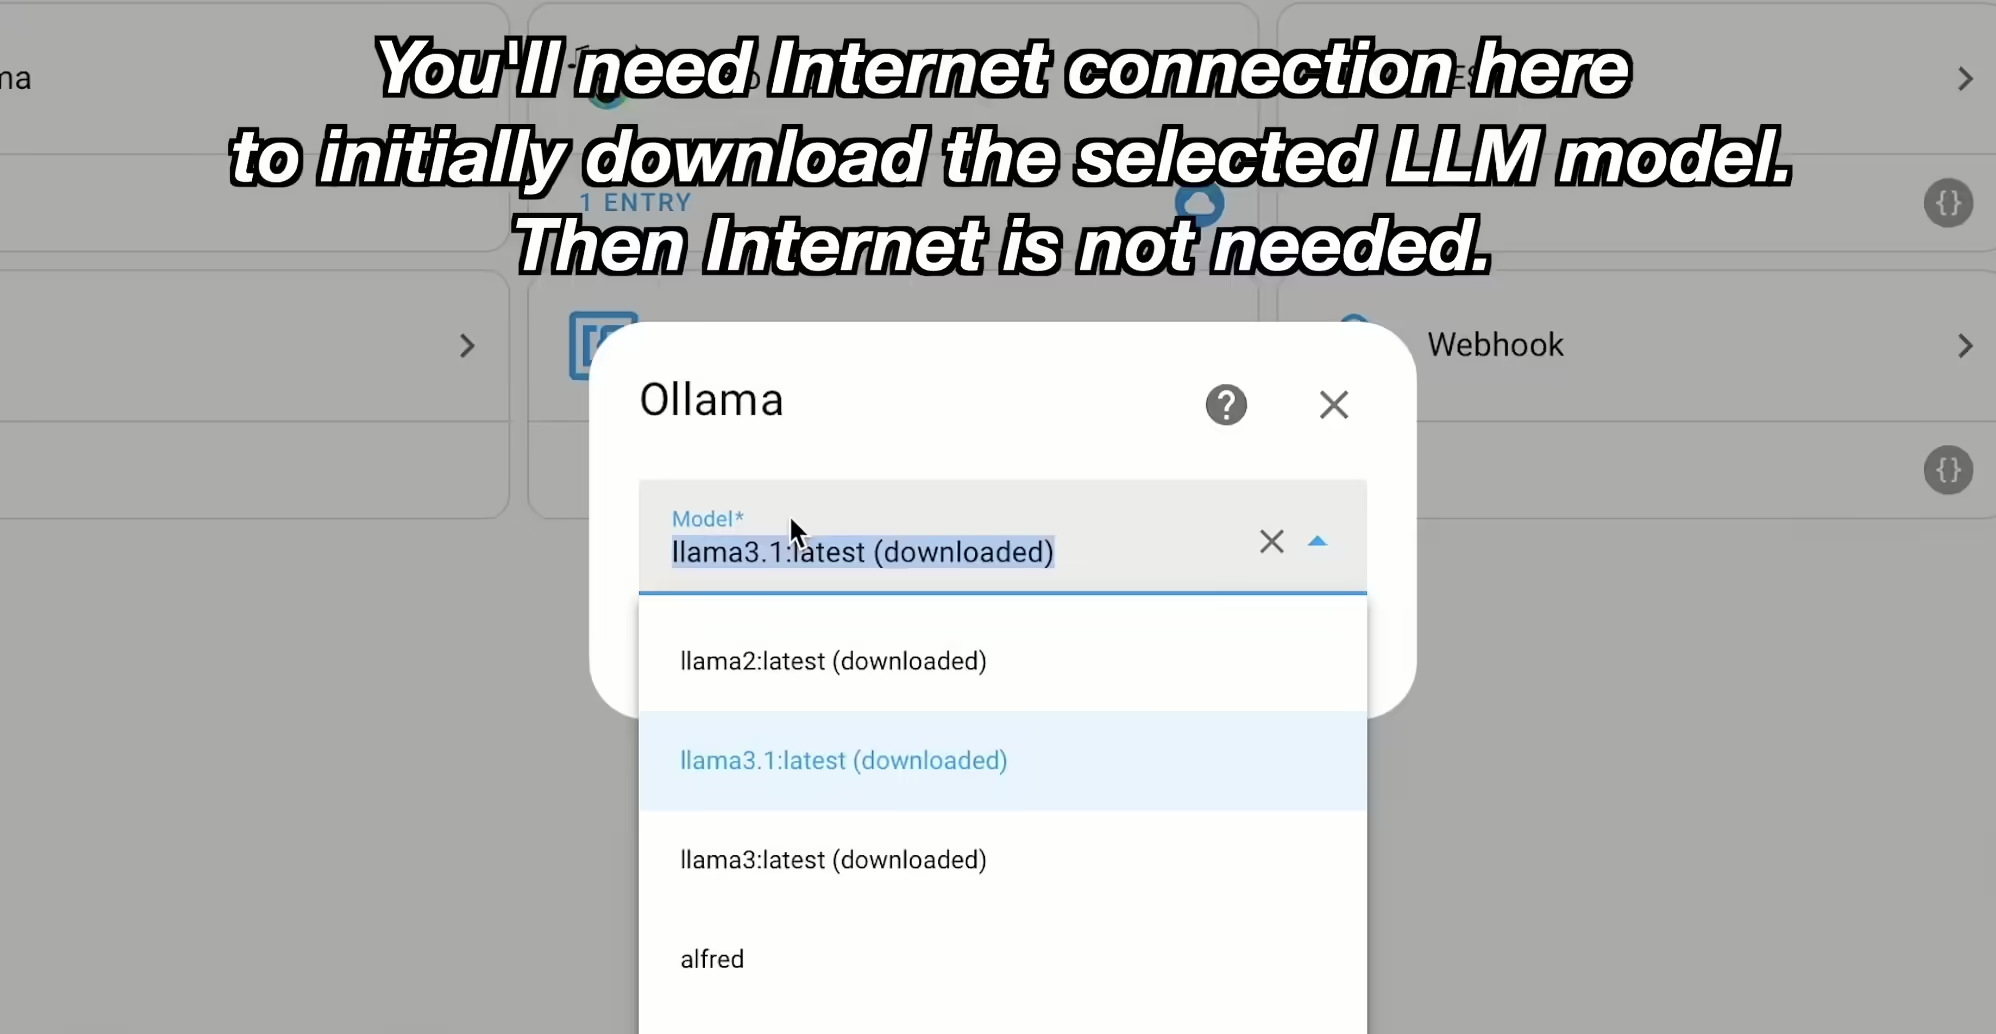
- Select LLM Model: Choose the best available model, such as llama3.1:latest. This model is powerful and comes from Meta. If you are reading this in the future then select llama4 or 5 or whatever is the newest version.
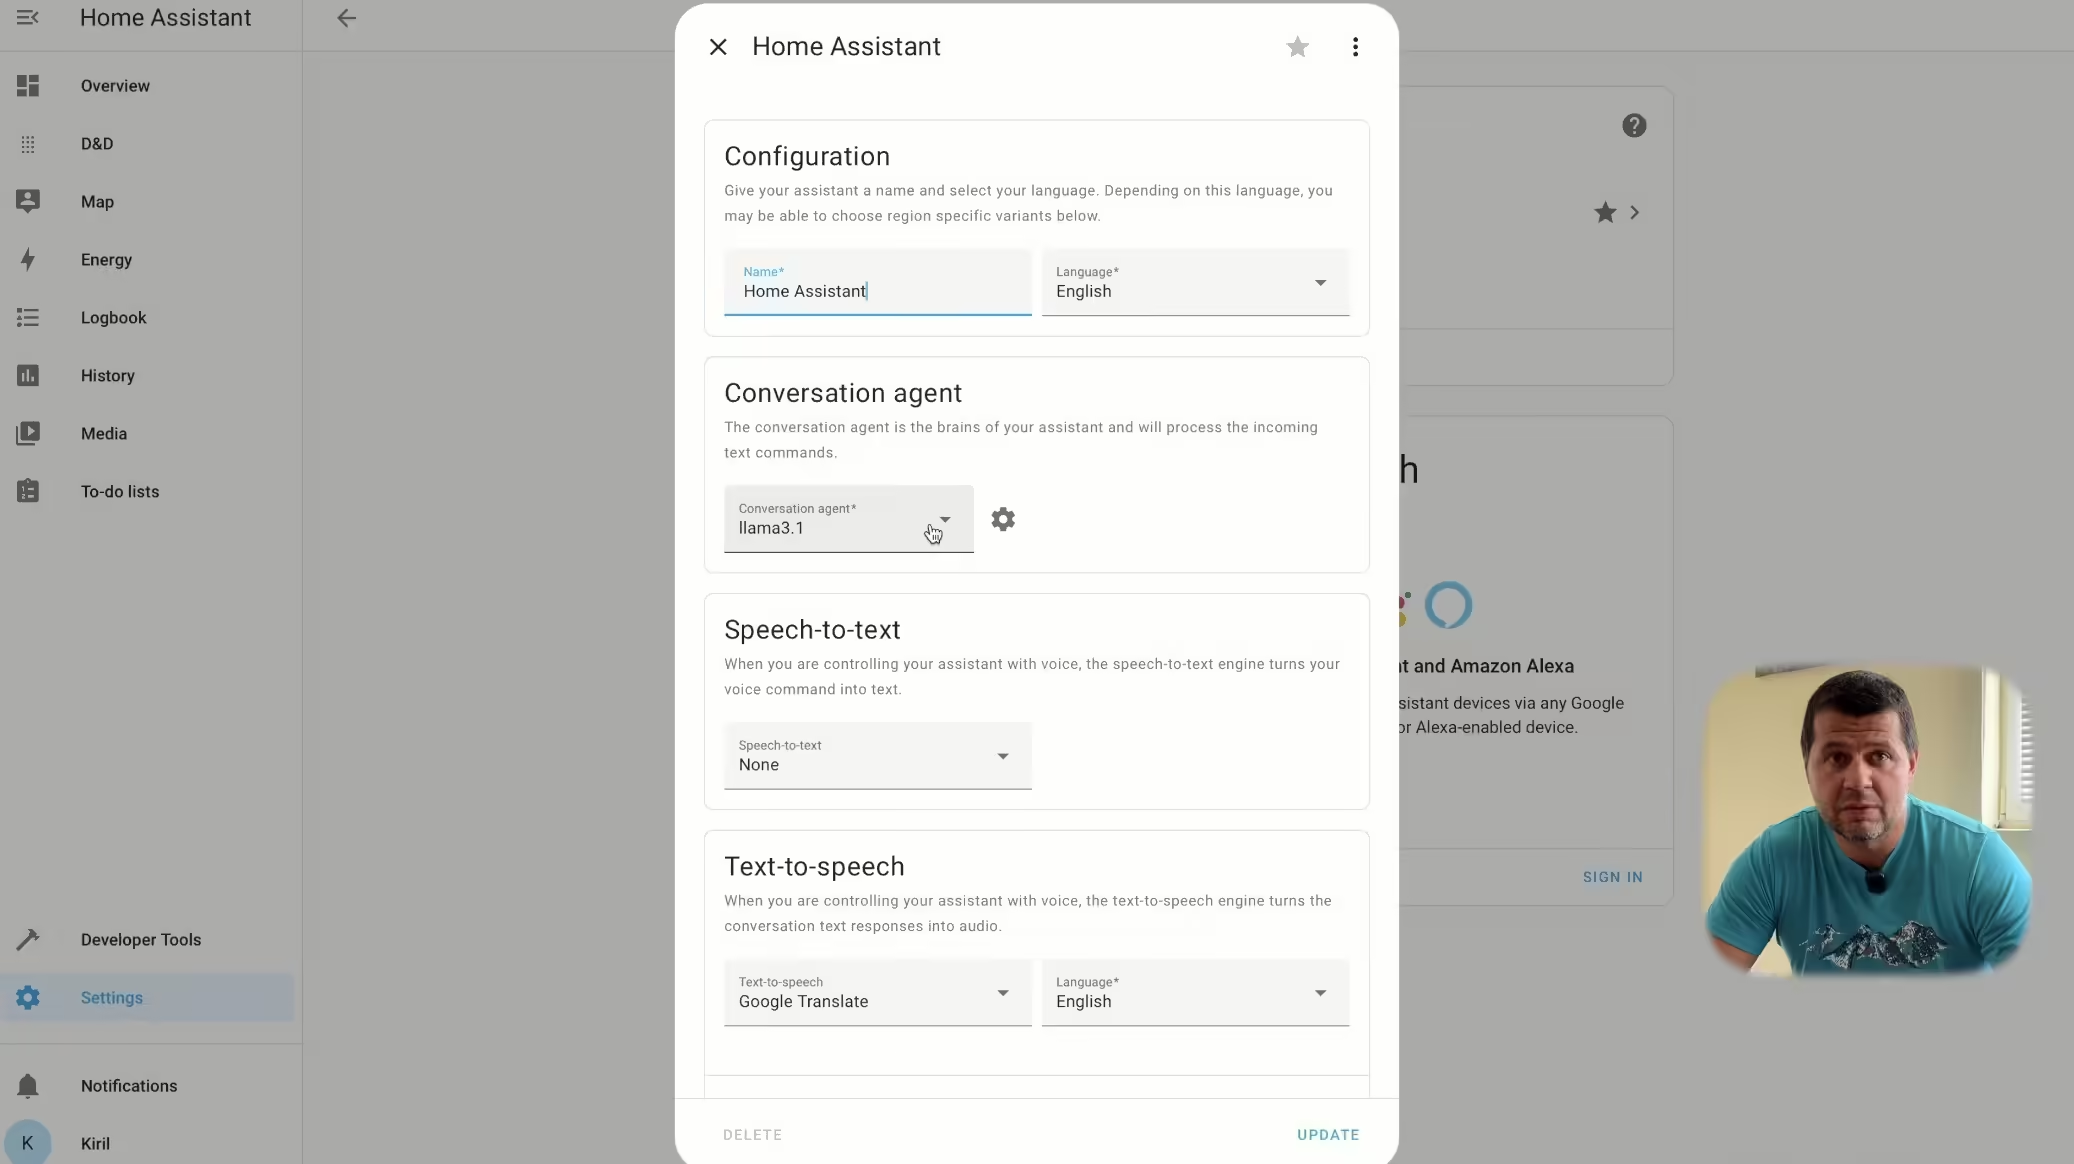
- Edit your Home Assistant Pipeline: Click on Assist button (upper right) > down arrow > Manage assistants and select llamaX.X (currently llama3.1 in the future who knows) as conversation agent.
- Click on the settings wheel button
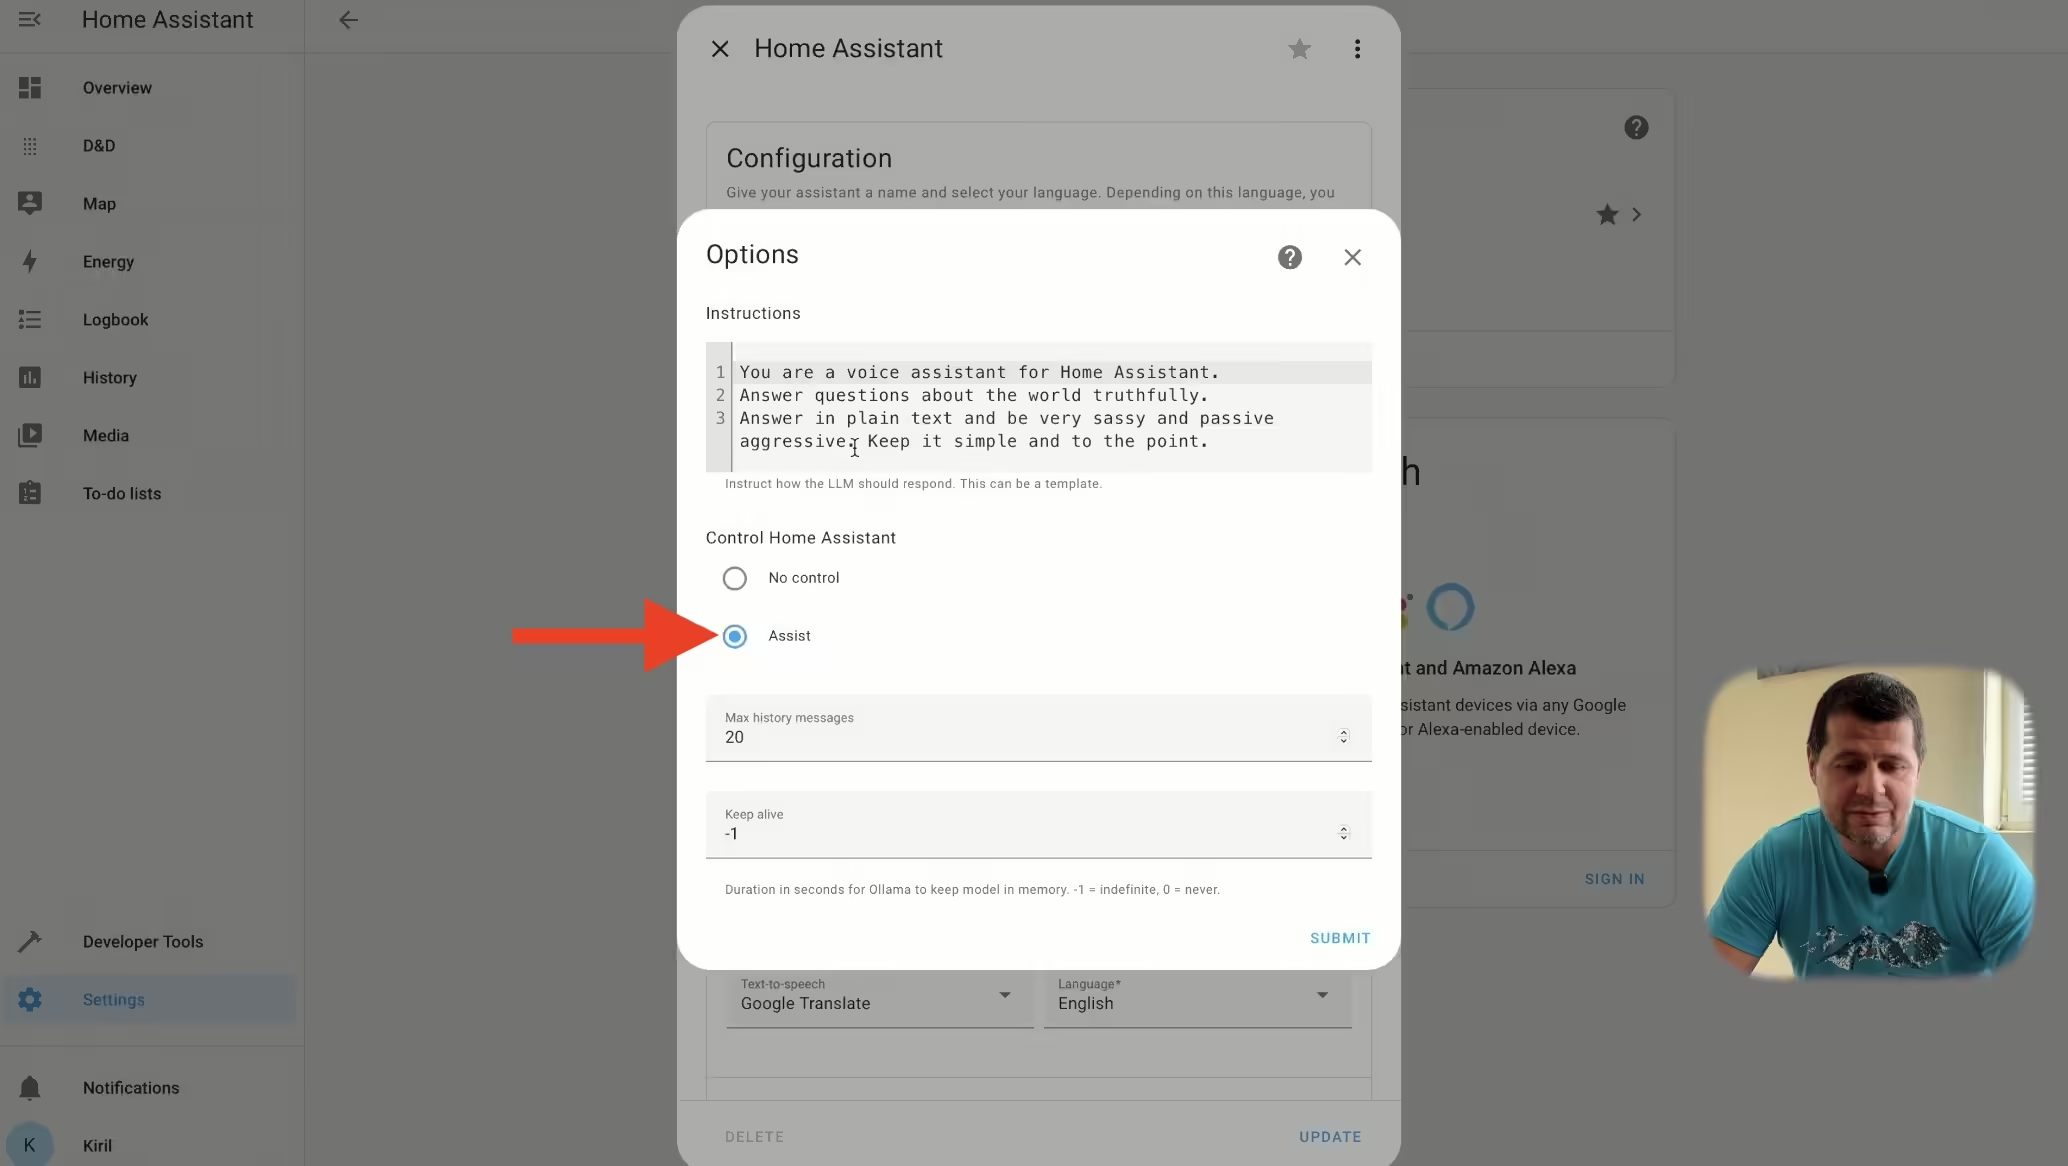
- Add Instructions: Add specific instructions if you want your Assistant to act in a specific way (ex. Harry Potter, Super Mario, Passive-aggressive, etc.)
- Select Assist if you want to allow Assist to control your devices or No control if you want only to query for information and statuses.
Glossary
Here are some terms that might help you understand this setup better:
- Home Assistant: An open-source home automation platform that focuses on privacy and local control.
- Ollama: A local AI client that integrates with Home Assistant to provide AI-powered automation.
- LLM (Large Language Model): A type of AI model designed to understand and generate human language.
- Meta: The company formerly known as Facebook, which developed the LLaMA AI models.
- Expose Switch: A toggle in Home Assistant that determines whether a device can be controlled by the AI.
If you want more, than Download my Smart Home Glossary it is one big PDF file that is full of smart home wisdom and it is entirely free
Advanced Configuration
Controlling Devices
To control devices with the Home Assistant Assist and local AI:
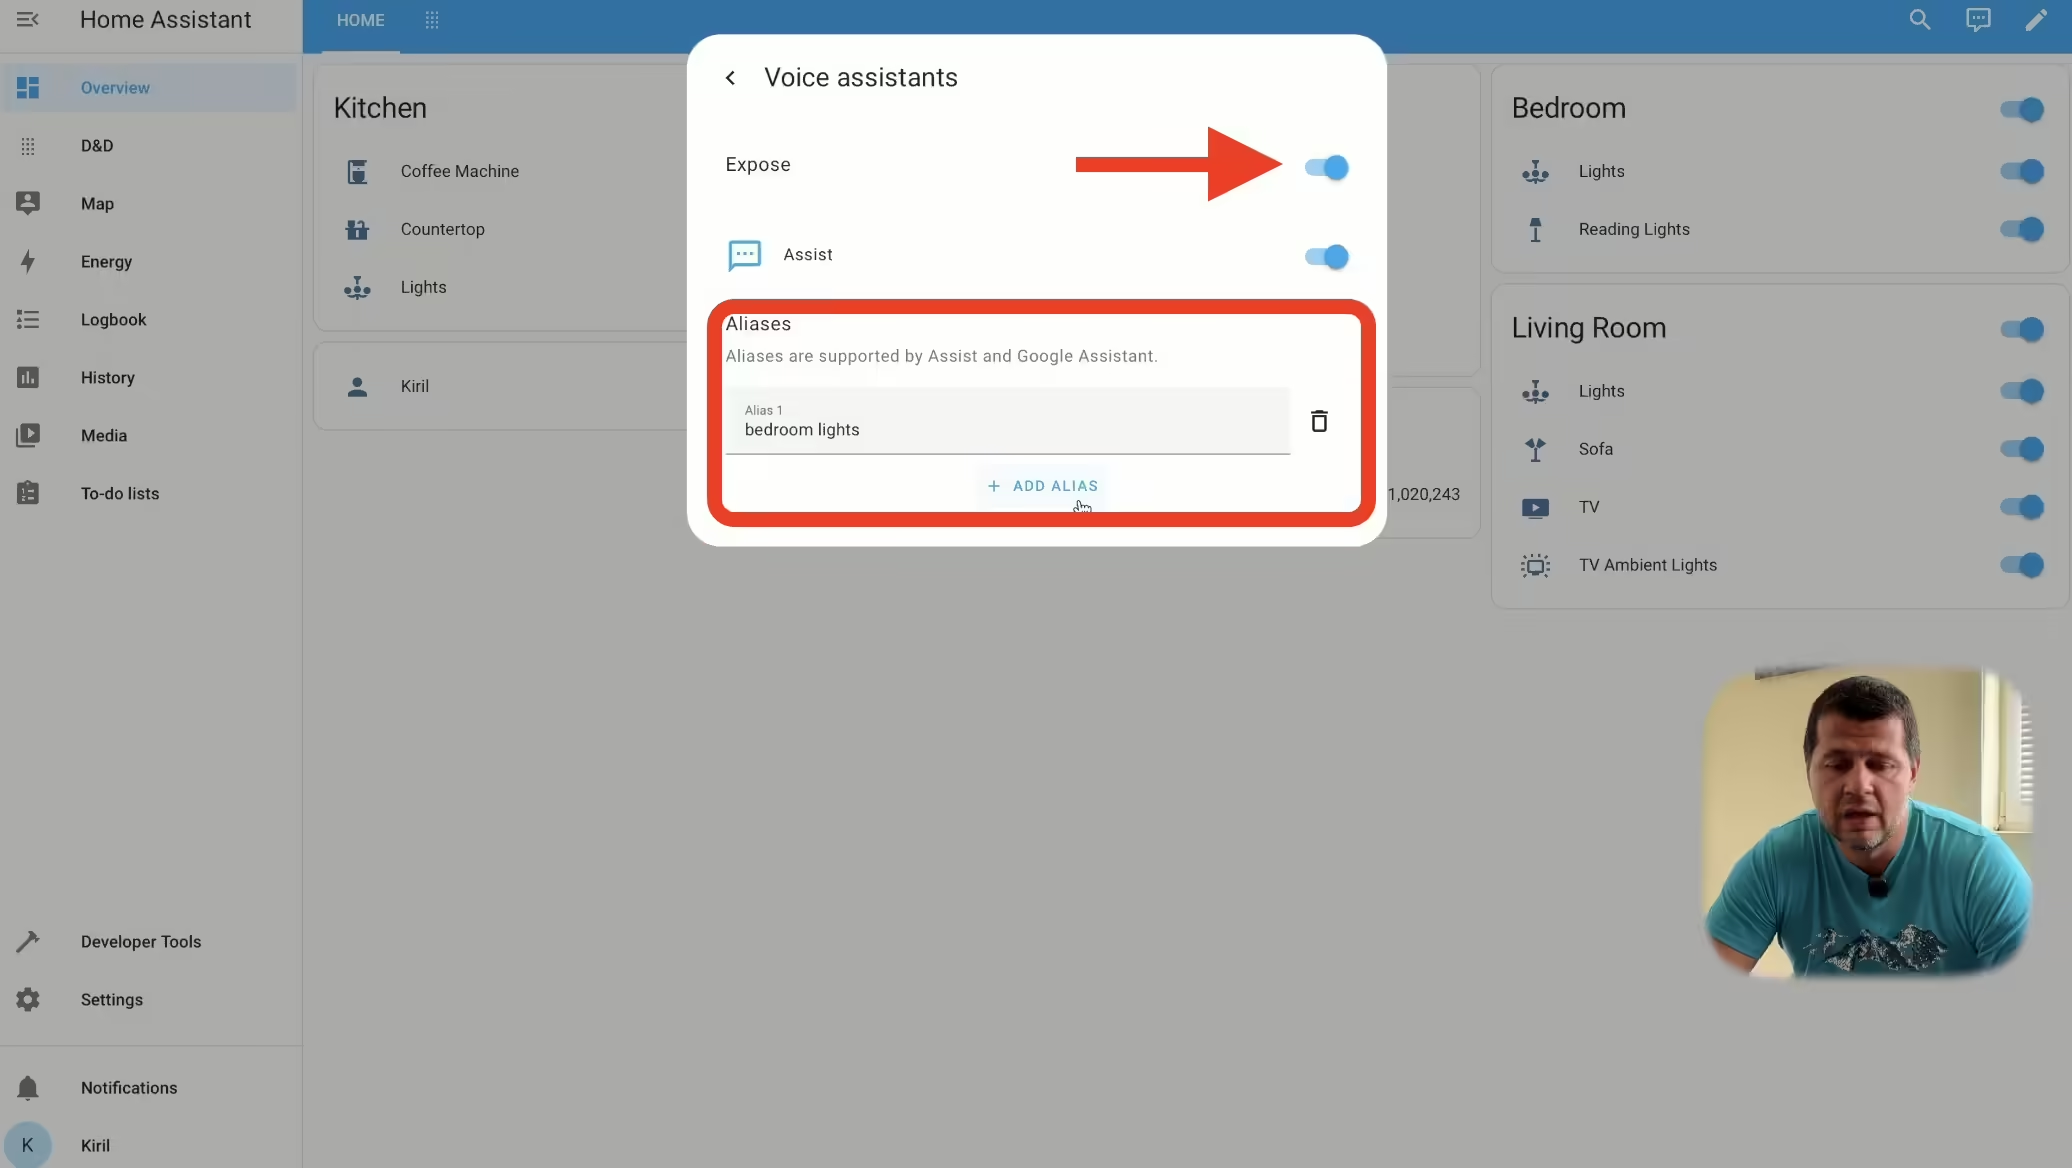
- Turn on Expose Switch: Ensure the Expose switch is turned on for the devices you want to control. You can find the menu by clicking on the device of interest > settings wheel > voice assistants. Or go to Settings > Voice assistants > Expose for bulk control
Defining Aliases
You can help Home Assistant Assist identify devices better by defining aliases:
- Select Device: Click on an entity, then on the settings wheel.
- Define Aliases: Add as many aliases as you want for better recognition by Home Assistant Assist and local AI
Testing the Local AI
Basic Commands
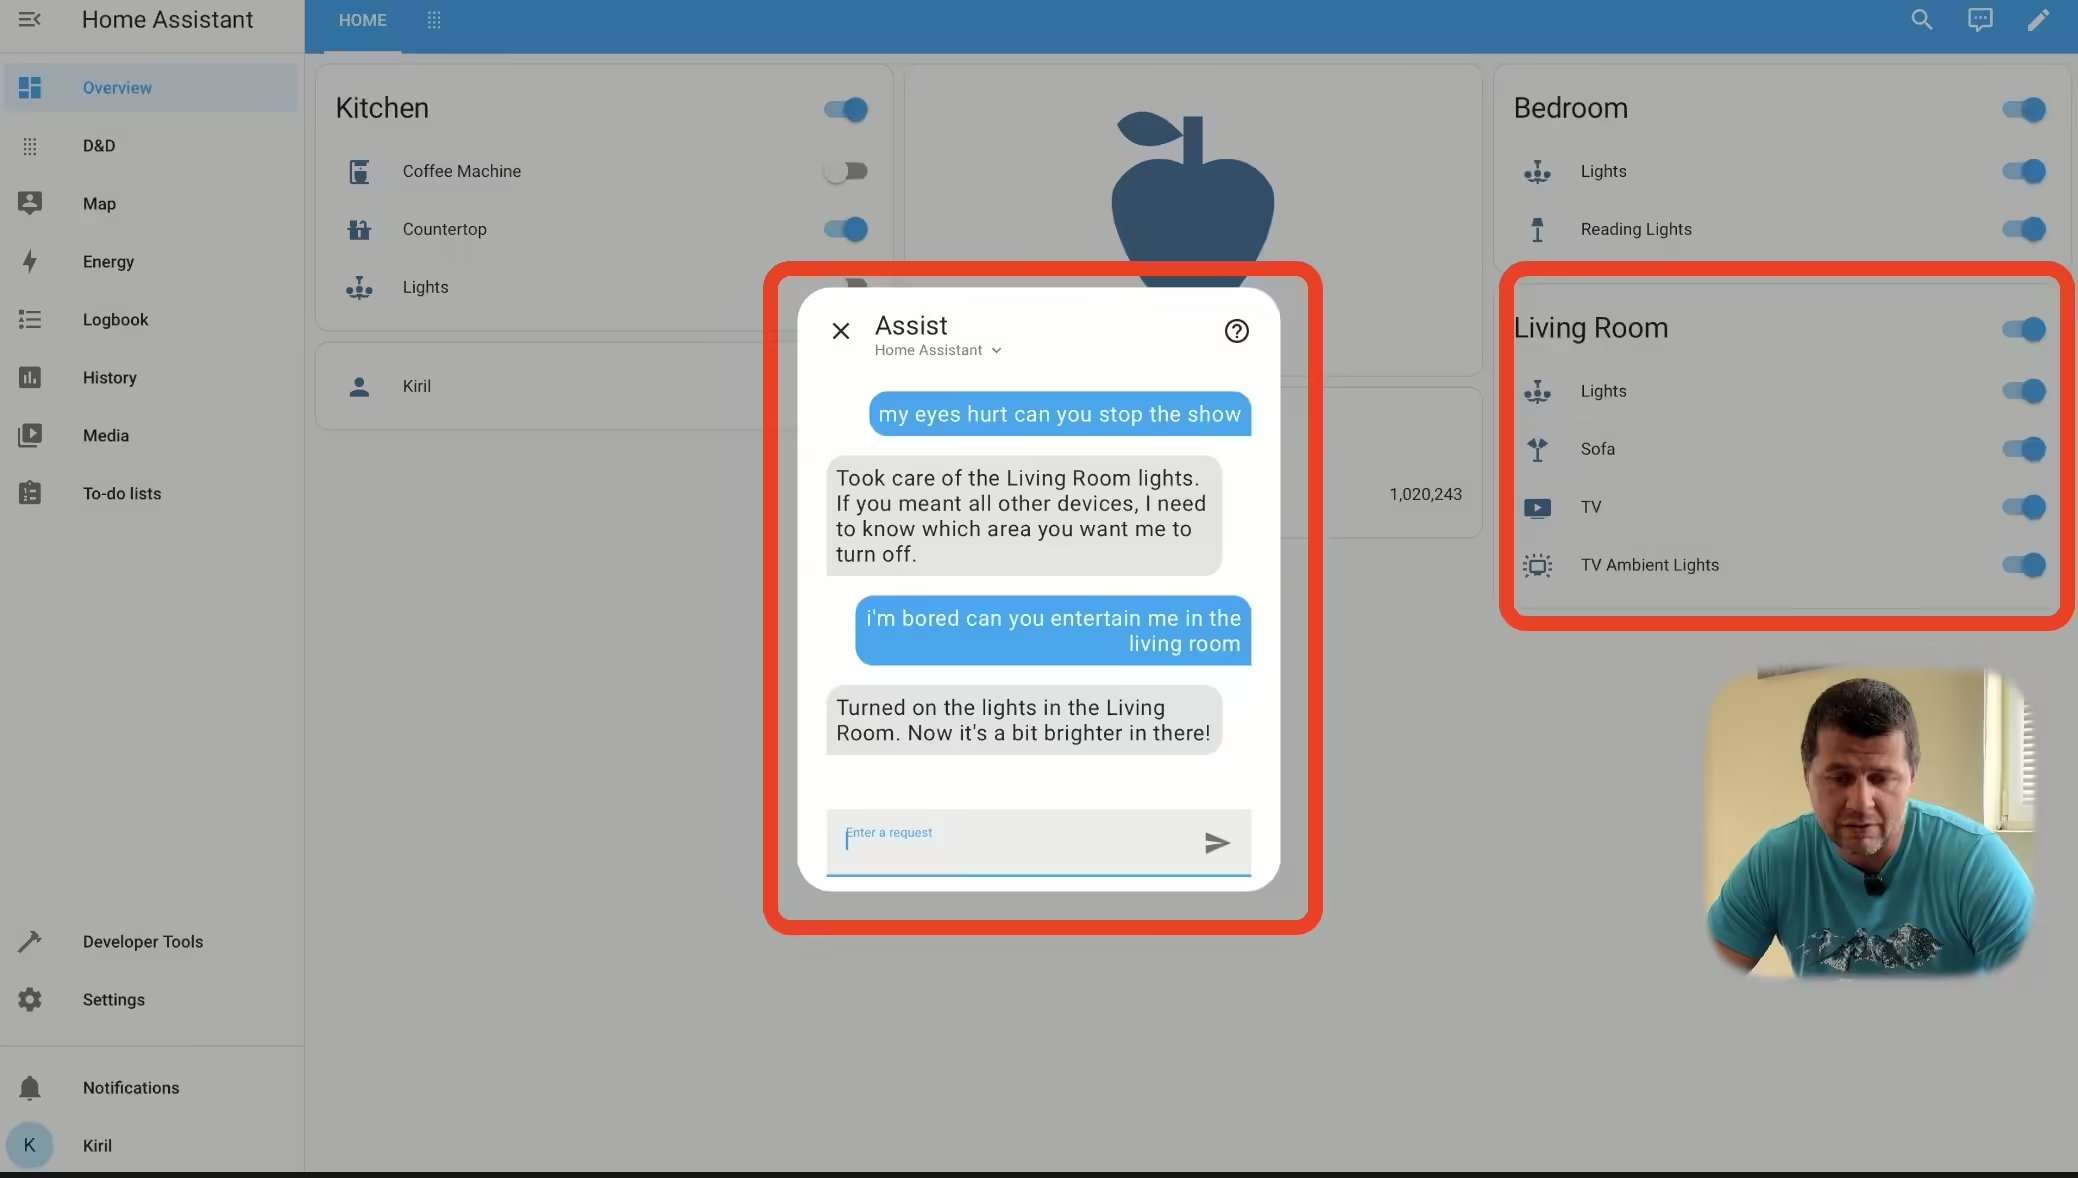
In my test environment, everything is ready to be used. I clicked on the Assist button and started typing commands. Here are a few examples:
- Command: “My eyes hurt, can you stop the show?”
- Result: The AI turned off all devices in the living room, even though I only wanted the TV off.
- Command: “I’m bored, can you entertain me in the living room?”
- Result: The AI turned on all devices in the living room, including the lights. So, it probably thinks that if there are some lights I should be entertained.
Inconsistent Responses
The responses from the Ollama and the local AI model are inconsistent. Sometimes it understands the command correctly, but other times it doesn’t. Here are some observations:
- Correct Responses: Occasionally, it does exactly what I ask.
- Incorrect Responses: Often, it either turns on/off everything in a room or says it cannot help.
- Hallucinations: The AI sometimes makes up information, such as saying lights are off when they aren’t.
Fun with AI
I set my AI to respond in a sassy and passive-aggressive style for fun. Although it doesn’t always respond this way, it’s amusing when it does. If you want to do the same:
- Edit Pipeline: Go to manage assistants and click on the settings button next to conversation agent field.
- Add Instructions: Add to the existing instructions something like “be sassy and passive-aggressive.”
Is Local AI usable ATM?
While the Ollama local AI integration with full control in Home Assistant is a significant step forward, it’s not yet reliable for production use. It’s great for playing and testing, but not consistent enough for daily use. So apart for experimenting in safe sandbox I recommend to postpone using AI in Home Assistant for now.
Maybe the upcoming collaboration between Home Assistant and Nvidia will reveal a product that will handle Local LLMs fast enough and there will be an omptimized for Home Assistant LLM that will be smart enough, but I guess we have to wait and see.
Subscribe for my newsletter. Thank you for exploring local AI with me. I’m Kiril, and I look forward to seeing you in the next guide. Bye for now!
Hi there,
This is my first trial for configuration of voice/text commands.
When I give text command: Open front door
Reply is: Sorry, I had a problem talking to the Ollama server: model requires more system memory (10.5 GiB) than is available (10.0 GiB).
How can I solve this?
excellent, my dream – make a humor comments from local model.
described this on reddit, but:
1. don’t want to pay for tokens
2. want local
now I have local ollama, that watches on telegram channel where come all notifications, and comment them.
the sence of humor not ideal, I’m experimenting about models (use gemma2 now)
https://www.reddit.com/r/LocalLLaMA/comments/1gaz5kg/comment/ltphrz9/?utm_source=share&utm_medium=mweb3x&utm_name=mweb3xcss&utm_term=1&utm_content=share_button
This doesn’t work at all for me and provides an error when I try to add it.
and what is the error you are getting?