Today, we’re diving into something super important that many Home Assistant users overlook – Home Assistant Google Drive integration. Proper backup strategy. I’m going to show you how to set up Google Drive backups for your Home Assistant configuration, and trust me, it’s easier than you might think!
Table of Contents
Why Should You Care About Cloud Backups?
Let’s be real for a second – keeping your backups only on your Home Assistant device is like keeping all your eggs in one basket. If something goes wrong with your device’s storage (and let’s face it, stuff happens), you could lose everything you’ve worked so hard to set up. That’s where Google Drive comes in as your backup superhero!
By following this guide, you’ll have your Home Assistant configuration safely tucked away in the cloud, encrypted and ready to save the day if anything goes wrong. The best part? Once it’s set up, it works automatically in the background – set it and forget it!
Get Your Free PDF Guide!
Hey, want to make this even easier? I’ve created a comprehensive PDF guide that puts everything you need in one place! Download it using the link below:
https://www.automatelike.pro/googledrive
What You’ll Get:
- Step-by-step instructions in a printer-friendly format
- All necessary links and commands in one document
- Visual guides for key steps
Bonus: Join the My Smart Home Club!
When you download the PDF, you’ll also get:
- Weekly smart home tips and tricks
- Early access to new tutorials
- Exclusive Home Assistant guides
- Latest automation ideas
- Special offers on smart home
How to Get Your Free PDF:
- Click the button below
- Enter your name and email
- Check your inbox to confirm your mail (this helps us keep the robots out!)
- Get instant access to your PDF
- Start receiving awesome smart home content!
[USE THIS LINK TO GET STARTED]
Don’t worry – I hate spam as much as you do. You can unsubscribe anytime with just one click!
Tired of Reading? Watch the Video Tutorial Instead!
I get it – sometimes it’s easier to follow along with a video. I’ve created a detailed video tutorial that walks you through this entire process step by step. Check it out here:
If you prefer written instructions, keep reading below! I’ve made sure to include every single detail you need to get this working perfectly.
Before We Start (Prerequisites)
You’ll need three things to get this working:
- A Google account (you probably already have one)
- Access to your Home Assistant setup
- About 15 minutes of your time (grab a coffee, you’ll need it!)
Let’s Get Started!
Step 1: Setting Up Your Google Cloud Project
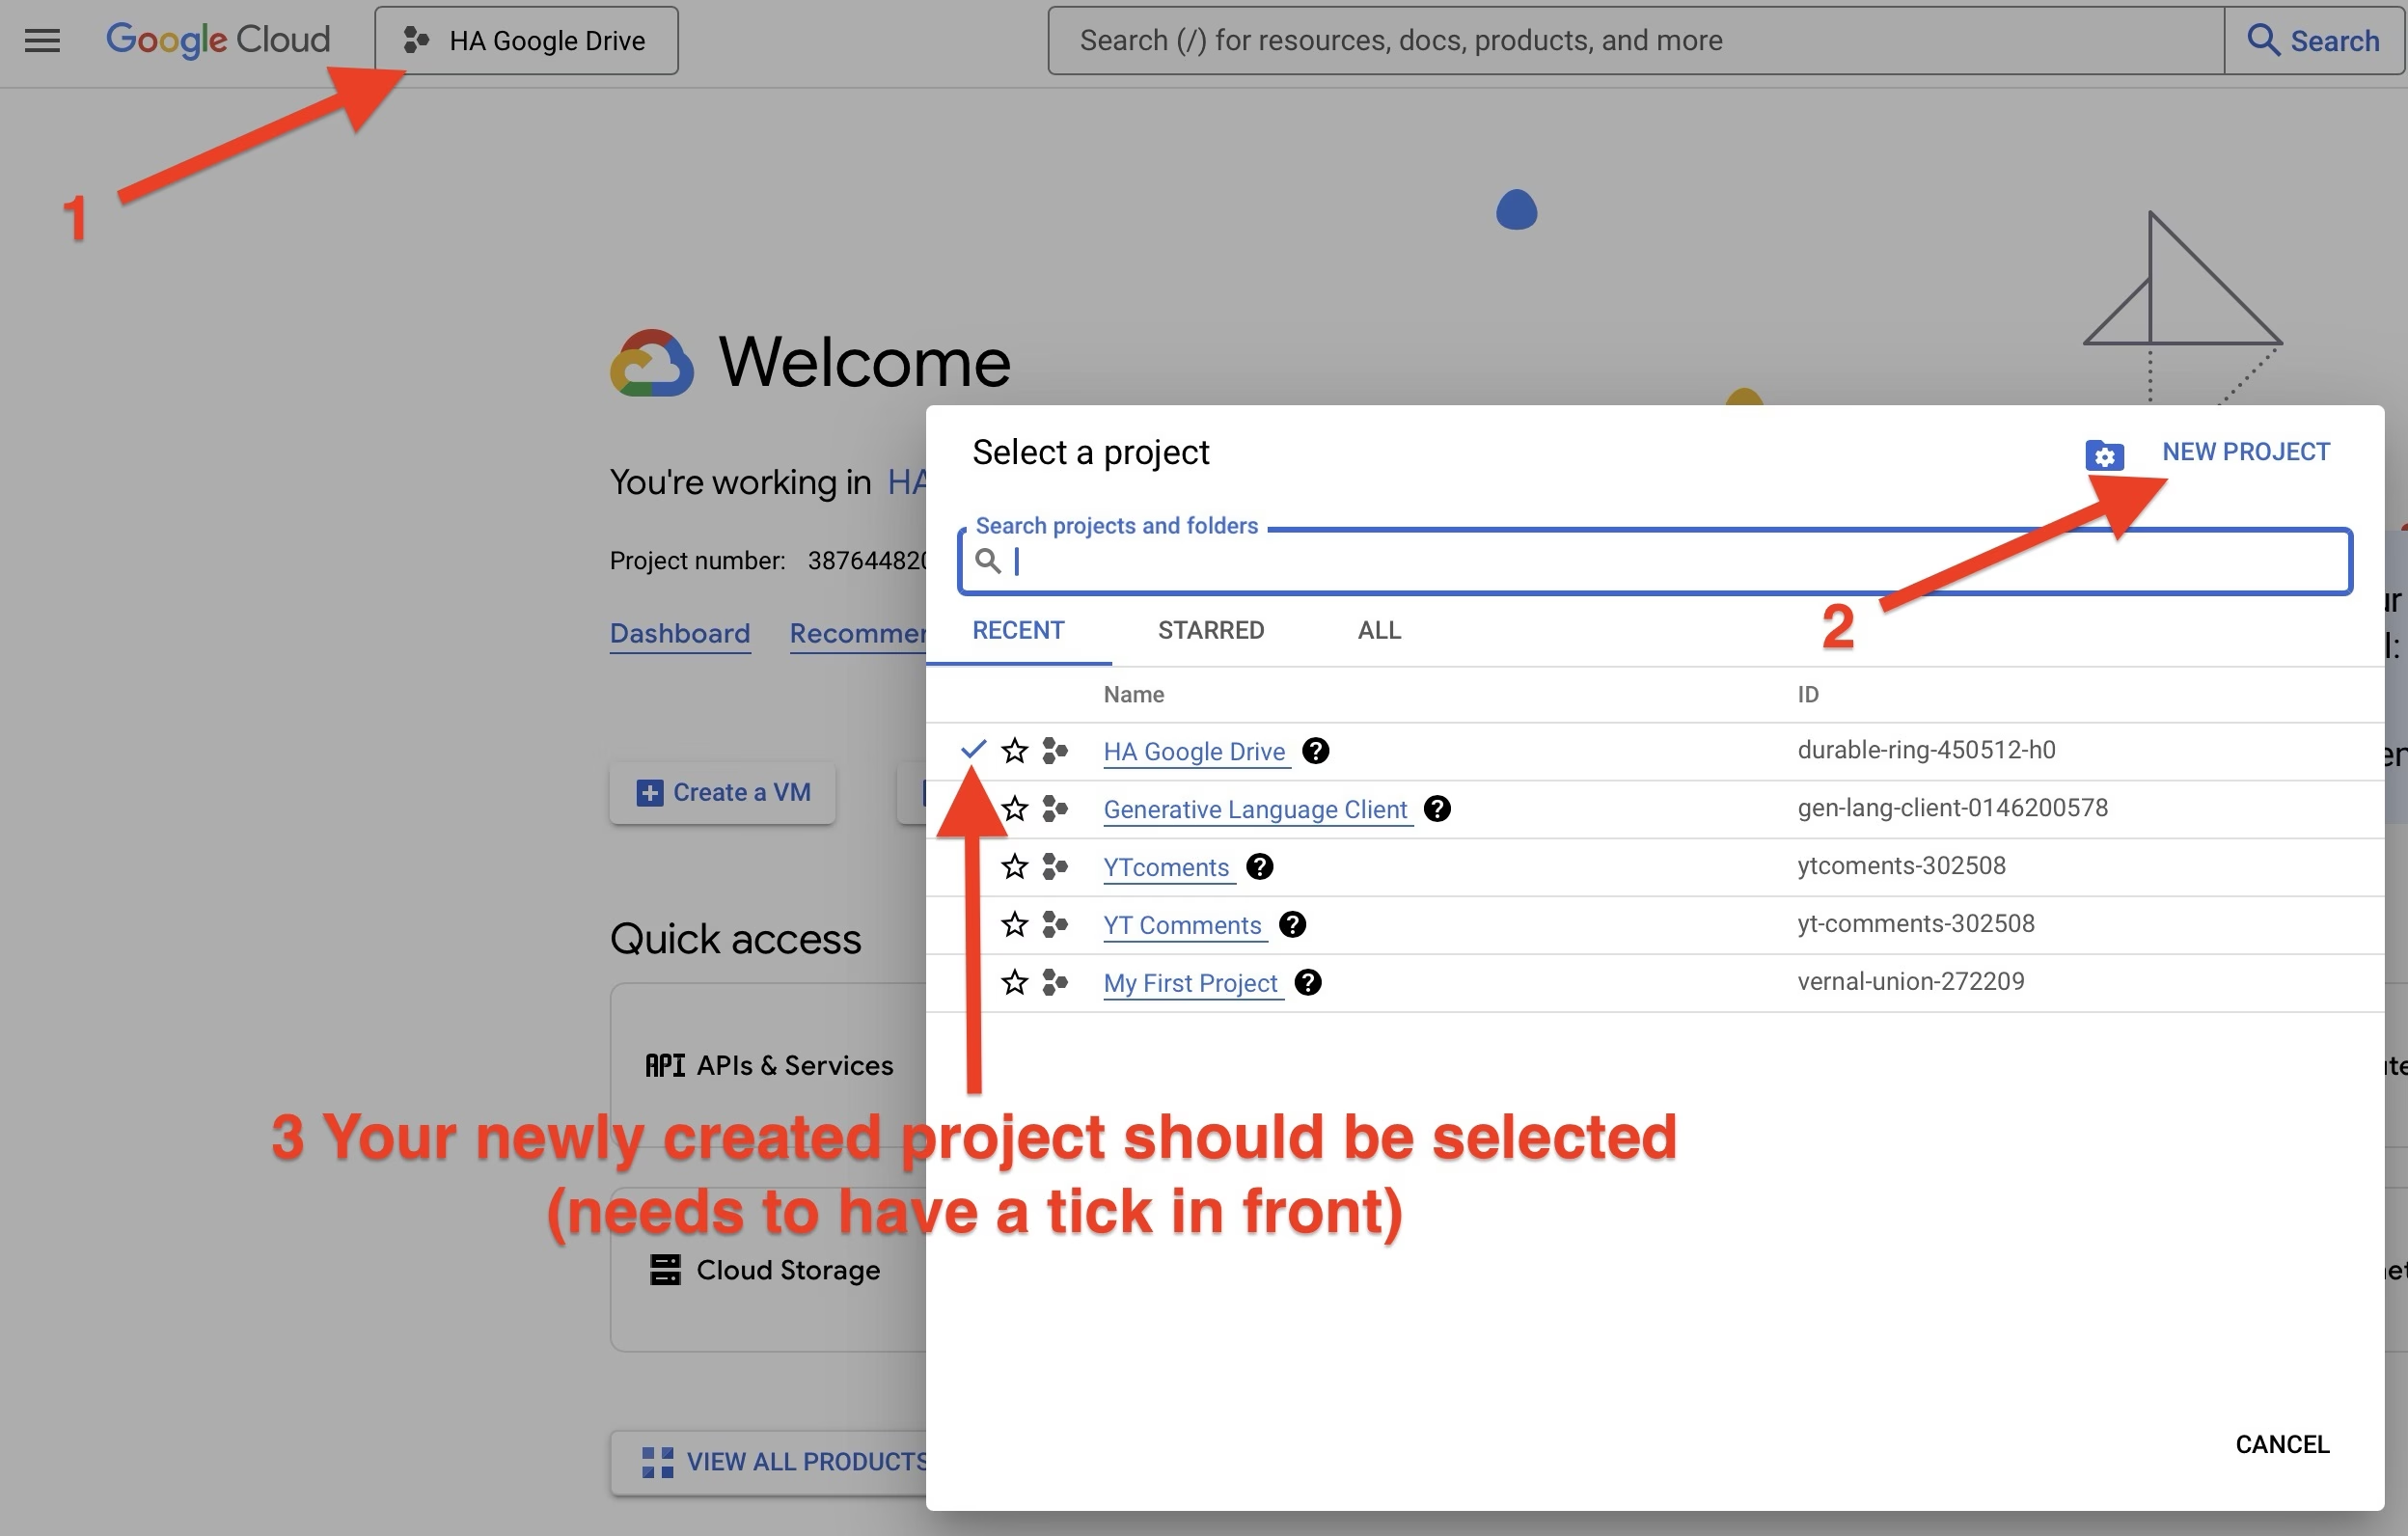
First things first, we need to create a new project in Google Cloud. Don’t worry, it’s not as technical as it sounds!
- Head over to console.cloud.google.com (or just copy and paste this into your browser)
- Look for a dropdown menu at the top of the page
- Click on it and choose “New Project”
- Give your project a name – something like “Home Assistant Google Drive” works perfectly
- Hit that “Create” button
- Once it’s done, make sure to select your new project from the dropdown
Step 2: Getting the Google Drive API Ready
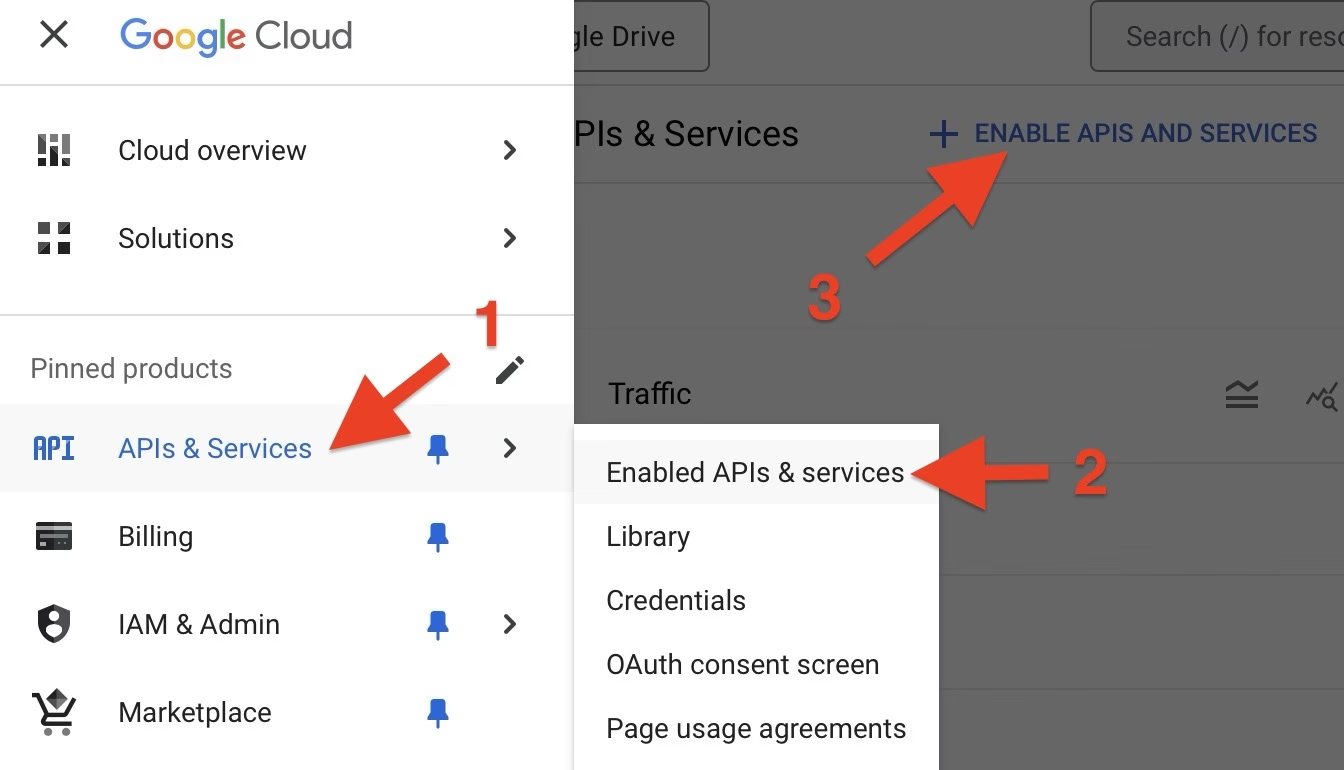
Now we need to tell Google that we want to use its Drive service:
- Find the “APIs & Services” section and click on “Enable APIs and Services”
- Use the search box to find “Google Drive API”
- Click on it and hit “Enable”
- Give it a moment to do its thing
Step 3: Setting Up OAuth Consent screen (Don’t Worry, It’s Not Scary!)
This part might sound technical, but I’ll break it down into simple steps:
- In the same “APIs & Services” area, look for “OAuth consent screen”
- Click “Get Started”
- Give your app a simple name (like “HA GDrive”)
- Put your Google account email as the support email
- Choose “External” for the Audience type
- Add your email again when it asks for contact info
- Agree to Google’s data policy
- Click “Create”
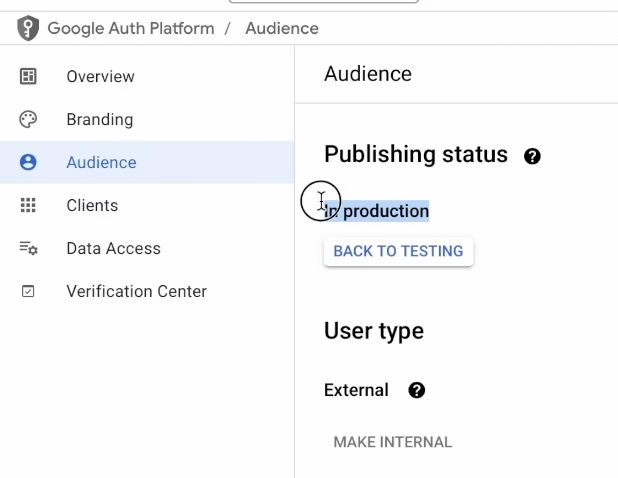
- Find the “Audience” section on the left
- Look for “Publishing status” and click “Publish App”
- Make sure it says “in production” when you’re done
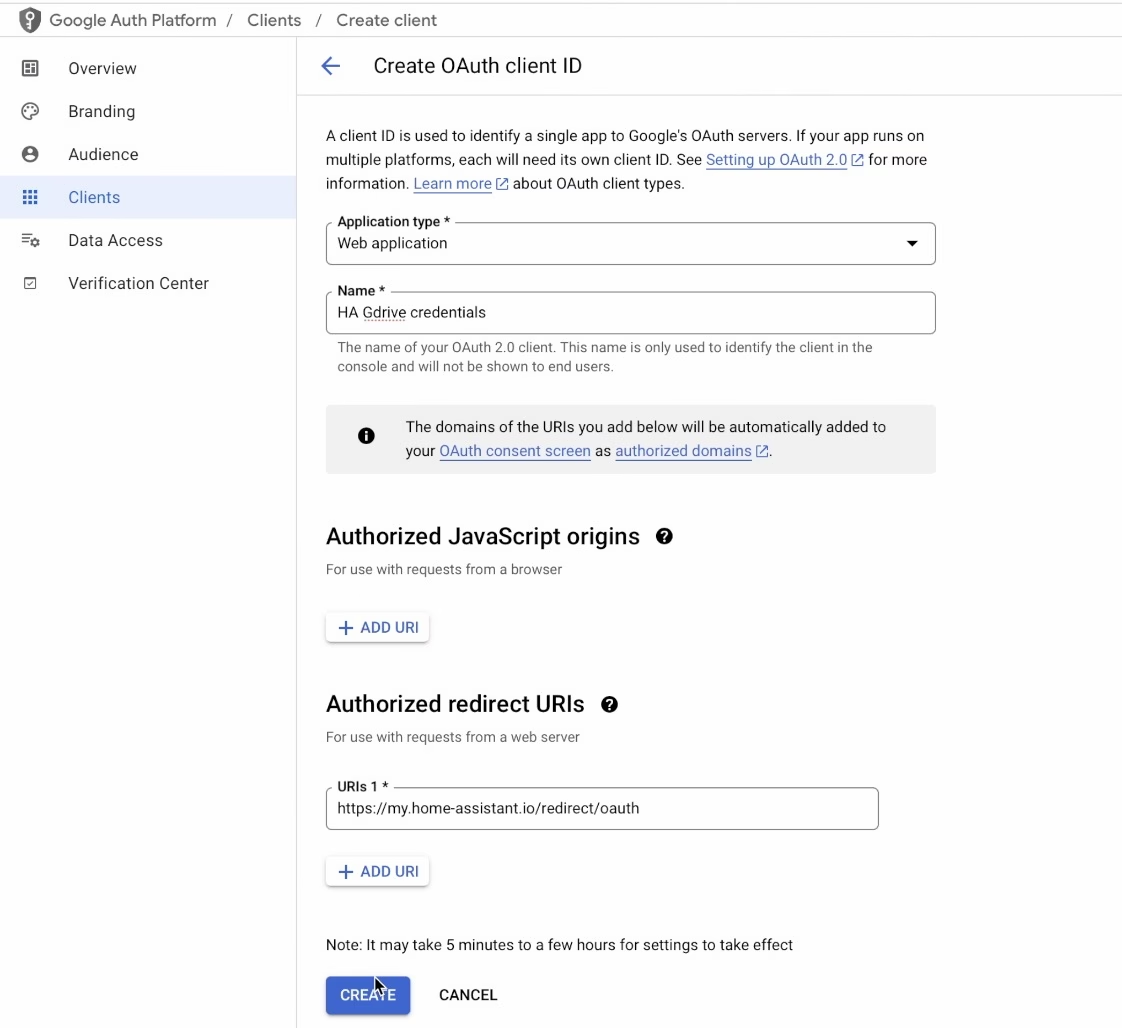
Step 4: Creating Your Access Keys
Almost there! Now we need to get the keys that’ll let Home Assistant talk to Google Drive:
- Go back to “APIs & Services” and find “Credentials”
- Click “Create Credentials” and choose “OAuth client ID”
- Pick “Web application” when it asks for the type
- Name it something like “HA Google Drive Credentials”
- Here’s the important part – add this exact URL as your redirect URL:
https://my.home-assistant.io/redirect/oauth - Hit “Create”
- You’ll get a Client ID and Client Secret – save these somewhere safe, you’ll need them in a minute!
Step 5: Getting Home Assistant Ready
Now the fun part – setting it up in Home Assistant:
- Open up your Home Assistant
- Pro tip: press the “c” key and type “integrations” (or go through Settings → Devices & Services if you prefer clicking)
- Look for the “+ add integraton” button (lower right) to add a new integration
- Search for “Google” and then pick “Google Drive”
- Give it a name
- Remember those credentials from step 4? Time to paste them in
- Pick your Google account when it asks
- Double-check your Home Assistant URL is correct
- Click “Link Account” and you’re almost done!
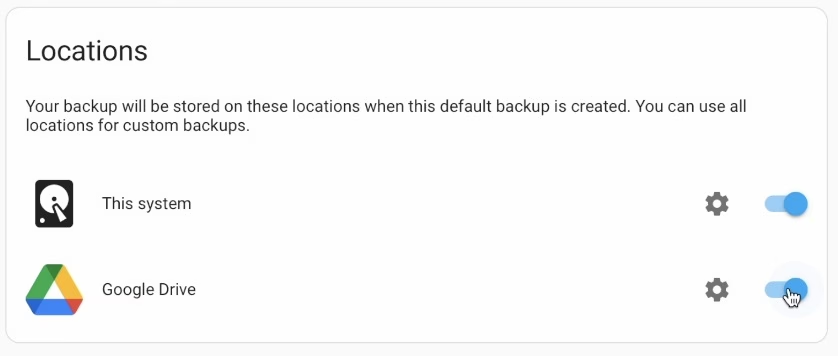
Step 6: The Final Touch – Enabling Cloud Backups
Last step, I promise!
- Back in Home Assistant, press “c” and type “backups” (or navigate through Settings → System → Backups)
- Look for the Google Drive backup option under Backup Locations
- Toggle it on
- Important: Keep encryption enabled it is that way by default (seriously, don’t turn this off!)
- Create a test backup to make sure everything’s working
Making Sure Everything Works
Here’s your quick checklist:
- Look for a new “Home Assistant” folder in your Google Drive
- Check that your backups are showing up both in Home Assistant and in that Google Drive folder
- Try downloading a backup from Google Drive to make sure you can access it
Some Important Stuff to Remember
- Keep that encryption turned on especially for the Google Drive – it’s there to protect your data
- When you download backups through Home Assistant, they’ll automatically be decrypted
- If you download directly from Google Drive, they’ll stay encrypted (which is good!)
- If you need to start over, you can remove the Home Assistant Google Drive integration or you can go to Settings → Devices & Services → Application Credentials (three dots menu in the upper right) and delete the credentials from there if the integration is not added in your HA at all.
Wrapping Up
If you reach this point – congratulations! Your Home Assistant configuration is now safely backing up to Google Drive. No more worrying about losing your carefully crafted automations or device setups. If anything ever goes wrong, you’ll have a secure backup ready to go.
Remember, this is one of those “set it and forget it” things – once it’s running, it’ll keep your backups safe without you having to think about it. Pretty cool, right?
Got questions or ran into trouble? Drop a comment below, and I’ll help you out. Don’t forget to share this with other Home Assistant users who might need it!
Happy automating, and stay safe out there and subscribe for my newsletter!
Thanks perfect guide
The original documentation from HA website was not clear enough, this one is. Good work!
Glad to help. Check my other articles as well, Peer!
Great guide! I wasn’t getting anywhere until I found this. Simple enough when you walk me through it.
Enjoy David and check my other guides as well they are also simple enough yet useful
What a perfect step by step guide. Thank you!
Many, many thanks for the comment. Check my other guides as well!