
Want to Ask Google Anything with Your Home Assistant? Here’s How!
Imagine walking into your room and asking, “Who won the game last night?” or “What’s the weather like this weekend?”— and your Home Assistant just answers, instantly. Or even better, Home Assistant to ask you do you want to hear the news? That’s the magic of combining Google Generative AI with web search into your Home Assistant setup.
Yes, it’s possible. And yes, you can set it up without being a tech wizard. And yes, it is free!
Table of Contents
Tired of Reading? Watch the Video Instead!
Don’t want to read the whole article? I’ve made a video that walks you through the entire process step by step.
Download My Free PDF Guide
Before we dive in, I want to let you know that I’ve put together a free “How to Enable Google AI Web Search in Home Assistant” PDF Guide that goes hand-in-hand with this content.
In this PDF:
- All the steps are clearly explained
- You’ll get direct links
- It includes the YAML code and screenshots
To get your copy:
- Click the link here -> https://automatelike.pro/googleai
- Enter your name and email
- Confirm your email (so I know you’re not a robot!)
- Boom! The PDF will automatically download
You’ll also join my Free PDF Club where I share weekly tips, news, and updates about Home Assistant and smart home automation. It is a free service and you can unsubscribe anytime with just one click. Now let’s go straight into today’s topic. How to enable enable web search in Home Assistant using Google Generative AI.
What Is Google AI Web Search in Home Assistant?
The Google Generative AI feature adds a friendly chat assistant to your Home Assistant. Think of it like having a smart helper that you can talk to using natural language!
This Google AI helper can:
- Chat with you about anything
- Search the web for you (if you enable that)
- Help you with your smart home devices (if you allow it)
If you want it to control your lights, thermostats, and other smart devices, you just need to give it permission and expose them to Home Assistant Assist. You get to choose exactly which devices it can access.
Once set up, you can ask it questions about your devices or ask it to control them for you. For example, “Too hot here in living room make it cold?” or “It is too bright in the kitchen, help me,” “what are the latest home assistant news in funny style and limited to 3 short sentences” and so on.
To get started, you’ll need:
- To be in one of the areas where the Google AI service is available
- An API key (you can create one using the link provided below)
Let’s dive into the step-by-step process!
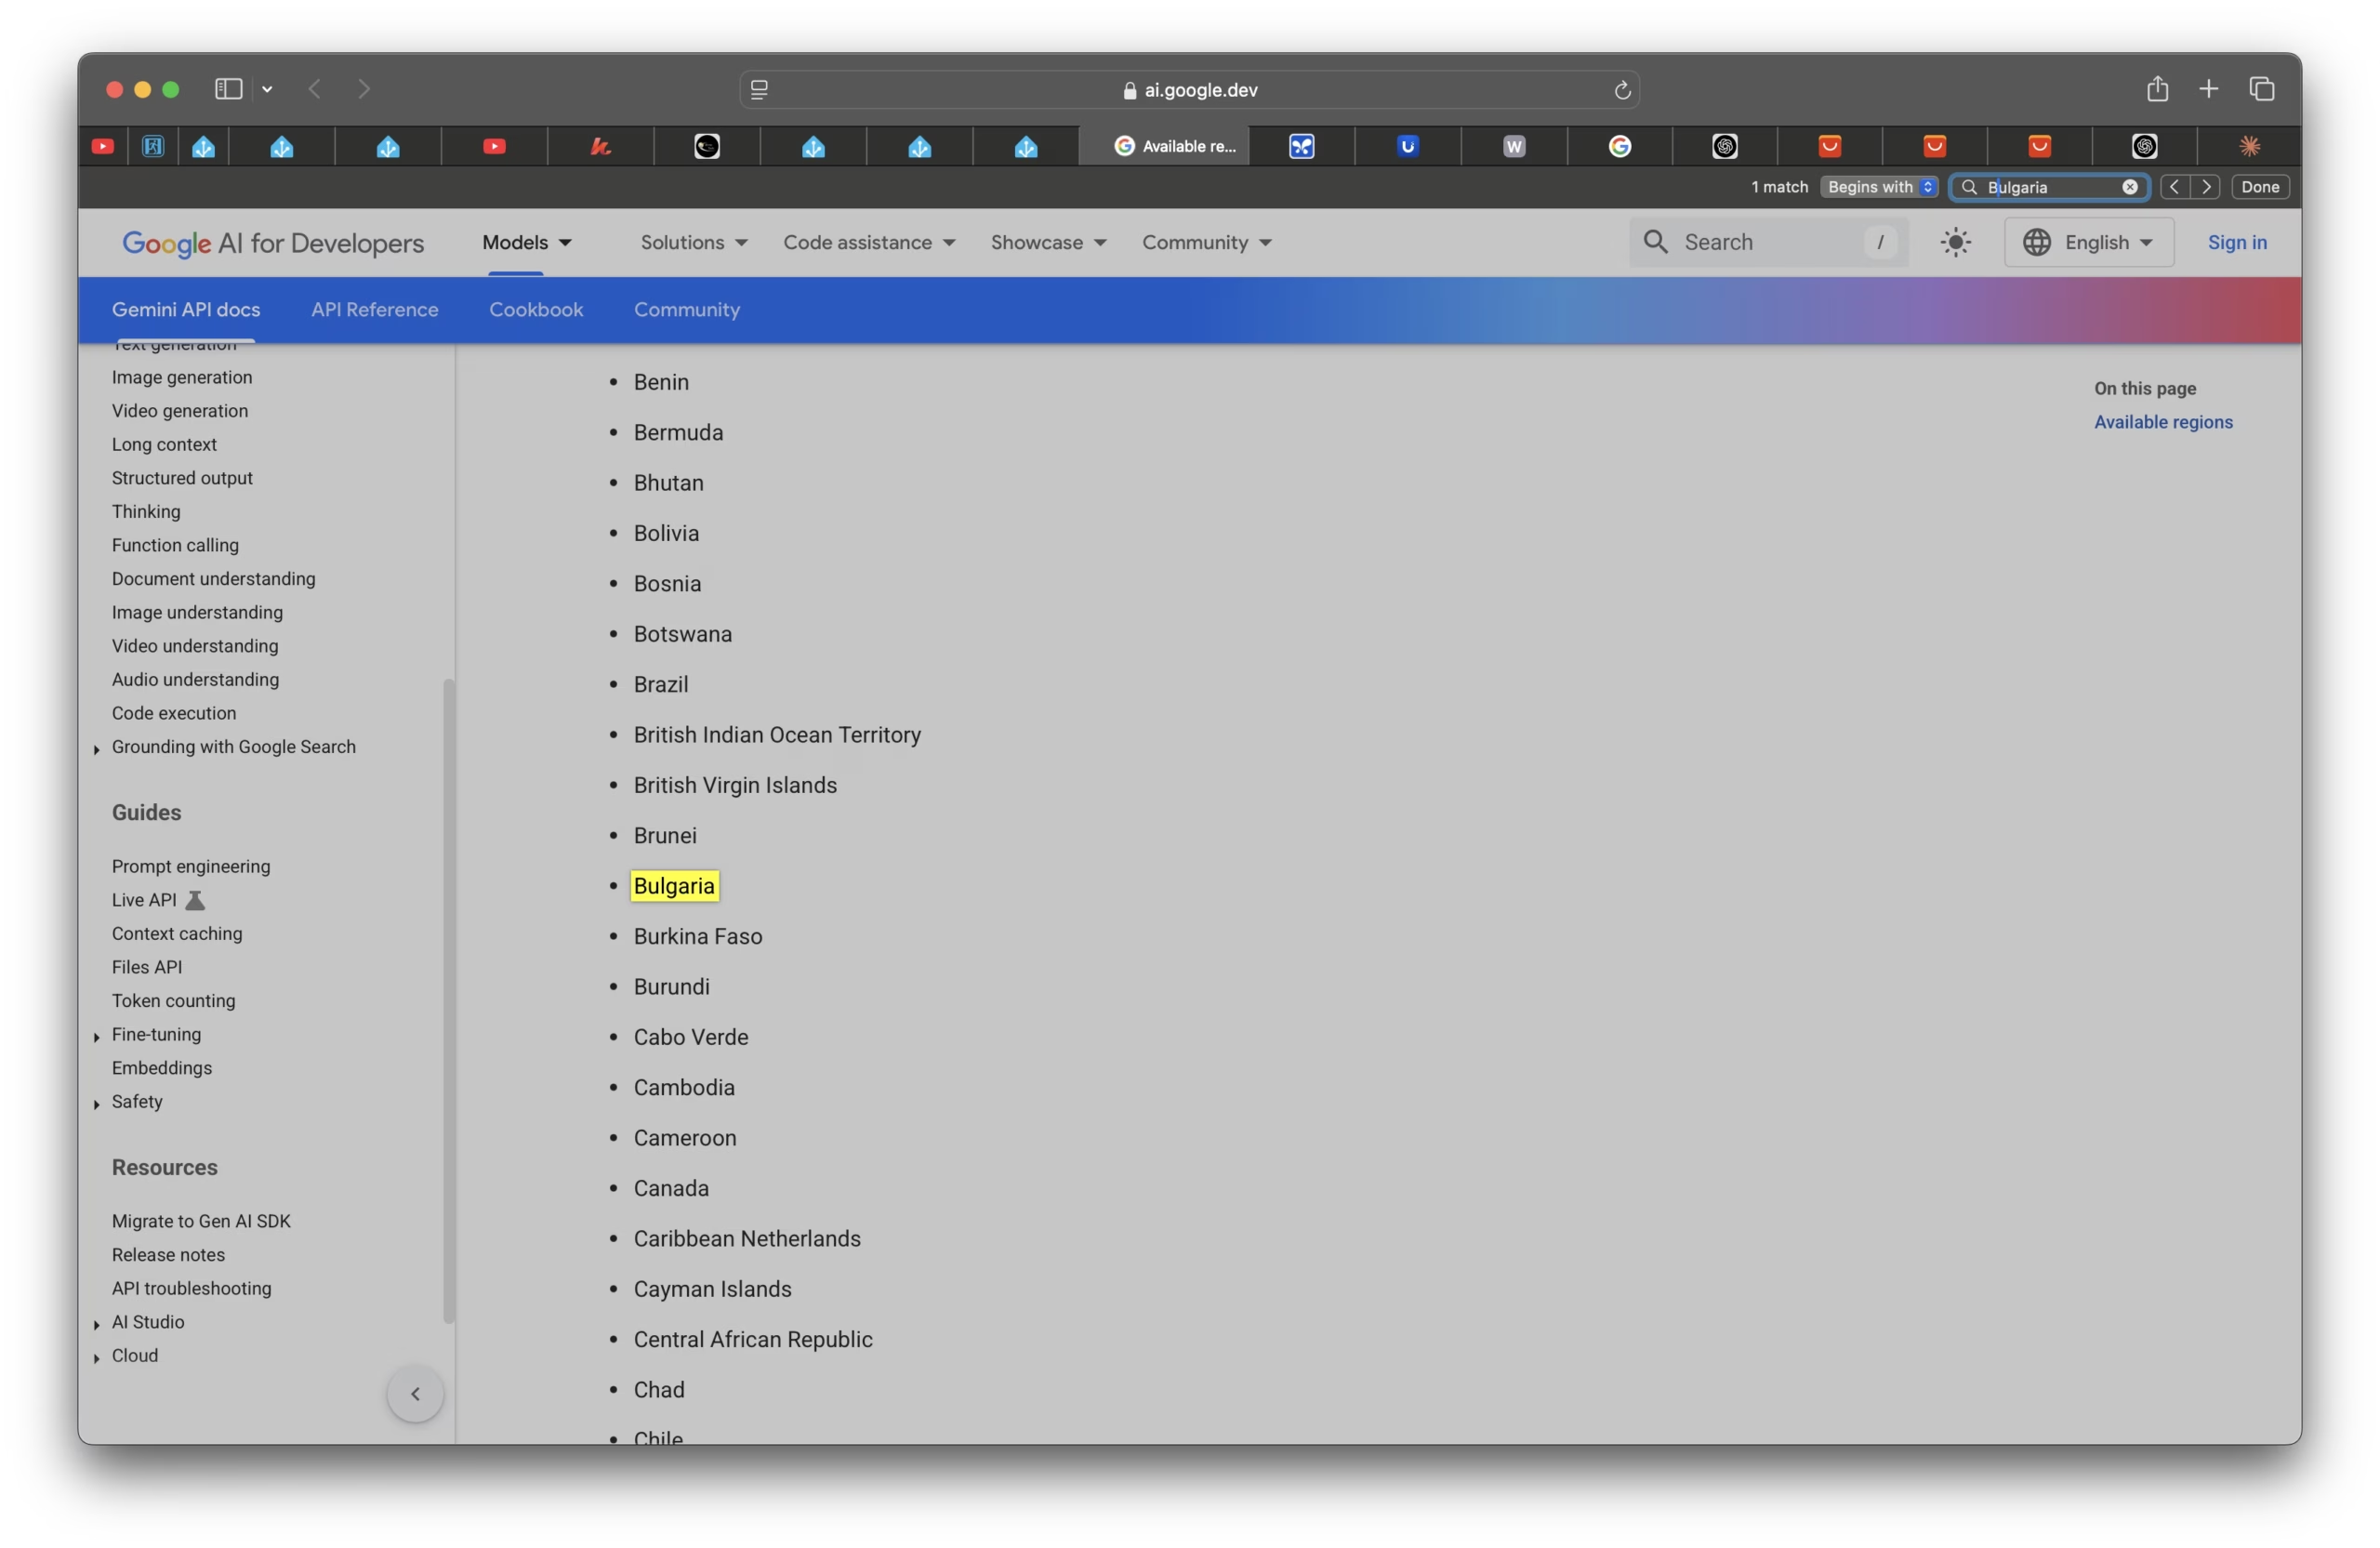
Step 1: Check if Google AI is Available in Your Region
The Google AI is available in many places, but not everywhere yet.
To find out if it works where you live:
- Click the link -> available regions
- Look for your country on the list
If your country is on the list:
- Great! You can use Google AI with your Home Assistant
If your country is not on the list:
- You might have trouble getting it to work and most probably it will not work at all with your Home Assistant
It’s always best to check first before trying to set it up!
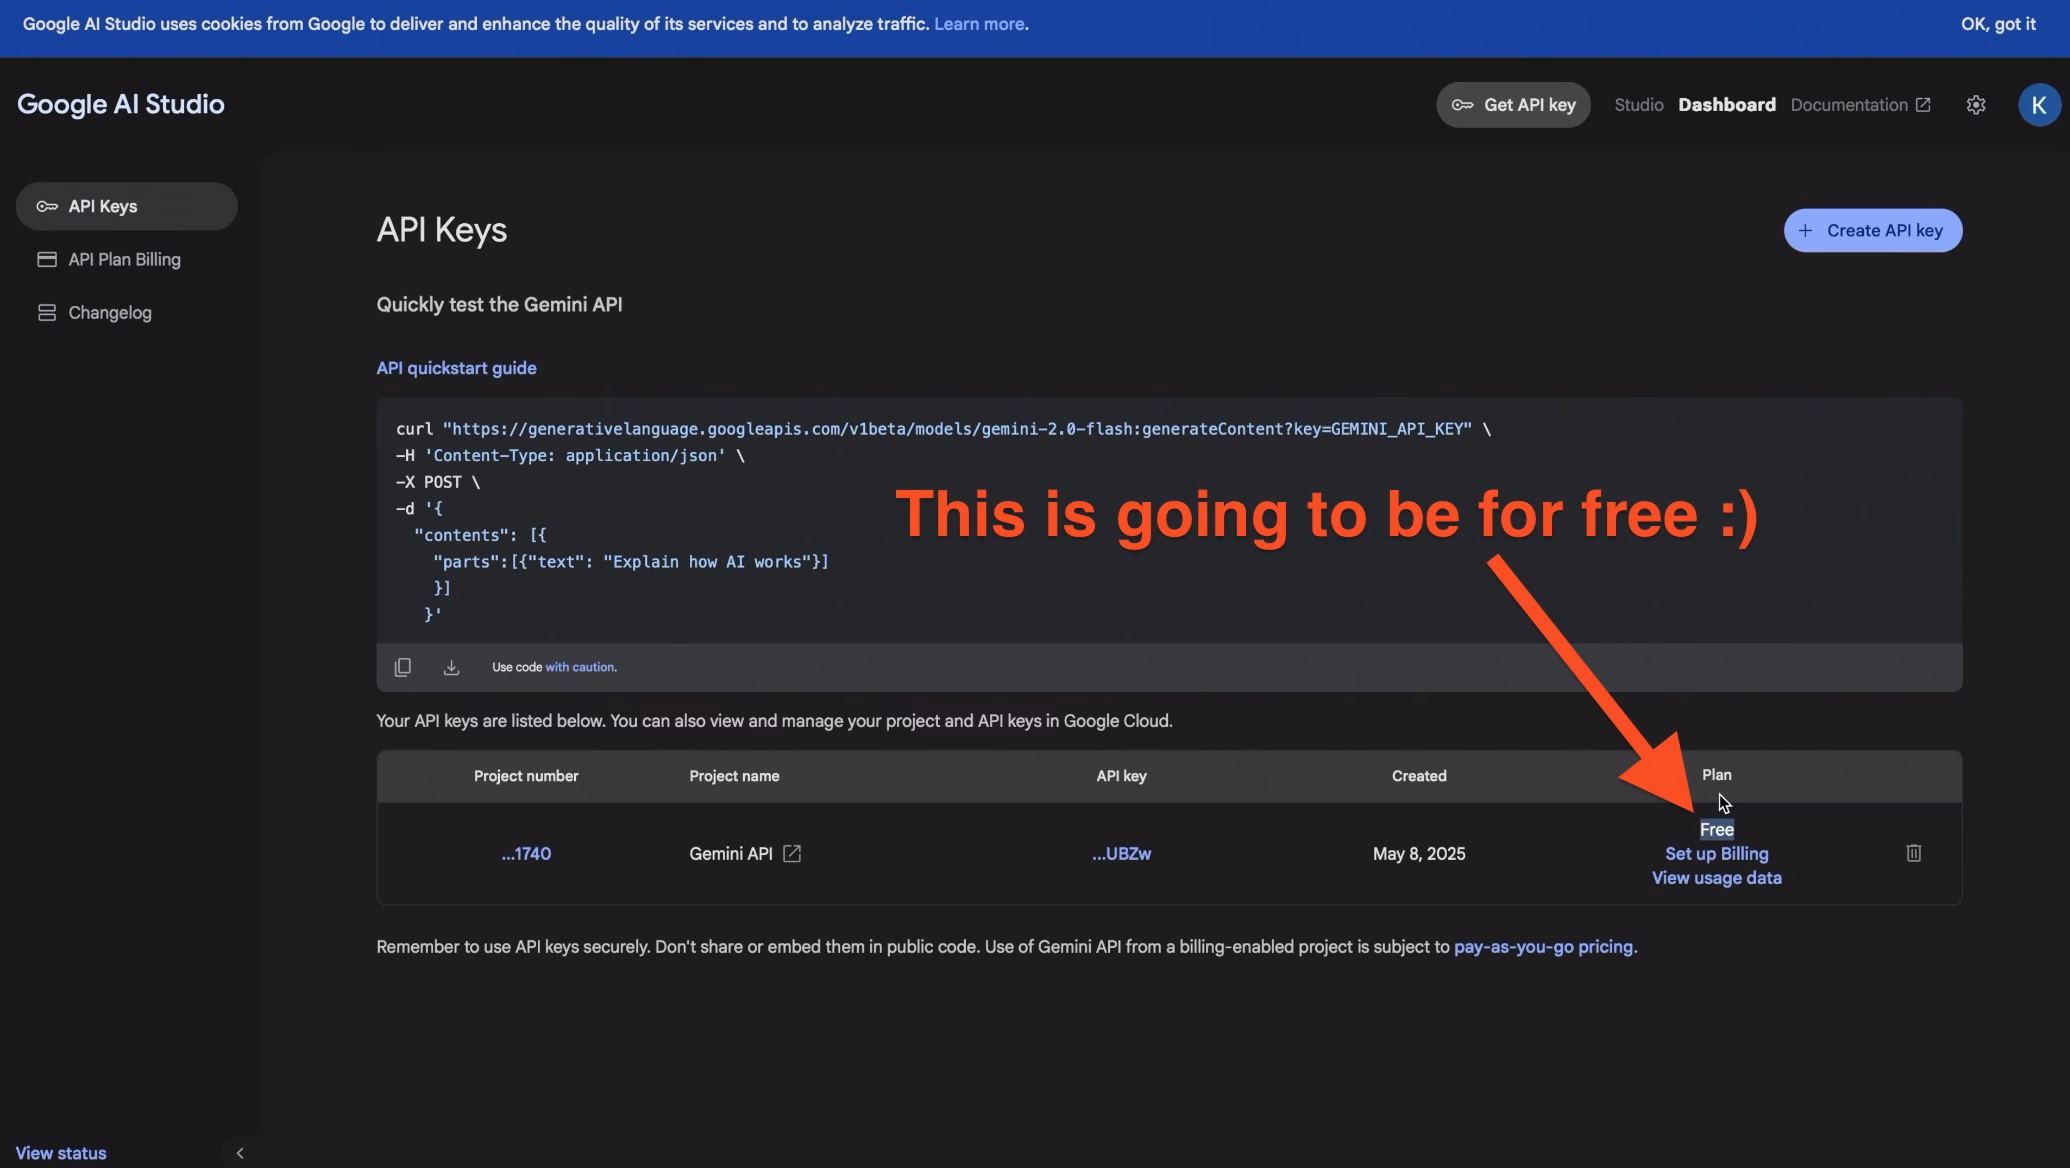
Step 2: Get Your Google AI API Key
To enable this Google AI Web Search in Home Assistant, you need a Google AI API key.
Here’s how to get it:
- Click this link – https://aistudio.google.com/app/apikey
- Log in with your existing Google account. If you don’t have one, you’ll need to create one (it’s easy and free)
- Click “Create API Key” button and store the generated key somewhere safe. Don’t share it with anyone.
- Click on “Set up Billing” button and go through the 2-step Account information process
- On step 2 either:
- Try to directly close the browser tab and then check if your plan is now on free tier
- If above trick doesn’t work for you, add your credit/debit card as payment method, but don’t worry you won’t be charged if you stay on free plan
- On step 2 either:
You can see all the plans side-by-side on the pricing page.
The main differences are:
- The free plan (which costs nothing) has limits on how often you can use it
- When you use the free plan, Google may use your questions and the AI’s answers to make their product better
The paid plans offer more features and fewer restrictions.
FINALLY! As end result from all the steps above you should see “Free” label under Plan column and you should have an API Key. Of course, if you choose a paid plan that is also fine.
Step 3: Add Google AI to Home Assistant
Easy Way:
Add Google AI Conversation with My Home Assistant Button – just click here
Manual Way:
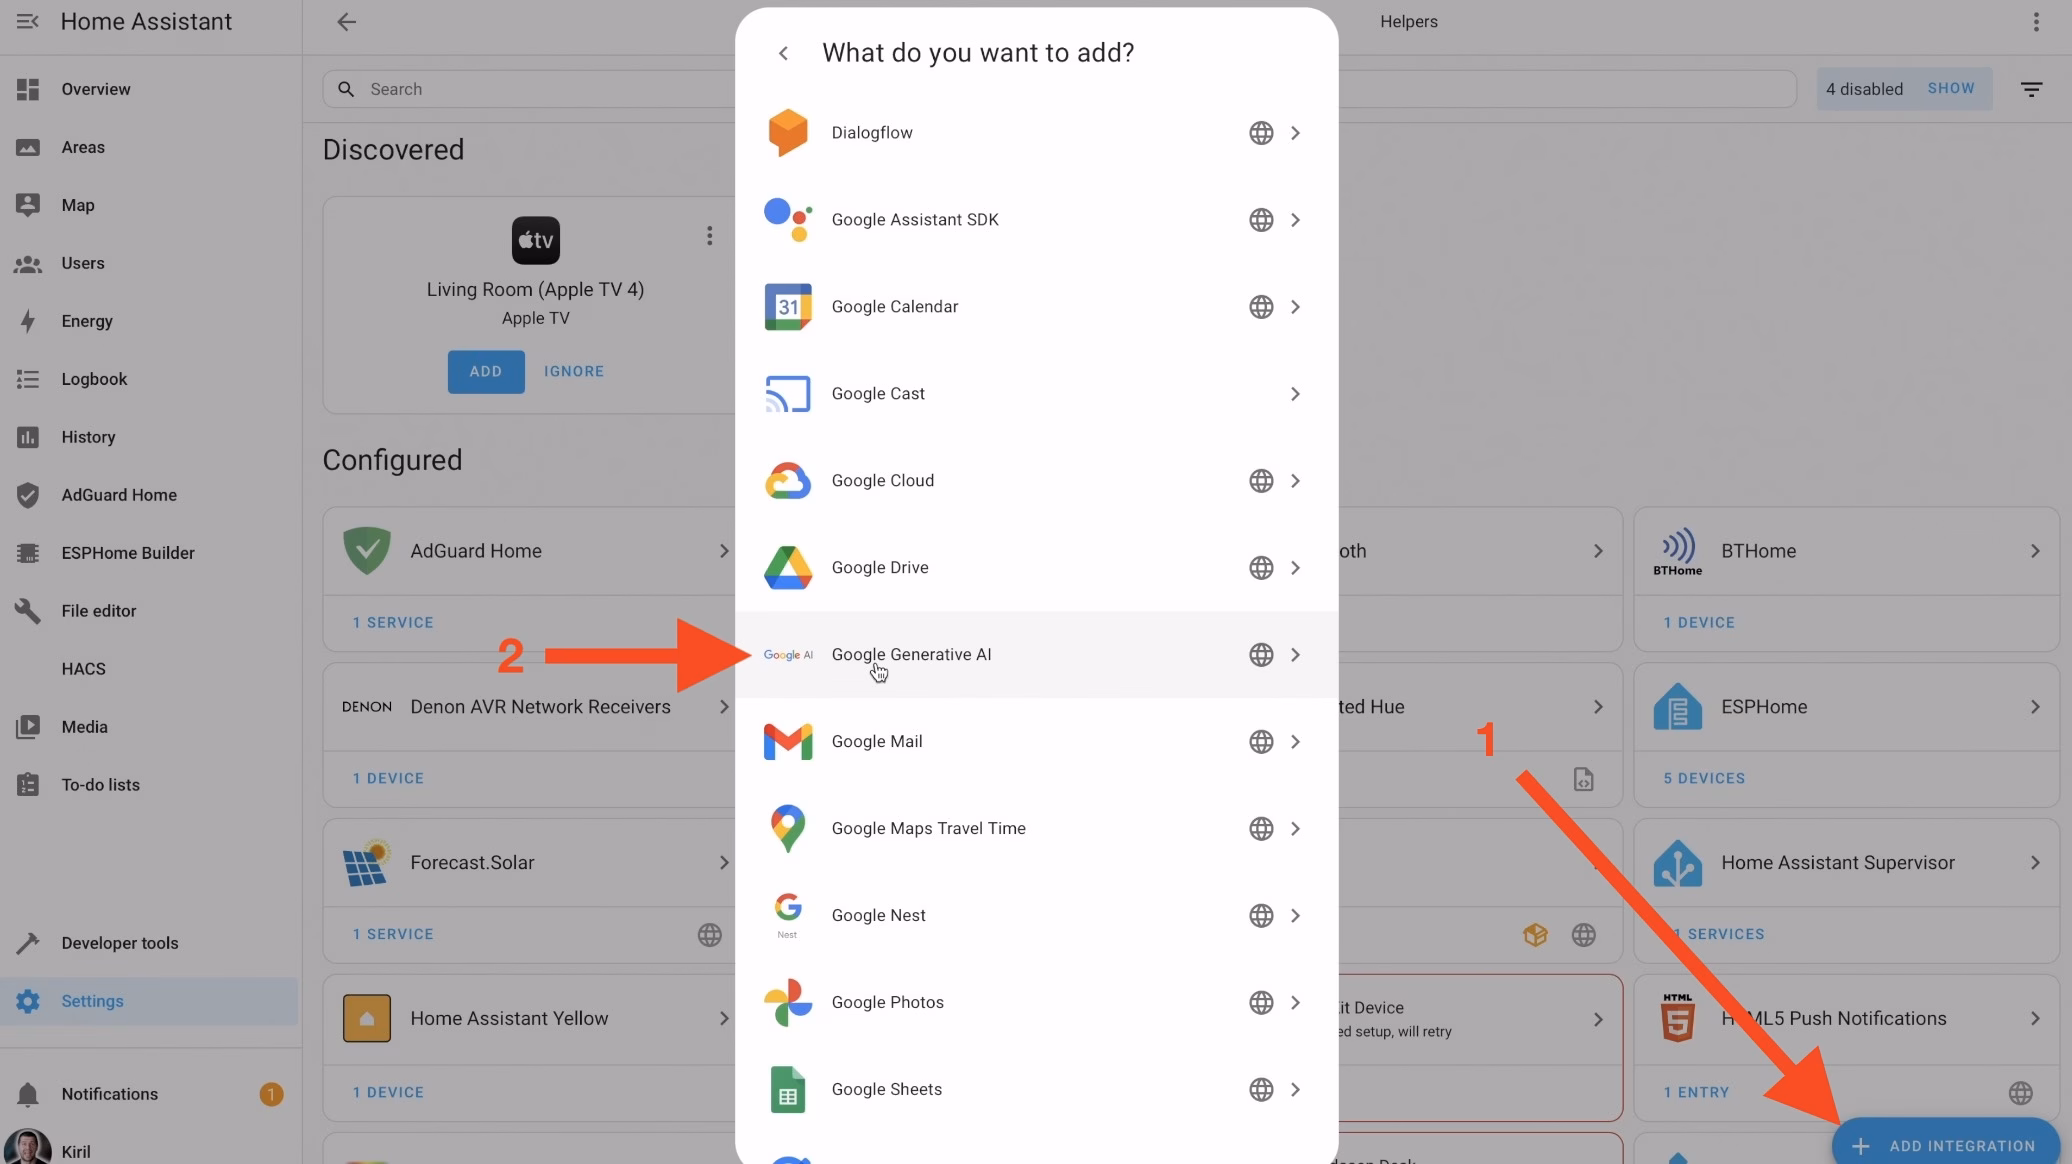
Can’t use the “My Home Assistant” button above? No problem! Here’s how to add Google AI yourself:
- Open your Home Assistant
- Click on “Settings” then “Devices & Services” or press “c” and type “Integrations” select “navigate Integrations“
- Look for the “Add Integration” button in the bottom right corner
- Search for “Google” and click on it, then find and click on “Google Generative AI” in the list
- Paste the Google API key in the Home Assistant Dialog
Step 4: Configure Google AI Options
To adjust settings:
- Go to Settings > Devices & Services or press “c” and type “Integrations” select “navigate Integrations“
- Click the Google AI Conversation integration
- Select Configure
- Uncheck Assist (full control) under Control Home Assistant section
Enable Web Search
- During setup, uncheck Recommended model settings
- Click Submit, then scroll to the bottom to configure:
- Enable Google Search Tool
- Note: Web search may not work if Assist (full control) is enabled due to Google API limitation. There is a workaround for that described later in the article.
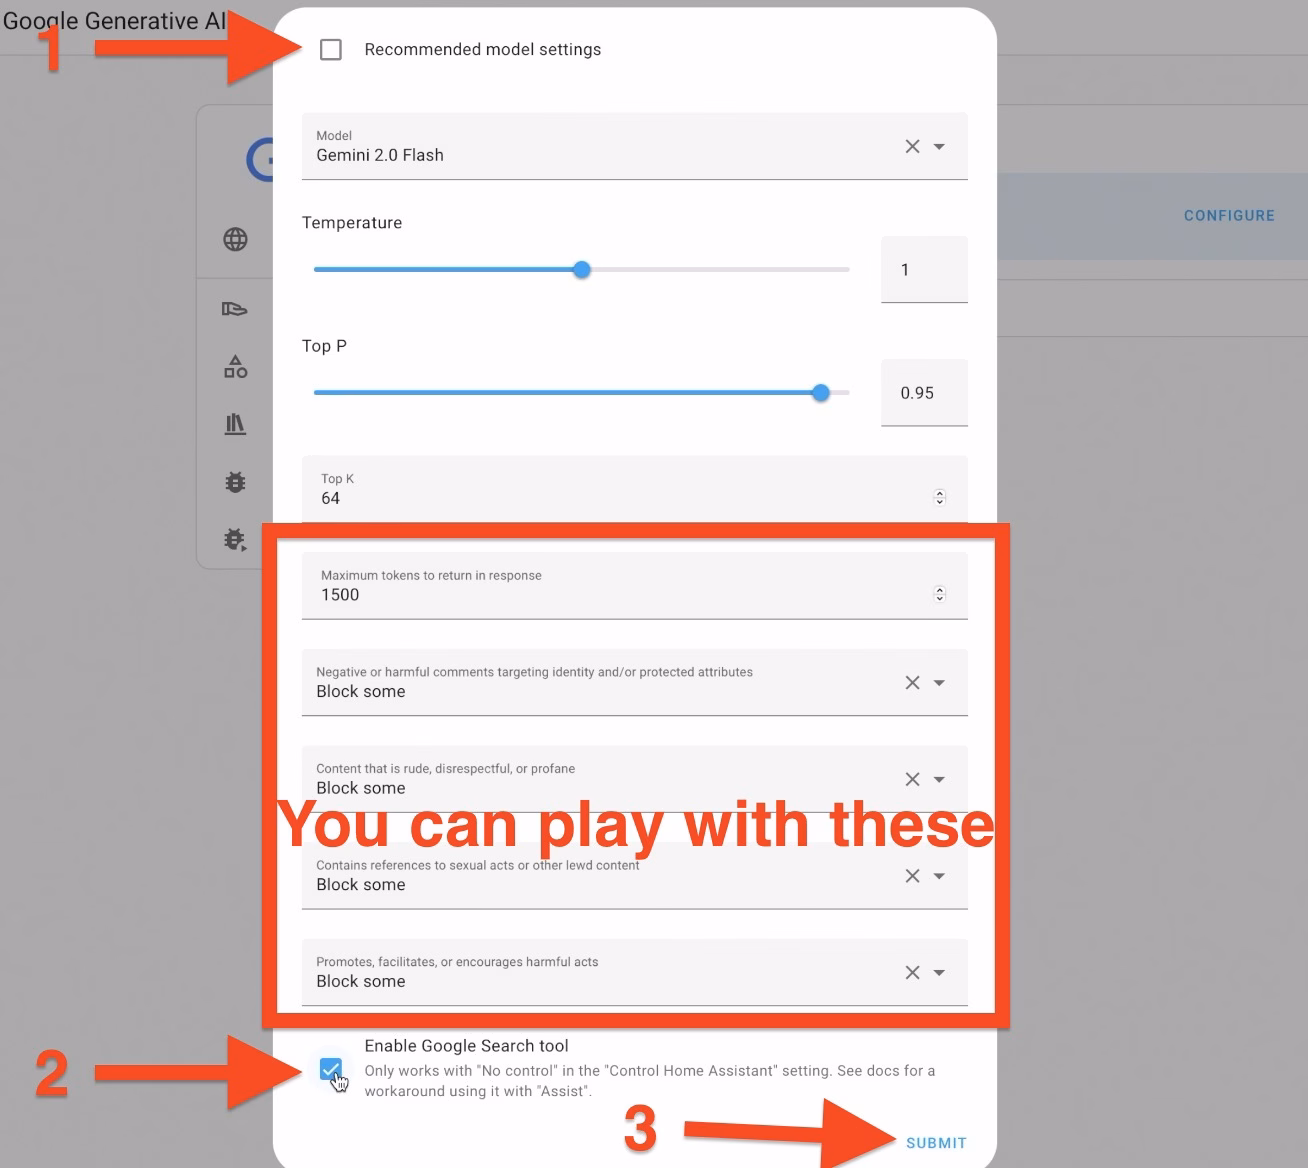
- Optionally, you can:
- Increase Maximum Tokens to return to response (affects speed)
- Decrease the filtration from Block some to Block none (for more relevant results)
Step 5: Set Up Your Voice Assistant
To speak or type to your home, set up an Assist pipeline:
NOTE: If you are Home Assistant Cloud user a voice assistant pipeline has been created for you already. Nevertheless, you need to create a new one for Google AI. You may skip the Install the Add-ons section below and go straight to Setup Your Voice Assistant.
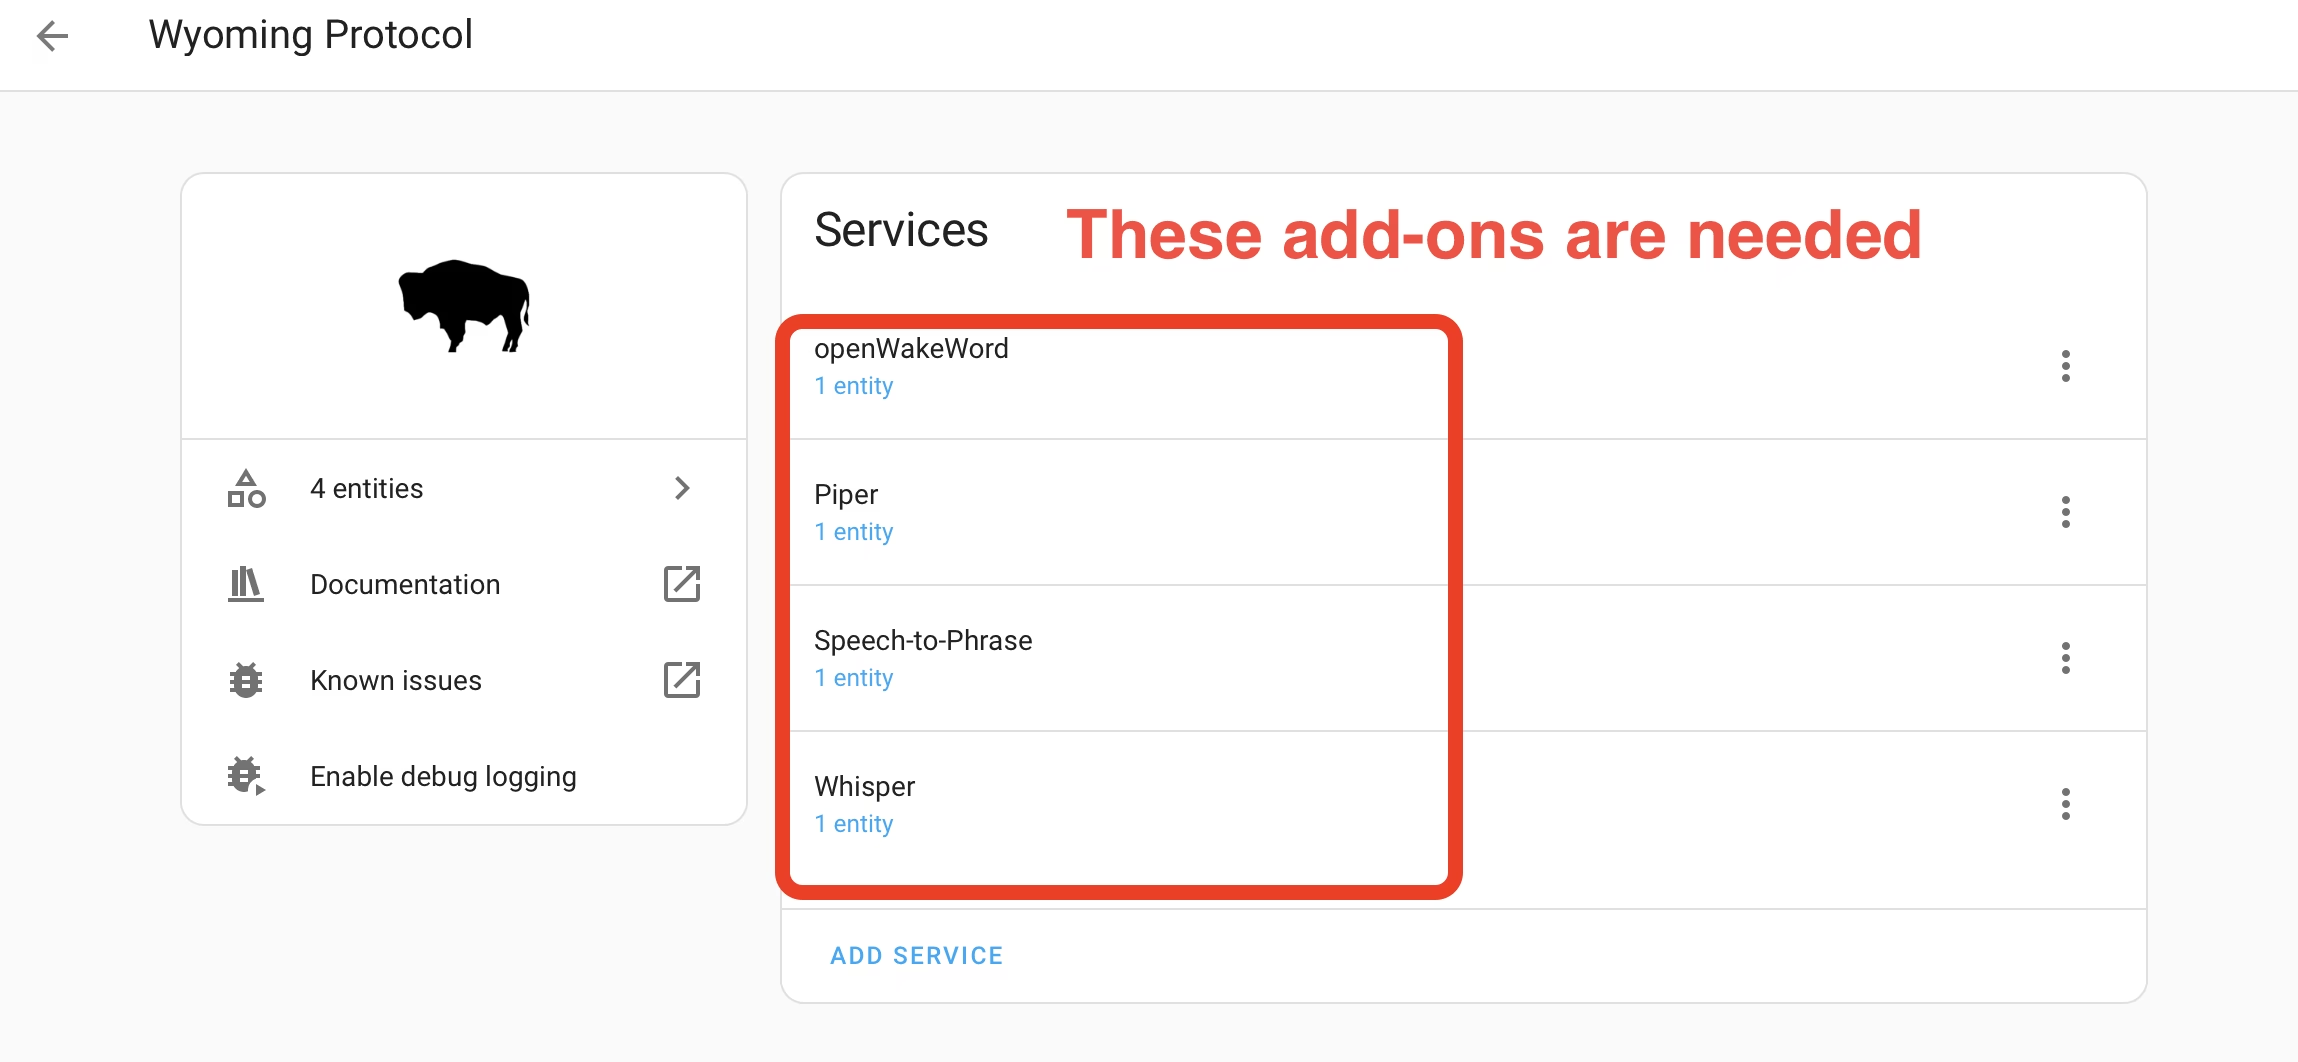
Install the Add-ons:
- Install speech-to-text (choose Whisper or Speech-to-Phrase)
- Install Piper (text-to-speech)
- Start both add-ons
- Go to Settings > Devices & Services
- You’ll see these under Wyoming Integration
- Click Add for each one
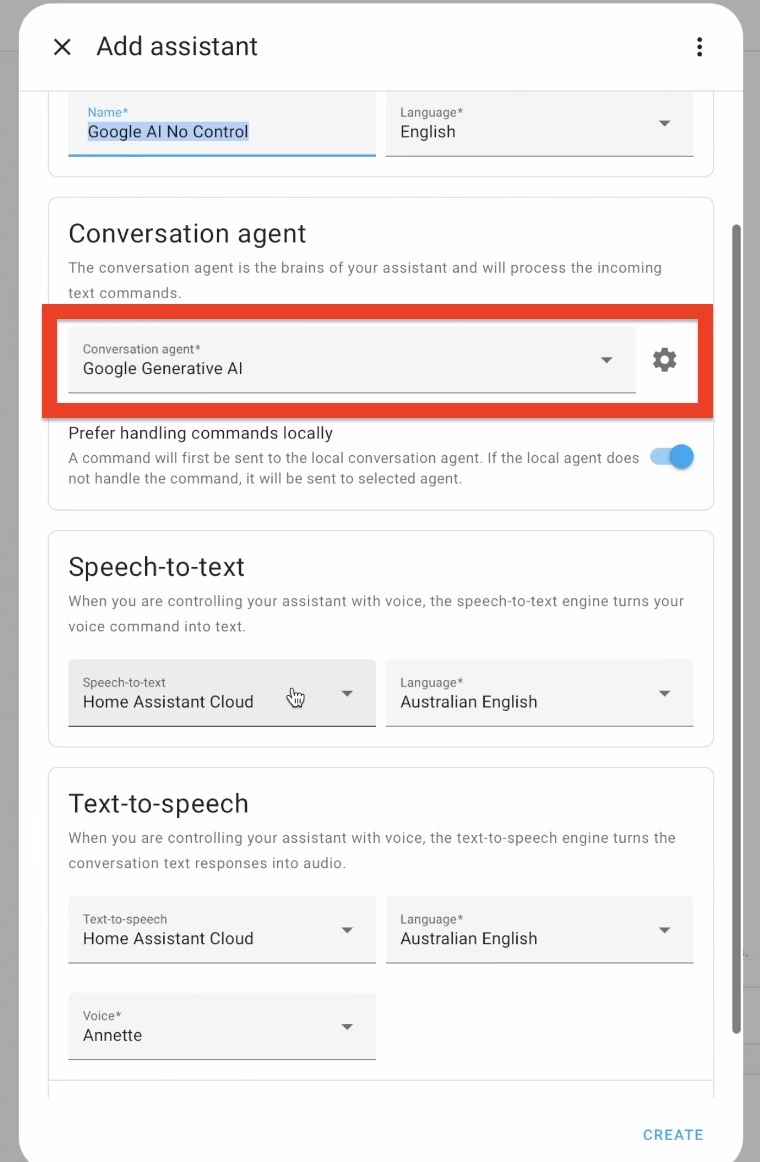
Setup Your Voice Assistant:
- Go to Settings > Voice Assistants
- Click Add Assistant
- Fill in:
- A name (anything you like!)
- Language (you like!)
- Conversation agent → choose Google Generative AI
- Speech-to-text → choose your installed engine or Home Assistant Cloud
- Text-to-speech → choose Piper or Home Assistant Cloud
- Pick language variants if available
- Done! You can now talk/type to your smart home using Home Assistant Assist and Google AI and you can useGoogle AI Web Search in Home Assistant
Step 6: Expose Devices to Control with Assistant
To protect your home, not all devices can be controlled by Home Assistant by default.
Note: It’s tempting to share all your entities with Assist, but be warned, it might slow things down. The more names and aliases the parser has to process, the longer it’ll take to match. And if you’re using a LLM-based conversation agent, it’ll cost more time or money or both per request because it needs to handle a bigger context. Only share the essentials you know you’ll use with voice assistants.
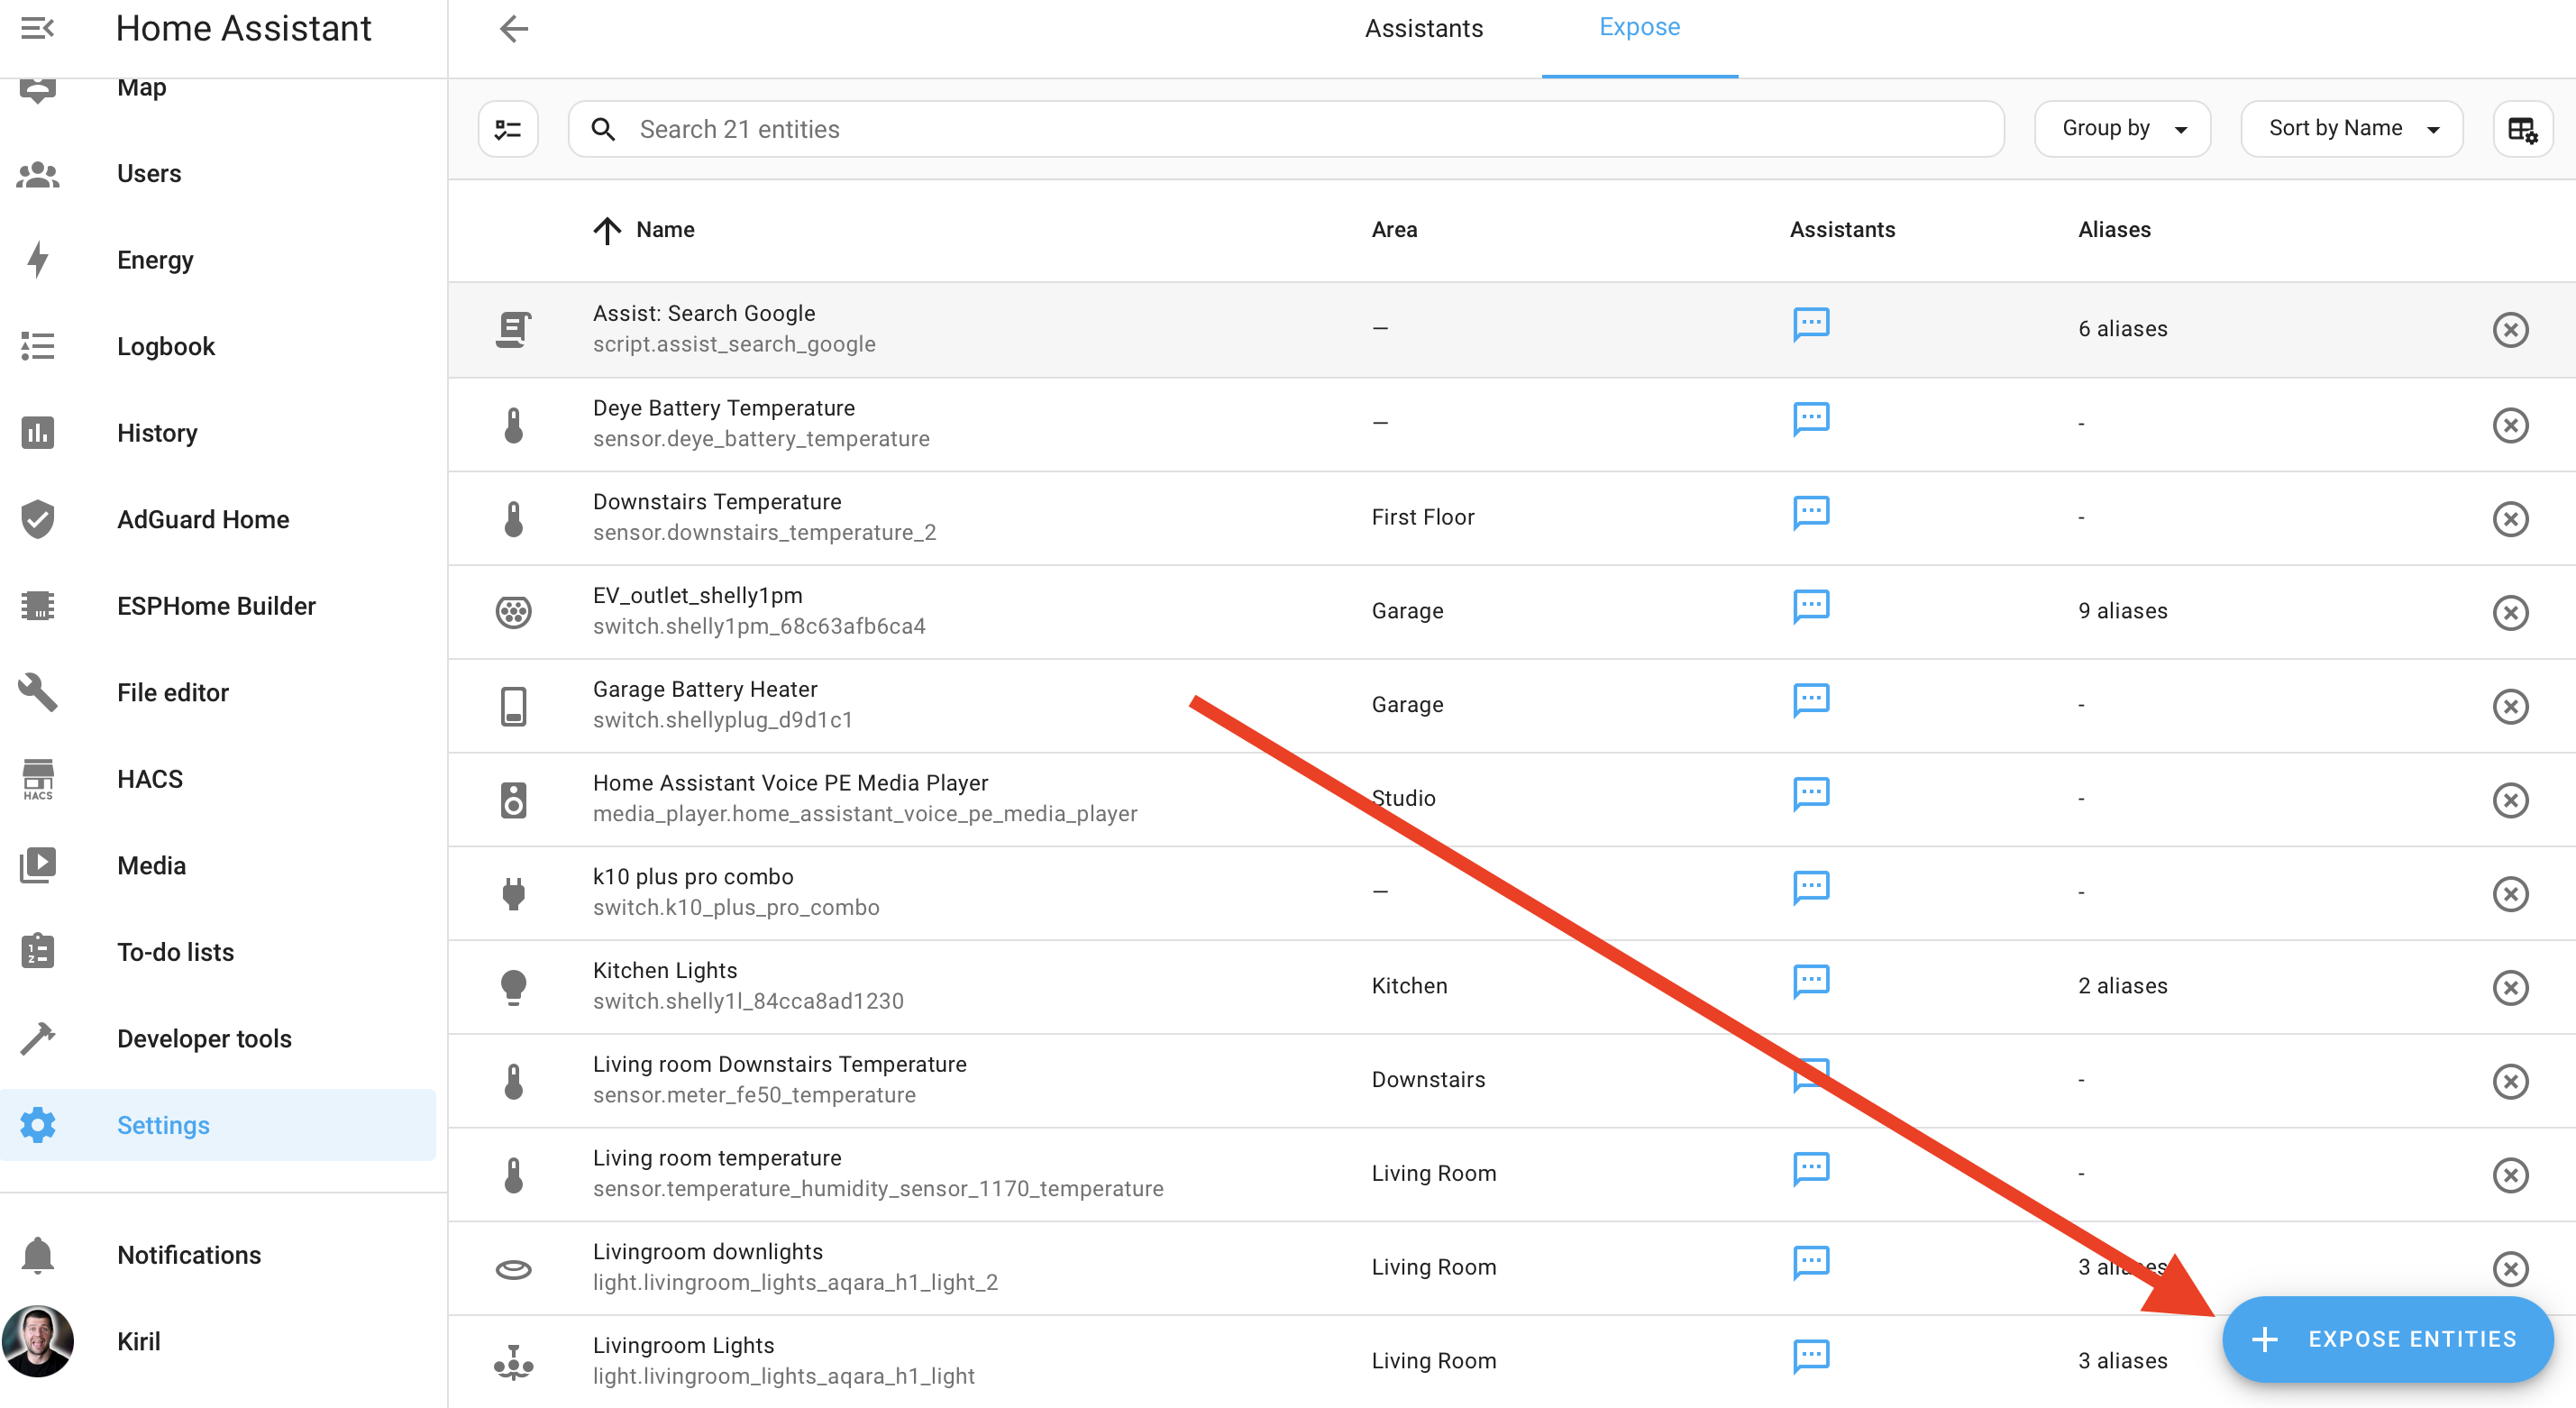
Here’s how to expose them:
- Go to Settings > Voice Assistants
- Open the Expose tab
- To expose a single device:
- Click it from the list
- In the popup, select where to expose it: Assist, Google, Alexa
- To expose multiple devices:
- Click Expose Entities
- Select all devices you want to control by voice
Devices like locks or garage doors aren’t exposed automatically — you decide what’s safe.
Step 7: Make Home Assistant Automation(s)
This Home Assistant automation below demonstrates how to search the web for latest tennis news after motion is detected by a motion sensor. You can customize it to fit your needs. You may wish to change the trigger with your motion sensor (or anything else) and in the action media player (media_player_entity_id:) with yours.
alias: search the web demo with Google AI
description: ""
triggers:
- trigger: state
  entity_id:
  - binary_sensor.lumi_lumi_sensor_motion_aq2_motion # change that with yours
  to: "on"
conditions: []
actions:
- action: conversation.process
  metadata: {}
  data:
    agent_id: conversation.google_generative_ai
    conversation_id: "1"
    text: >-
      summarize me the most important tennis news in 2 short sentences in a
      funny passive aggressive style. Don't include sources, links, titles.
      Don't do any text formatting and go straight to point
    response_variable: ai
- action: persistent_notification.create
  metadata: {}
  data:
    message: "Tennis news are: {{ai.response.speech.plain.speech}}"
- action: tts.speak
  metadata: {}
  data:
    cache: false
    message: "Tennis news are: {{ai.response.speech.plain.speech}}"
    language: en-GB
    media_player_entity_id: media_player.home_assistant_voice_pe_media_player # change that with yours
  target:
    entity_id:
    - tts.home_assistant_cloud
mode: single
The next automation below is asking “Do you want to hear the latest home assistant news?” And if answered positively it uses the Google AI to search the web for updates. Again, you may wish to change the trigger with your motion sensor (or anything else) and in the action media player (media_player_entity_id:) with yours.
alias: Ask for Home Assistant news summary - Google AI
description: ""
triggers:
- trigger: state
  entity_id:
  - binary_sensor.lumi_lumi_sensor_motion_aq2_motion # change that with yours
  to: "on"
conditions: []
actions:
- action: assist_satellite.start_conversation
  metadata: {}
  data:
    preannounce: true
    start_message: Do you want to hear the latest home assistant news?
    extra_system_prompt: >-
      Only If answered positively, summarize me the most important and latest home assistant news
      in 2 short sentences in a funny passive aggressive style. Don't include
      sources & links. Don't do any text formatting and go straight to point
  target:
    entity_id: assist_satellite.home_assistant_voice_pe_assist_satellite # change that with yours
mode: single
How to Use Google AI Search and Full Assist Control in HA (Workaround)
Let me explain a clever workaround to get Google AI Search working alongside Assist with Full Home Assistant Control enabled.
Reason for the workaround is that there’s a small issue, due to Google AI API limitation the web search can’t work when Assist functionality is enabled. But don’t worry!
Here’s an easy fix:
The Workaround:
- Enable Assist (Full Control) for your existing Google AI service (conversation.google_generative_ai)
- Add a second Google AI service
- Click “Configure“
- Uncheck “Assist” under the Home Assistant control options
- Uncheck “Recommended model settings“
- Click “Submit“
- Turn on “Enable Google Search tool“
- Optionally, make the “Maximum tokens” bigger for longer answers
- Click “Submit” again
- Create a special script
- Go to “Settings” → “Automations & scenes” → “Scripts” → “Create script”
- Click the 3 dots (upper right) → “Edit in YAML“
- Copy the code shown below (remember to change “conversation.google_generative_ai_2” if yours has a different name)
- Click “Save script“
sequence:
- action: conversation.process
  metadata: {}
  data:
    agent_id: conversation.google_generative_ai_2
    text: "{{ query }}"
    response_variable: result
- variables:
    result:
      response: "{{ result.response.speech.plain.speech }}"
- stop: ""
  response_variable: result
alias: "Assist: Search Google"
description: >-
  Makes a Google search to answer questions that are completely unrelated with
  the smart home and are exclusively about current events or information in
  real-time like the current president, results of last night's game, release
  dates, etc.
fields:
  query:
    selector:
      text: null
    name: Query
    description: The query to search Google for
    required: true
- Make it work with voice
- Click the 3 dots → “Settings” → “Voice assistants“
- Check “Expose Assist“
Now you can ask questions about current events, sports results, or other real-world information AND you can control your Home Assistant devices and entities. Enjoy!
Final Google AI Web Search in Home Assistant Thoughts & Download Reminder
Boom — you did it! Google AI Web Search in Home Assistant is now enabled and you just turned your Home Assistant into a truly smart home hub using Google AI Web Search in Home Assistant.
Don’t forget to grab the free PDF Guide:
- All steps clearly explained
- Includes links, YAML code, and extra tips
- Instant download when you confirm your email
Thanks for reading! Drop your thoughts or questions in the comments and subscribe to my newsletter to stay updated!
Thanks for AI-ing with me,
Kiril Peyanski