
Smarten Up Your Internet with this Home Assistant Starlink tutorial. Have you ever been on a video call only to have your internet cut out? If you’re a Starlink user, you know how amazing it is when it works, but like any internet, it can have its moments. The good news is, with Home Assistant, you can take control and make your Starlink smarter than ever.
Home Assistant is a free, open-source home automation software that lets you manage all your smart devices in one place. Best of all, it has an amazing integration for Starlink, allowing you to create powerful automations that solve common problems and even save energy.
While most people think about automating a lost connection, the real magic lies in using a Starlink Home Assistant setup to handle things like obstructions, overheating, and a “sleep” mode for your dish. I’ll show you how to set up these four essential automations.
Table of Contents
First Step: Adding Your Starlink to Home Assistant
Before you can create any automations, you need to connect your Starlink to Home Assistant. This is a quick and easy process.
- Make sure your Home Assistant device (like a Raspberry Pi) is connected to the same network as your Starlink.
- Open Home Assistant, press “c” key on your keyboard & type “integrations” then select it to go to the Integrations section,
- Click on + Add integration and search for “Starlink“
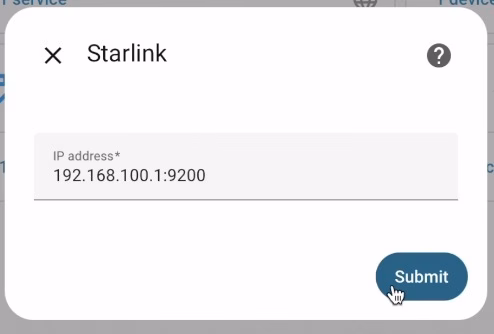
- Click on the integration. In most cases, the default settings will be correct, so you can just click Submit.
- Just like that, your Starlink Home Assistant integration is complete! You will now see new sensors and switches for your Starlink device.
Get one free month of Starlink
If you register from the link below we will both (you and I) get one free month of Starlink service:
https://www.starlink.com/residential?referral=RC-DF-6522173-86629-55&app_source=share
Automation 1: The Starlink Disconnected Alert
Imagine you’re in the middle of a video call, and your Starlink drops out. This simple Home Assistant Starlink automation will send an instant alert to your phone and Home Assistant, so you know exactly what’s happening.
- Trigger: The automation is set off when the Starlink connectivity sensor changes to the “disconnected” state.
- Actions: It sends a message to your mobile phone and a persistent notification within Home Assistant, so you get an alert no matter where you are.
- What to change: You’ll need to change the notification service to your specific phone’s name, which is created when you set up the Home Assistant app on your device.
This detailed guide includes step-by-step instructions on how to set up Home Assistant Starlink automations, all the YAML code you need, and extra tips to make them work for your setup.
Tired of Reading? Watch the Video Instead!
Prefer to see these automations in action? If you’ve had enough reading and want a visual walkthrough, check out my full video guide on YouTube! I’ll show you step-by-step how to set up each Home Assistant Starlink automation, including live demonstrations of them working.
Watch the Home Assistant Starlink Automation Video Here!
Don’t miss out on seeing how easy it is to make your Starlink Home Assistant setup truly smart.
Automation 2: The Obstruction Alert
Sometimes, slow internet isn’t random. It’s because something is blocking your Starlink dish. This Starlink Home Assistant automation will warn you if the dish is obstructed for more than a few seconds.

- Trigger: The automation activates when the obstruction sensor shows a “problem” status for a set time, which you can adjust.
- Actions: Just like the first automation, it sends a notification to your phone and Home Assistant. The message will tell you to “Check for trees, birds, or debris.”
By the way, if you want that automation YAML code as well, just get that free PDF I mentioned. Here is how it works. Open the link below and just type your name and email address.
Then you’ll get an email from me where you can confirm that you’re not some kind of a robot. Then boom, the PDF is yours to have.
Inside the PDF, you will find step-by-step instructions on how to add Starlink in Home Assistant, all YAML code for all automations from this video, and extra detailed explanations. You also join my newsletter where I’ll share news and updates. It’s a free service and if you don’t like it, you can unsubscribe anytime with just one click.
Automation 3: The Overheating Alert
During hot weather, your Starlink dish can overheat, causing it to slow down its performance to protect itself. This Home Assistant Starlink automation will tell you when this happens before your internet speeds tank.
- Trigger: This automation is triggered when the
thermal_throttlesensor changes to a “problem” state. - Actions: It sends you an alert that says something like, “Starlink is thermally throttled, check dish cooling or move to shade.”
Automation 4: The Starlink Sleep Routine
Did you know you can put your Starlink to “sleep” to save energy? While you can do this from the official app, integrating this into a Starlink Home Assistant routine is much more powerful.
- Trigger: The automation is triggered when your phone’s battery state changes from “not charging” to “charging.” This is a perfect signal that you’re plugging it in for the night.
- Conditions: The automation only runs if the time is after 11:00 PM and it’s a weekday. This way, you save energy only when you’re actually asleep.
- Actions: The
sleep_shadowswitch for your Starlink is turned on, and you receive a notification that your “Starlink is going to bed.”
This clever Home Assistant Starlink automation is a great way to save energy and make your life easier.
Final Thoughts on Home Assistant & Starlink
A Home Assistant Starlink setup gives you a level of control and insight that the standard app simply can’t match. You can customize these automations to fit your needs, whether it’s adding more actions or changing the triggers.
To get all the details, including the exact YAML code for each of these automations and a step-by-step guide on how to set it all up, be sure to download the free PDF guide. It’s the ultimate resource for anyone looking to get the most out of their Starlink Home Assistant setup.
If you want more Home Assistant tutorials check this category