
If you want to make your Home Assistant more fun and easier to use, then pay close attention to the next 15 Home Assistant tips and tricks that I’m going to share with you.
But here’s the crazy part — the most mind-blowing tricks you are about to see aren’t complex, fancy automations or integrations. They’re the small things, hidden from the first sight, but they make everything faster, smoother, and just plain cooler.
These tips and tricks are not in any particular order, but they are grouped into three main categories: Dashboard, Automation Editor, and System. Trust me, you will want to see them all.
Table of Contents
Dashboard Home Assistant Tips & Tricks
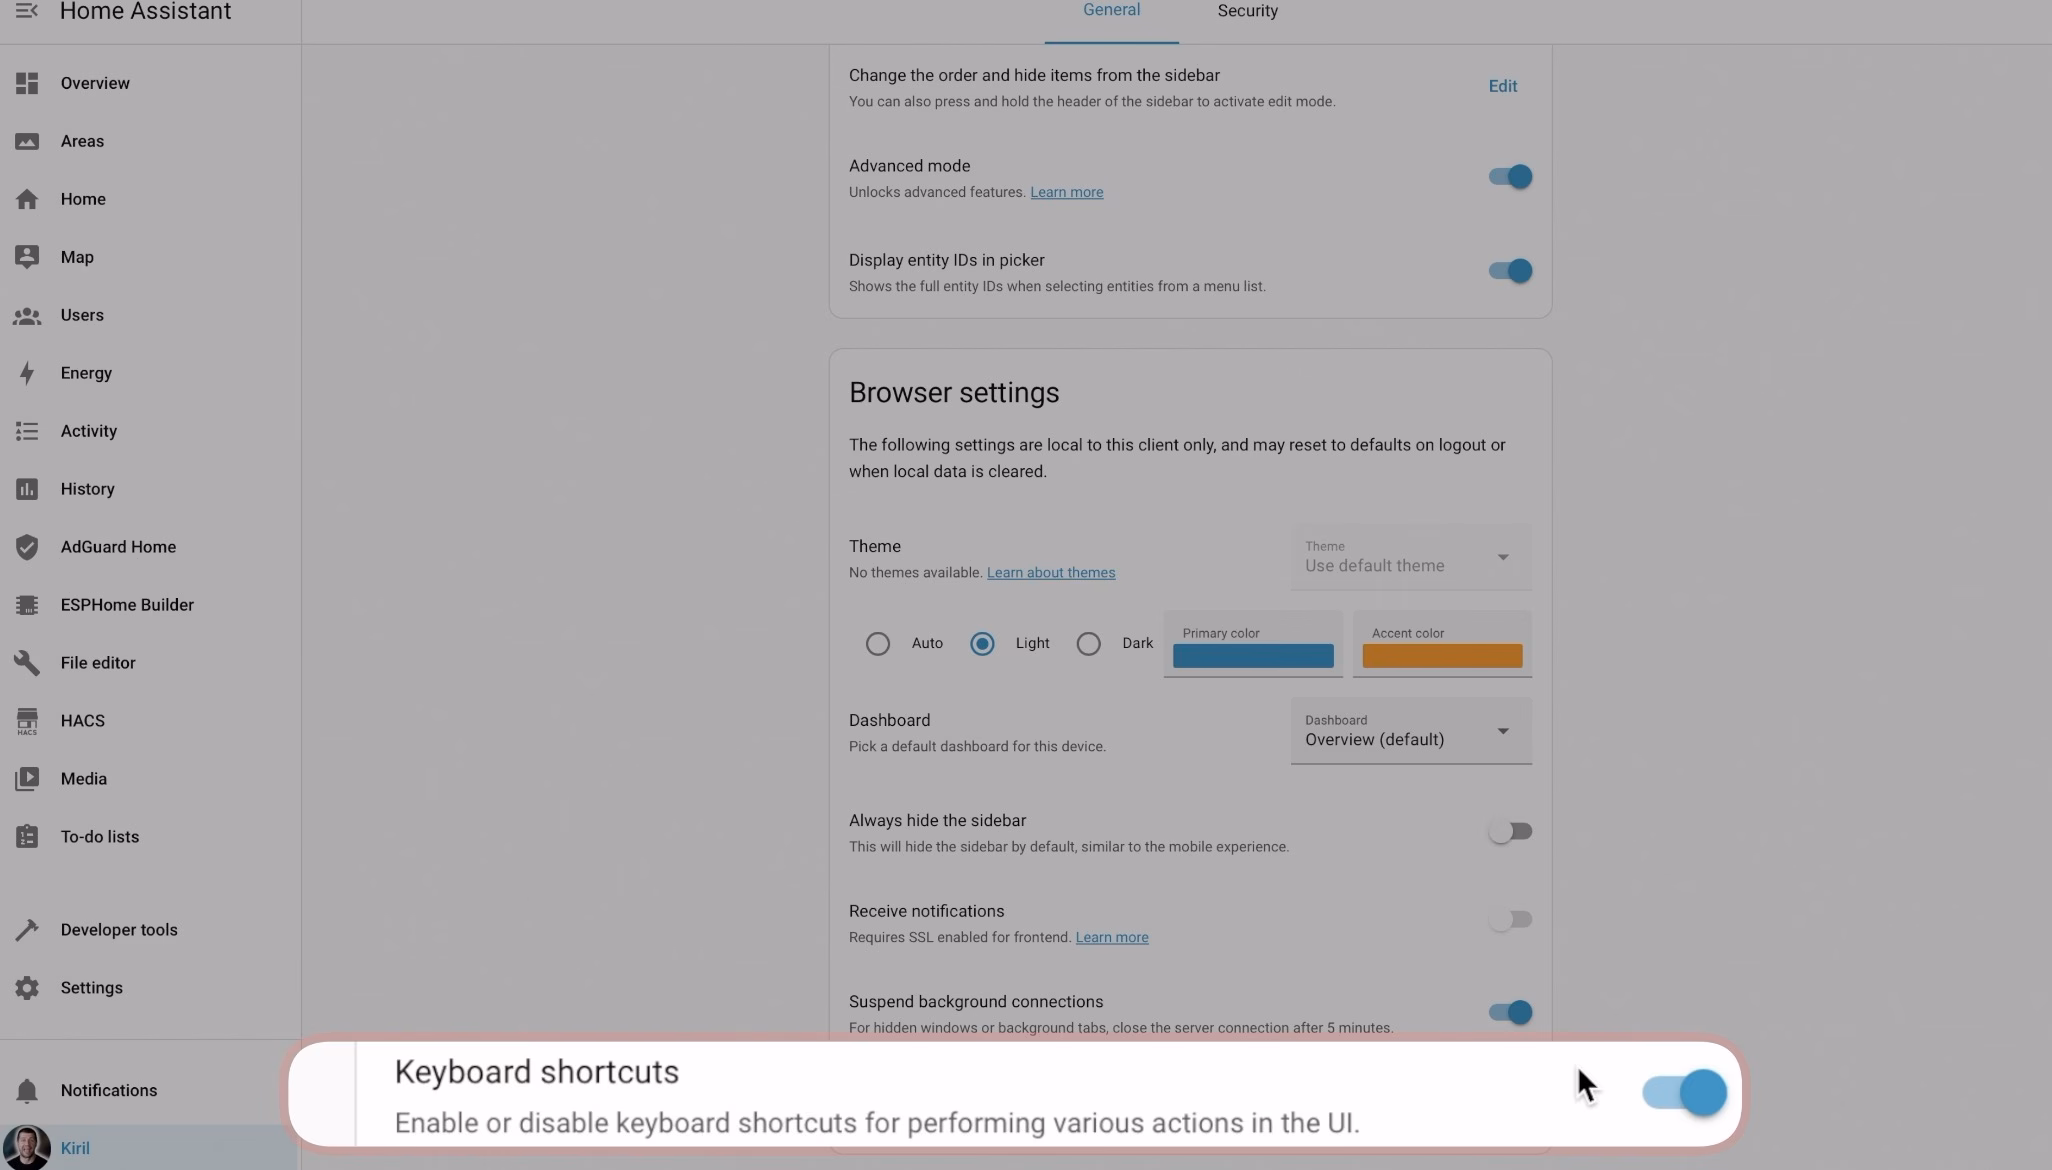
Tip #1: Master Your Workflow with Keyboard Shortcuts
Okay, this first one is a total time-saver. I showed this to a friend once and he said, ‘Bro, I’ve been trying to remember where everything is for months… this changes everything!’ So, let me show the Home Assistant shortcuts to you as well.
While you’re on your Home Assistant dashboard, you can trigger all sorts of actions with just your keyboard. First, make sure you have shortcuts enabled in your user profile. Then, try these:
- Hit
Eto open the Entity filter, where you can search for and open any entity instantly. - Hit
Dfor the Device filter to quickly find any of your devices. - Hit
Cfor the Command palette, your universal tool for quick menu navigation. I use this one all the time to jump between different Home Assistant sections. - Hit
Mto quickly generate My Links. - Hit
Ato invoke Assist, the Home Assistant voice assistant. - Hit
?to open the full list of available shortcuts.
They are called shortcuts for a reason. Learn to use them, and you will see a massive difference in your efficiency. I’m really curious, are you using these shortcuts? Let me know in the comments below!
Tired of reading?
If you are a visual person and you don’t want to read now, then check my 15 Home Assistant tips & trips video here:
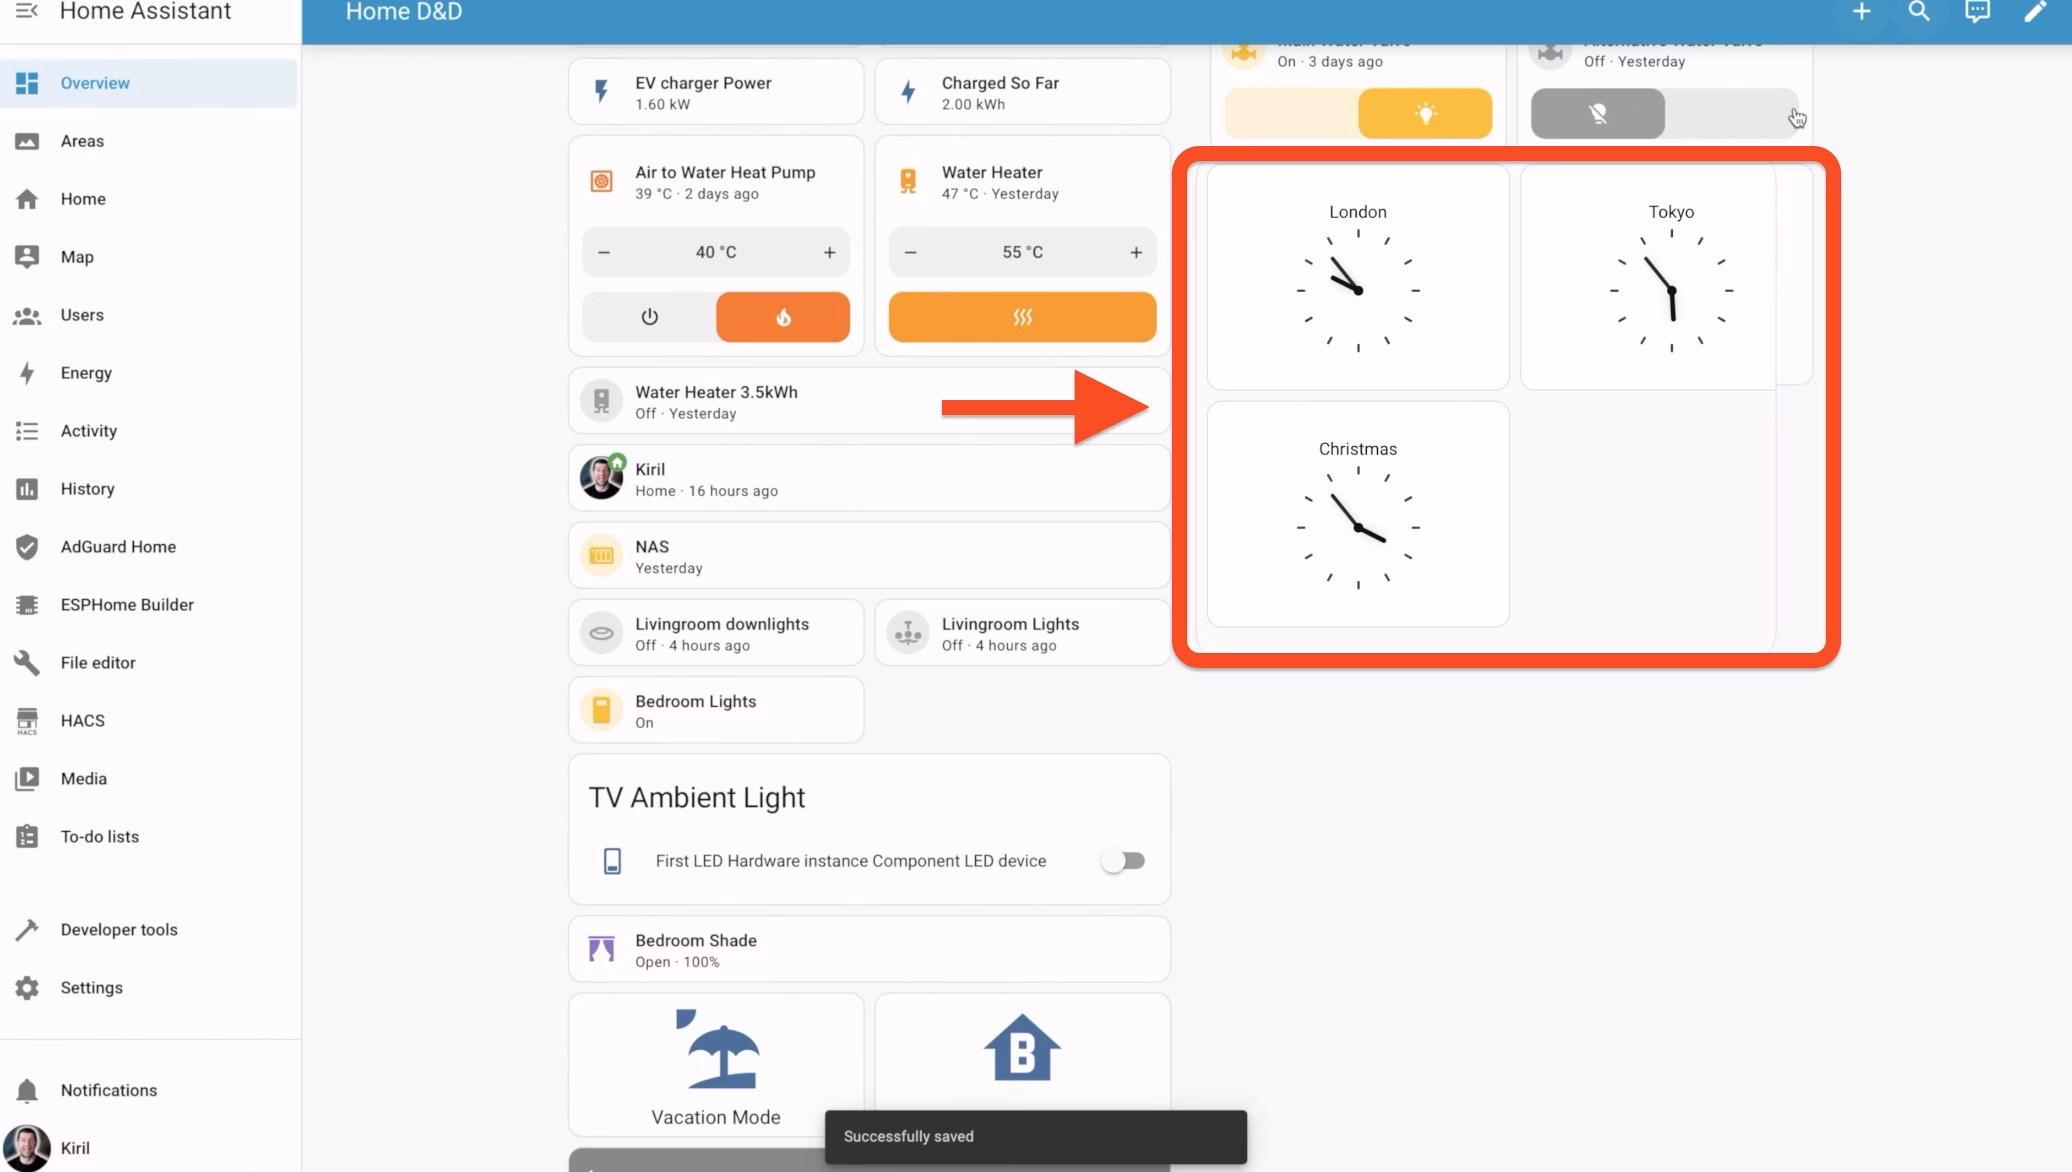
Tip #2: Customize the Analog Clock Card
You’ve seen the clock card, right? Most people just drop it in as a boring digital clock. But did you know you can switch it to an analog display? If you’re into dashboard aesthetics, this is where it gets fun.
With the analog clock, you can customize its style, choose whether to show the seconds hand, display it with or without numbers, and even change the number of ticks on the face. For a cool, international feel, you can add several clocks to your dashboard, each set to a different timezone, just like in a hotel lobby.
Tip #3: Tame Your Badges with Scrolling
This tip will change how your badges look forever. You know those little circular badges that can appear at the top of your dashboard view? By default, they just wrap to the next line when you have too many, which can look messy, especially on a phone.
But did you know you can set them to scroll horizontally instead? This is perfect for mobile users whose badges have started to look like a never-ending brick wall.
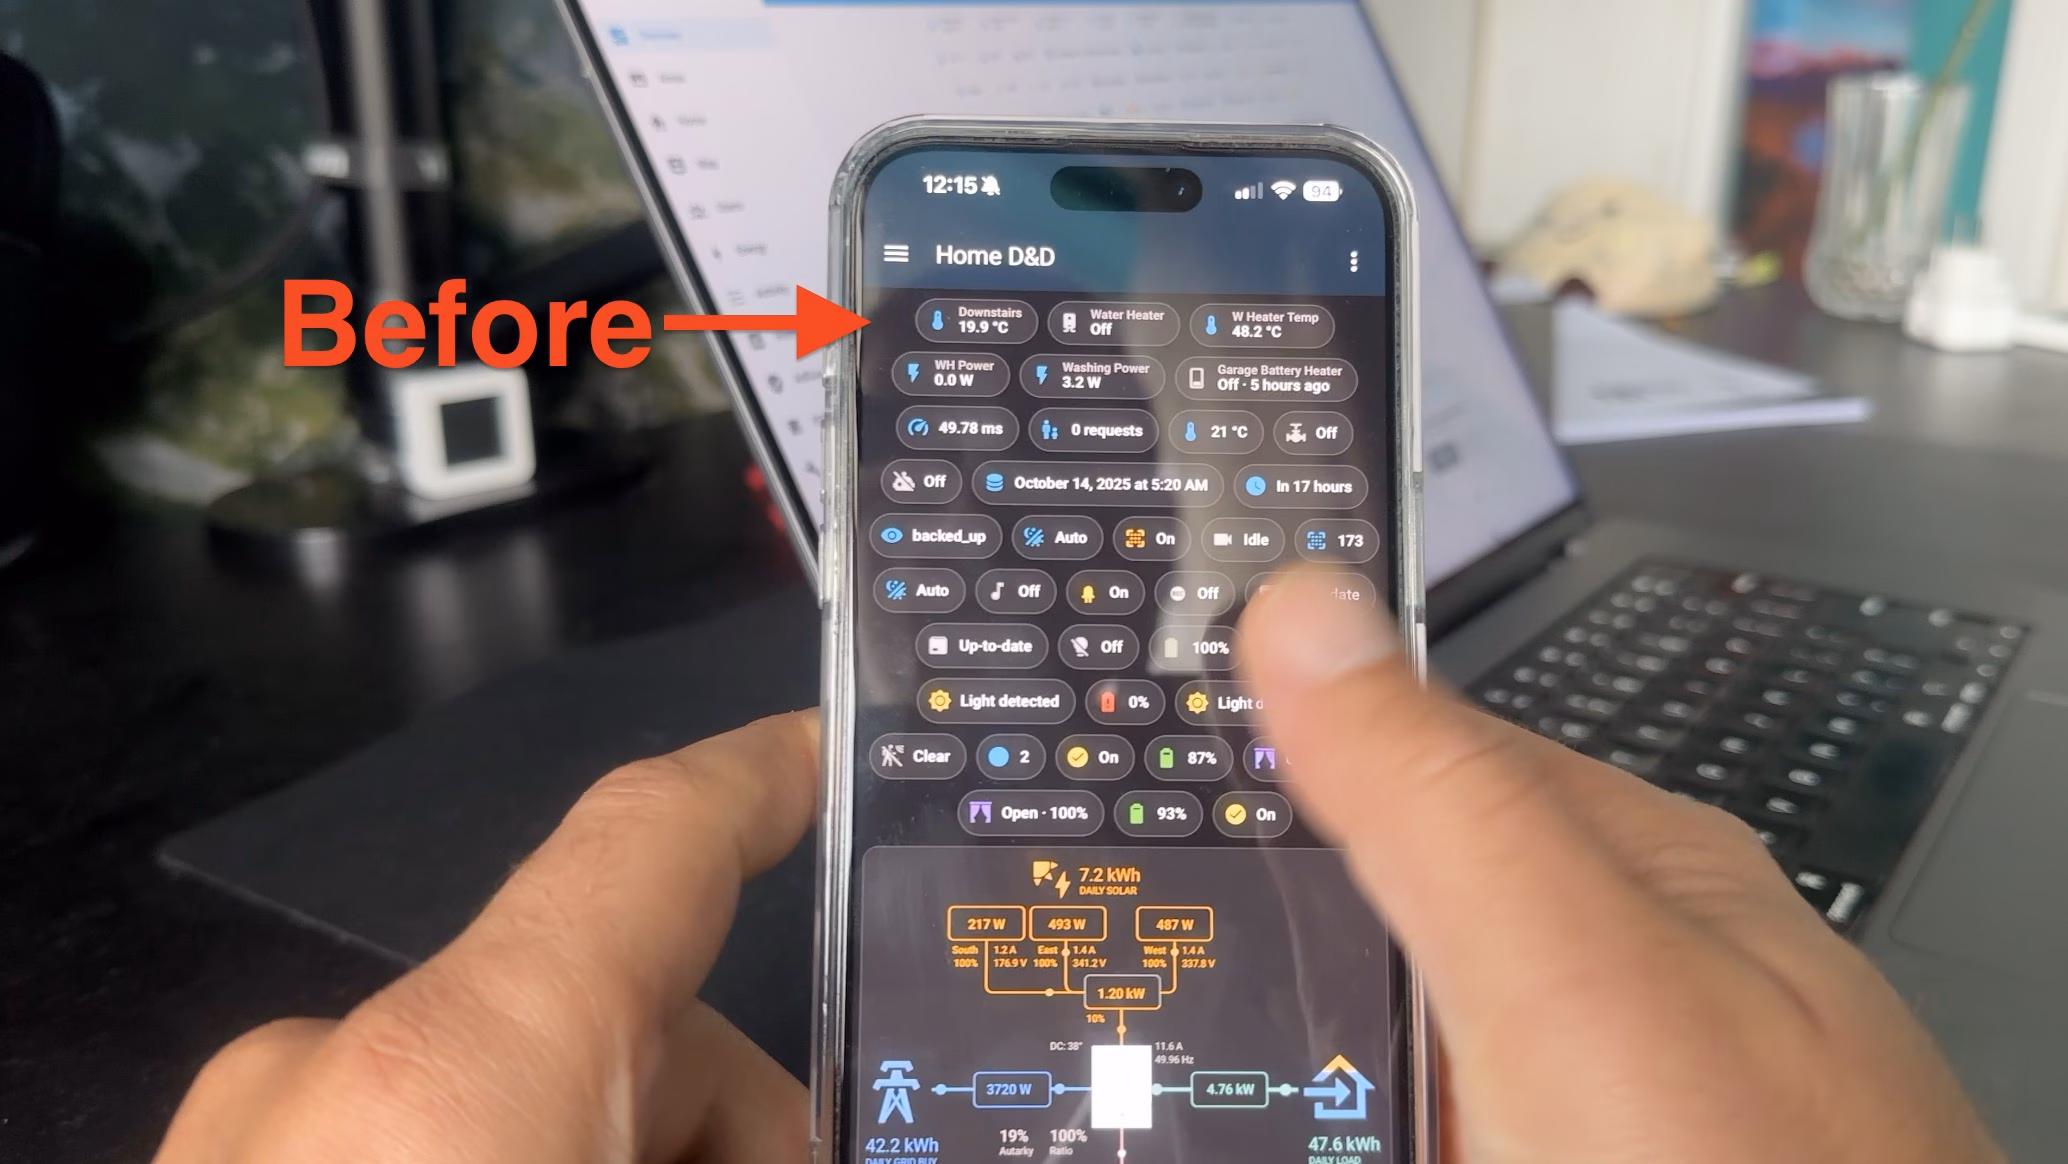
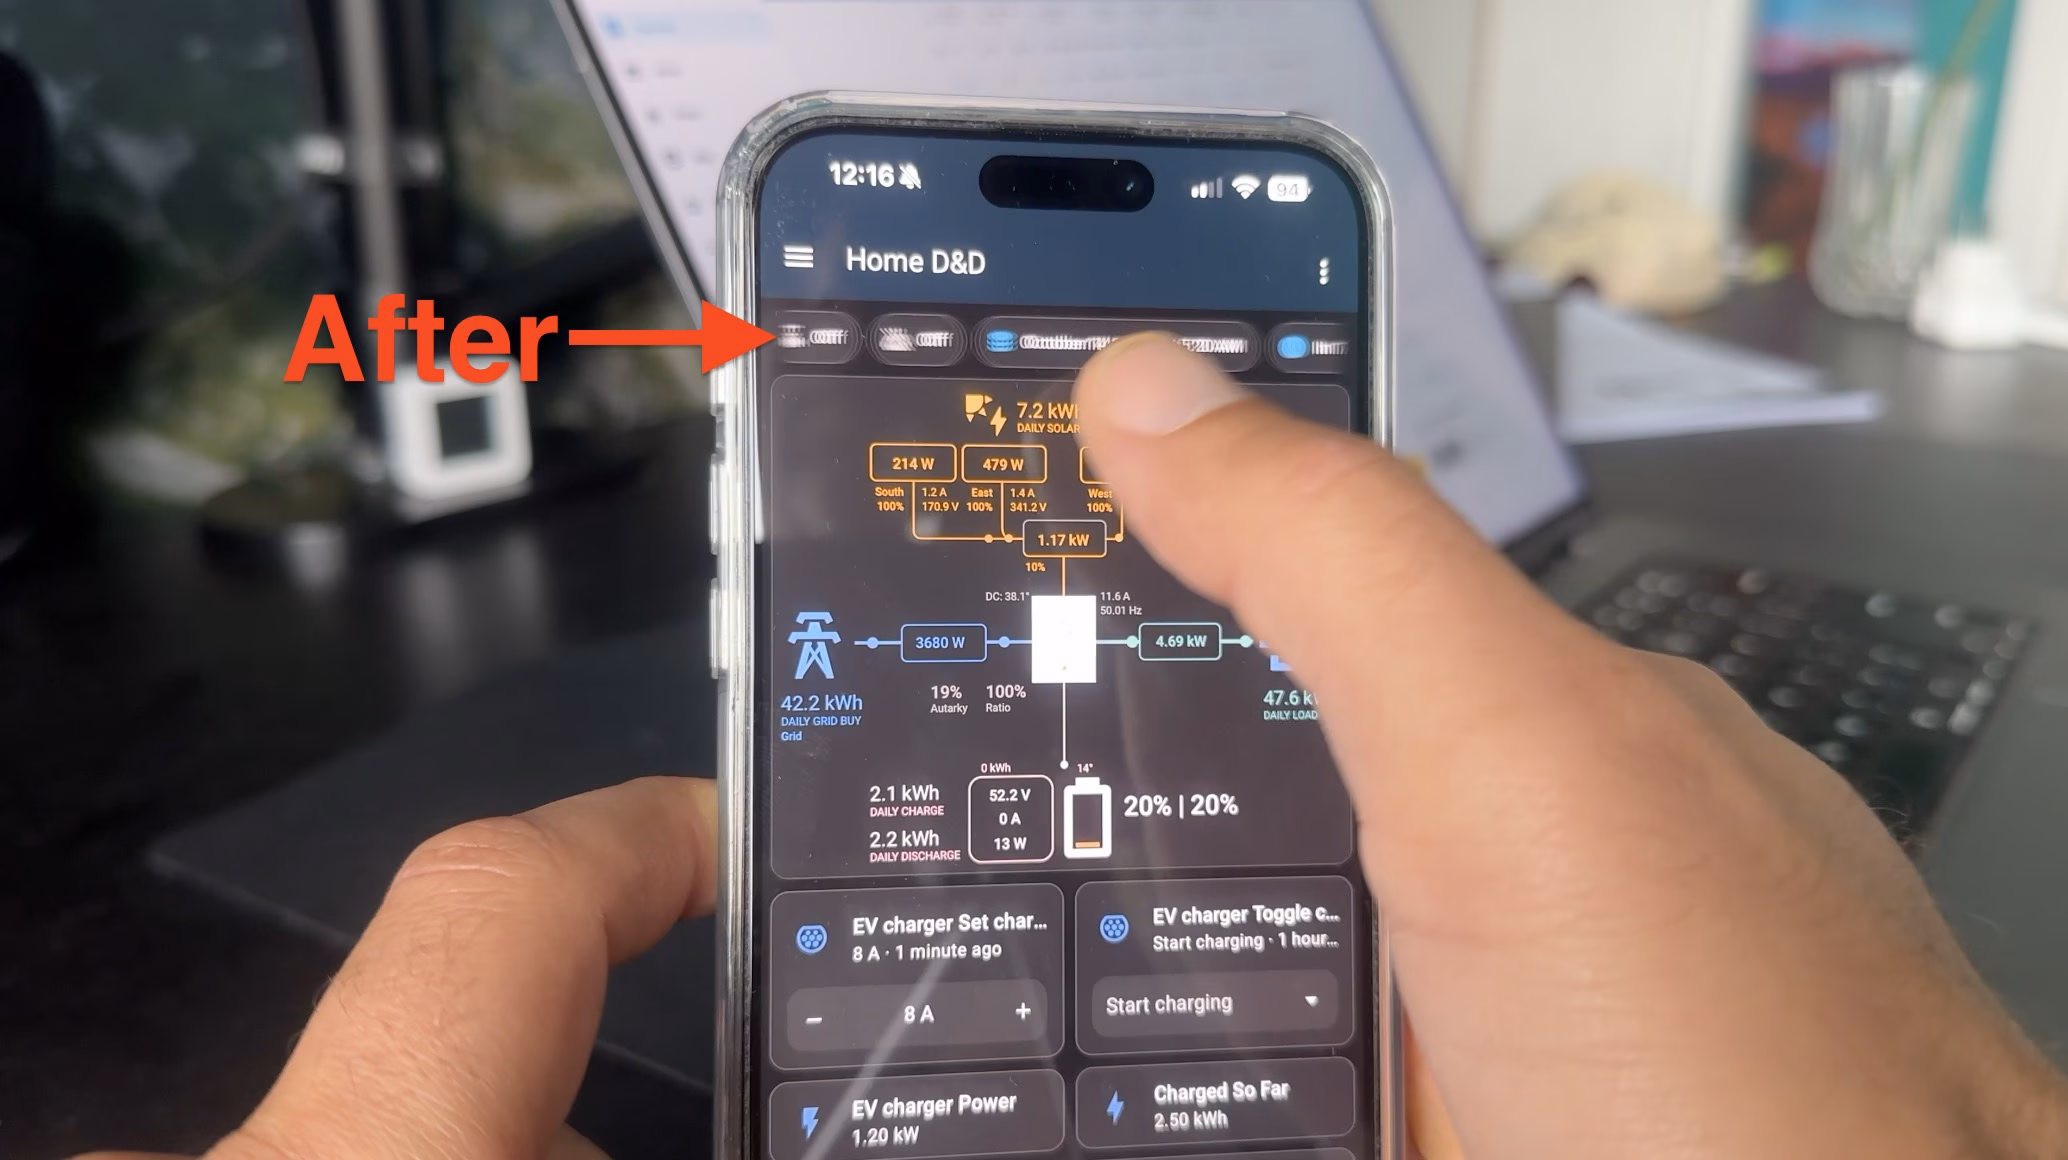
To make the switch:
- Click the three-dot menu on your dashboard and select Edit Dashboard.
- Click the pencil icon on the view tab you want to edit.
- In the View Settings, find the Badges section and change the presentation from Wrap to Scroll.
It’s a small tweak, but a huge win for usability and visibility. No more badge walls!
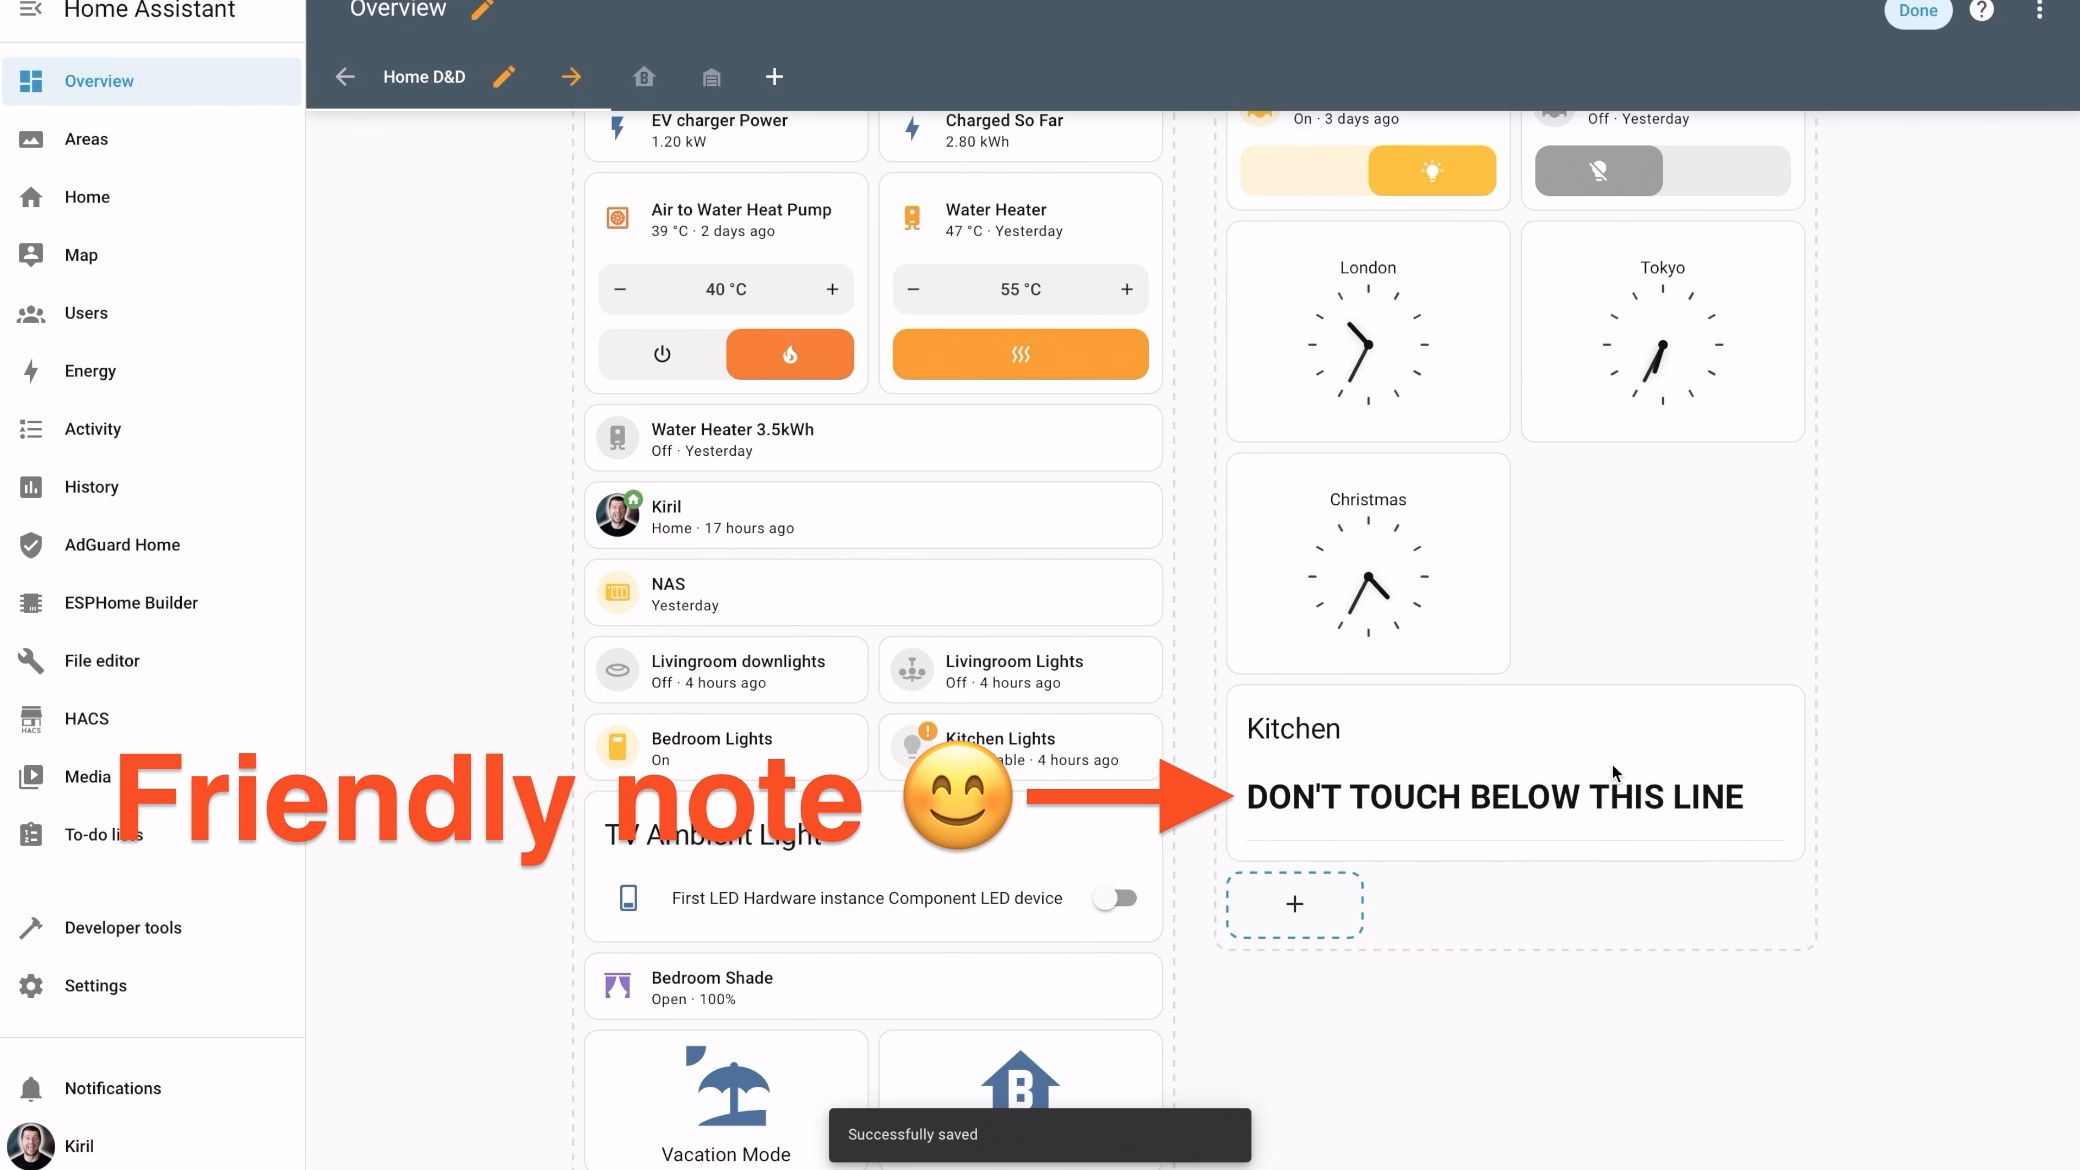
Tip #4: Organize Like a Pro with Markdown Cards
This next tip will make your dashboards feel more labeled and organized. You can use a Markdown Card to add section titles or quick notes directly to your dashboard. While the Heading card is similar, the Markdown Card is far more powerful. You can style your text, add links, insert images, and much more. There are tons of markdown cheatsheets online to help you get started.
Markdown cards are also a great way to leave little friendly “don’t touch below this line!” notes for your family members.
Tip #5: Zoom and Scroll Graphs with Ease
This one is a small but incredibly satisfying feature. Did you know you can zoom in and out of the history graphs on your dashboard?
- Double-click on any graph to quickly zoom in and out.
- For more precision, hold
Ctrl(orCmdon a Mac) and drag your mouse to select the exact range you want to inspect.
This is perfect for tracking down the exact moment of a temperature spike or analyzing your energy usage. Once you try it, you’ll wonder how you ever lived without it. Now, if only we could zoom out of our electricity bills that way!
Tip #6: Clean Up Your Dashboard with the Visibility tab or Entity Filter Card
Ever wish your dashboard could automatically hide stuff that’s off, closed, or unavailable? That’s exactly what the or visibility tab or Entity Filter card does.
You can configure simple or complex conditions to declutter your view. For example, you can set it to hide all devices that have lost their connection (usually showing an “unknown” or “unavailable” state).
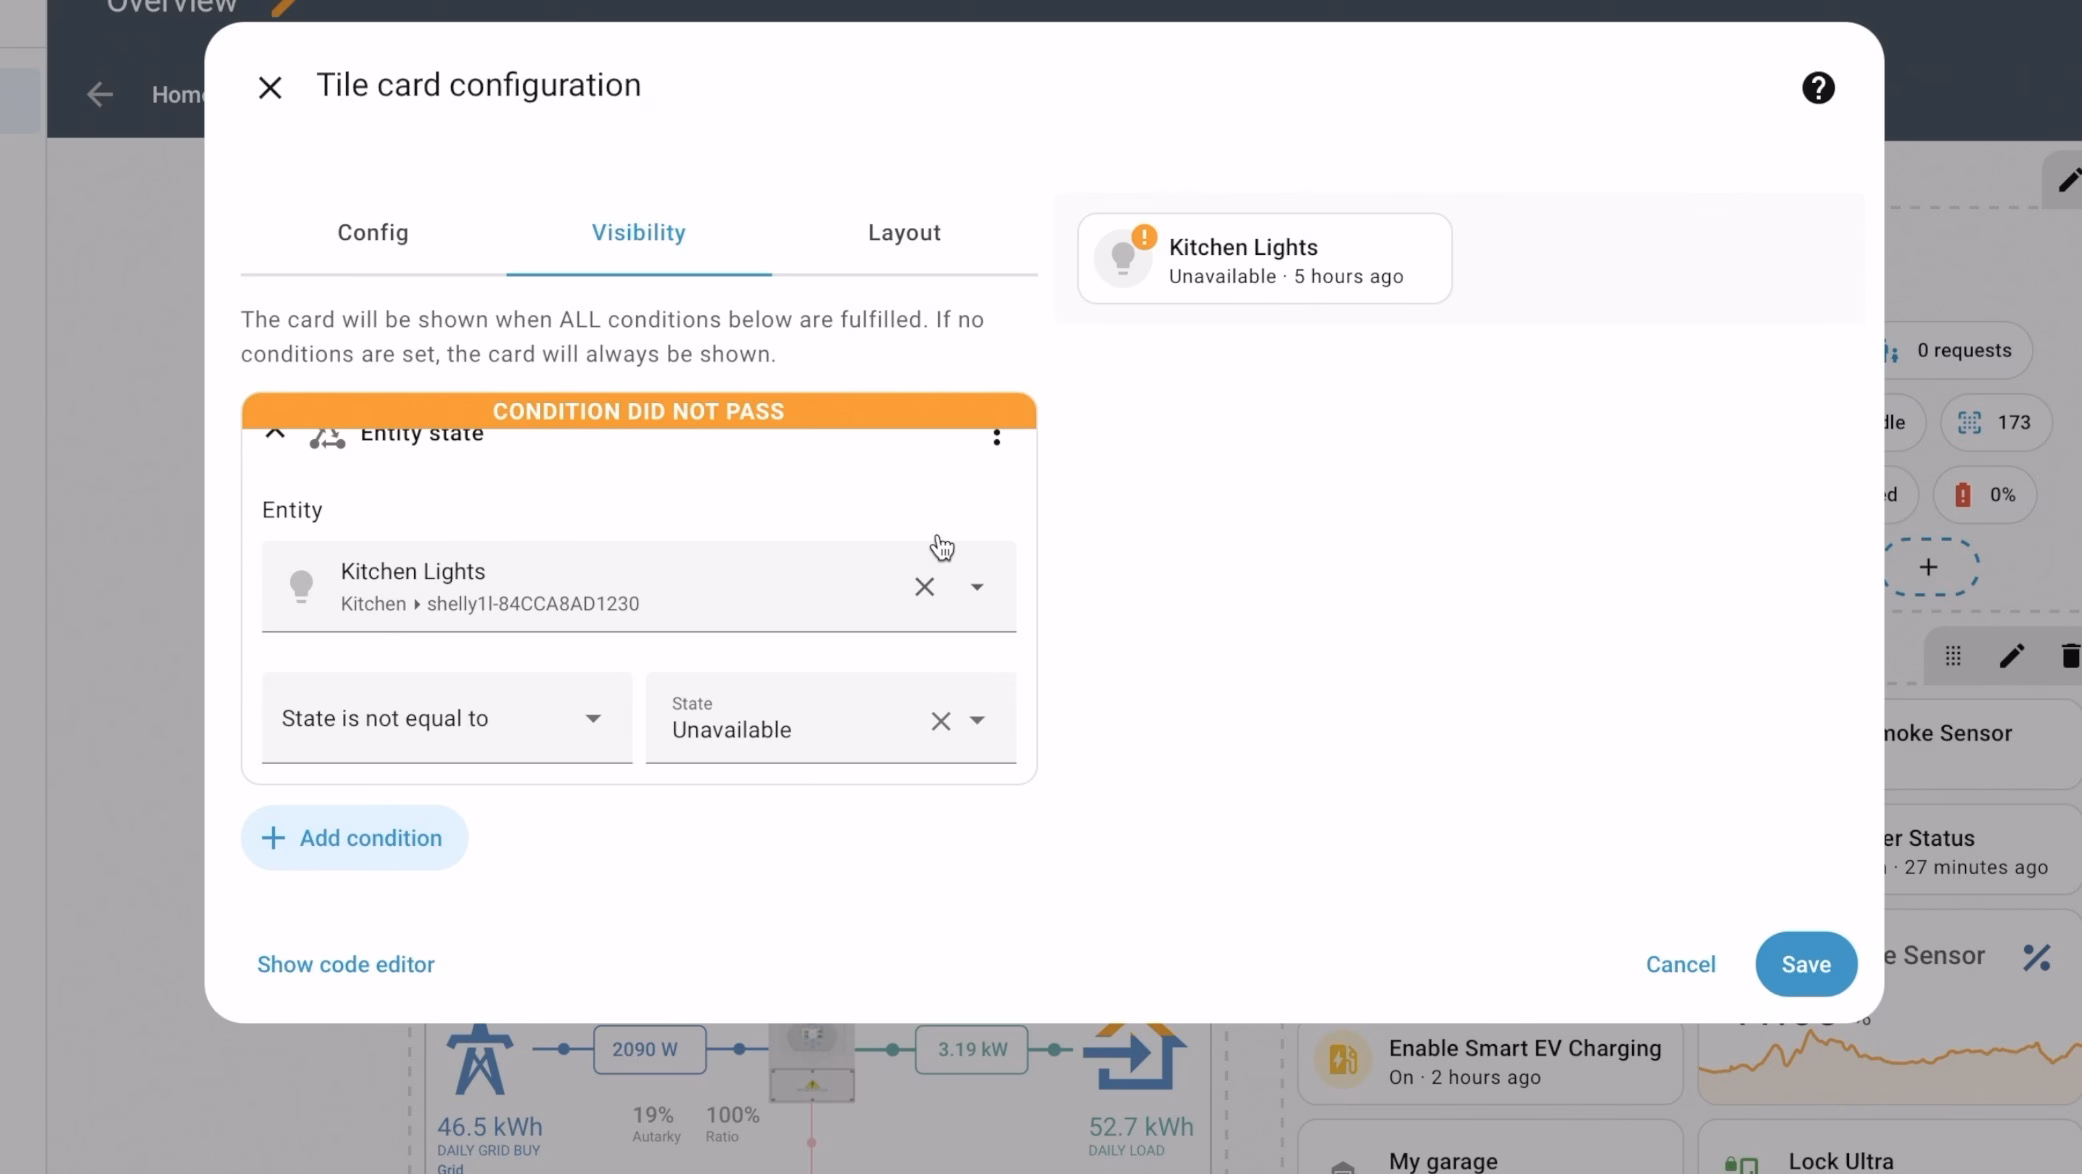
Everything that isn’t working because you manually unplugged it just disappears, leaving your dashboard looking pretty and free of ugly errors. Once you plug those devices back in, they will reappear automatically. It’s like giving your dashboard a bit of common sense.
Tip #7: Edit Your Sidebar in a Snap
This next tip is like a hidden easter egg. You can, of course, reorder or hide items from your sidebar by going into your Home Assistant user profile. But there’s a much faster way.
Simply click and hold your mouse button on the sidebar header for a moment, then release it. This will instantly activate the edit mode. See it again: click, hold, release. If your sidebar has been a mess, this is your moment to clean it up.
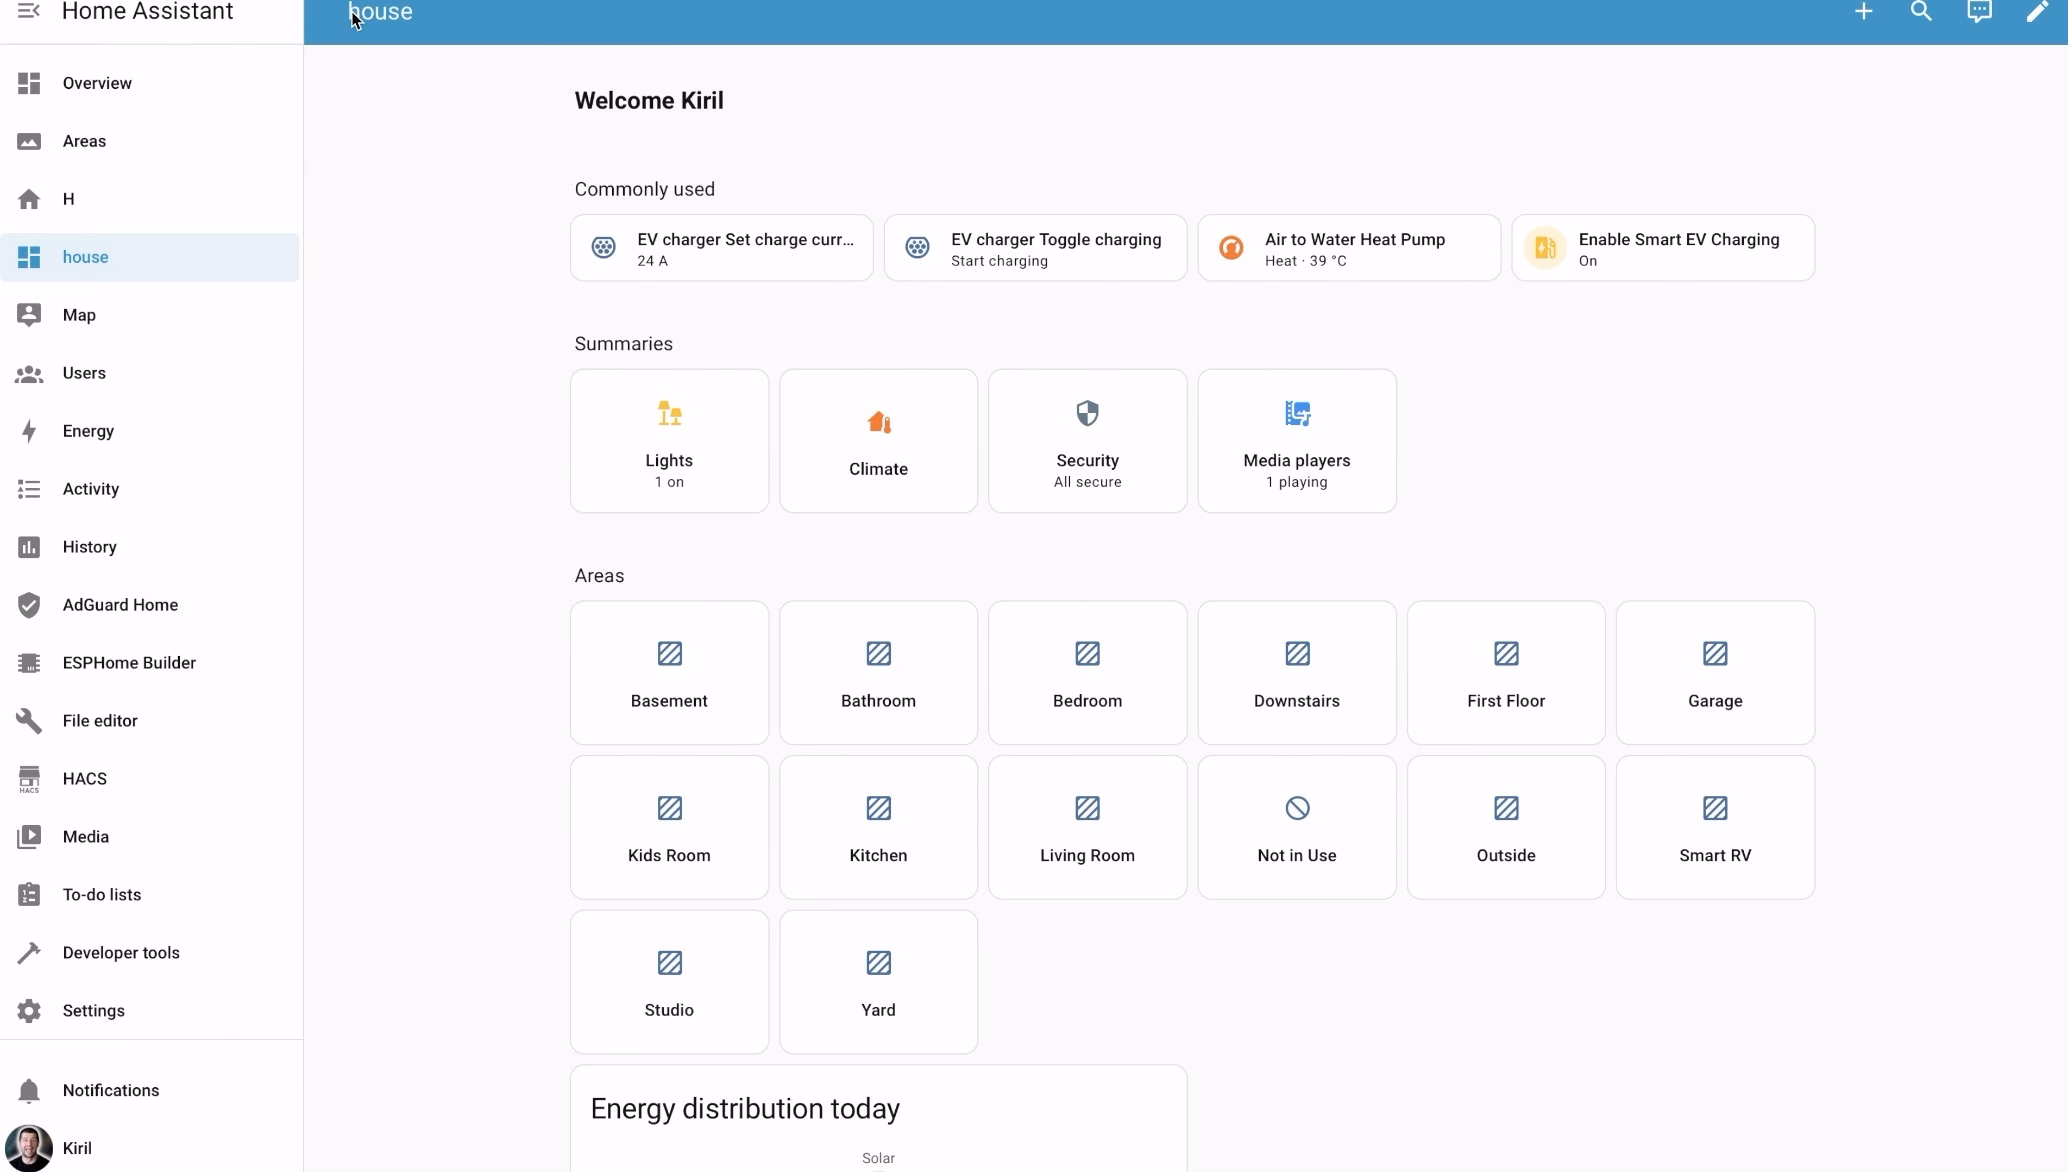
Tip #8: Create a Polished, App-Like Dashboard
This next tip reminds me of a story. A subscriber, let’s call him Bob, told me he was proud of his Home Assistant setup, but his wife hated it because it was just one giant, endless page of scrolling. I shared this trick with him, and he later messaged me saying, “It’s finally wife-approved!”
What I showed him was the new experimental Home Dashboard. To try it:
- Press
Cto open the command palette and typeDashboards, then select it. (Alternatively, navigate to Settings > System > Dashboards). - Click Add Dashboard.
- Select the Home dashboard type.
- Give it a meaningful title and click Create.
Boom! All of your devices are now automatically sorted into commonly used sections, summaries, and areas. It creates a super-clean dashboard that feels like a professional, polished app and is so much easier to navigate.
We are about halfway through our list! If you like what you’ve seen so far, be sure to visit and subscribe to my YouTube channel at https://youtube.com/@kpeyanski. I’m trying to hit 100k subscribers before I’m too old to read my own automations!
Now, let’s move from the dashboard to the powerhouse of Home Assistant: the Automation Editor.
Automation Editor Home Assistant Tips & Tricks
The following tips work in the Automation, Script, and Scene editors.
Tip #9: Paste YAML Directly into the Automation Editor
Have you ever found a cool automation online but it was only available in YAML format? Don’t worry about manually recreating it. You can paste YAML code straight into the visual automation editor, and Home Assistant will automatically convert it into UI blocks. Just copy the YAML, go to the Automation editor and paste your code with control + v or command + v. Done!
Tip #10: Resizable Sidebar in Automation Editor
Ever been stuck editing a long script or a chunk of YAML in that tiny sidebar? From a very recent update, you can now resize it! Just hover your mouse over the edge of the sidebar, and when the cursor changes, click and drag it to your desired width. This makes working with complex automations way less frustrating.
Tip #11: CTRL+V to Paste Blocks in the Automation Editor
This is a true power move for editing automations. We’ve been able to copy and cut blocks for a while, but pasting was tricky. Now, it’s super intuitive.
- Click on any trigger, condition, or action block to select it.
- Press
CTRL+C(orCmd+Con a Mac) to copy it. - Click on any other block in your automation.
- Press
CTRL+V(orCmd+V) to paste the copied block right underneath.
Reusing and reorganizing parts of your automations has never been faster.
Tip #12: Undo / Redo in the Automation Editor
You know that heart-stopping moment when you delete a huge chunk of your automation by mistake? Fear no more! The Automation Editor now has Undo and Redo functionality, allowing you to go back and forth up to 75 steps.
Just use the standard keyboard shortcuts you already know:
- Undo:
Ctrl+Z - Redo:
Ctrl+Y
Yes, Home Assistant finally caught up to Microsoft Word—and we love it, don’t we?
Tip #13: Show Entity IDs (or Don’t!)
For better or for worse, you might have noticed that entity IDs are no longer visible in the entity pickers by default. This is an intentional design choice, as the Home Assistant UI has become clean enough that you often don’t need them.
However, if you’re a power user and still prefer to see them, you can easily re-enable them. Just go to your user profile settings and enable the toggle for Display entity IDs in picker. The choice is yours.
System Home Assistant Tips & Tricks
Tip #14: Get Deeper Storage Insights
Ever wondered what’s eating up all your Home Assistant disk space? Now you can find out easily. Home Assistant provides detailed storage metrics right in the system settings.
Navigate to Settings → System → Storage (or just press C and type “Storage” – tip #1 remember?). Here, you’ll see exactly what’s using up your space. It’s super handy for managing long-term data recording. Spoiler: it’s probably your camera recordings.
Tip #15: Discover What Home Assistant is Discovering
This last tip is a bit geeky but fascinating. You probably know that Home Assistant constantly scans your network using protocols like DHCP, mDNS, and UPnP to automatically discover new smart devices.
But did you know you can see what it’s discovering in real-time? Go to Settings → System → Network (or just press C and type “Network”), scroll down to the Network Discovery section, and you can browse everything that Home Assistant is detecting on your network. It’s a great way to troubleshoot discovery issues or just geek out at what’s happening behind the scenes.
Challenge for you!
Before we get to the bonus, here’s a little challenge for you: if you already knew all the Home Assistant tips and tricks I shared, that’s seriously impressive! But if you learned even one new thing, please consider subscribing to my YouTube channel at https://youtube.com/@kpeyanski. Help me reach that 100k subscriber goal!
Bonus Tip: Unlock the Language of Smart Homes with Our Glossary!
Did you know we have a Smart Home Glossary? It’s a comprehensive PDF packed with Home Assistant terms, industry words, and acronyms, all explained in simple, easy-to-understand language.
You can look up what IoT means, the difference between a device and an entity, and so much more.
You can get this PDF for free! Here’s how:
- Visit our glossary page at https://automatelike.pro/glossary.
- Enter your name and email address in the form.
- You’ll receive a confirmation email—this helps us ensure you’re a real person.
- Once you confirm, the PDF will be sent straight to your device.
By signing up, you’ll also join my free newsletter where we can become digital friends! And don’t worry, if you don’t find it valuable, you can unsubscribe anytime with a single click.
Now, check my home assistant category for more insights
Thanks for publishing this. I’m just getting started in H.A. and none of this makes sense to me – yet.
oh that is interesting at least shortcuts should work for you no matter that you are just getting started