Controlling your Windows, Linux, or Mac computer has never been easier, thanks to the powerful TRIGGERcmd integration with Home Assistant. With just a few clicks or a simple automation, you can make your computer do almost anything you want—whether it’s opening an application, running a script, or even shutting it down remotely.
This article will guide you through the process of setting up TRIGGERcmd on your computer and integrating it with Home Assistant. By the end of this guide, you’ll have a fully functional setup that can control your computer remotely with ease.
And the best part? You can use the TRIGGERcmd integration for free! There are some fair limitations—such as only controlling one computer and sending one remote command per minute—but for many users, this will be more than enough. If you want more flexibility, there’s an affordable subscription option at less than $20 per year, which allows for multiple computers and more frequent commands.
This article is not sponsored or affiliated with TRIGGERcmd in any way. I just genuinely love the service and wanted to share my experience with you. Now, let’s dive into how to control your computers using TRIGGERcmd and Home Assistant!
Table of Contents
Don’t Want to Read Anymore?
I know some of you prefer watching videos over reading text, so I’ve created a video tutorial that walks you through this entire process step by step. You can find the video below
Enhancing Your Smart Home Knowledge: Free Smart Home Glossary
If some of the terms or concepts mentioned in this article are unfamiliar to you, I’ve got a solution! I’ve created a Smart Home Glossary that explains all the key terms in simple language.
You can download the glossary for free by visiting automatelike.pro/glossary. It’s packed with clear definitions for everything from basic smart home tech to advanced integrations. If you’re serious about building a smart home, this glossary is a must-have.
Setting Up TRIGGERcmd
Step 1: Creating a TRIGGERcmd Account
To get started, you’ll first need to create a TRIGGERcmd account. This is straightforward:
- Visit the TRIGGERcmd Website: You can use the link here – https://www.triggercmd.com/user/auth/signup
- Sign Up: You can sign up with a Google account or manually enter your details (email and password).
- Access the Dashboard: Once you’ve signed up, you’ll be taken to the TRIGGERcmd dashboard. This is where you will manage your computers, commands, and settings.
Step 2: Download and Install the TRIGGERcmd Agent
Next, you need to install the TRIGGERcmd agent on your computer. This agent is the software that allows your computer to receive commands from TRIGGERcmd. Here’s how to do it:
- Download the Agent: Head over to the instructions page in your TRIGGERcmd dashboard. You’ll find links for different operating systems—Windows, Mac, Linux
- Install the Agent: Once downloaded, install the agent on your computer:
- For Windows, follow the installation wizard.
- For Mac, drag the application into your Applications folder.
- For Linux, follow the terminal instructions provided.
- Enter Your TRIGGERcmd Token: After the installation is complete, the agent will prompt you to enter your TRIGGERcmd token. This token links your computer to your TRIGGERcmd account. You’ll find this token on the instructions page of the TRIGGERcmd dashboard. Just copy it and paste it into the agent.
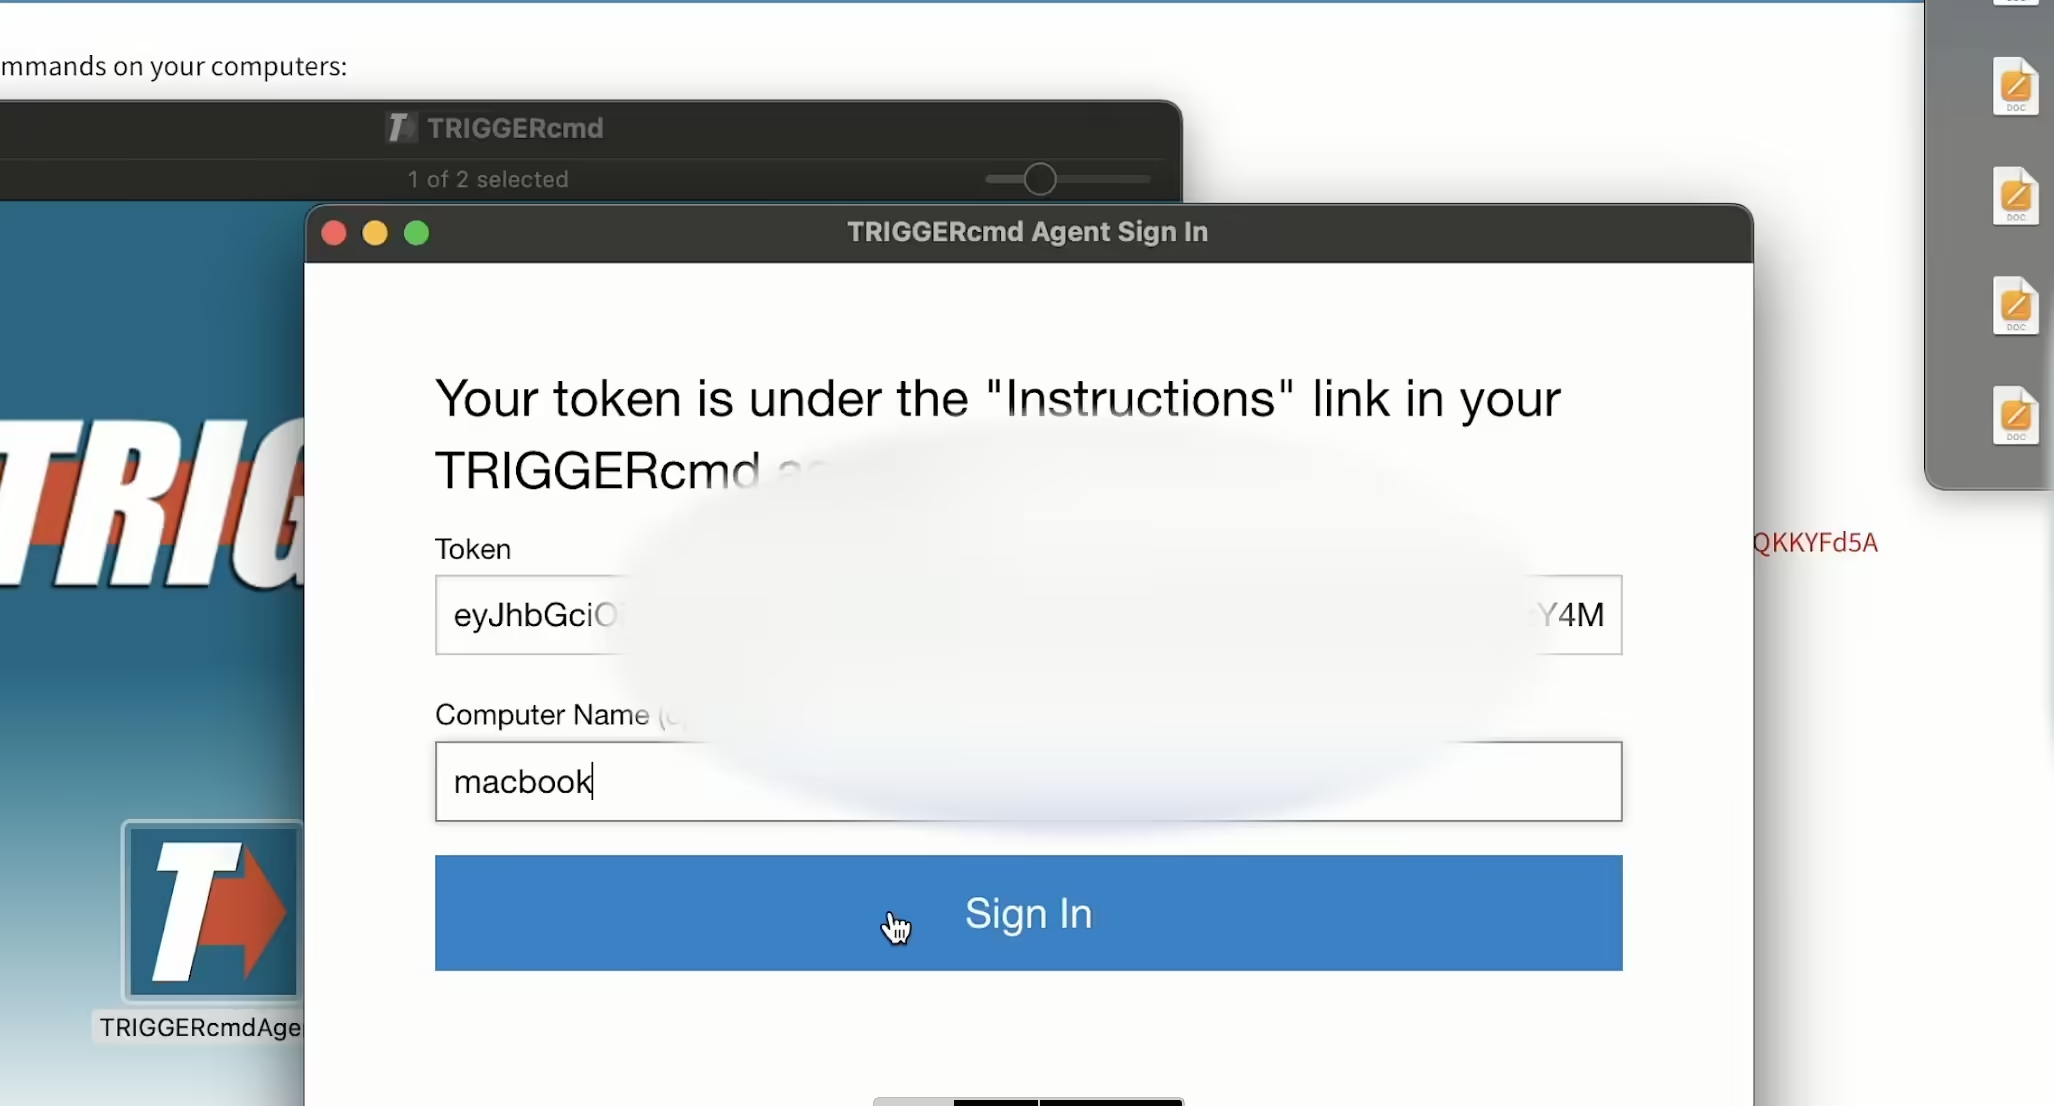
Now your computer is linked to your TRIGGERcmd account!
Step 3: Testing Basic Commands
Before diving into Home Assistant, let’s test if TRIGGERcmd is working properly on your computer. You can do this by sending a simple command to your computer, like opening the calculator app.
- Open the TRIGGERcmd Command Editor: TRIGGERcmd has both a text and graphical command editor. You can use either one to create commands.
- Create a Simple Command: For instance, if you’re on a Mac, type the command
open -a Calculator. If you’re on Windows, typecalc. This will open your calculator app. - Execute the Command: Once the command is set, press Run. Your calculator should open, confirming that the TRIGGERcmd agent is working.
TRIGGERcmd also provides a list of pre-configured commands that you can use right away. Some examples include:
- For Windows: Start Dropbox, lock PC, restart, shutdown, open Google Chrome.
- For Mac: Mute speakers, lock screen, start Calculator
- For Linux: Turn monitors on or off, restart, shutdown.
Step 4: Integrating TRIGGERcmd with Home Assistant
Now comes the fun part—integrating TRIGGERcmd with Home Assistant. This will allow you to control your computer from your Home Assistant dashboard or create automations that include commands to your computer.
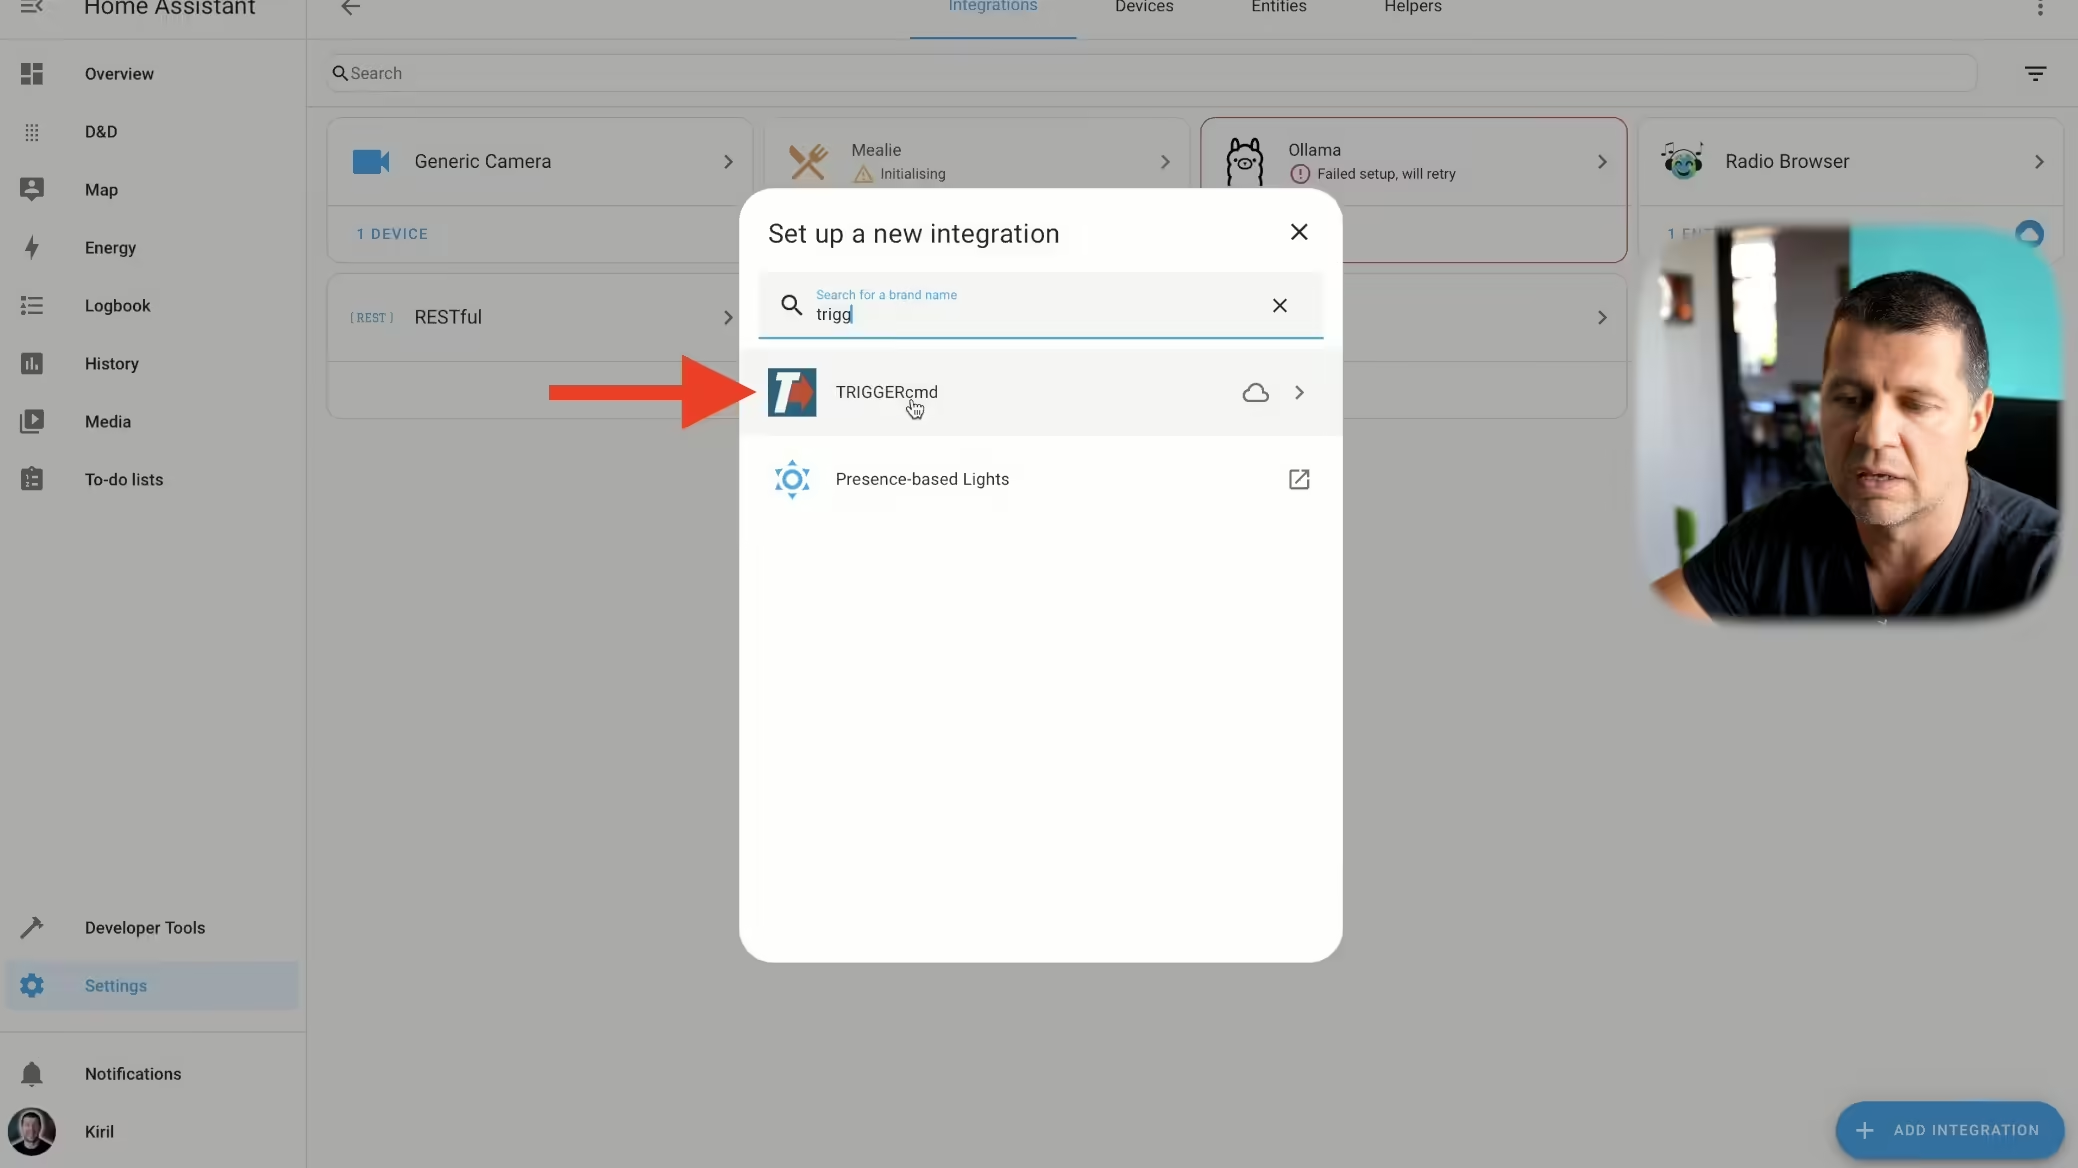
- Open Home Assistant: Ensure you’re using a version of Home Assistant that is 2024.10 or newer.
- Navigate to Integrations: In Home Assistant, press the “C” key to open the search bar. Type Integrations and select Navigate Integrations.
- Add TRIGGERcmd Integration: Click Add Integration and search for TRIGGERcmd. Once it appears, click on it.
- Enter Your Token: Home Assistant will ask for your TRIGGERcmd token. Copy it from your TRIGGERcmd dashboard (the same token you used earlier) and paste it into Home Assistant.
- Success!: After submitting the token, Home Assistant will confirm the integration. You’ll now be able to control your computer from the Home Assistant interface.
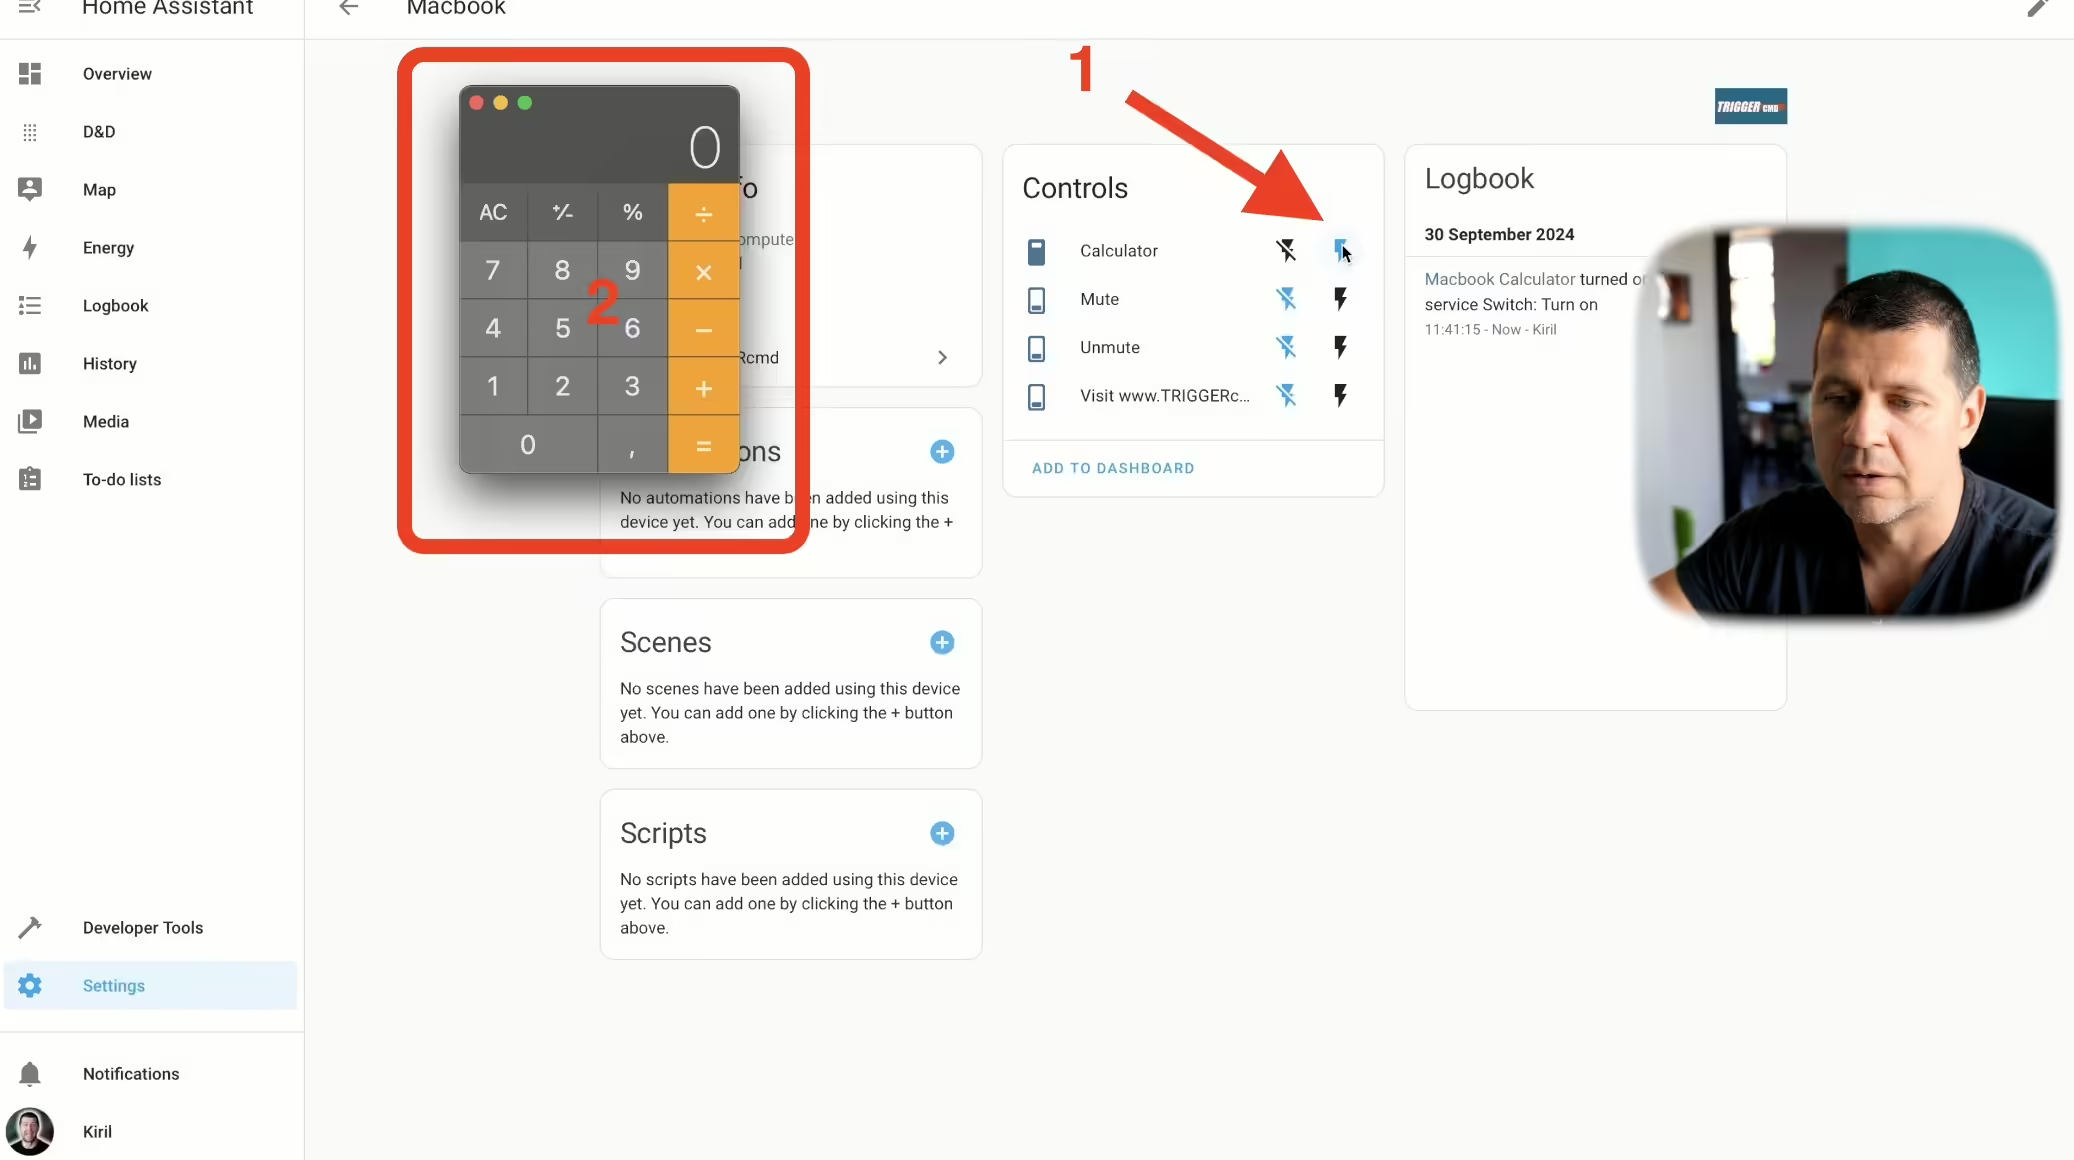
Step 5: Running Commands from Home Assistant
Once TRIGGERcmd is integrated, you can create automations and run commands directly from Home Assistant. You can start and stop apps, mute or unmute speakers, restart or shut down your computer, and more.
Let’s say you want to open the calculator app from Home Assistant, no problems
Looking for More Control? Check Out My Home Assistant Wake On LAN Guide!
One great complement to the TRIGGERcmd integration is setting up Wake On LAN in Home Assistant. This feature allows you to power on computers remotely, making it an essential tool for any home automation enthusiast.
To learn more about Wake On LAN, read my detailed article: Wake Devices Remotely Using Home Assistant and Wake On LAN
You’ll discover how to configure it, troubleshoot issues, and use it in your automations.
Using Voice Commands with Alexa and Google Assistant
If you have an Amazon Alexa or Google Assistant device, you can control your computer with your voice using TRIGGERcmd. For example, you could say, “Alexa, mute my computer,” or “Hey Google, open Chrome on my Mac.”
This adds even more convenience, especially if your hands are busy or you’re across the room.
TRIGGERcmd Free vs. Paid Version
As I said in the beginning, while TRIGGERcmd can be used for free, there are some limitations:
- You can only control one computer.
- You’re limited to one command per minute. This means that if you try to send multiple commands within 60 seconds, only the first one will work.
For many users, this is more than enough to get started. However, if you find these limitations too restrictive, you can upgrade to the paid version for less than $20 per year. The paid version allows:
- Control over multiple computers.
- Multiple commands per minute.
- Access to premium features like the AI script assistant.
Home Assistant Webinar: Learn More About Installing and Configuring Home Assistant
To further enhance your Home Assistant knowledge, I also host a free Home Assistant webinar where I discuss the pros and cons of different Home Assistant installation types. In this session, you’ll learn:
- Which installation type is best for you.
- Common pitfalls to avoid.
- How to optimize your setup for performance and reliability.
Interested? You can attend the webinar for free by clicking the link below or scanning the QR code:
REGISTRATION LINK: automatelike.pro/webinar
Summary
TRIGGERcmd is an incredibly powerful tool that allows you to control your computer remotely with Home Assistant. Whether you want to automate tasks, control your system from afar, or integrate it with voice assistants like Alexa and Google, TRIGGERcmd makes it easy.
For most users, the free version is a great way to start exploring the possibilities of remote computer control. However, if you want more flexibility, the paid version offers excellent value.
Now that you’ve learned how to control your computer with TRIGGERcmd, why not give it a try? Let me know in the comments how you plan to use TRIGGERcmd and what automations you’re setting up in your smart home!