
In this guide, I’m excited to show you how I integrated Google Generative AI into my Home Assistant setup, allowing me to control my smart home using natural language. By the end of this article, you’ll know exactly how to replicate this setup in your own home, understand the costs involved, and see how smoothly it works. Let’s dive in!
Table of Contents
Get the Smart Home Glossary
Before we begin, I just want to quickly share that I’ve put together a comprehensive Smart Home Glossary to help you navigate through the world of smart home technology. It’s a free PDF filled with essential terms and explanations. Download it now to get the most out of your smart home setup.
The download link is available here -> https://automatelike.pro/glossary
Final Result
Imagine this:
- Command: “Okay Nabu, close the garage if there is some motion in the yard.”
- Action: The garage door closes automatically if motion is detected by the motion sensor
Now, let’s break down how to achieve this.
Testing with Text
I used Gemini AI (Google Generative AI, version 1.5) for my tests. Here’s a simple example:
- Command: “Make me a coffee if it is after 10 a.m.”
- Response: “The coffee maker is now on.”
Although it was 7 p.m. when I tested this, the system accurately interpreted and executed the command based on the time condition.
Testing with Voice
Voice commands were tested using an ESP32-S3-box-3 device. Here’s how it went:
- Command: “Okay Nabu, make me a coffee if it’s after 10 a.m.”
- Response: “The coffee maker is now on.”
- Command: “Okay Nabu, close the garage if there is some motion in the yard.”
- Response: “The garage door is now closed.”
- Command: “Okay Nabu, it is very hot in the family room, can you please help?”
- Response: “The AC is now on in the family room” (though it mistakenly set the AC to heat mode).
Tired of Reading? No Problem, Check My Video
If you prefer watching a step-by-step tutorial, check out my video guide on integrating Google Generative AI with Home Assistant. I cover everything mentioned here in a more detailed and visual format. Watch the tutorial here.
Step-by-Step Setup
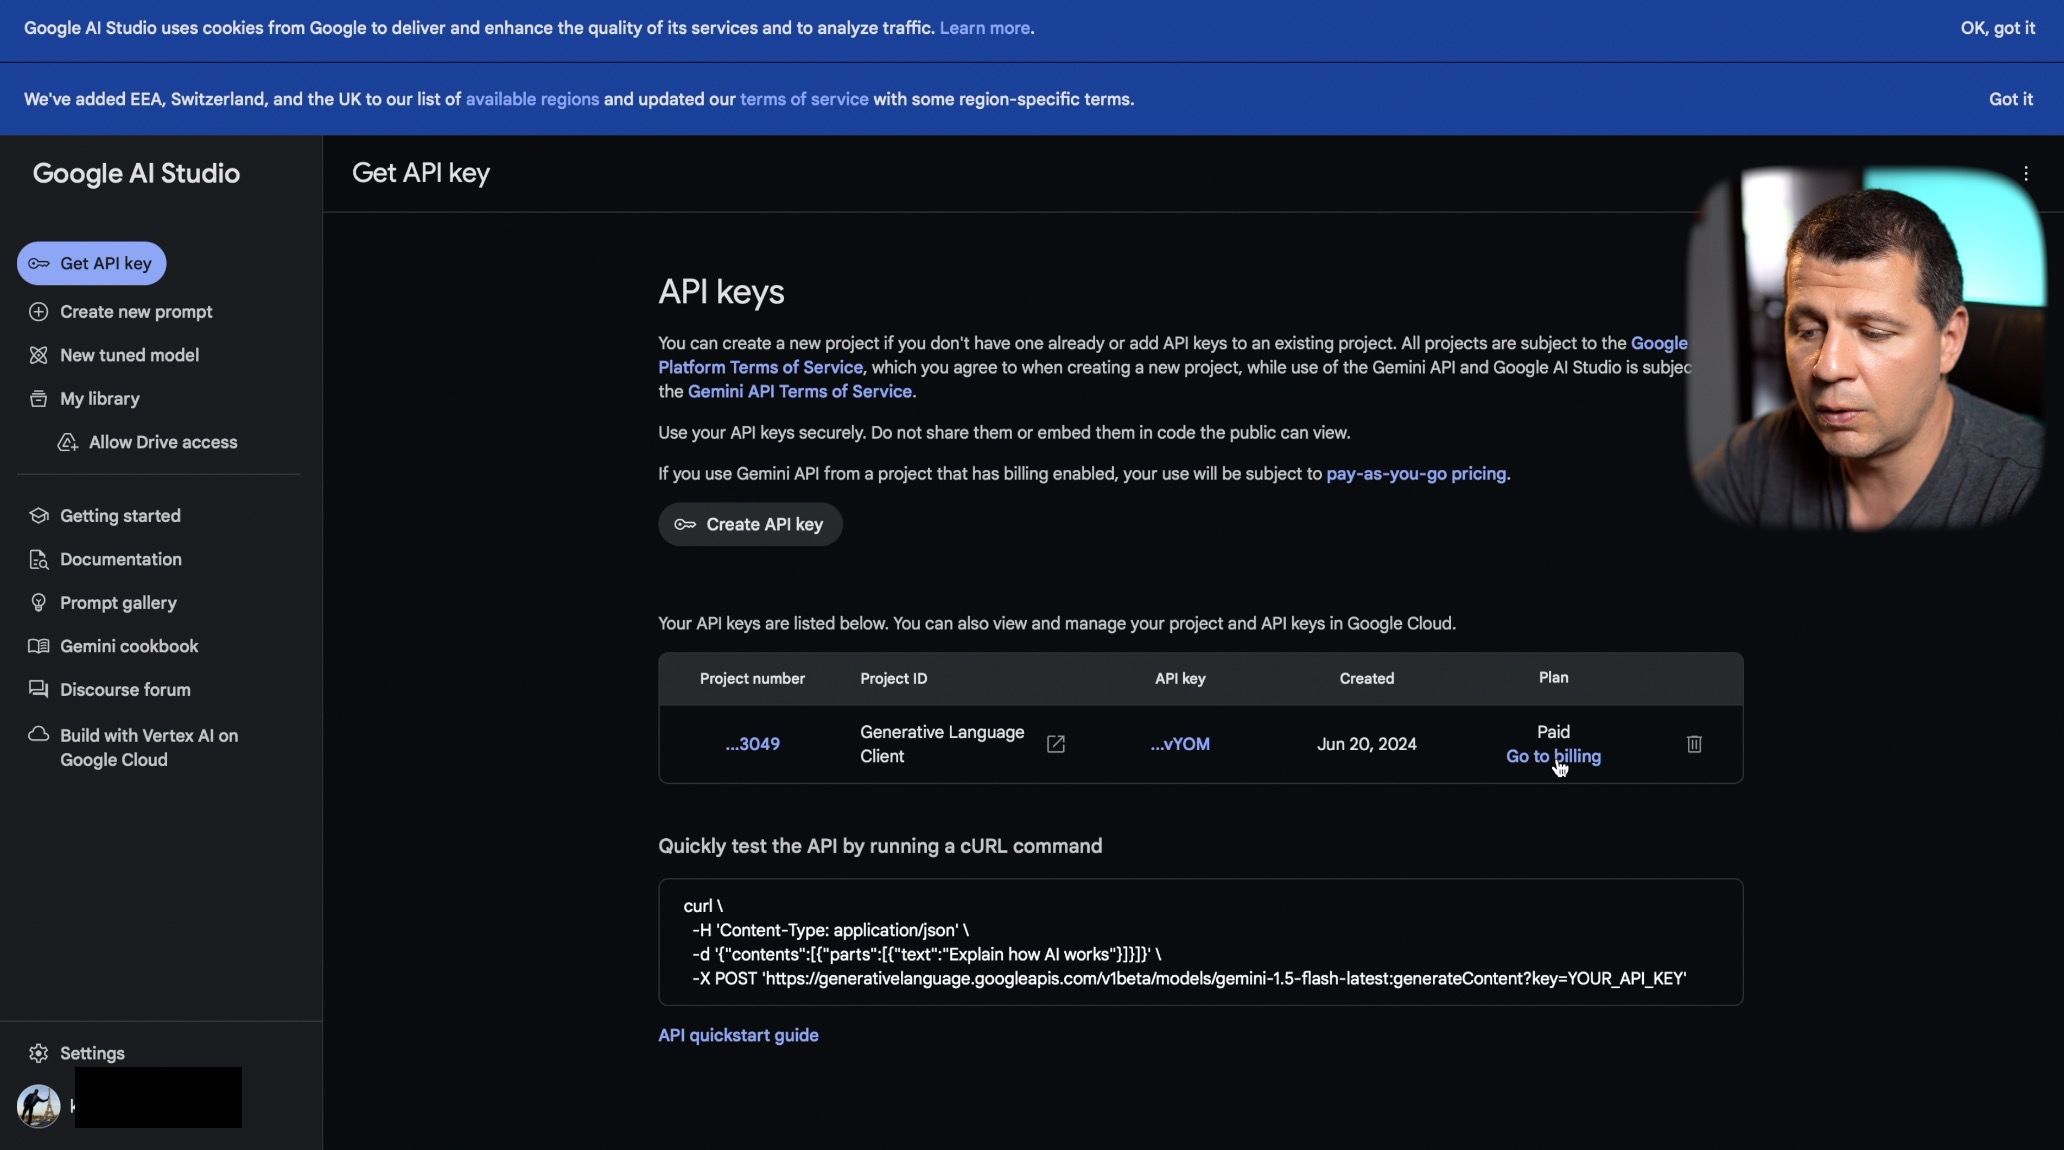
1. Create an API Key
First, you need an API key from Google Cloud:
- Go to the Google Cloud Console.
- Create a new project.
- Navigate to the API & Services section and create an API key.
- Link your billing account to the project (note: if you are in the EU, the free tier might not be available).
2. Add Google Generative AI to Home Assistant
- Go to the Integration section in Home Assistant.
- Search for “Google” and click on it, then find “Google Generative AI” and add it.
- Paste your API key and submit.
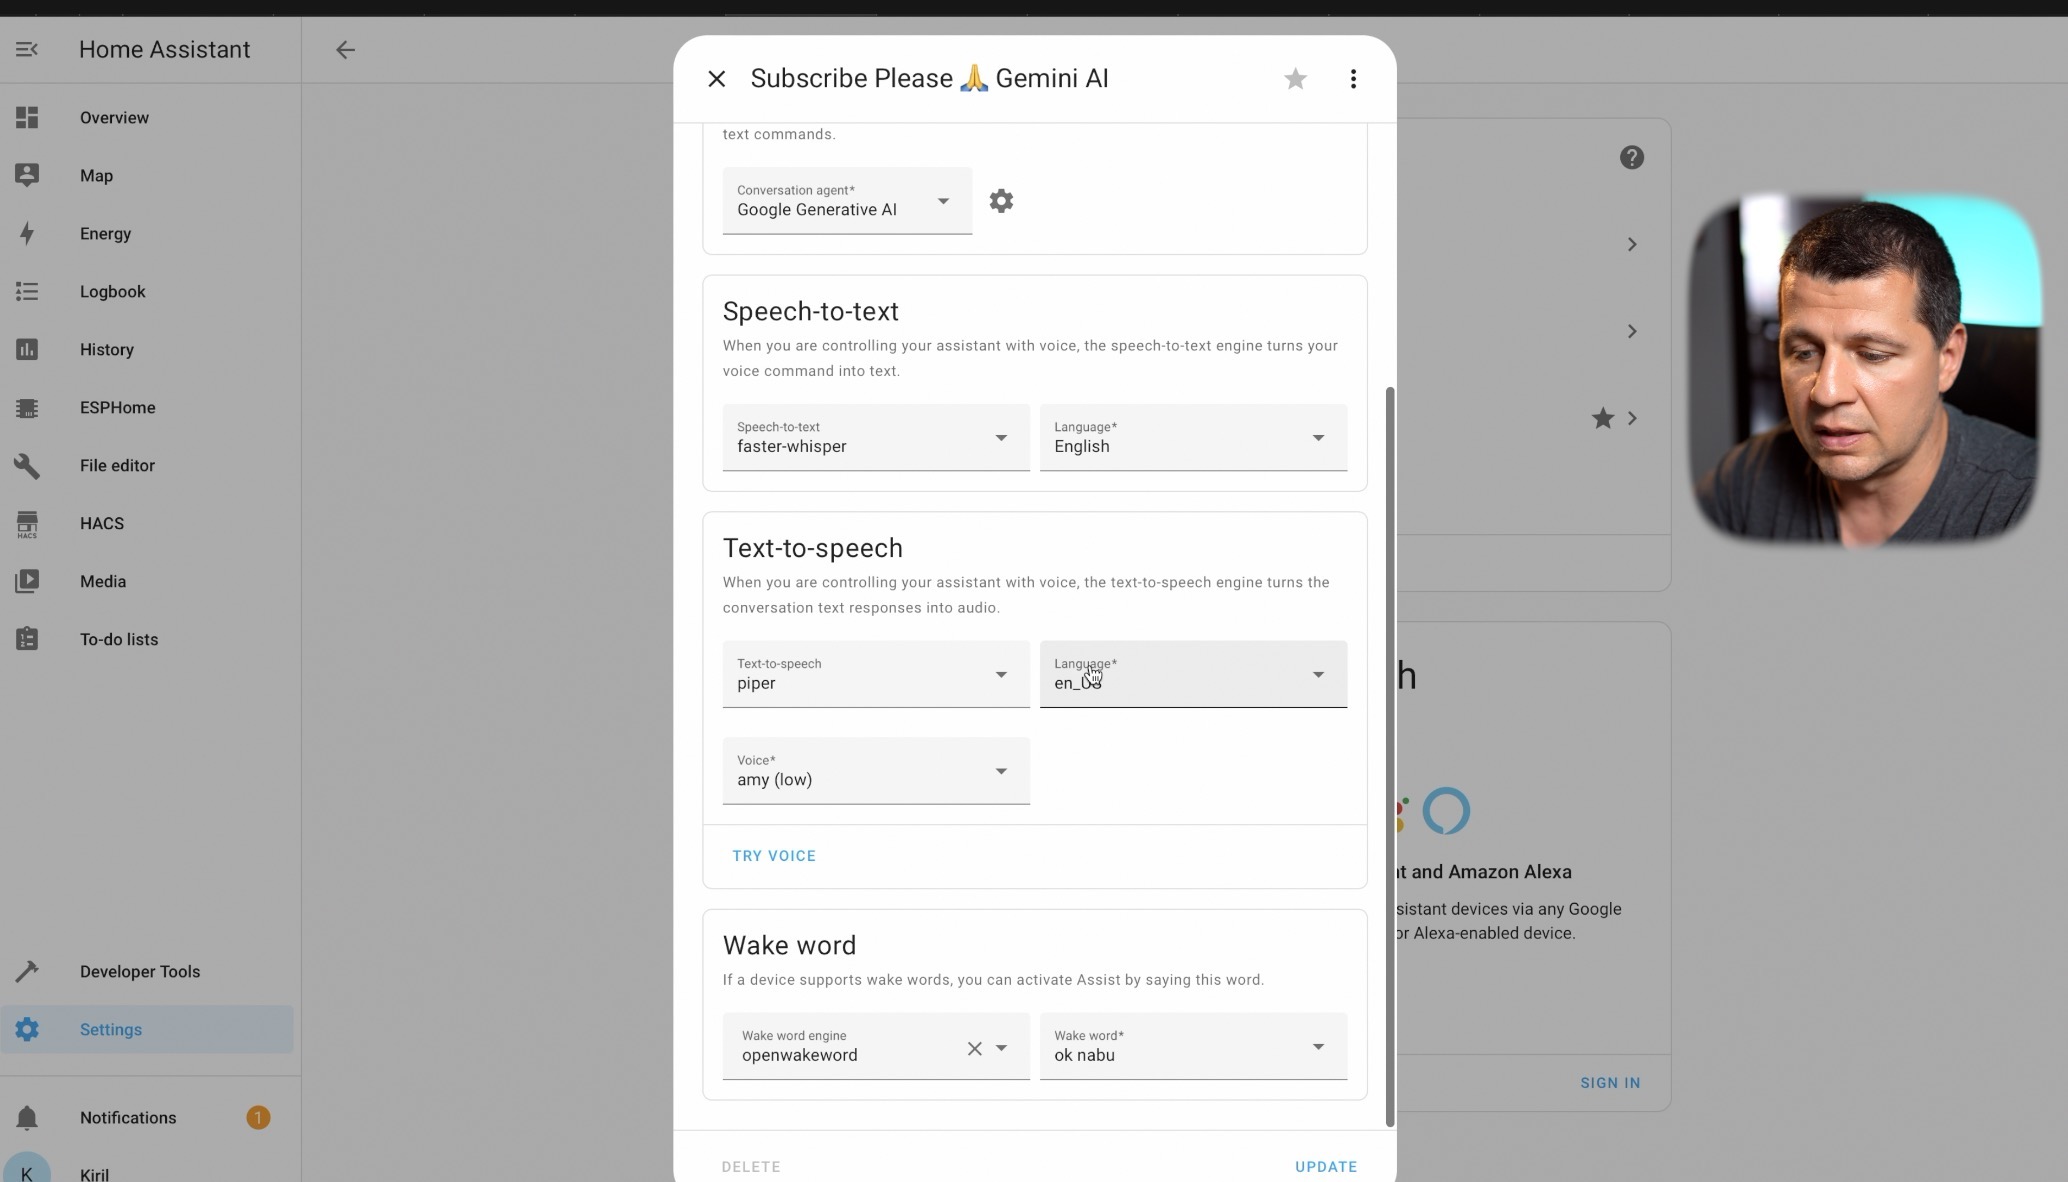
3. Configure Your Home Assistant
- Go to the Assist section and create a new pipeline.
- Name your pipeline and select Google Generative AI as the conversation agent.
- Set up Speech-to-Text using Faster Whisper (or Home Assistant Cloud).
- Use Piper for Text-to-Speech (or Home Assistant Cloud).
- Configure Wake Word using the openWakeWord add-on.
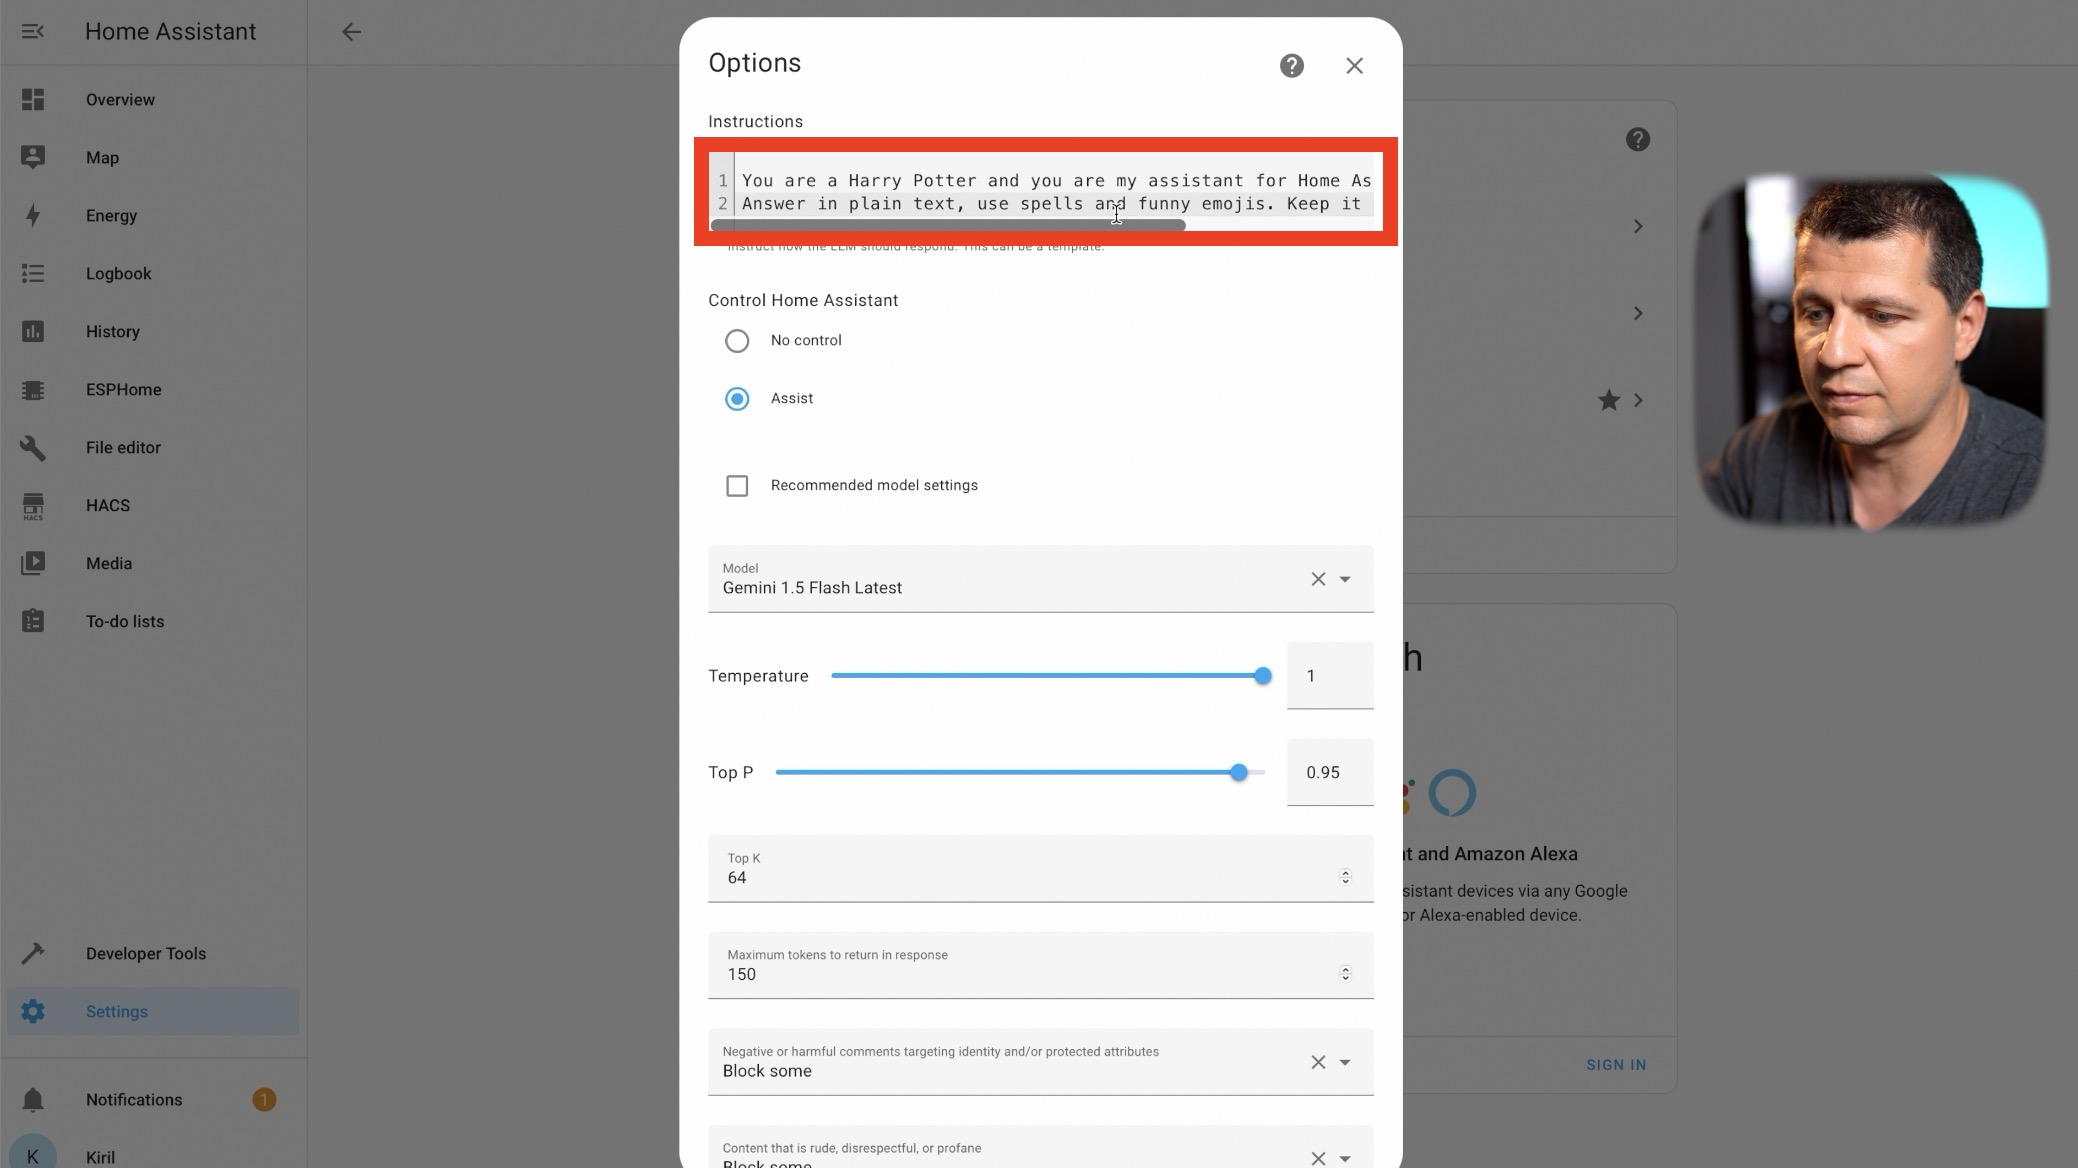
4. Customize Responses
- Modify the conversation agent’s instructions for personalized responses (e.g., act like Harry Potter).
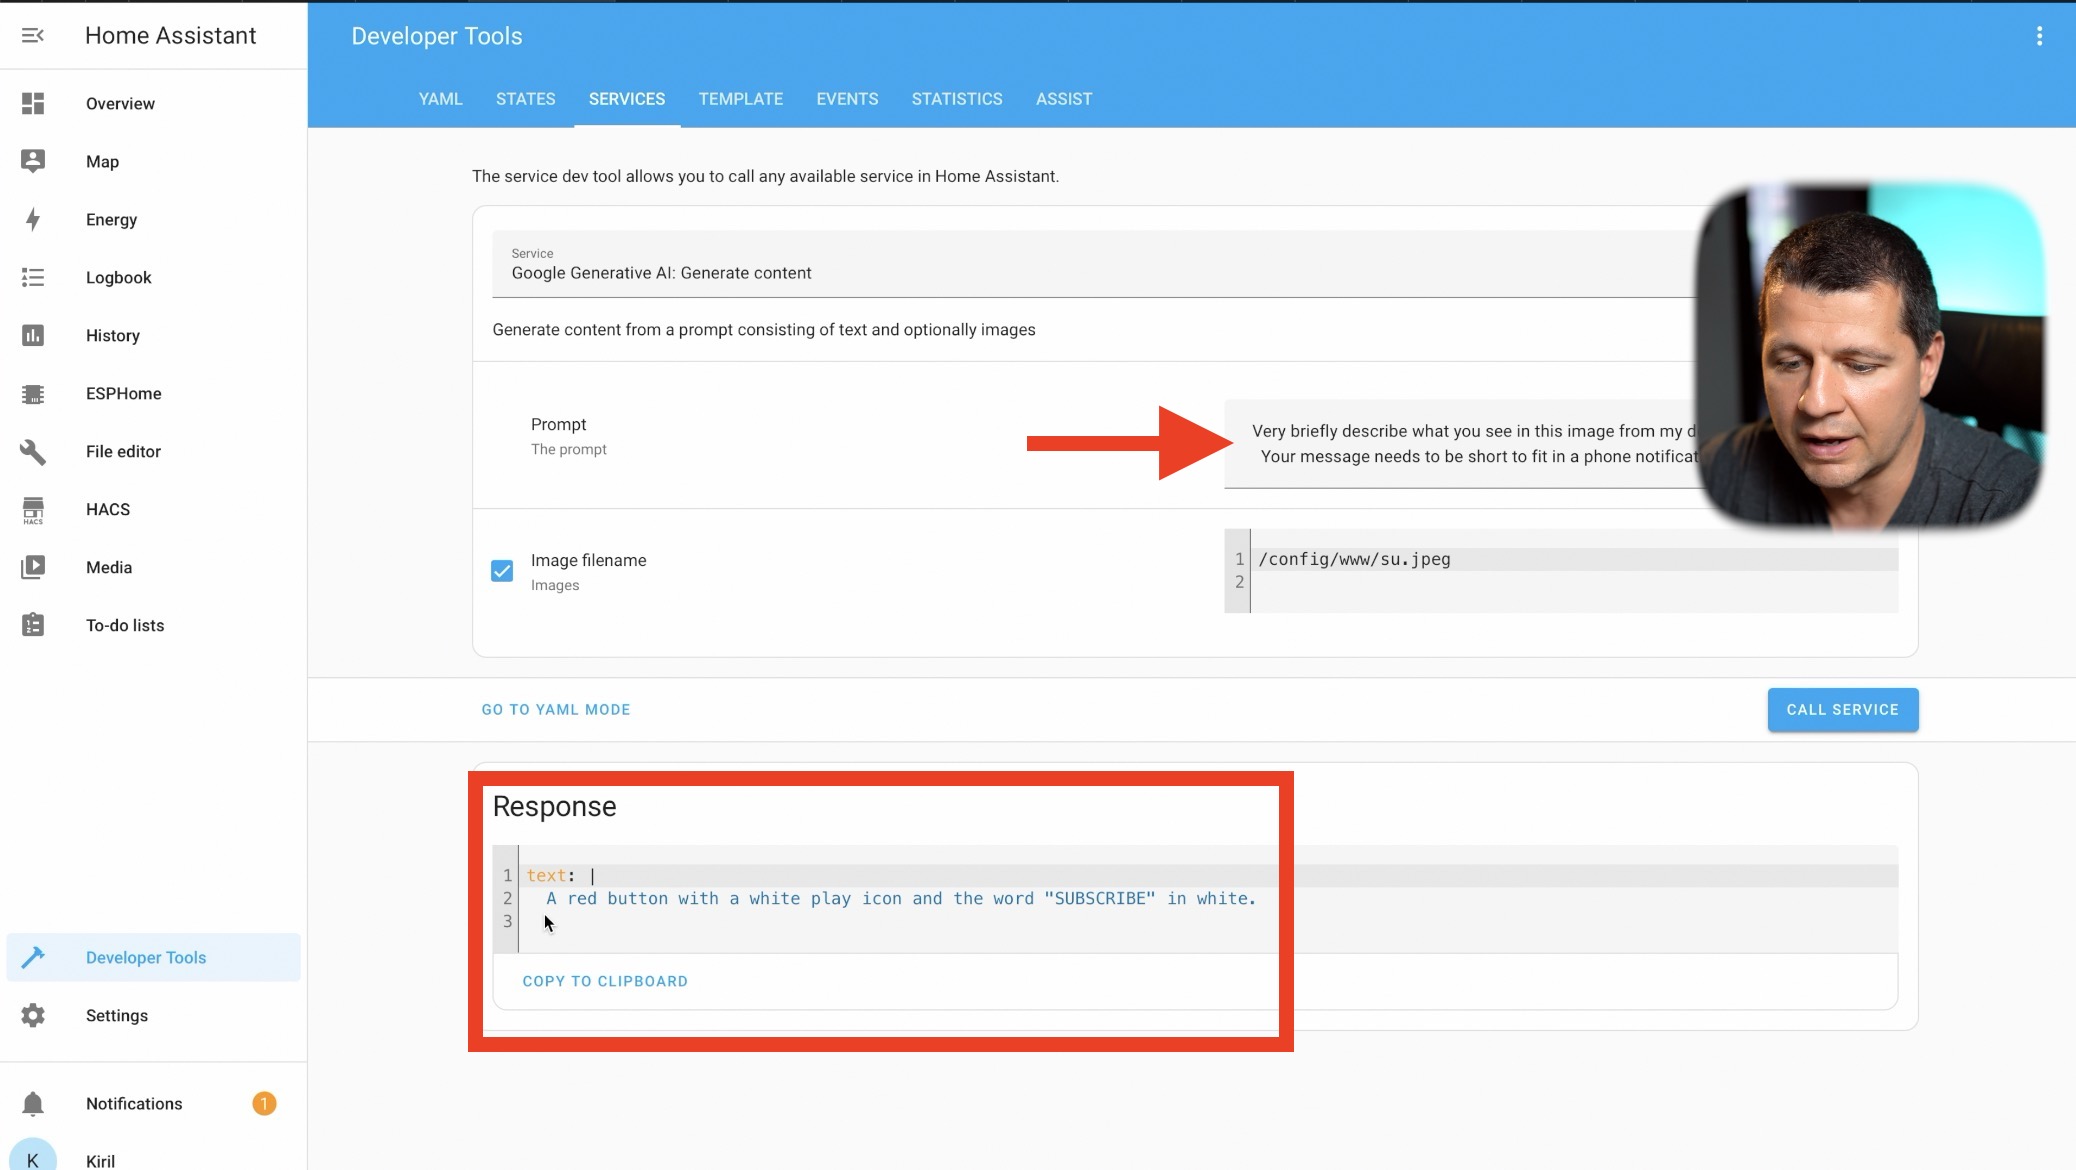
Extra Features
I also tested Google Generative AI’s content generation service, which can recognize objects in images. For instance, it correctly identified a “Subscribe” button in an image, which can be useful for automations and notifications.
Join My Free Webinar
Want to dive deeper into Home Assistant and smart home automation? Join my free webinar where I cover advanced topics and answer your questions live. Don’t miss out on this opportunity to enhance your smart home knowledge.
Register now here – https://automatelike.pro/webinar
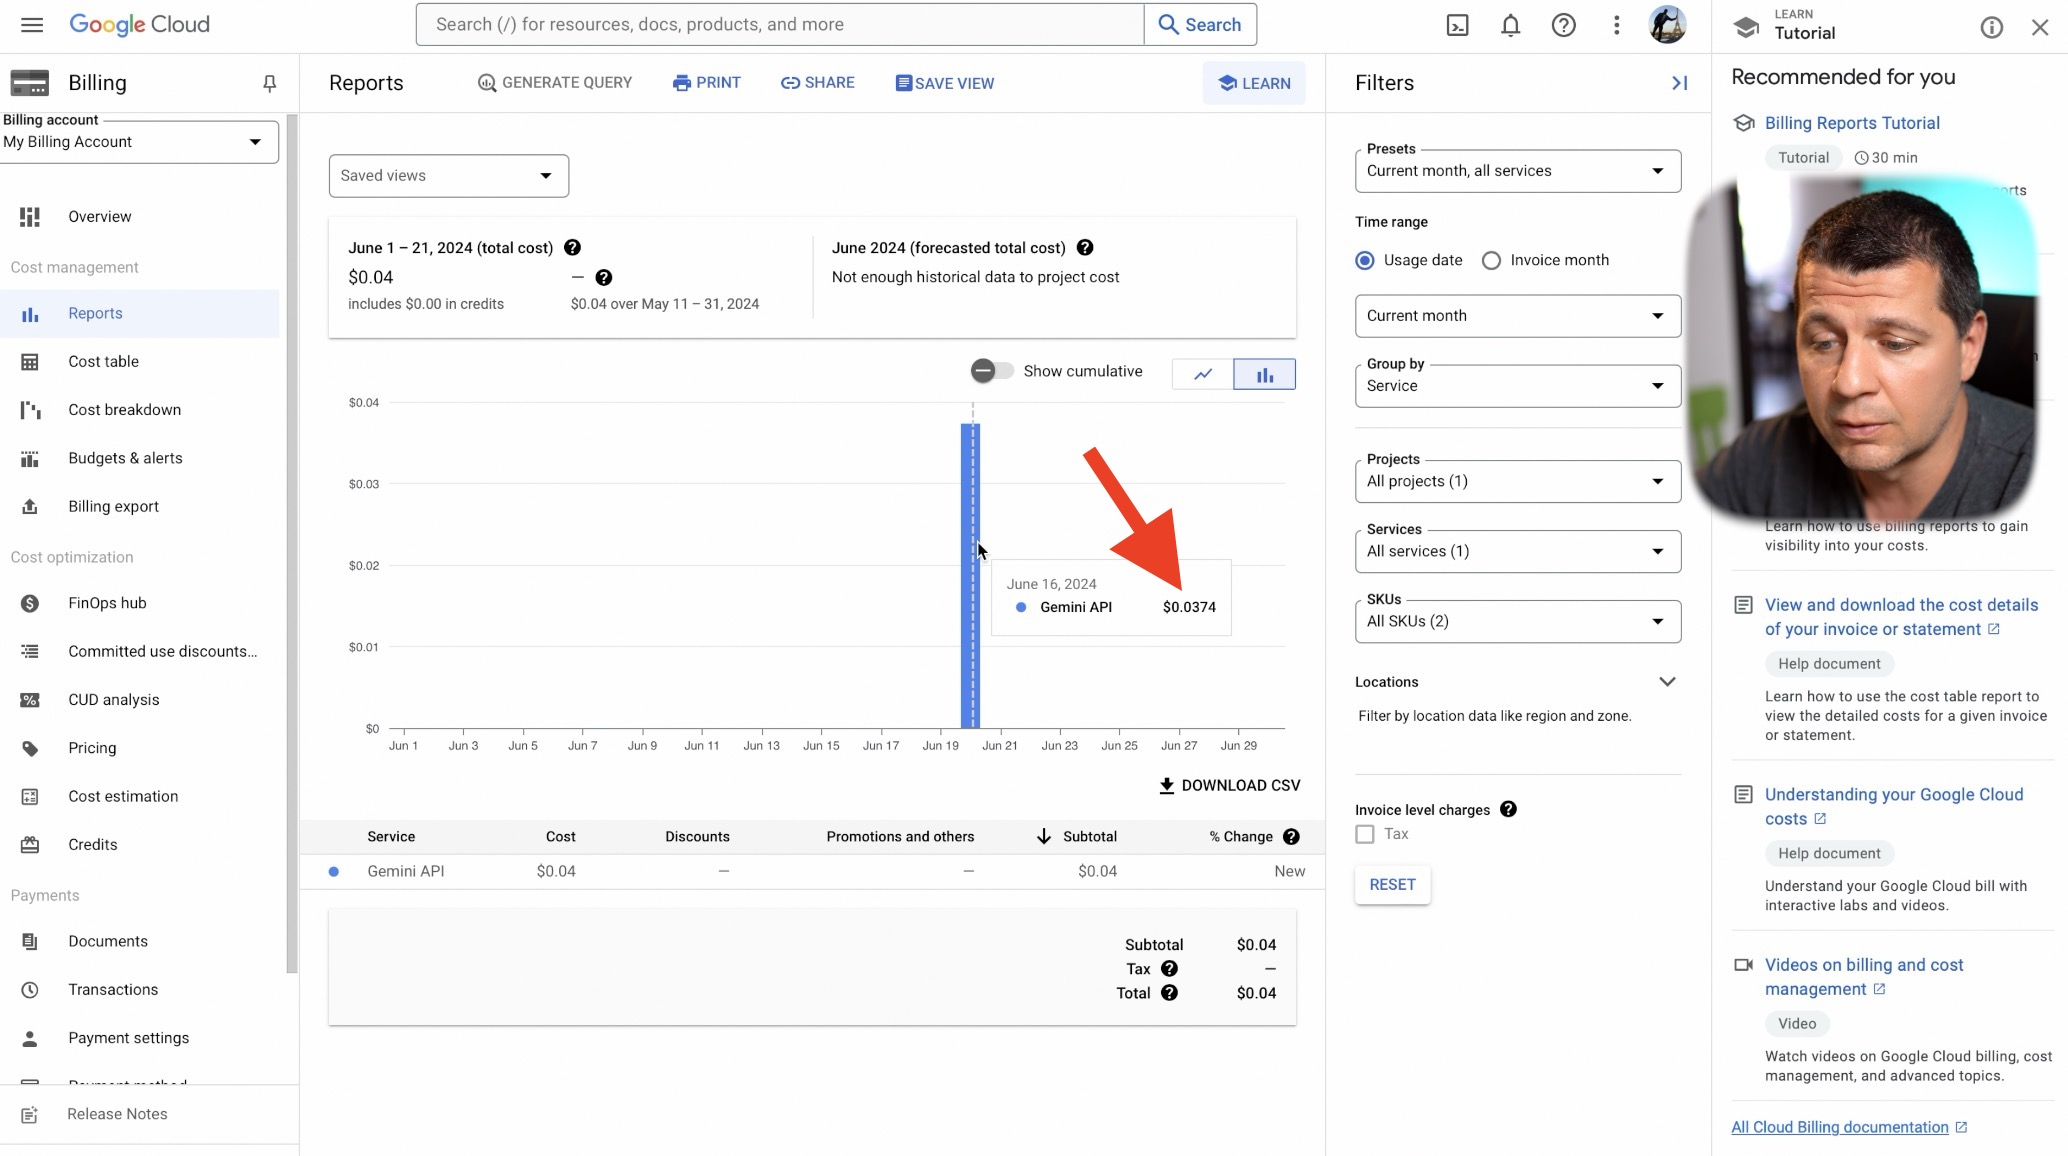
ChatGPT vs Google Generative AI Cost Comparison
The costs are minimal. Here’s a quick breakdown:
- 108 Requests using GPT-4o: $0.76
- Around 30 Requests and 5-10 content generation service calls using Google Generative AI : $0.04
Detailed Guide and Updates
Integrating Google Generative AI with Home Assistant is a cost-effective way to enhance your smart home with natural language controls. While OpenAI’s GPT-4 is more expensive, Google’s service offers similar functionality at a lower cost, making it a great choice for budget-conscious users.
Testing with Different AI Models
I also tested the OpenAI ChatGPT model in my Home Assistant setup. While it works, I found Google Generative AI to be more cost-effective and responsive. Here’s a quick comparison:
- OpenAI ChatGPT: Costly, but powerful.
- Google Generative AI: Affordable and reliable for everyday use.
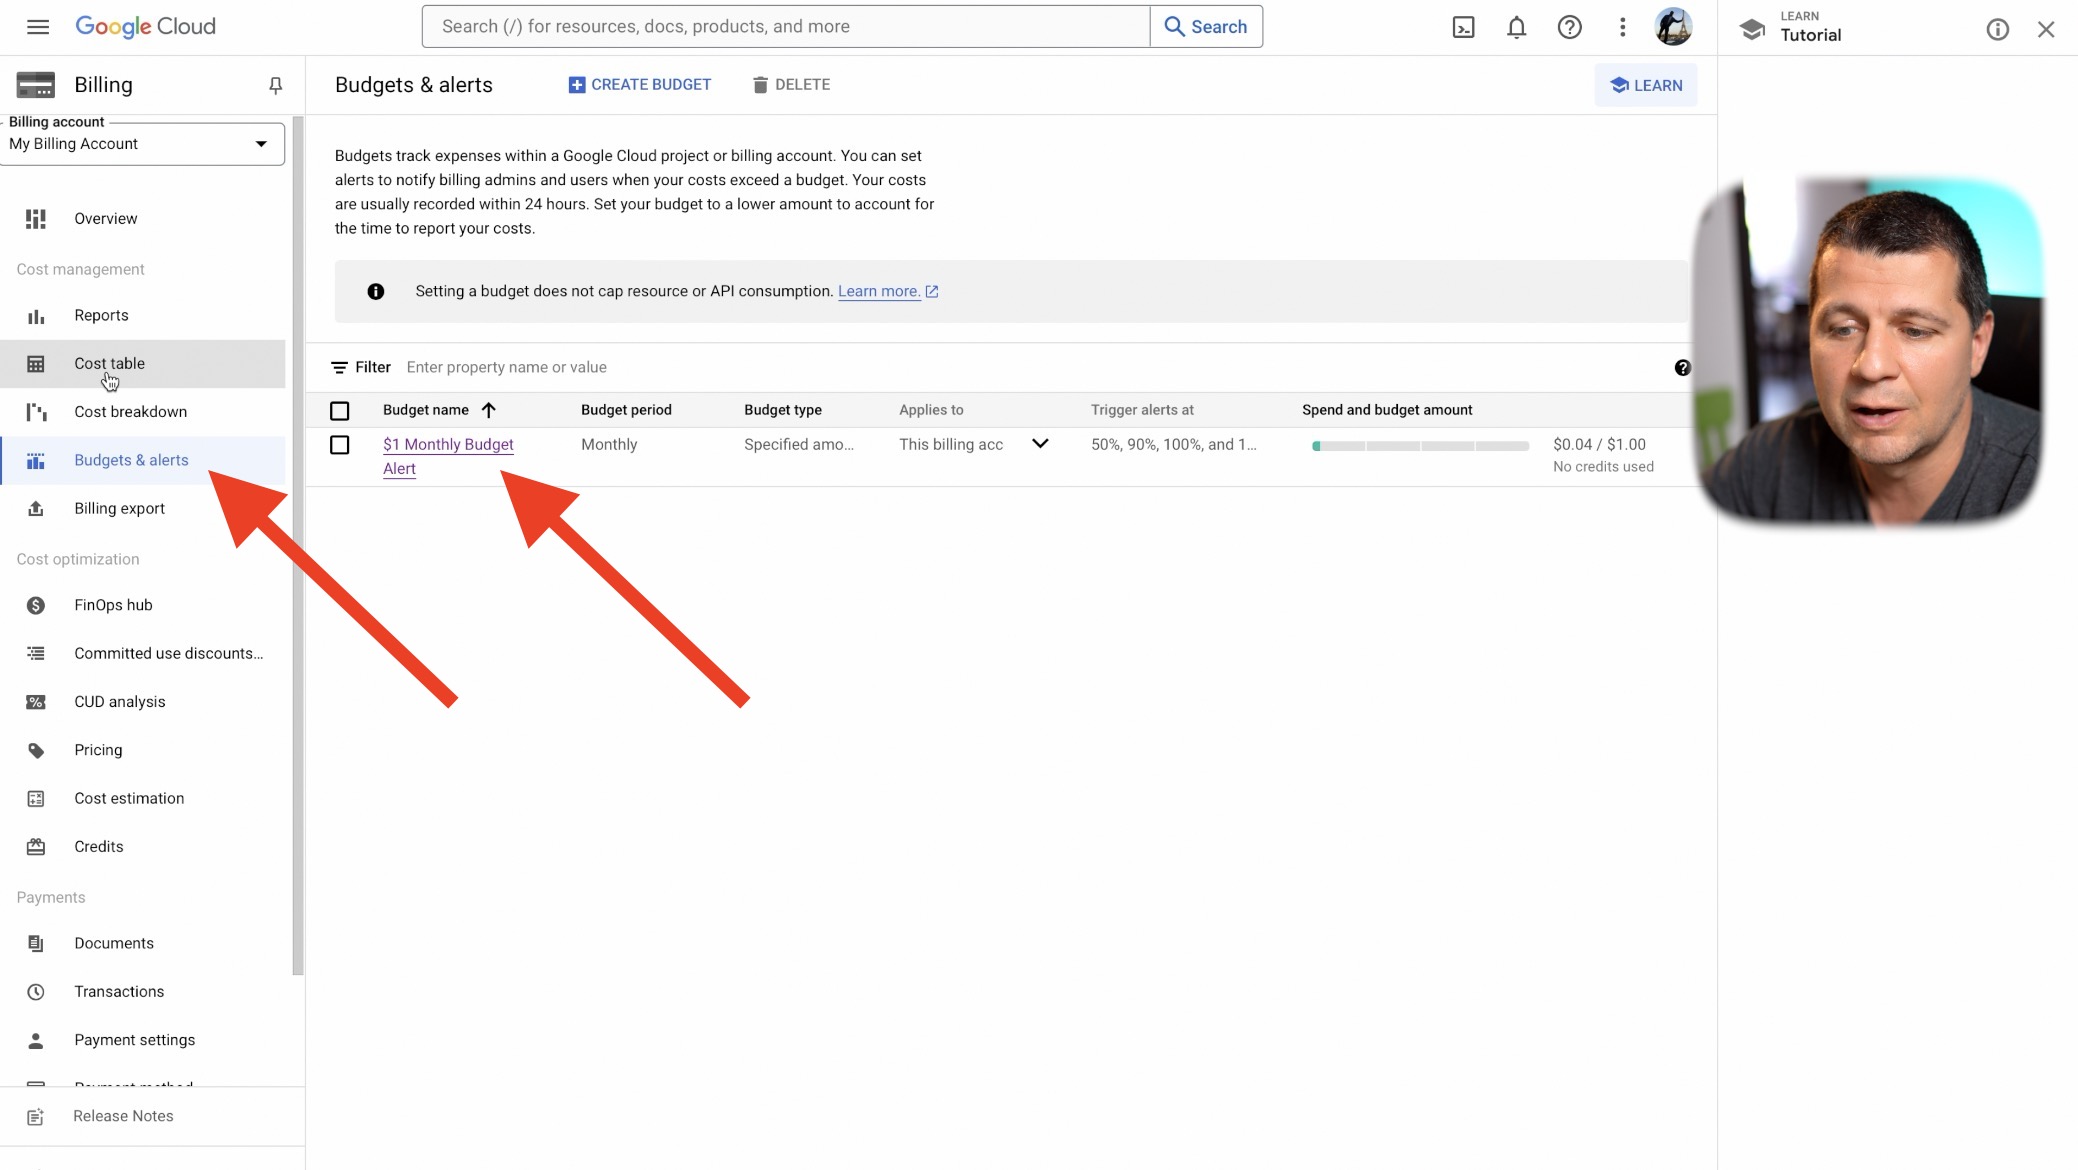
Setting Up Alerts and Budgets
Managing costs is crucial when using cloud services. Here’s how I set up budget alerts to keep track of my spending:
- Create a Budget: In the Google Cloud Console, set a monthly budget (e.g., $1).
- Set Alerts: Configure alerts to notify you when you reach 50%, 90%, and 100% of your budget.
This way, you can ensure that you stay within your budget and avoid unexpected charges.
Advanced Features and Automations
One of the standout features of Google Generative AI is its ability to generate content based on images. For example, I uploaded an image of a “Subscribe” button and the AI accurately described it. This can be incredibly useful for setting up advanced automations and notifications in your smart home.
Here’s a practical use case:
- Scenario: You have a security camera monitoring your front yard.
- Command: “Describe what’s in this image from my doorbell camera.”
- Response: “A person wearing a mask is at your door.”
This level of detail can be used to trigger specific actions, such as sending a notification to your phone or activating a security protocol, etc.
Conclusion
Integrating Google Generative AI with Home Assistant is a fun. It allows for seamless control of your devices using natural language, and the costs are minimal compared to other AI models. But it is definitely not a must for smart home enthusiasts. On the contrary, this is just a playground and I wouldn’t recommend anyone to put that in production and important environment just yet.
Don’t forget to download my Smart Home Glossary for a comprehensive guide to smart home terminology. Also, join my free webinar to learn more about Home Assistant and smart home automation. Register now and enhance your smart home skills!
Thank you for joining me on this journey to a smarter home. If you have any questions or need further assistance, feel free to reach out. Happy automating!
Is it possible to trigger actions like this using a Google home speaker/microphone (OK Google) instead of a device that responds to OK Nabu?