
Home Assistant Automations and Scripts are very useful and you can do a lot of cool stuff with them to make your life easier and your home smarter.
But sometimes they seems a little bit complicated and hard to understand and now the latest release brings even more changes like the Home Assistant Automations and Scripts Running modes. But don’t worry I will explain them in details.
Table of Contents
Check this story if you are in a hurry

Home Assistant Automations and Scripts basics
Before we go further let’s first talk about the Home Assistant Automations and Scripts basics.
What is Home Assistant Automation?
An automation usually consist of two or three different parts. These are: trigger, condition (which is optional) and action.
- Triggers describe the events that should start the automation.
- With condition you can add additional tests to the trigger like time checks or state of the sun for example. The condition part is optional and can be skipped.
- And the final part is the action, which will be performed when all conditions in trigger and conditions parts are met.
What is Home Assistant Script?
Scripts are a sequence of actions that Home Assistant will execute. Scripts can be used standalone or they can be embedded in Automations.
Basically the action part of an automation is a script.
Is this applicable to Automations and Scripts?
Everything discussed here apply to both Home Assistant automations and scripts.
But let’s see them in action by showing some examples and we will discuss this further.
Creating an Home Assistant Automation
The automations can be created from the Home Assistant User Interface or by directly editing the automations.yaml file located in Home Assistant configuration folder.
It doesn’t matter which method you choose you have to have at least one entity to automate.
For example you can create a dummy bulb.
Create a dummy bulb.
If you have real entity like: switch, light, sensor, etc. you can skip the creation of the dummy bulb and use your entity for the automation.
In that case directly go to YAML vs User Interface section
Otherwise open your configurations.yaml file and paste the following YAML inside:
# Example configuration.yaml entry
input_boolean:
  lightbulb:
    name: Dummy light bulb
    icon: mdi:lightbulb
You should then restart your Home Assistant to make the changes available.
To visualise the dummy bulb in Home Assistant dashboard try adding a button card with the input_boolean as entity.
Check my video if you don’t know how to do that.
YAML vs User Interface
Now is the time to decide which method you want to use for Home Assistant Automations and Scripts creation.
The manual method using YAML files or the Graphical User Interface that Home Assistant provide.
The results are exactly the same.
I will show you both ways and you can choose which one is more suitable for you.
Create an Automation with Yaml
Create an Automation from User Interface
Create an Automation with YAML
First you have to find your Home Assistant configuration folder.
This depends of your Home Assistant installation type, but the rule is: your configuration folder is where your yaml files are (e.g. configuration.yaml, automations.yaml).
Editing automations.yaml
Now open automations.yaml file in your favorite text editor or Home Assistant add-on (like File editor).
And paste the following lines there:
- id: '1595779628618'
  alias: Back home
  description: ''
  trigger:
  - entity_id: person.kiril
    platform: state
    to: home
  condition:
  - before: sunset
    before_offset: 03:00:00
    condition: sun
  action:
  - data: {}
    entity_id: input_boolean.lightbulb
    service: input_boolean.turn_on
  mode: single
save the file and you are done.
I’m kidding, before you save the file you have understand it and adapt it for your needs first. So let’s go step by step:
Description, alias, id
The first three lines are kind of optional for an automation.
- id: '1595779628618'
  alias: Back home
description: ''- The id is automatically populated from the Home Assistant UI and can be omitted. If you decide to use it you have to enter unique numbers and characters there for the entire automations.yaml file
- The alias – is exactly what you think it is, type anything you like there that makes sense for you. You can also skip this.
- The description – you got it again, you can type several words here about what your automation is doing or you can leave it empty
Automation Triggers
Triggers are what starts the automation and they are mandatory.
trigger:
  - entity_id: person.kiril
    platform: state
    to: home
In our example the trigger will be: state change of “person.kiril” entity from any state to “home”.
You can create many different triggers and if you need more examples they are very good described in the trigger documentation of Home Assistant .
Automation Conditions
Conditions and triggers are very similar and they can be easily confused. The main difference is that a trigger will look at events while a condition only looks at the current state. Conditions are optional
  condition:
  - before: sunset
    before_offset: 03:00:00
    condition: sun
In our example the condition will be met only when the current time of the system (Home Assistant) is 3 hours or less before sunset.
Conditions are very powerful and useful and you can read more about them in the condition documentation of Home Assistant.
Automation Actions
This is what will be executed if all conditions are met and triggers are activated.
In our example automation the action is call the service: input_boolean.turn_on against the entity_id: input_boolean.lightbulb.
  action:
  - data: {}
    entity_id: input_boolean.lightbulb
    service: input_boolean.turn_on
You can read more about the actions in the Home Assistant documentation.
Automation running mode
And last, but not least is the following row in our example automation:
mode: singleThis is where you select the running mode for your automation, but we will talk more about that in the Home Assistant Automations and Scripts: Running Modes section.
It is time to test our creation… I mean automation, just go directly to the Testing the Automation section.
Create an Automation from User Interface
You can use the user interface for automations creation which sometimes is a lot easier to do, but sometimes is a little bit restricting.
Some people love it, some hate it. Exactly as the saying: “Matter of taste said the dog and then start licking his @ss”.
Anyways, open your Home Assistant and go to Configuration > Automations
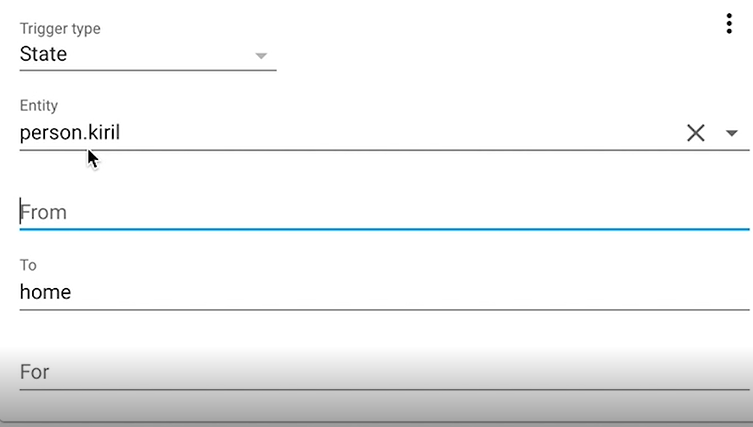
Add the following trigger:
you can change the entity “person.kiril” with your entity that you want to track.
Next go to the Conditions section and add the following
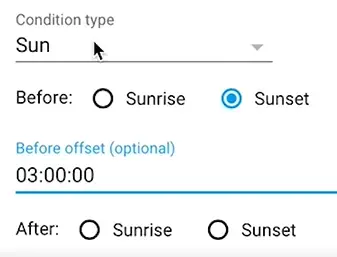
That means 3 hour or less before sunset.
As I already said Conditions are optional and you can leave this entire section empty if you wish.
And the Actions are mandatory. Here is mine that call the service input_boolean.turn_on for the input_boolean.bulb entity.
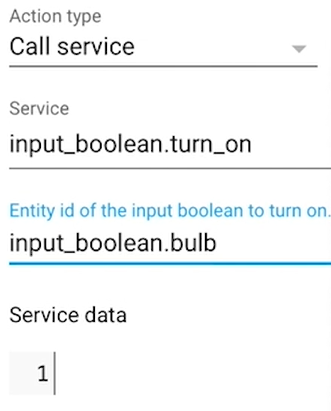
That action means turn on the dummy bulb.
And the last thing that you have to do is to hit the big orange button with a diskette icon in the lower right corner.
BTW do you know what diskette is? Have you ever seen 3 1⁄2 inch floppy disk that can store the “huge” amount of 1.44MBytes? What about 5 1⁄4-inch one? Boy, I’m getting old – check them here if you are interested.
Testing the Automation
You can test the automation that we just created by simulating person state changes using the Developer Tools.
So go to the Developer Tools menu available in the Home Assistant sidebar (left part of the screen) and select STATES tab.
Choose your entity in my case it is “person.kiril” and set the state to “home”
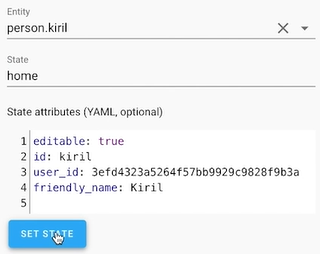
Then just click on “SET STATE” button
this will change the state of the entity to the “home” and that will trigger the automation. If conditions are also met (3 hours or less before sunset remember?) your automation action will be executed and the dummy bulb will be turned on.
If the automation doesn’t work. Try increasing the hours before sunset in the Condition part. It will all fail if you are trying to test the automation in 09:00a.m. and you set 3h before sunset condition for example.
You can also try to remove the whole Condition section if it’s easier for you and this whole trigger and condition thing confuse you somehow.
Creating a Home Assistant Script
Very Similar to the automations, the scripts can be also created from Home Assistant GUI or by editing the scripts.yaml file
I will cover only the editing scripts.yaml file, because the graphical part is covered in my video.
Also this article is getting pretty big and I’m not sure that anybody will read all of this. If you read the whole article, let me know some how! That will be great reward for me.
Anyways, open your scritps.yaml file and paste the following YAML code inside it:
# Example scripts.yaml entry
turn_the_light_for_5_sec:
  alias: Turn the light for 5 sec
  icon: mdi:lamp
  mode: single
  sequence:
  - data: {}
    entity_id: light.kitchen_lights
    service: light.turn_on
  - delay: 00:00:05
  - data: {}
    entity_id: light.kitchen_lights
    service: light.turn_off
Save the file and click on “RELOAD SCRIPTS” button from Configuration > Server Controls menu in Home Assistant.
This script will turn on the dummy bulb for 5 seconds and then it will turn it off using single running mode.
I won’t spam, I promise!
Meanwhile why don’t you Subscribe for my newsletter. You’ll receive Smart Home related articles weekly.
[sibwp_form id=2]
Home Assistant Automations and Scripts: Running Modes
Recently new running modes for both Home Assistant automations and scripts are introduced. Using different running modes allows you to control what happens if actions of a previous trigger are still running.
But as they say one picture means a thousand words! Let’s see a very good one from the Home Assistant documentation.
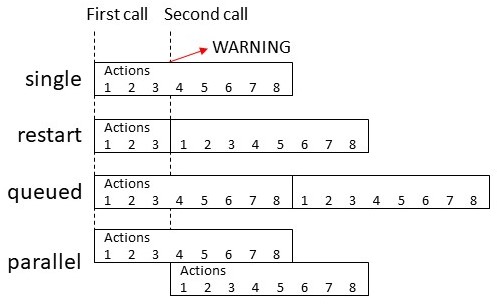
For the queued and parallel modes, an additional parameter named max is available to control the maximum number of runs.
The default running mode is named single, which means – do not start a new run, if there is one already active.
The restart running mode means – start a new run, and stop the previous.
The queued running mode means – start a new run after previous run finish.
And parallel running mode means – start a new, independent, run in parallel with the existing run.
Follow up?
If there is enough interest about the latest changes in Home Assistant Automations and Scripts – let me know some how and I will make another article about the other new things added in Home Assistant that’s: repeats and choosers.
And the best way to let me know that you are interested is to hit the comments section below this article as hard as you can.
Testing the Scripts and different running modes
You can go now and test the script with every running mode using the Developer Tools > SERVICES.
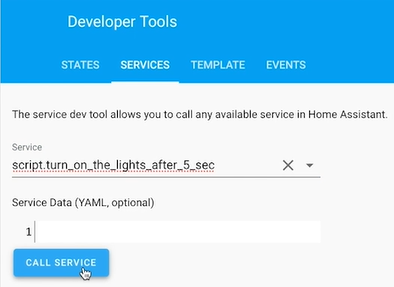
Select your script from the drop-down menu and click “CALL SERVICE“
If everything is OK the – the dummy bulb should be turned on for 5 seconds and then it will turn off.
But it will get interesting if you call the script twice or more times during its execution. This is where the running modes are coming in.
To change the running mode you either have to edit the script in scripts.yaml file or you can use the Configuration > Scripts menu.
This is what will happen if you click on “CALL SERVICE” button again during the first execution of the script (within the defined 5 seconds duration) using the different running modes.
- Single running mode – nothing will happen the bulb will turn off exactly after 5 seconds no matter how many times you press the “CALL SERVICE” button during the execution. Only a warning in the log files will appear saying that the script is already active.
- Restart running mode – The script will start from the beginning and it will cancel the previous execution every time you press “CALL SERVICE“.
- Queued running mode – Every new execution will be set on a queue and it will be executed after the previous run finish. That means if you press the “CALL SERVICE” twice within the execution time of 5 seconds – the dummy bulb will be turned on for 10 seconds.
- Parallel running mode – It will start the script independently with every new “CALL SERVICE” click and the script will run in parallel with the existing runs.
Question for You!
What is your most useful automation that you have in your Smart Home? Type your answers in the comments below. And if it is easier for you the automation doesn’t have to be in Home Assistant.
Support my Work!
If you like what you see so far and you want more content like this you may want to become one of my supporters check my support page.
Any other sort of engagement on this site and my YouTube channel does really help out a lot with the Google & YouTube algorithms, so make sure you hit the subscribe, as well as the Like and Bell buttons If you enjoy this Home Assistant Automation and Scripts video article.
Also feel free to add me on Twitter by searching for @KPeyanski. You can find me on my Discord server as well.
I really hope that you find this information useful and you now understand much better the Home Assistant Automations and Scripts and their running modes.
Stay safe and don’t forget Home Smart, But Not Hard!
Thank you for reading, and see you next time.
Hi Kiril,
in the middle of your post you ask about the lenght. I#am lucky that you right a lot. Thx that’s help me a lot as a beginner in HA. The other thing what i like ist the mix with Video an blog. Go ahead. I wish you make a tutorial with all Function with node-red for HA. regards Balta
Balta, thank you very much for that comment, it is really a reward for me! I enjoy chatting with real people and to understand their thoughts and ideas. Thank you very much once again and feel free to join my Discord server. We are talking about Home Assistant and Node-RED there a lot.