I’ll be honest — I never really thought about air quality.
Weather? Sure. I check it every morning. Rain, sun, temperature — that’s the stuff that decides if I grab a jacket or leave it at home.
But the actual air quality? The invisible stuff floating around that I breathe in all day? Nah. Never crossed my mind.
Until one day, it did.
Table of Contents
The Moment That Changed How I Think About Air 🌬️
A few months ago, I was sitting outside with my coffee — beautiful sunny morning, not a cloud in sight. Perfect day, right?
Then I opened a random weather app and noticed a tiny icon I’d never paid attention to before. It said something like “Air Quality: Moderate — PM2.5 elevated.”
I thought: “What does that even mean? And why is nobody talking about this?”
So I did what any curious person would do — I went down the rabbit hole. And what I found kind of surprised me.
Turns out, air quality changes all the time. It can be great in the morning and not-so-great by afternoon. It depends on traffic, factories nearby, weather patterns, even wildfires hundreds of miles away. And the worst part? You can’t see it. The sky can look perfectly blue and the air can still be full of tiny particles that aren’t great for your lungs.
I’m not trying to scare anyone here — most of the time the air is totally fine. But wouldn’t it be nice to just… know?
That’s when I started thinking: what if my smart home could just tell me?
Tired of reading?
If you are a visual person/learner then check my video about that topic
Home Assistant Air Quality Monitoring — The Idea 💡
I’ve been using Home Assistant for a while now (you might be part of the journey so far I don’t know), and one of the things I love about it is that you can connect it to almost anything. So I started looking into whether there’s a way to pull air quality data directly into my dashboard.
And guess what — there is!
Google has an Air Quality API that gives you real-time data about the air around you. Things like:
- Overall air quality score (from 0 to 100 — higher is better)
- Category (Excellent, Good, Moderate, Low, or Poor)
- Dominant pollutant (the main “bad thing” in the air right now)
- Individual readings for PM2.5, PM10, Ozone, Nitrogen Dioxide, Carbon Monoxide, and more
And Home Assistant has an official Google Air Quality integration that connects to this API and turns all of that data into sensors you can use in your automations.
Pretty cool, right?
But here’s the thing — having 12 sensors with scientific names and numbers is great for data nerds. For a normal human who just wants to know “Is the air okay today?” — it’s a bit overwhelming. 😅
This Is Where AI Comes In 🤖
So here’s what I did, and this is the part that made me genuinely excited about Home Assistant air quality monitoring.
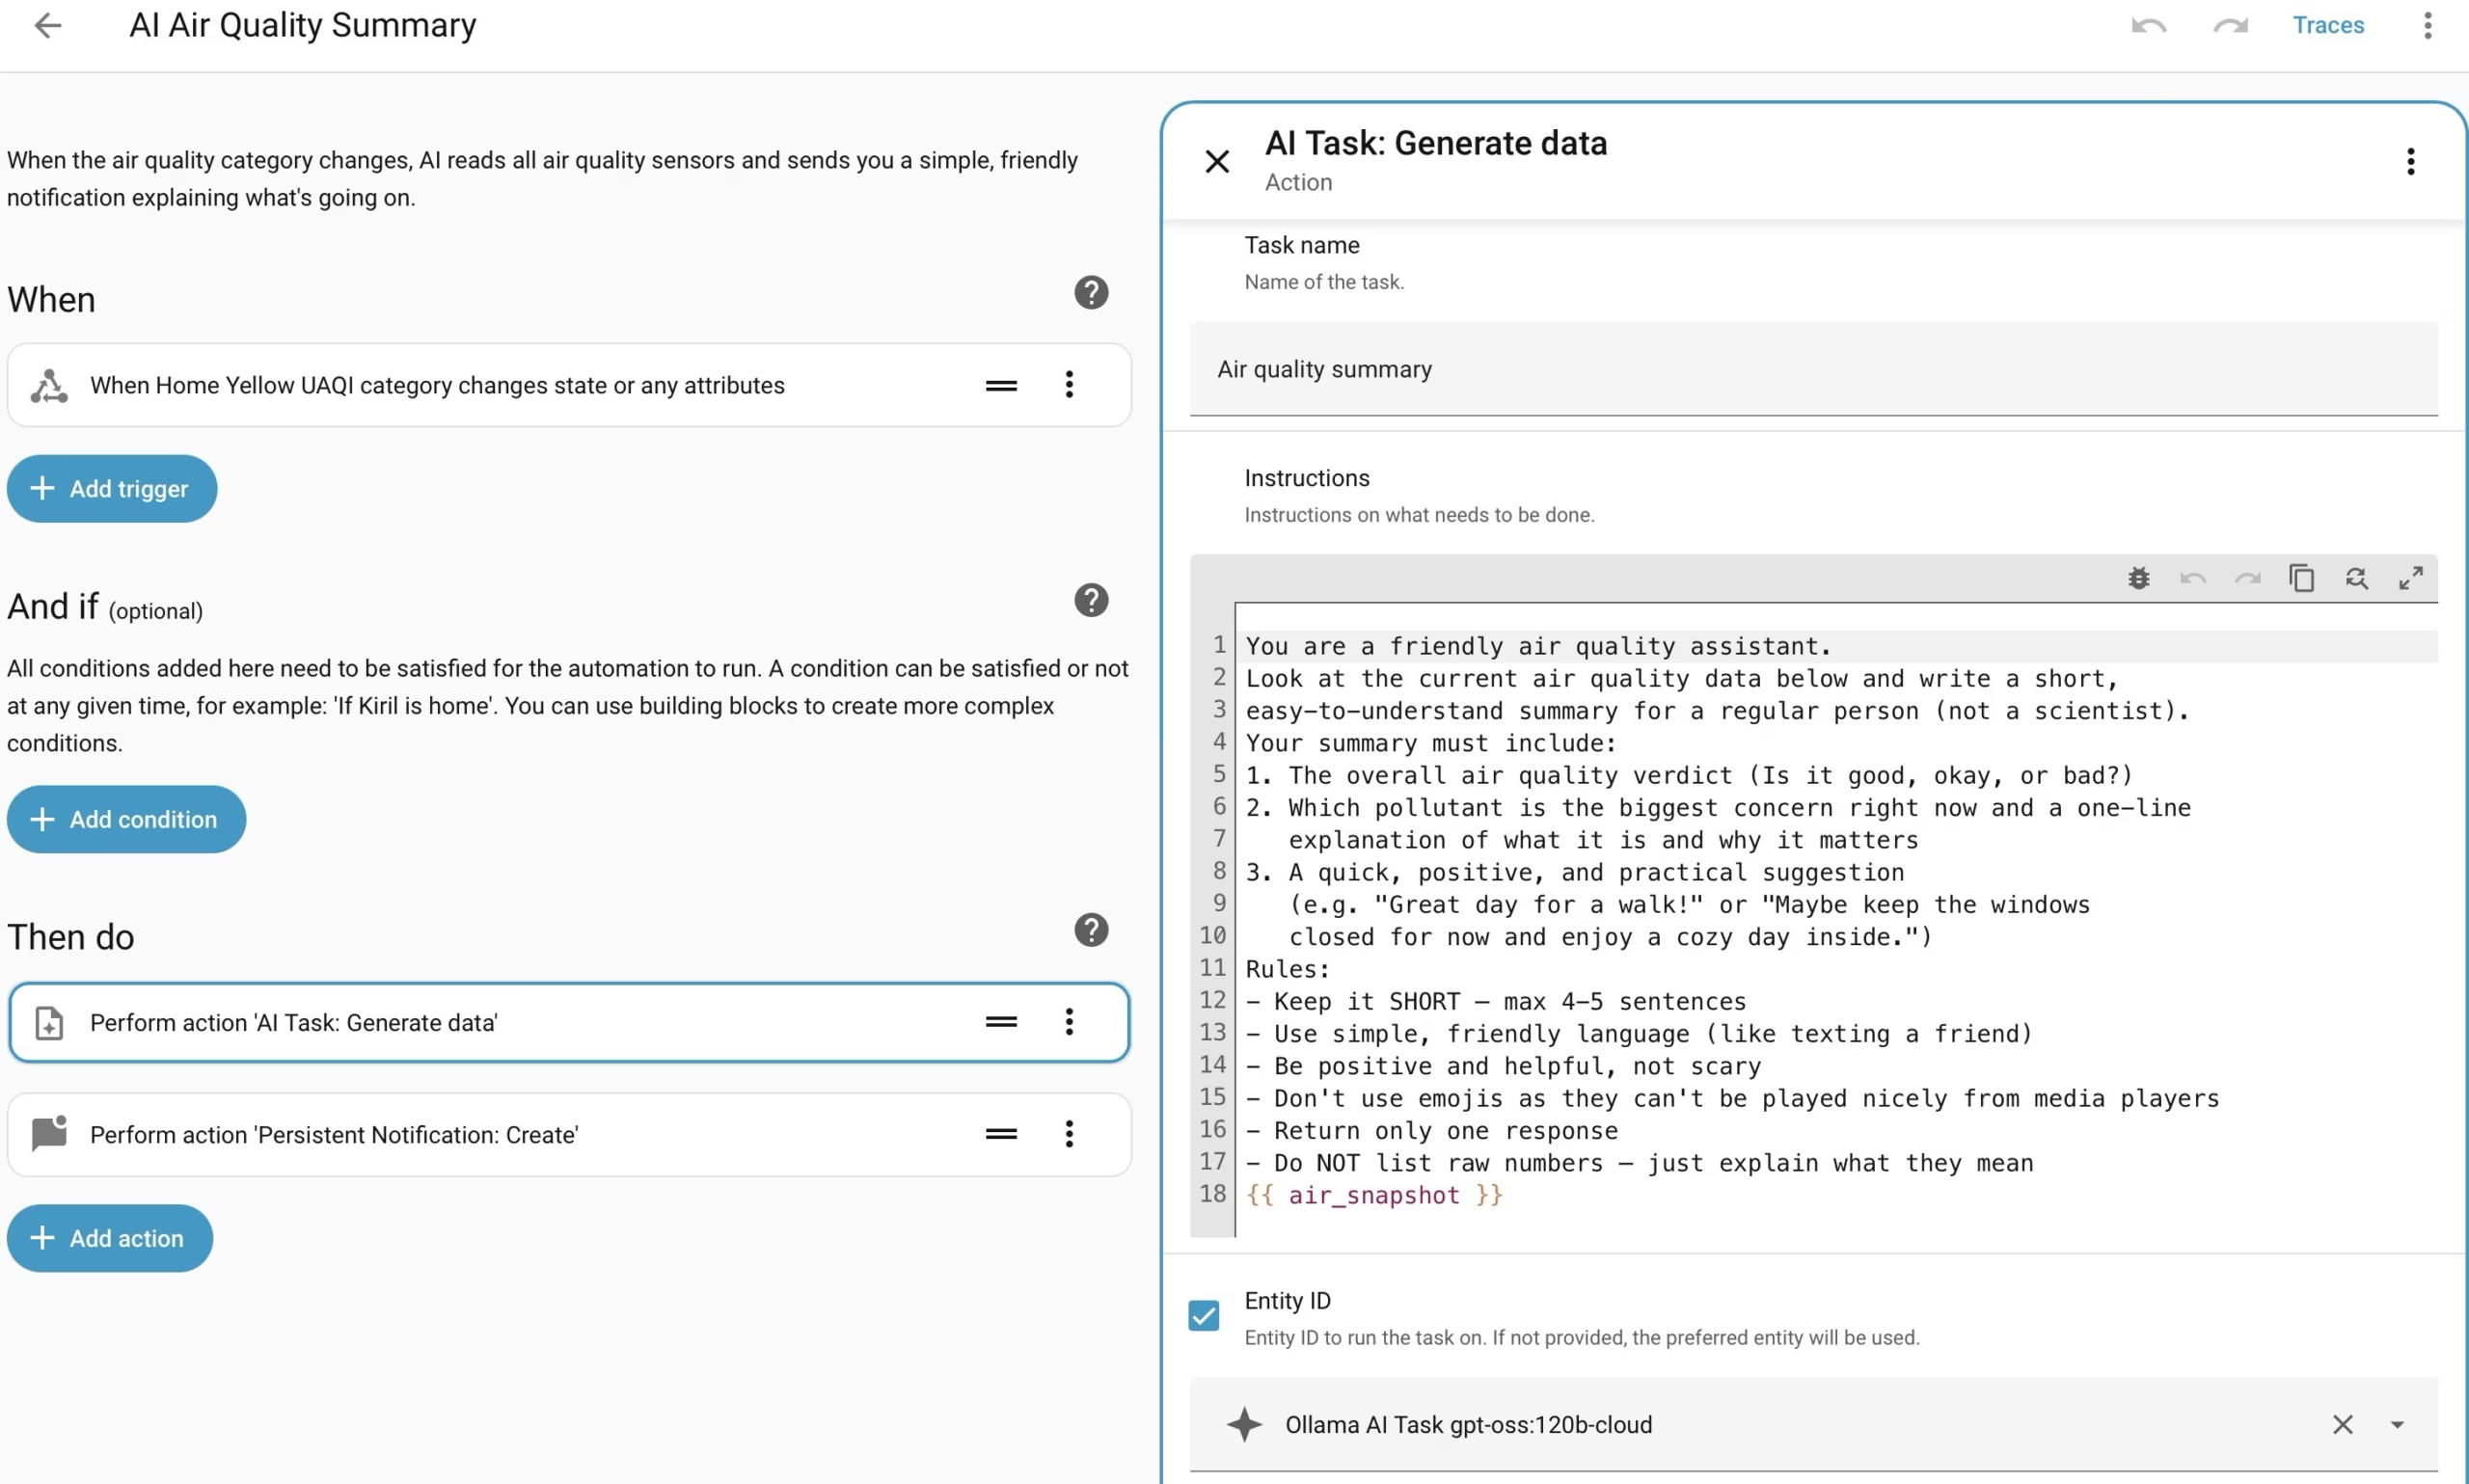
I created an automation that:
- Watches the air quality category sensor
- When it changes (say, from “Good” to “Moderate”), the automation kicks in
- It grabs all 12 air quality sensor values
- It sends everything to an AI running locally through the Ollama-HA app
- The AI writes a short, friendly summary in plain words
- Home Assistant sends that summary as a notification right to my dashboard
So instead of staring at numbers likePM2.5: 14.2 µg/m³and wondering what that means, is it good or bad?. I get something like:
“Air quality is moderate today 🌤️ The main concern is fine dust particles (PM2.5). Nothing dangerous, but maybe keep the windows closed and save your outdoor workout for tomorrow.”
That’s it. Simple, clear, and actually useful.
No science degree needed. No apps to open. My smart home just tells me in plain English what’s going on with the air — and gives me a quick suggestion on what to do about it.
I call it my personal AI air quality reporter, and honestly, it’s one of my favorite automations I’ve ever built.
Can You Set This Up Too? Absolutely! ✅
The whole setup involves three main pieces:
- Google Air Quality integration — connects Home Assistant to Google’s air quality data. You need a free Google API key (Google gives you 10,000 free API calls per month, which is more than enough).
- AI processing — the easiest way to get this is with Ollama-HA app running in Home Assistant with a cloud or local AI model that can read the sensor data and write a human-friendly summary.
- The automation itself — a YAML automation that ties it all together. It watches for changes, sends data to the AI, and delivers the result as a notification.
Each piece is straightforward on its own, but getting everything connected and working smoothly does take a bit of attention to detail. The sensor names need to match, the AI prompt needs to be right, and there are a couple of Google Cloud setup steps that can be confusing if you’ve never done them before.
That’s exactly why I put together a complete step-by-step guide that walks you through the entire process — from creating your Google API key to testing the final notification.
📥 Get the Full Step-by-Step Instructions (Free PDF)
I’ve packed everything into a detailed PDF guide that you can download for free.
It covers:
- ✅ How to create your Google Cloud project and API key
- ✅ How to set up the billing account (don’t worry — there’s a generous free tier)
- ✅ How to add the Google Air Quality integration to Home Assistant
- ✅ How to configure the AI Task with the Ollama-HA app
- ✅ The full automation YAML code with inline comments
- ✅ How to adapt everything to your specific setup
- ✅ Troubleshooting tips for common issues
- ✅ A fun quiz to test what you learned 🧠
👉 Download it here: automatelike.pro/google-air
Here’s how it works — type your name and email, confirm your mail (check your junk/spam folder if you’re not getting the confirmation mail) and boom, I’ll send the PDF straight to your inbox.
By signing up, you’ll also join my free newsletter where I share new Home Assistant content, automation ideas, updates, and — right now — my exclusive AI + Home Assistant Challenge where all the details and steps are shared only through the emails. My newsletter is completely free service, and if it’s not your thing, you can unsubscribe anytime with just one click. No hard feelings, no questions asked. 😊
What Makes This Different From Just Reading a Blog Post?
Fair question!
The PDF is designed to be a do-it-with-me guide. You open it on one screen, and you follow along step by step on the other. Every click, every field, every setting — it’s all there.
I specifically made it so that someone who has never touched Home Assistant, Google API or written a YAML automation can follow along and get it working. The language is simple, the steps are numbered, and there are tips and warnings in all the right places.
Plus, you can save it, print it, or come back to it whenever you want. No scrolling through a webpage trying to find where you left off.
Why Home Assistant Air Quality Monitoring Matters (More Than You Think)
Here’s something I didn’t fully appreciate until I started using this setup:
Air quality isn’t something that’s bad once and then fine for the rest of the year. It fluctuates constantly. An area with normally great air can have a bad day because of nearby construction, a change in wind direction, or seasonal pollen combining with traffic pollution.
And for people with asthma, allergies, or small kids — knowing about these changes in real time can actually make a big difference. Even something as simple as “keep the windows closed today” can save someone from a rough afternoon.
With this Home Assistant air quality automation, you don’t need to remember to check. Your smart home does it for you — and it explains the results in simple ways that makes sense.
That’s the kind of automation that isn’t just cool to show off — it’s genuinely useful every single day.
The Setup in a Nutshell 🥜
If you’re wondering how complex this really is, here’s the flow in four boxes:
Google Air Quality API → Home Assistant Sensors → AI Summary → Your Notification
That’s the whole thing. Google provides the data, Home Assistant stores it, AI translates it, and you get a friendly message.
The Google Air Quality integration updates every 60 minutes. When the air quality category changes, the automation fires. The AI reads everything and writes a 4-5 sentence summary. You get a notification with a green thumbs up or a gentle heads-up.
Set it up once, and it runs forever.
📥 Ready to Build Your Own AI Air Quality Reporter?
Everything you need is in the free PDF guide.
👉 automatelike.pro/google-air — Just enter your name and email, confirm you’re human, and the full instructions will be in your inbox in minutes.
And hey — you’ll also get access to my newsletter and the AI + Home Assistant Challenge. But if email isn’t your thing, one click and you’re out. Simple as that.
Before I Wrap Up…
Looking back, I find it kind of funny that I used to check the weather every single day but never once checked the air quality — you know, the stuff I’m actually breathing. 🫁
Now my smart home handles it for me. And every time I get one of those friendly notifications, I think: “Yeah, this is why I love Home Assistant.”
If you’re into Home Assistant and you like the idea of combining it with AI to do something actually practical — this is a great project to try. It’s not too hard, it doesn’t cost anything to run, and the result is something you’ll actually use.
Give it a shot. Your lungs will thank you. 😊
Happy automating!