
IMPORTANT UPDATE: The Freenom domains shown in the post are now banned by Cloudflare and you cannot use .cf, .ga, .gq, .ml, .tk, domain names anymore. Instead you need another domain. One of the cheapest alternative is using .xyz domain that contains only numbers (between 6-9 numbers). This domain cost around $0.85/per year with the same renewal price. I used Namecheap to register mine .xyz domain – http://shrsl.com/43swo
In today’s post, I will show you how to create a Cloudflare tunnel to Home Assistant, so you can remotely connect to your Smart Home without opening any ports.
After reading this post till the end, you’ll be able to access your Home Assistant from anywhere. You can do so using https connection absolutely for free from a first-level domain ending with ga, tk, ml, and so on.
I’m not quite sure as I have a real IP address here and I have nowhere to test this but I think if you are behind CGNAT (Carrier-Grade NAT) this whole setup will work for you as well.
Quick Tip: Carrier-grade NAT, also known as large-scale NAT, is a type of Network address translation for use in IPv4 network design.
By the way, check my free Smart Home glossary where you will find some simple, but useful explanations of the most common Smart Home words and abbreviations.
The glossary is all free and you can get it here on my other website.
Now without further ado, let’s dive in as I can’t wait to show you the cool things! This will be a follow-along tutorial where I will practically explain the complete procedure as I go through each step.
Table of Contents
#1. Free Domain Registration
The first one is to get a free domain name. Of course, if you have a paid domain and you want to use it you can do so.
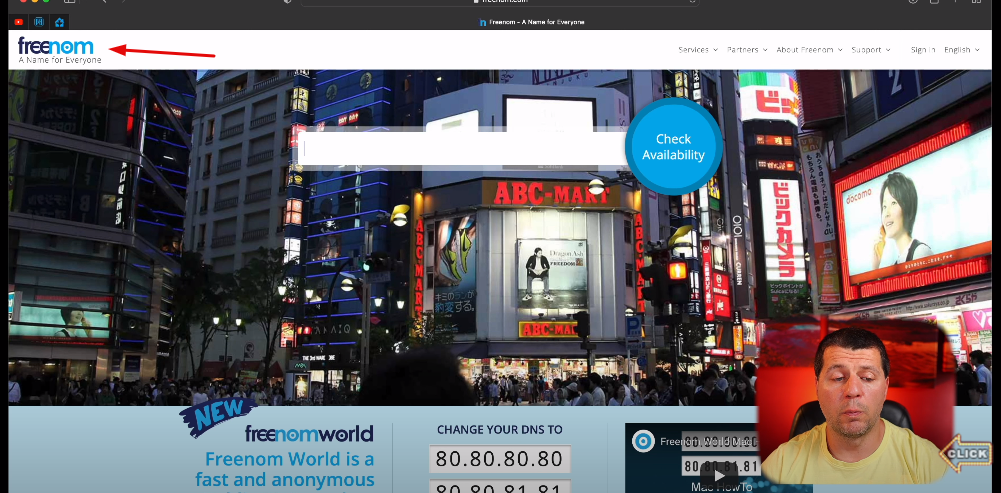
Go to freenom.com and search and register your own domain here. I’ll search for temenu.ga. (which is a kind of flower in Bulgarian, I think it’s a violet or something) and I’ll check for availability.

The temenu.ga domain is free and I’m going to click on checkout. I’ll extend the period to 12 months for free and I’ll click continue.
I’m not quite sure what will happen with this free domain after 12 months. If you happen to know that let me know in the comments it will be very useful for all of us.
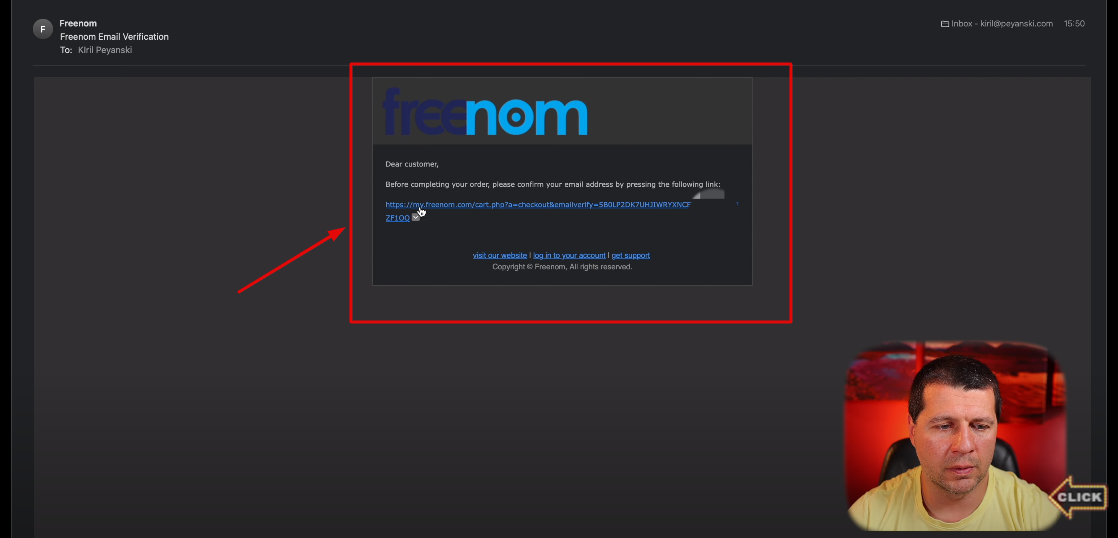
I’ll enter my email address and I’ll click on verify my email address.
I have to wait now for the verification email to arrive. It can take some time because it’s a free service and it is not very fast sometimes.
Next step is to enter my details. I’ll enter my information (name, password, etc) and I’ll tick the ‘I have read and agree the terms and conditions’ and I’ll click on complete order button.
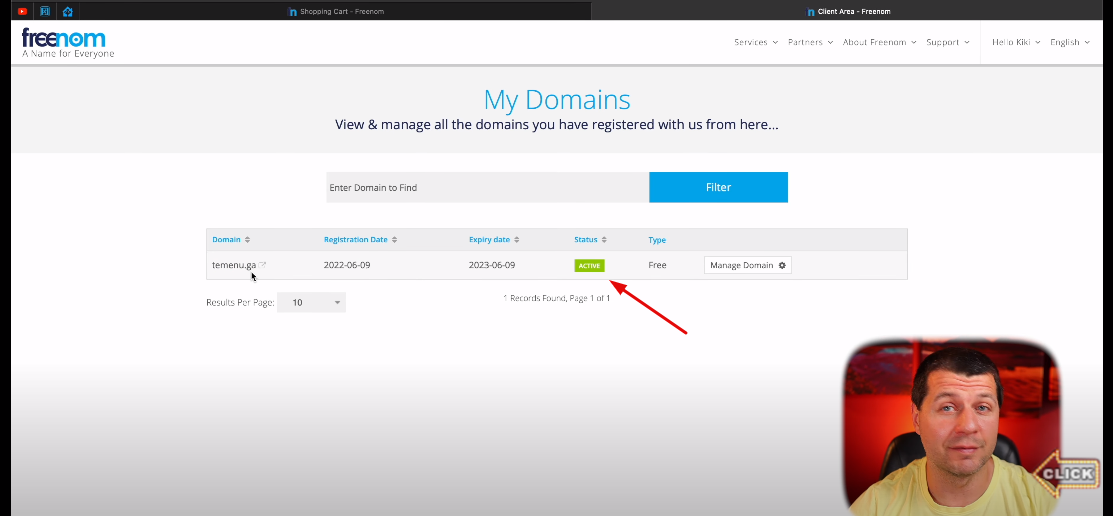
And my order which is completely free is confirmed. Now, I can go to my client area and I can see my domain name temenu.ga, violet in english as active.
#2. Cloudflare Registration
Next, we have to create an account in Cloudflare. This is so standard and easy that I will not even show you the exact steps. On top, Cloudflare is so popular lately that there is a big chance that you already have an account there. If not just create one.
Now go create a user on Cloudflare.com
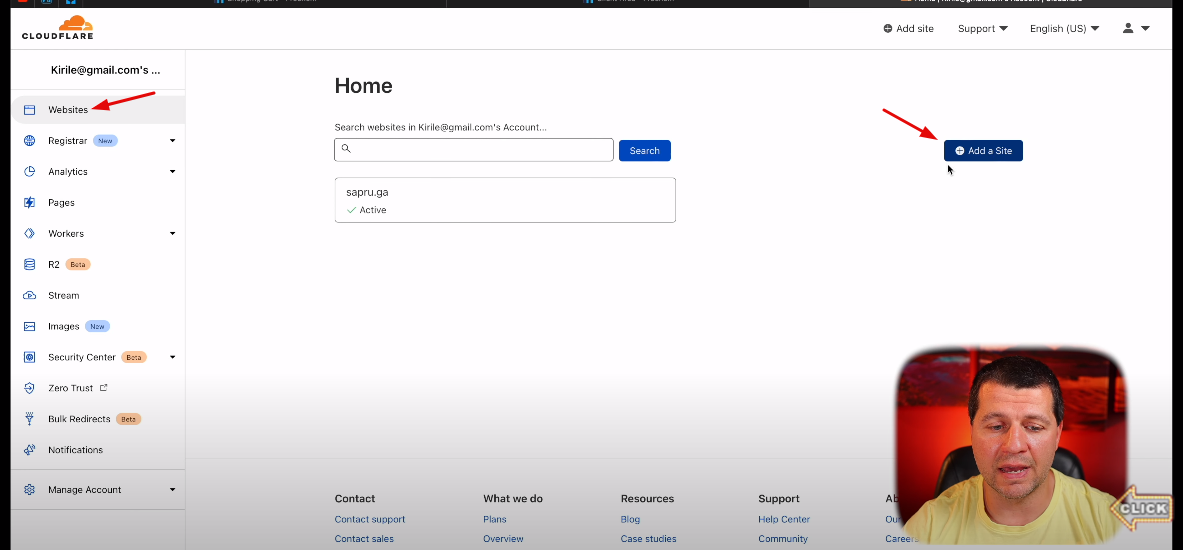
I already created one and inside the Website section, I’ll click on Add a Site.
I’ll enter temenu.ga which is my new free domain that I just created.
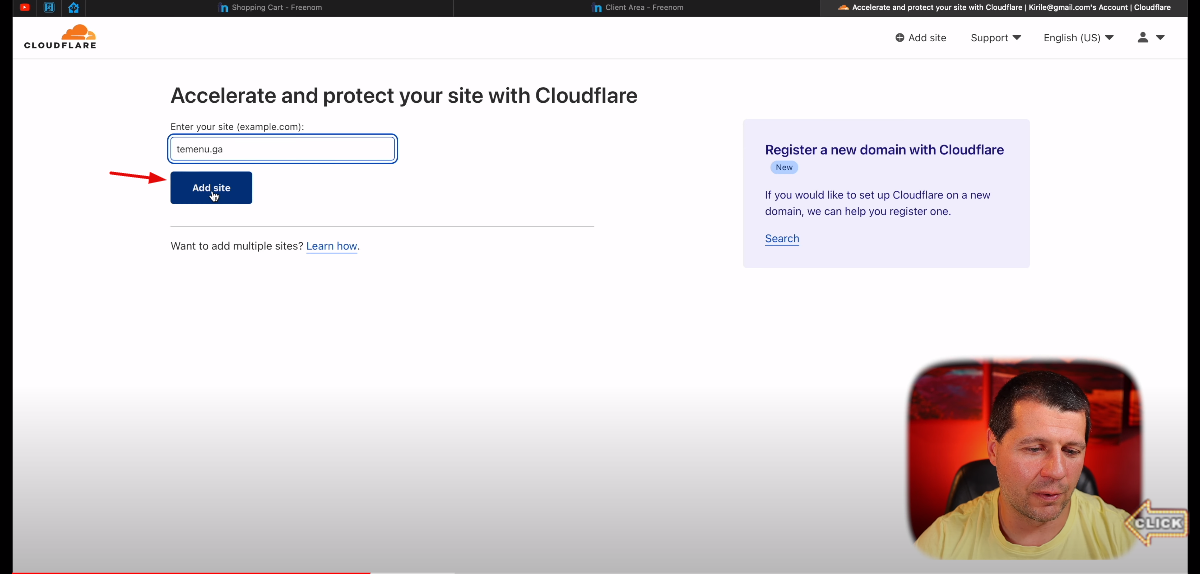
I’ll click Add site. I’ll select the free plan which is just perfect. The Cloudlflare will start scanning for existing DNS records.
Then I’ll click on continue without DNS records.
“Cloudflare isn’t able to activate your site…” I know that and I’ll click Confirm and this is what I wanted to get:
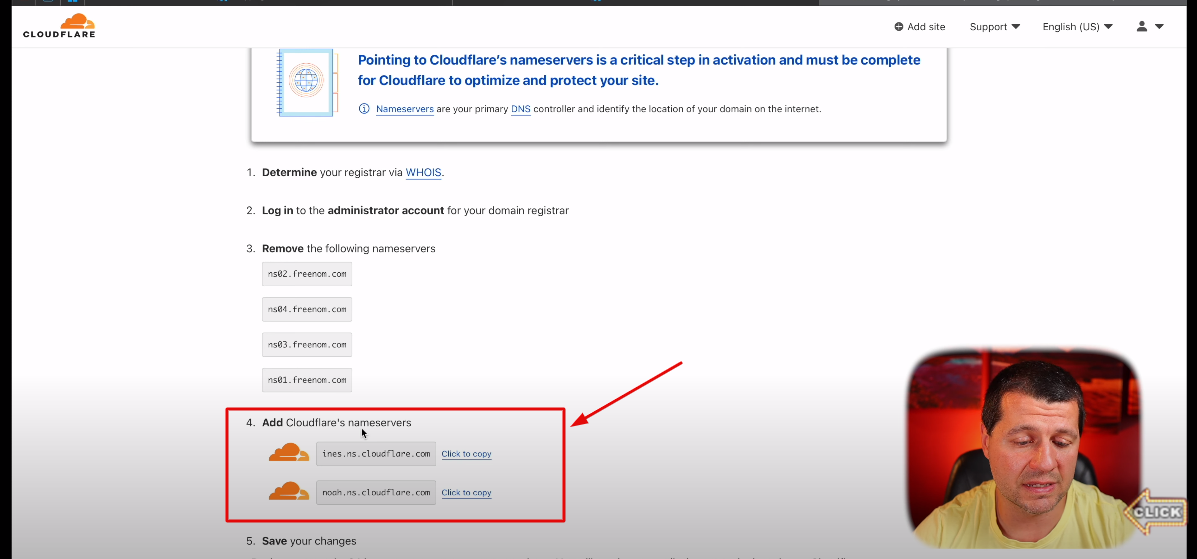
These are the Cloudflare’s nameservers and I’ll copy them and I’ll go back to my freenom management portal.
I’ll click on the Manage Domain, I’ll click on the Management Tools > Name Servers > Use custom name servers and I’ll paste the name servers that I get from Cloudflare.
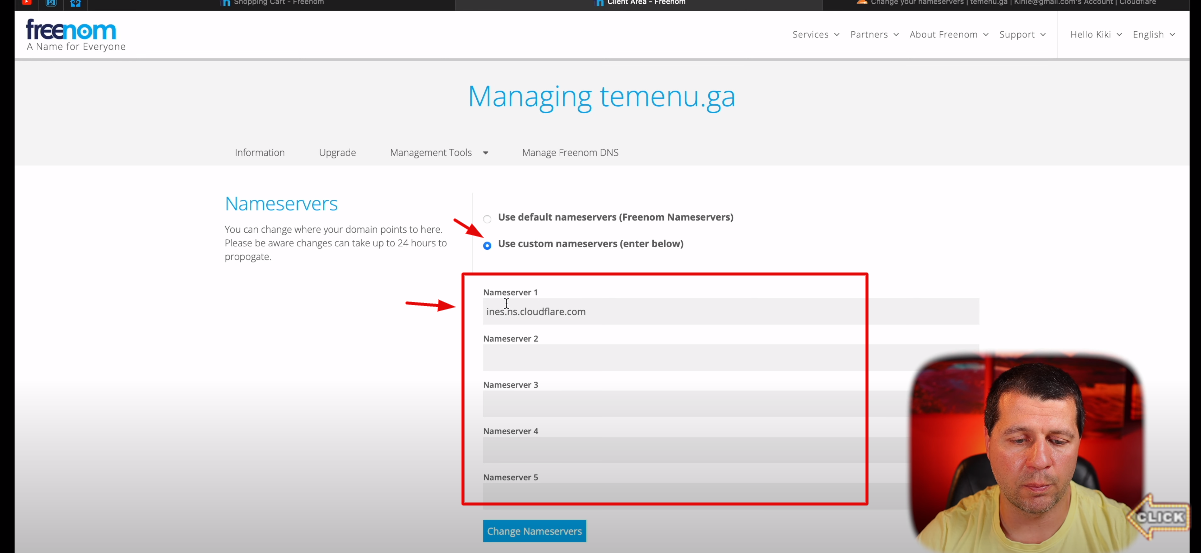
I’ll copy both of the name servers under Nameserver 1 & Nameserver 2. Finally, I’ll click on Change Nameservers and configuration of my free domain name temenu.ga is almost finished.
Now I have to wait a few minutes and I’ll receive an email from Cloudflare telling me that my site temenu.ga is added.
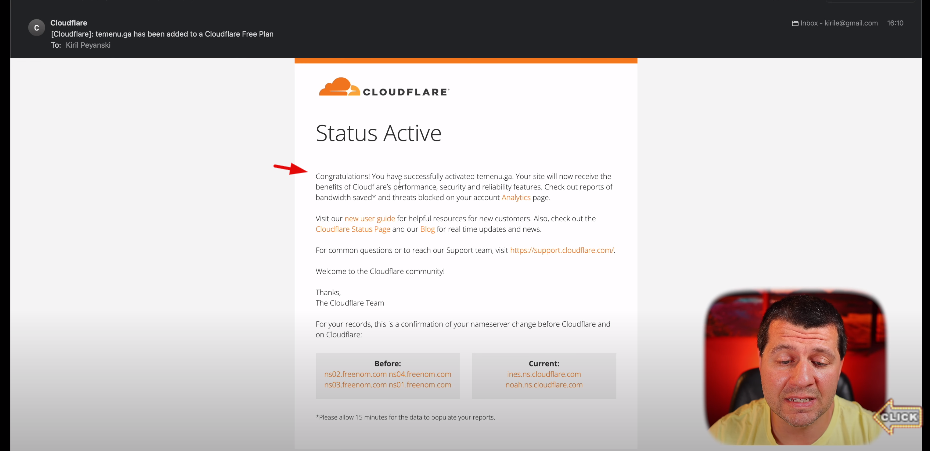
Congratulations you have successfully activated temenu.ga. Your site will now receive the benefits of Cloudflare’s performance, security and reliability features, great!
#3. Installing the Cloudflared Home Assistant add-on
Tobias Brenner is the author of the Cloudflared Home Assistant add-on, so all the credits go to him.
Let’s install the add-on that he has created as it will greatly help us in our secure, tunnel mission.
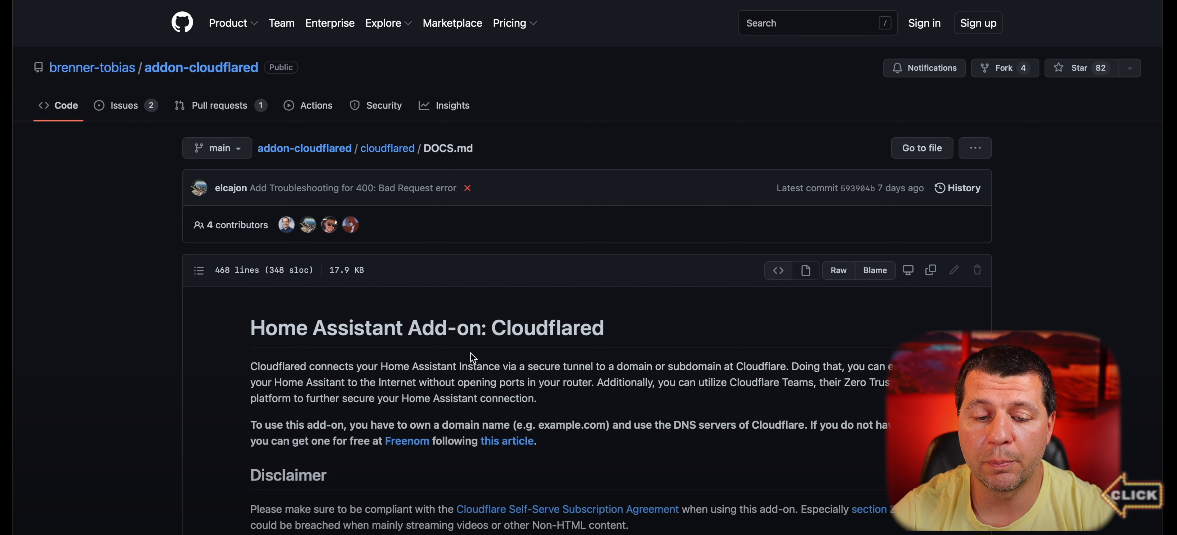
This is the official GitHub page of Home Assistant add-on Cloudflared and here we have some prerequisites.
- Make sure to remove all other add-ons or configuration entries handling SSL certificates. That means if you already have DuckDNS add-on or Let’s Encrypt add-on or something similar, or you have manually configured some SSL certificates in your Home Assistant, you have to remove them.
- Next, you have to have a working Cloudflare setup with a domain name and we already have that, so we are good to go.
- And the last prerequisite is to decide whether to use a local or managed tunnel (We are going to use a local one)
We are coming to the actual installation of the Cloudflared Home Assistant add-on.
- I’ll open my test Home Assistant.
- I’ll press the “c” button on my keyboard to invoke the search bar and I’ll type add-on and I’ll go to the Add-on store of Home Assistant
- Then, I’ll click on the three dots menu, repositories and I’ll paste the Cloudflared repository.
https://github.com/brenner-tobias/ha-addons- Alternatively, you can directly use the My Home Assistant link which will do the same as above three bullets.
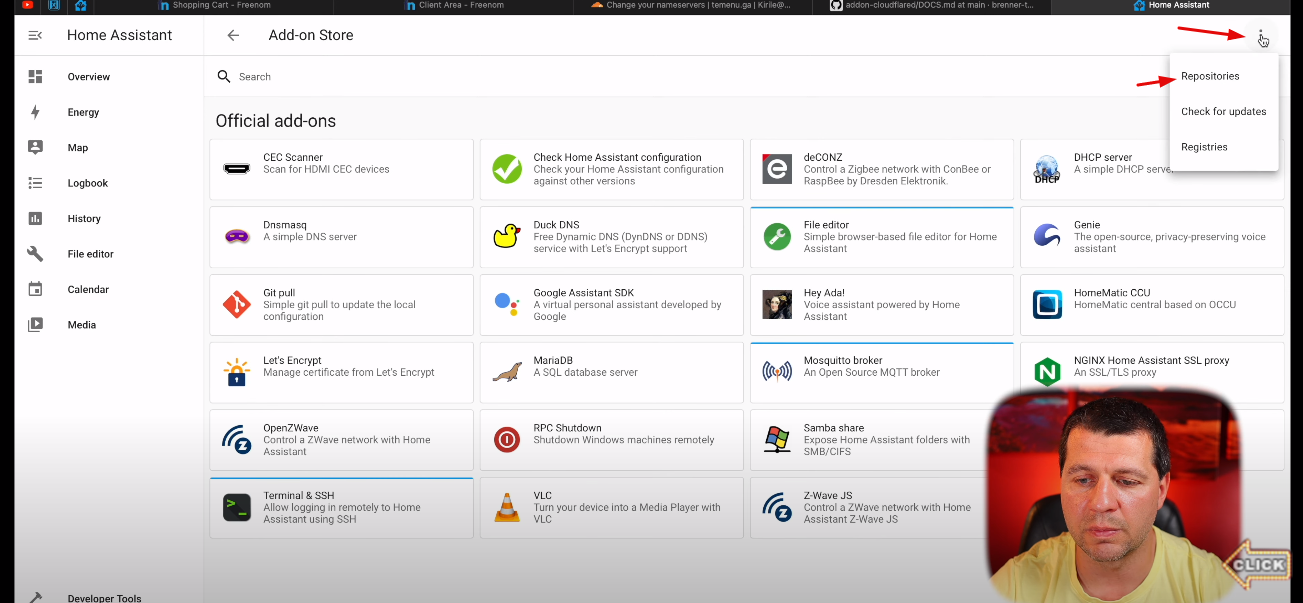
- To confirm adding the new Cloudflared repository, I’ll click Add and then Close.
- I’ll click on the Cloudflare add-on and I’ll click install.

If you don’t have an add-ons section in your Home Assistant, that means you are not running Home Assistant OS or Supervised installation type.
If you want to know more about the different installation types of Home Assistant – check my webinar. In the Webinar I’m explaining everything about this topic. It is completely free and you can register on my other website – https://automatelike.pro/webinar
The Cloudflared add-on is now installed and I’ll go to the Configuration section.
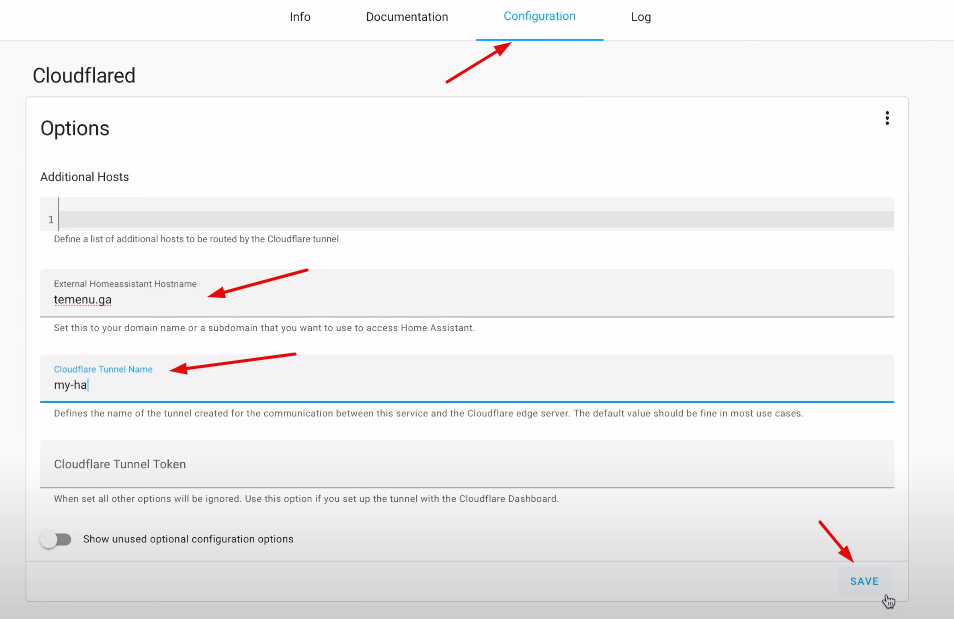
In this section, I’ll enter my domain name which is temenu.ga. and I’ll change the Cloudflare tunnel name to let’s say My HA. I’ll click Save.
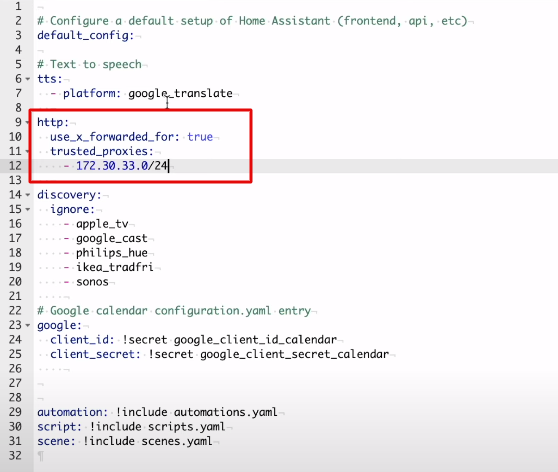
I’m ready to start the Cloudflare add-on in Home Assistant, but before that, I have to add some YAML code to my configuration.yaml file. For that, I’ll open my File Editor add-on and I’ll open the configuration.yaml file (of course, you can use any other text editor that you wish).
Inside the configuration.yaml file I’ll paste the following lines which will allow requests from the Cloudflare add-on.
http:
  use_x_forwarded_for: true
  trusted_proxies:
    - 172.30.33.0/24
I’ll hit Save and then I’ll restart my Home Assistant.
#4. Starting the Home Assistant Cloudflared add-on
The grande finale is just ahead 🙂 Let’s see if our Cloudflare tunnel to Home Assistant is actually working.
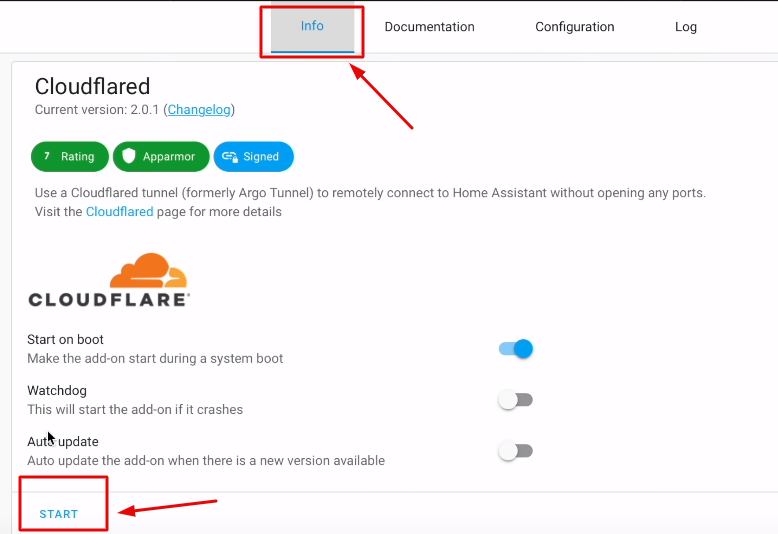
Home Assistant has started and I’ll go again to my Add-on store section, Cloudflare add-on. The configuration is Okay and I’ll go to the Info tab and I’ll hit the Start button.
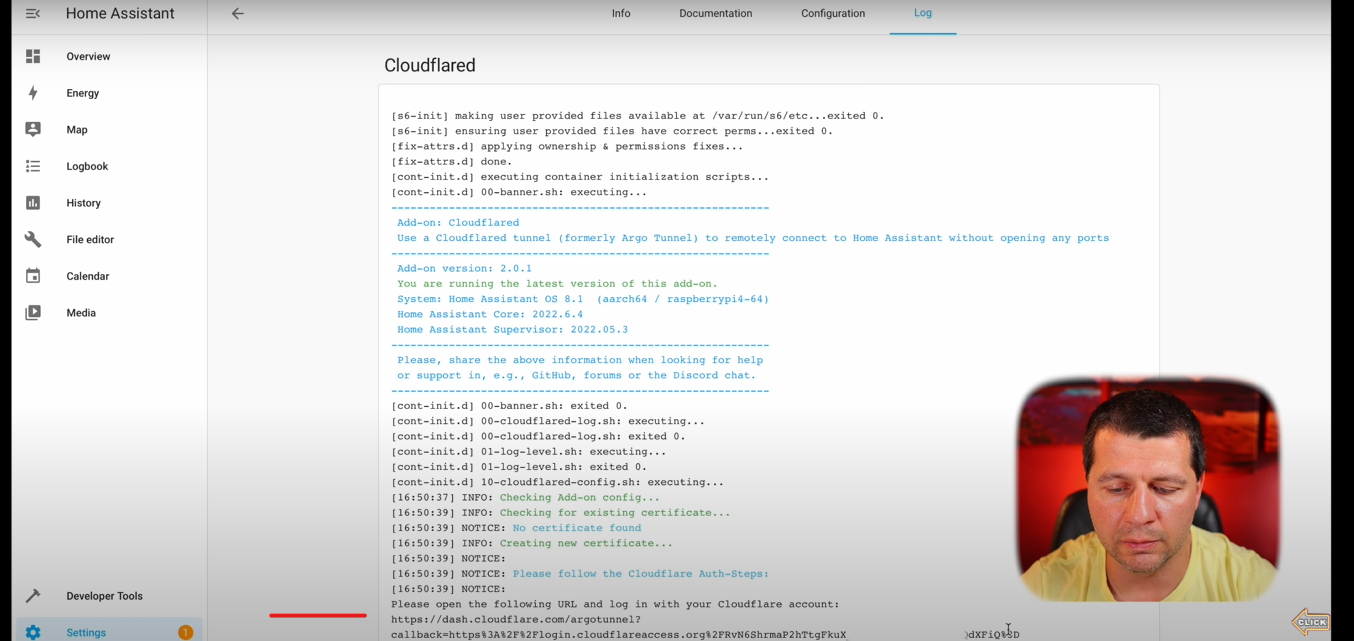
Then I’ll go to the Log tab and I’ll hit the Refresh button constantly here until I see the “Please open the following url and log in with your Cloudflare account…” text.
I’ll copy the link and I’ll paste it into a new tab. I’ll select my temenu.ga domain and I’ll click Authorize button. Cloudflare has installed a certificate allowing your origin to create a tunnel on this zone.
Very good! Let’s hit refresh again. Everything seems good except these small errors which I don’t know how to resolve.
If you know that let me know in the comments. They’re not fatal, everything should work with them, but anyways if you know the solution let us know.
#5. Testing the Home Assistant Cloudflare tunnel
Now it is time to check what we have done. I’ll open a new tab and I’ll type tememu.ga and I’ll hit enter. My Home Assistant login page is immediately displayed on the screen. Great, I managed to open my Home Assistant using the Cloudflare tunnel.
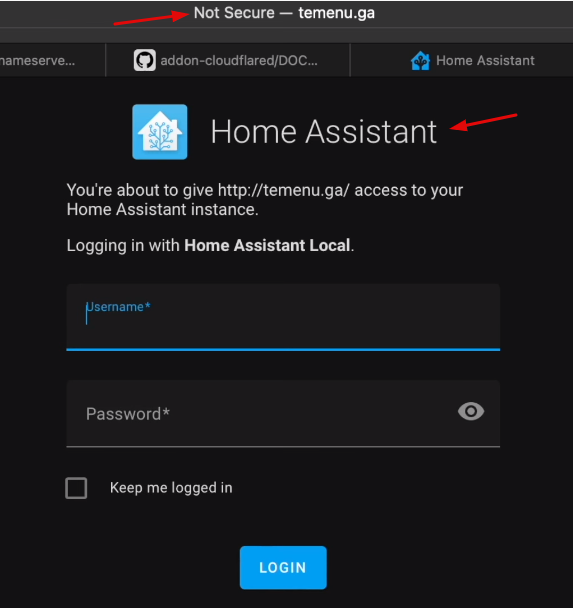
I see one problem though: the connection is not secure. That means it is an http connection. Making this a secure connection is very hard it will take us around one or two hours, but let’s do it.
I’m kidding It’s very easy!
I just have to change the http to https and I’ll enter my domain name again and now everything is fine.
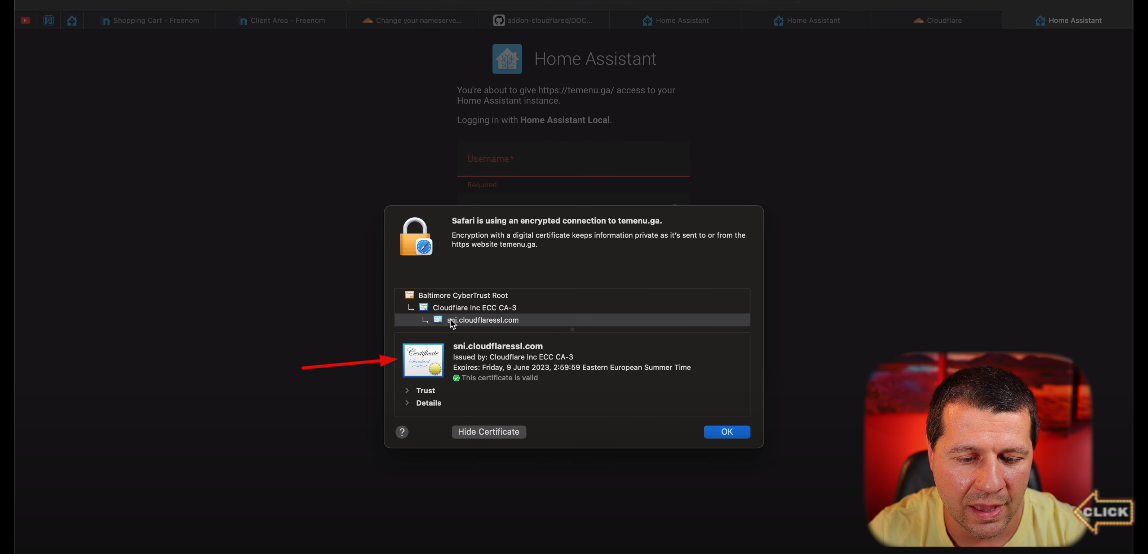
I have a valid certificate coming from Cloudflare and I’m able able to login in my Home Assistant using a secure tunnel without opening any ports in my router!
Bonus: Home Assistant Companion app
Everything that I showed you so far is free of charge which is wonderful, but there is one more bonus. You can now use this free domain and this Cloudflare tunnel to connect Home Assistant companion app which is available for iOS and Android devices.
All you have to do is to enter your domain name during the Home Assistant Companion app setup.
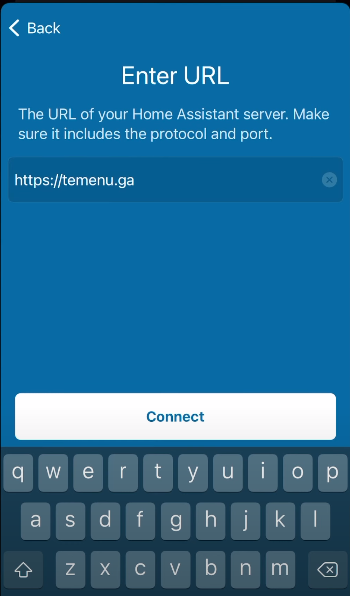
Doing so, you will not only be able to control your Smart Home from everywhere, but you unlock some device tracking features and notifications that are pretty cool.
Don’t forget to subscribe to my newsletter which is also free
So that’s it! Hope you enjoyed and found this post helpful. This is Kiril signing off. See you again next Wednesday!
Thank you. I watched the video on the TV and came here to actually do it.
It was nice and much simpler than when I set up DuckDNS and Nginx, because I have some local wifi buttons that need http, so I coudln’t stay with only DuckDNS.
I’ll have to reconfigure Google Home and hopefully still works, but no big deal if it doesn’t.
QUESTION: do you know if/how to allow external access to some addons that have the port in the URL? like for example Sonarr, which would be tememu.ga:8989 –> it won’t work… neither with duckdns.
PS: the HTTPS thing can be fixed in Cloudflare, setting “Always use HTTPS”.
Hi Antonio,
you can try add additional hosts in the configuration of the Cloudflared add-on. Check the documentation for the exact syntax, but in theory you should list them as new services and you will be able to access these services using subdomains of your main domain registered in the Cloudflare. This is an example of what you can add in the Cloudflared add-on
additional_hosts:
– hostname: “router.example.com”
service: “http://192.168.1.1”
A simple A record that points to an IP address where HA is located is enough. Cloudflare addon for HA detects it automatically and add a tunnel for the subdomain.
Hi KIril, nice your tutorial! I already have my Argo tunnel created but I observe sometimes when I remove the SD card from raspberry to create a iso image or a simple reboot the tunnel becomes inactive, so I must to go in cloudeflare (zero trust) web site, delete the tunnel and restart the addon to work again. What you think about that? Is tere any option to keep the tunnel always alive?
Hi, thank you very much for this tutorial. It seems to work except for the picture card where a live stream from a an esp32-cam is running. In the picture card simply the local ip address of the camera is listed:
http://192.168.178.92:81/stream
Do you knwo how to fix this problem?
Thanks for this! Much simpler than setting up secure public access via other methods. Worth nothing you can setup additional security using Cloudflare Access so that only authorized devices and users can even get to the login page.
You are most welcome, Philip! Check my other articles as well!
KIril:
Thank You for a very nice tutorial that works great and does not require me to open ports on my firewall.
Now that I have enabled remote access, what is the best way to track successful remote logins over the tunnel time to be sure my HA stays safe.
Thanks again.
Glad that I could help. You can enable IP ban option in HA configuration – https://youtube.com/shorts/ECVDXLmM6gY
Perfect – done & thanks again.
Hello, thank you for the tutorial.
May I know setting up a cloudfare tunnel, does it mean any random people over the internet can access my home assistant by guessing the password?
If so, how can I prevent home assistant being control by unknown people over the internet? Thank you.
Thank you for the tutorial, it’s working perfect with my paid domain! I’m using a home assistant installation, which has internet access only over LTE modem, so no way to have incoming traffic.
Great to hear Chris. Good Work, check my other tutorials and enjoy!
Do someone make Alexa work with the cloudflare tunnel ? Which tutorial do you follow ?
Thank you.
Great tutorial with clear steps & instruction’s.
Now that I’ve got external access to my Home Assistant, I thought I would be able to create an Automation with a webhook trigger & then post an HTTP put or post from the internet using something like http:///api/webhook/ but it doesn’t work – is there some further config required to allow webhooks to work?
I meant something like http://mydomain.com/api/webhook/mywebhookid in the above post but it got messed up & I can’t edit the post.
It’s working now (I’ve no idea why it didn’t work at first). Thanks to your instructions, I can now send Webhook posts to my Home Assistant even although I’m behind my ISP’s CGNAT thing.
Is there a guide to do this without using the Cloudflared add-on? I use Home Assistant Core, installed in Docker on a NAS, so I cannot use add-ons.
Connecting through a browser worked fine for me. But using the companion App in iOS gives me the error: URLSessionTask failed with error: it was not possible to find a server with the specified host name. Error code: Alamofire.AFError 13″. This error appears after I have been presented with a login screen from Home Assistant, so apparently the App was able to reach the HA instance. Anyone was able to solve this?
Username checks out
thanks this worked great
Thank you for this tutorial. Unfortunatelly I am not able to complete it. Can you help me?
I use my paid domain, I went throuhg all necessary steps and on the cloudflare web I see my site with Active status.
But in the add-on log I see only these lines:
s6-rc: info: service s6rc-oneshot-runner: starting
s6-rc: info: service s6rc-oneshot-runner successfully started
s6-rc: info: service fix-attrs: starting
s6-rc: info: service init-banner: starting
s6-rc: info: service fix-attrs successfully started
s6-rc: info: service legacy-cont-init: starting
s6-rc: info: service legacy-cont-init successfully started
———————————————————–
Add-on: Cloudflared
Use a Cloudflare Tunnel to remotely connect to Home Assistant without opening any ports
———————————————————–
Add-on version: 4.0.3
You are running the latest version of this add-on.
System: Home Assistant OS 9.3 (aarch64 / raspberrypi4-64)
Home Assistant Core: 2022.11.2
Home Assistant Supervisor: 2022.10.2
———————————————————–
Please, share the above information when looking for help
or support in, e.g., GitHub or forums.
———————————————————–
s6-rc: info: service init-banner successfully started
s6-rc: info: service init-log-level: starting
s6-rc: info: service init-log-level successfully started
s6-rc: info: service init-cloudflared-config: starting
[17:07:34] INFO: Checking config for legacy options…
[17:07:35] INFO: Checking add-on config…
[17:07:36] INFO: Checking for existing certificate…
[17:07:36] NOTICE: No certificate found
[17:07:36] INFO: Creating new certificate…
[17:07:36] NOTICE:
[17:07:36] NOTICE: Please follow the Cloudflare Auth-Steps:
[17:07:36] NOTICE:
Please open the following URL and log in with your Cloudflare account:
https://dash.cloudflare.com/argotunnel?callback=https%3A%2F%2Flogin.cloudflareaccess.org%2F-fKxYASki0WlviLTpKaE4dtn35vcMj15rRH0AbEe6GU%3D
Leave cloudflared running to download the cert automatically.
2022-11-15T16:08:29Z INF Waiting for login…
2022-11-15T16:09:23Z INF Waiting for login…
2022-11-15T16:10:16Z INF Waiting for login…
2022-11-15T16:11:09Z INF Waiting for login…
2022-11-15T16:12:02Z INF Waiting for login…
2022-11-15T16:12:55Z INF Waiting for login…
2022-11-15T16:13:48Z INF Waiting for login…
2022-11-15T16:14:42Z INF Waiting for login…
Do you have any idea which login is missing?
I setup the tunnel with no issue but how do I change my smartthings configuration in HA to use the tunnel and how do you setup a sub domain?
Which option do you prefer? The DuckDNS route with the reverse proxy or this one with Cloudflare? My router is blocking a lot of possible network intrusions since opening the 443 port.
Are both options safe to use?
Hi I’m new in here and seeking advice
Currently running HA in raspberry pi docker
Today try to use cloudflare tunnel to my HA
Getting error : 400: Bad Request
i’ve addedd to configuration.yaml
http:
use_x_forwarded_for: true
trusted_proxies:
172.30.33.0/24
any suggesstion?
Thank you. I followed your guide and I now have this working perfectly.
Does the cloudflare certificate need renewing?
Is let’s encrypt still needed, or can I remove it.
Hi,
I have followed the great write up and can connect in to my HA using http but when I switch to https I get a 403: Forbidden error. Has anyone else seen this? Do I need to install / configure something on my HA to enable me to use SSL?
j’ai DEUX raspberry pi avec homeassistant . le premier est un raspi4 et l’autre un raspi5
alors via le tunnel cloudflaire je veux avoir un tunnel sur user91490-domo.ovh pour le pi5 et pour le pi4 je veux avoir capteurs.user91490.ovh
alors est ce que je dois acheter DEUX noms de domaines qui vont forcement arrivé chaqu’un sur la meme adresse ip externe.
est ce que cet addon permet de gérer cette situation.
i have TWO raspberry pi with homeassistant. the first one is a raspi4 and the other one a raspi5 so via the cloudflaire tunnel i want to have a tunnel on user91490-domo.ovh for the pi5 and for the pi4 i want to have sensors.user91490.ovh so do i have to buy TWO domain names that will arrive each one on the same external ip address. does this addon allow to manage this situation.