
Are you concerned about the VOC air quality in your home? Would you like to monitor it without spending a fortune? If so, you’re in luck! In this guide, I’ll show you how to make your own air quality smart sensor for Home Assistant for less than $5 and in just 10 minutes. We’ll be using a sensor called the AGS10, which may sound complicated, but this DIY project is straightforward and easy to follow.
Table of Contents
Why Monitor Air Quality?
Before we dive into the steps, let’s talk about why this sensor is important. The AGS10 is a volatile organic compound (VOC) sensor. VOCs are chemicals found in many household products, such as candles, perfumes, cleaning products, craft supplies like glue and paint, cooking fumes, and even some children’s toys. High levels of VOCs can pose health risks, including respiratory irritation, headaches, and other symptoms. Therefore, having a VOC sensor can help you maintain a healthier indoor environment.
Prefer Watching Video?
If you don’t want to read more then please check my video tutorial about this topic.
Parts You’ll Need for the VOC Air Quality Sensor
To build this smart air quality sensor, you only need four components, and you might already have some of them:
I’m sharing some affiliate links below to all the parts and if you buy something from these links I’ll get a small commission from your purchases with no additional cost for you.
- AGS10 Sensor: This VOC sensor costs from $1.50 to $3 on AliExpress.
- AGS10 AliExpress Links:
- AGS10 Amazon Links:
- D1 Mini ESP8266: The brain of the operation, costing less than $3 on AliExpress.
- D1 Mini AliExpress Link – https://s.click.aliexpress.com/e/_DmseDwf
- D1 Mini Amazon Link – https://amzn.to/3I6MR4V
- Jumper Wires: To connect the AGS10 to the D1 Mini.
- AliExpress Link – https://s.click.aliexpress.com/e/_DEoCGxH
- Amazon Link – https://amzn.to/3fRlXyK
- Micro USB Cable: For powering the D1 Mini and uploading the ESPHome code.
- AliExpress Link – https://s.click.aliexpress.com/e/_DmMNO6L
- Amazon Link – https://amzn.to/32tdxdF
Software Requirements
You’ll need Home Assistant, preferably with the Add-on Store, and the ESPHome dashboard. The ESPHome dashboard can be installed as a Home Assistant add-on, making the setup process smooth.
If you don’t have Home Assistant yet, consider registering for my free Home Assistant webinar
https://automatelike.pro/webinar
Step-by-Step Guide
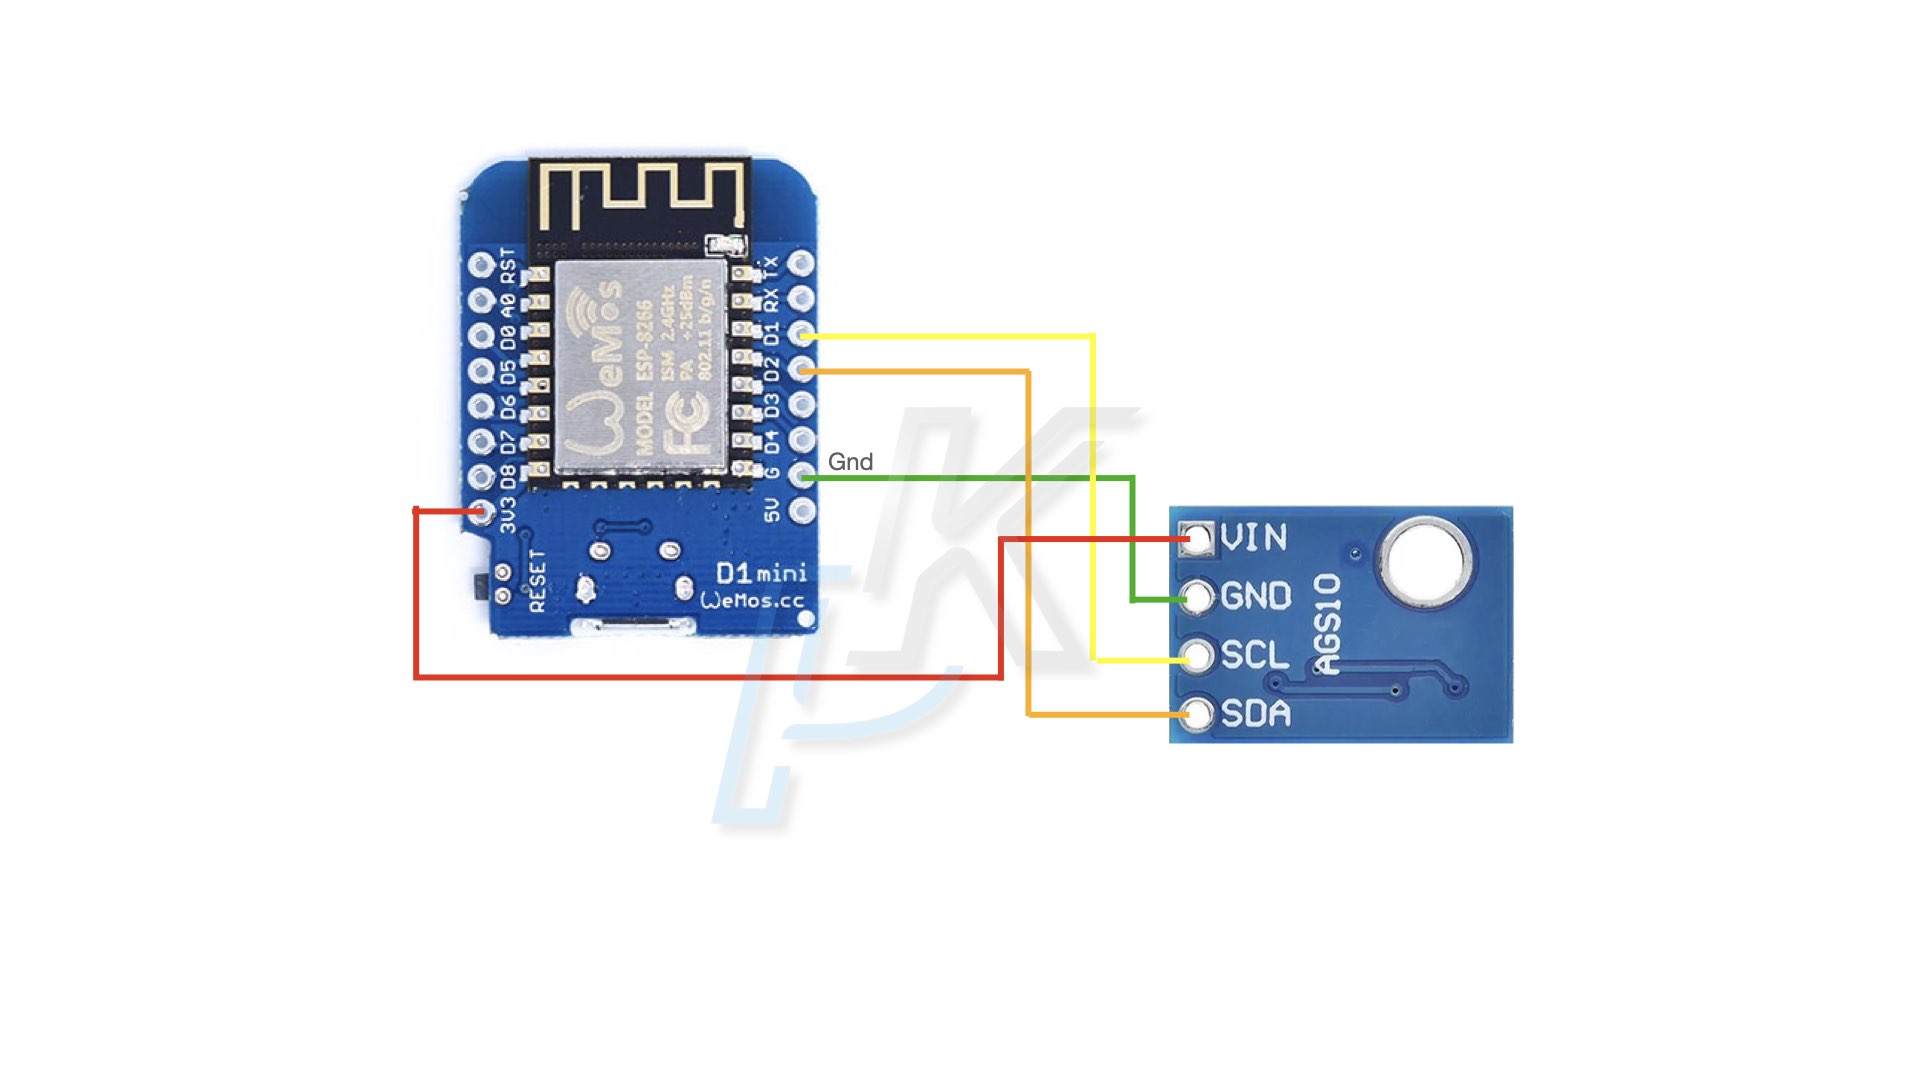
Step 1: Wiring the Sensor
Here’s how to wire the AGS10 sensor to the D1 Mini:
- Connect the VIN pin on the AGS10 to the 3V3 pin on the D1 Mini.
- Connect the GND pin on the AGS10 to the G pin on the D1 Mini.
- Connect the SCL pin on the AGS10 to the D1 pin on the D1 Mini.
- Connect the SDA pin on the AGS10 to the D2 pin on the D1 Mini.
Step 2: Uploading ESPHome Code
Now, let’s upload the ESPHome code to the D1 Mini.
- Open your Home Assistant and go to the Add-on Store.
- Install the ESPHome add-on, then click on “Start”.
- Open the ESPHome dashboard by clicking “Open Web UI”.
- Click on “New Device” and follow the prompts. Name your device (e.g., “VOC Air Quality”), select the board type (ESP8266 for the D1 Mini), and skip the initial configuration.
- Edit the configuration by adding the following code to the bottom of the existing ESPHome code (add new line at the very bottom and paste the code below there):
i2c:
  sda: 4
  scl: 5
  scan: True
  frequency: 10kHz

web_server:
  port: 80

sensor:
  - platform: ags10
    update_interval: 1s
    tvoc:
      name: TVOC
- Save the configuration and connect the D1 Mini to your Home Assistant device using a micro USB cable.
- Click on “Install” and select “Plug into the computer running ESPHome Dashboard”. This will upload the code to your D1 Mini.
Step 3: Adding the Sensor to Home Assistant
- Go to the Integrations page in Home Assistant.
- You should see a new device (your VOC air quality sensor) ready to be configured. Click on “Configure” and then “Submit”.
- Once configured, you can find the sensor in your ESPHome section under configured devices.
Step 4: Creating Automations
Now that your sensor is set up, you can create automations based on its readings. For example, you can set up notifications if VOC levels exceed a certain threshold.
- Go to the Automations page in Home Assistant and create a new automation.
- Set the trigger to “Volatile Organic Compounds Concentration changed” and set a threshold value (e.g., 400 ppb).
- Add actions, such as sending a persistent notification in Home Assistant and a message via Telegram (additional configuration needed – Home Assistant Telegram Notifications (Video How-To)).
Here’s an example configuration for the automation:
alias: the VOCs are over 400
description: ""
trigger:
  - type: volatile_organic_compounds_parts
    platform: device
    device_id: 5b79cd9f1bcc334d9edc1fa7e8cc796c
    entity_id: 3f4456a88745912e17e91a5216e33801
    domain: sensor
    above: 400
condition: []
action:
  - service: persistent_notification.create
    metadata: {}
    data:
      message: the VOCs are over 400
  - service: notify.telegram
    metadata: {}
    data:
      message: the VOCs are over 400
mode: single
Testing the Sensor
To test your sensor, use a product that emits VOCs, like nail polish remover or aftershave. Place the sensor near the product and monitor the readings in Home Assistant. If everything is set up correctly, you should see the VOC levels rise and receive notifications when they exceed your set threshold.
Conclusion
Congratulations! You’ve just built a DIY air quality smart sensor for less than $5. This sensor can help you monitor and maintain healthy indoor air quality, giving you peace of mind.
Feel free to download my Smart Home Glossary which is coming as one big PDF file and it is full of Smart Home Wisdom 🙂 Oh, and it is free.
Thank you for reading, and happy DIY-ing!
Hi – thanks for all your wonderful content over the past few years with esphome and HA. Have you ever reached the upper limit of devices for espHome? Since the changes made in I think it was April 2024, I have had hit and miss ability to get devices to add to my esphome. My main error is they wont connect to my wifi, or they randomly drop off. I suspect my code is wrong, however I can made a device and it works, clone the code with changes only to the devices name and location and nope wont work. Primarily I am having trouble with d1mini’s both normal and external antenna pro’s. Even the fallback wifi arent working. At this stage Im afraid to update any of my old wemos devices running dht22’s as at the moment at least they are working 100% all the time everytime. Can I bother you for your most recent code?
Any other thoughts? or have you had a similar experience?
Thanks heaps Red
Hey KIril! Thanks for this self explained tutorial.
I followed the step-by-step video, but I’m always getting this output:
“`
Time Level Tag Message
11:19:47 [V] [i2c.arduino:110] 0x1A TX 00
11:19:47 [E] [ags10:180] Reading AGS10 version failed!
11:19:50 [V] [i2c.arduino:110] 0x1A TX 00
11:19:50 [E] [ags10:180] Reading AGS10 version failed!
11:19:53 [V] [i2c.arduino:110] 0x1A TX 00
11:19:53 [E] [ags10:180] Reading AGS10 version failed!
“`
I used the same chips as in your tutorial, and I’m running ESP Home on a Home Assistant OS from a R-PI + CM4.
Any suggestions?
Much appreciated in advance!