
I will discuss one of the most important tasks in Home Assistant that you should do no matter what else are you doing there. Namely, Home Assistant Backup and Restore!
And I’m not talking about the regular Backup procedure, but about one that is on steroids and will allow you to automate that task and store your backups on another host either on Local Share or on Google Drive in the Cloud.
Table of Contents
Problems with Home Assistant Backup?
The Home Assistant backup or former Snapshot functionality is almost perfect. However, there are several problems:
- By default, you have to trigger the backup manually. What if you often forget to do this (or you are lazy like me)?
- The actual backup archive stays on the device where Home Assistant is. That means If your storage got corrupted you will lose your backup and your Home Assistant at the same time.
How to avoid Home Assistant Backup problems?
Having in mind the problems stated above, it is a good idea to have automated backup that are moved to another location and what’s better than a local Samba share or Google Drive for that?
And this is exactly what I’m going to show you – how to backup Home Assistant regularly and automatically on a remote host, so you will be as safe as possible. And if there is such need you will be able to restore your Home Assistant in no time!
Not as quickly as smashing the Subscribe button for my Newsletter, where you will receive weekly articles like this, but anyways let’s start this!
What will I use to accomplish the best possible Home Assistant Backup?
To accomplish the best possible Home Assistant Backup I’m going to use two Home Assistant add-ons:
- Home Assistant Samba Backup (GitHub Link)
- Home Assistant Google Drive Backup (GitHub Link)
You can choose one of these methods or if you want to be on the extra safe side you can implement them both. I will start with the Home Assistant Samba Backup first and then we will continue with Home Assistant Google drive backup.
Home Assistant Samba Backup Add-on installation
Home Assistant Samba Backup Add-on work with Samba shares that require authentication by username/password or allow guest access, but let’s first install the add-on in our Home Assistant.
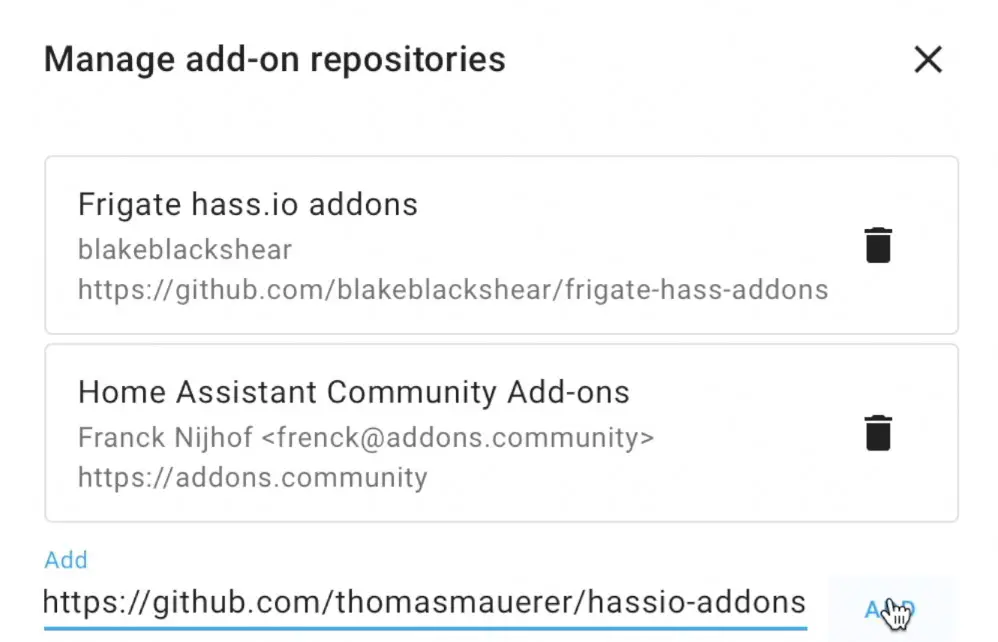
- In your Home Assistant, press the “c” button to invoke the commands search bar and start typing Add-on Store, then select Navigate Add-On Store. Then, click on the Three dots menu (upper right corner) > Repositories and paste the following URL as an additional repository:
https://github.com/thomasmauerer/hassio-addons - Refresh your browser and search for the Samba Backup add-on, then click the INSTALL button.
Home Assistant Samba Backup Add-on Configuration
Time to configure the Home Assistant Samba Backup add-on so it will run automatically from now on. Get your local share credentials ready to use and let’s do this.
I will use slightly modified version of the configuration example in the Home Assistant Samba backup GitHub project page.
Go to Configuration tab of the Home Assistant Samba backup add-on, click on the Three dots menu and select Edit in YAML, then remove everything there and paste the following text:
{
  "host": "10.0.0.218",
  "share": "home",
  "target_dir": "/HABackup",
  "username": "admin",
  "password": "smash-the-like",
  "keep_local": "5",
  "keep_remote": "20",
  "trigger_time": "04:00",
  "trigger_days": ["Mon","Tue","Wed","Thu","Fri","Sat","Sun"],
  "exclude_addons": [],
  "exclude_folders": [],
  "backup_name": "{type} Backup {date}"
}
In general, most of you should only have to change the following from the above example:
- host – with the IP of your server where your local share is,
- share – which is the share name,
- target_dir – with the target directory where the backups will be stored,
- username – with your local share username,
- password – with your local share password,
- Optionally, you can change the trigger time and days if you are not happy with the everyday at 04:00am backup schedule,
- Optionally, you can exclude add-ons or folders from the backup, but I personally don’t want to do that.
When you are ready with your Samba Backup configuration, do the following:
- Click Save button, to validate your changes.
- Go back to Info tab and start the Samba Backup add-on.
- Go to Log tab of the add-on and hit Refresh button until you see a text saying “Samba Backup started successfully” or something similar.
- If you see errors in the Logs instead, share your issues in the comments below, open a new GitHub issue, but first of all Google for the error.
Home Assistant Samba Backup Sensor
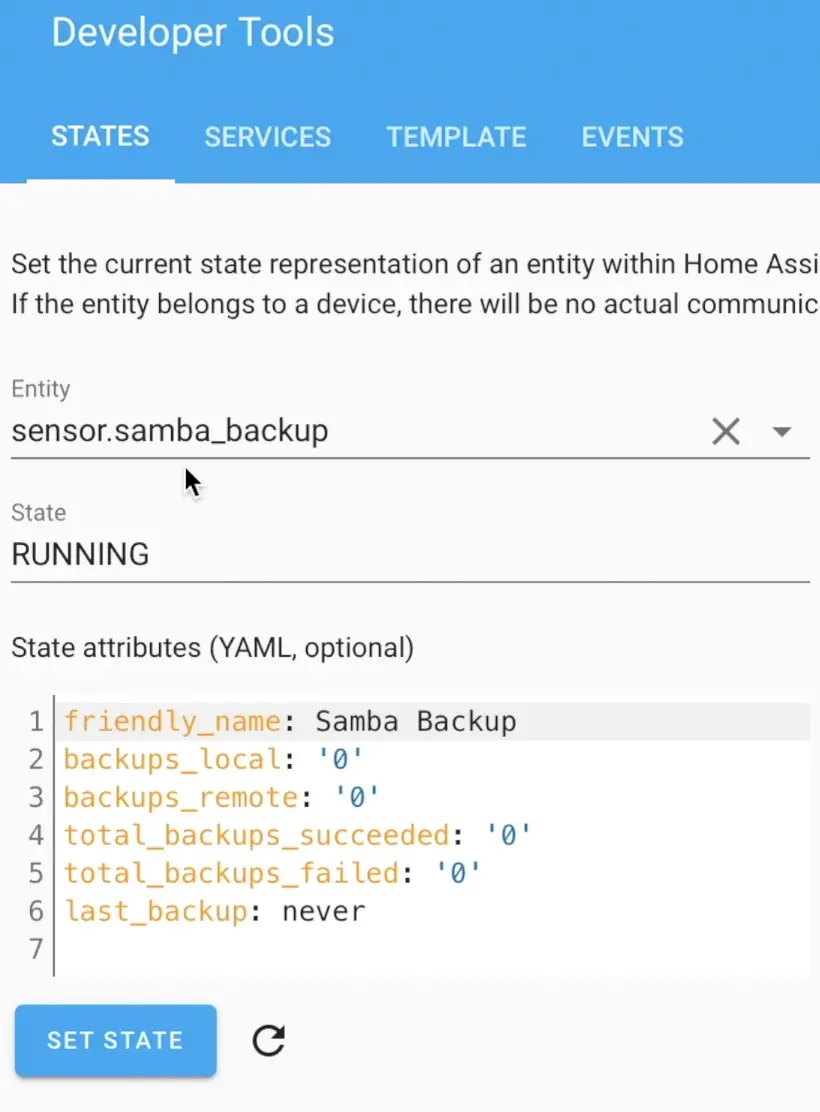
The Home Assistant Samba Backup add-on includes a sensor for Home Assistant which reflects the backup status. No configuration is needed and you can use it right away. The sensor name is sensor.samba_backup and it have some very useful attributes.
Home Assistant Samba Backup Sensor can be added on the Home Assistant dashboard or can be used to automations.
However, there is a known limitation that the sensor will be unavailable if you restart Home Assistant. You can easily fix this by creating an automation that will restore the sensor after Home Assistant startup. Just add the following YAML in your automations.yaml file and reload your automations.
automation:
- alias: Restore Samba Backup sensor on startup
  trigger:
  - event: start
    platform: homeassistant
  action:
  - service: hassio.addon_stdin
    data:
      addon: 15d21743_samba_backup
      input: restore-sensor
  mode: single
Manual run of the Home Assistant Samba Backup
The Home Assistant Samba backup is up and running and everything is automated, but if for any reason you wish to run it manually, then you can use the following script:
service: hassio.addon_stdin
data:
  addon: 15d21743_samba_backup
  input: trigger
You can invoke the above script from the Home Assistant Developer Tools, or you can create a new script and add a button to your Lovelace for example.
Home Assistant Google Drive Backup
That was the Home Assistant Samba backup, now it is time for the Home Assistant Google Drive Backup.
Please, have in mind that when using Google Drive backup method your data will be uploaded to the Google Servers somewhere in the Cloud. In theory only you will have access to it, but if at some point Google turns evil or someone hack your Google account, they can get your secrets.yaml file if you know what I mean.
So, if you afraid of such scenario, go back and implement only the local Home Assistant Samba backup that I already described, otherwise let’s start implementing the Home Assistant Google Drive Backup:
Home Assistant Google Drive Backup installation
To install the Google Drive backup add-on do the following:
- In your Home Assistant, press the “c” button to invoke the commands search bar and start typing Add-on Store, then select Navigate Add-On Store. Then, click on the Three dots menu (upper right corner) > Repositories and paste the following URL as an additional repository: :
https://github.com/sabeechen/hassio-google-drive-backup - Then search for the Home Assistant Google Drive Backup add-on and click on the INSTALL button.
- You can optionally go to Configuration tab and play with the settings there, but the default settings are just fine.
- Go to Info tab, click Start and after few seconds, click on the Open Web UI.
- You will be greeted by a Get Started screen with one big blue button in the middle saying “Authenticate with Google Drive”
- Click on the Authenticate with Google Drive button to link the add-on with your Google Drive account.
- Select your Google account, give access to the habackup.io (Home Assistant Google Drive Backup add-on) to your Google Drive and hit Continue button.
- On the next page, copy the Authorisation String, go back to Browser Tab with Home Assistant Google Drive add-on configuration and paste the string in the empty box.
- Click Save and you are done!
After you are ready with the above you will be ready with everything! Your backups will be automatically uploaded on the Google Drive every 3 days and your local and remote backups will be with 4 days retention. Meaning, you will have the last 4 backups stored locally in Home Assistant and in your Google Drive (by default).
Of course, you can change this behaviour in the add-on settings if you wish or you can manually start a backup from there. The choice is yours.
Having both Home Assistant Samba Backup & Home Assistant Google Drive Backup at the same time
If you want to have both the Home Assistant Samba backup & Home Assistant Google Drive Backup simultaneously, you can set days_between_backups: 0 in the Home Assistant Google Drive Backup configuration.
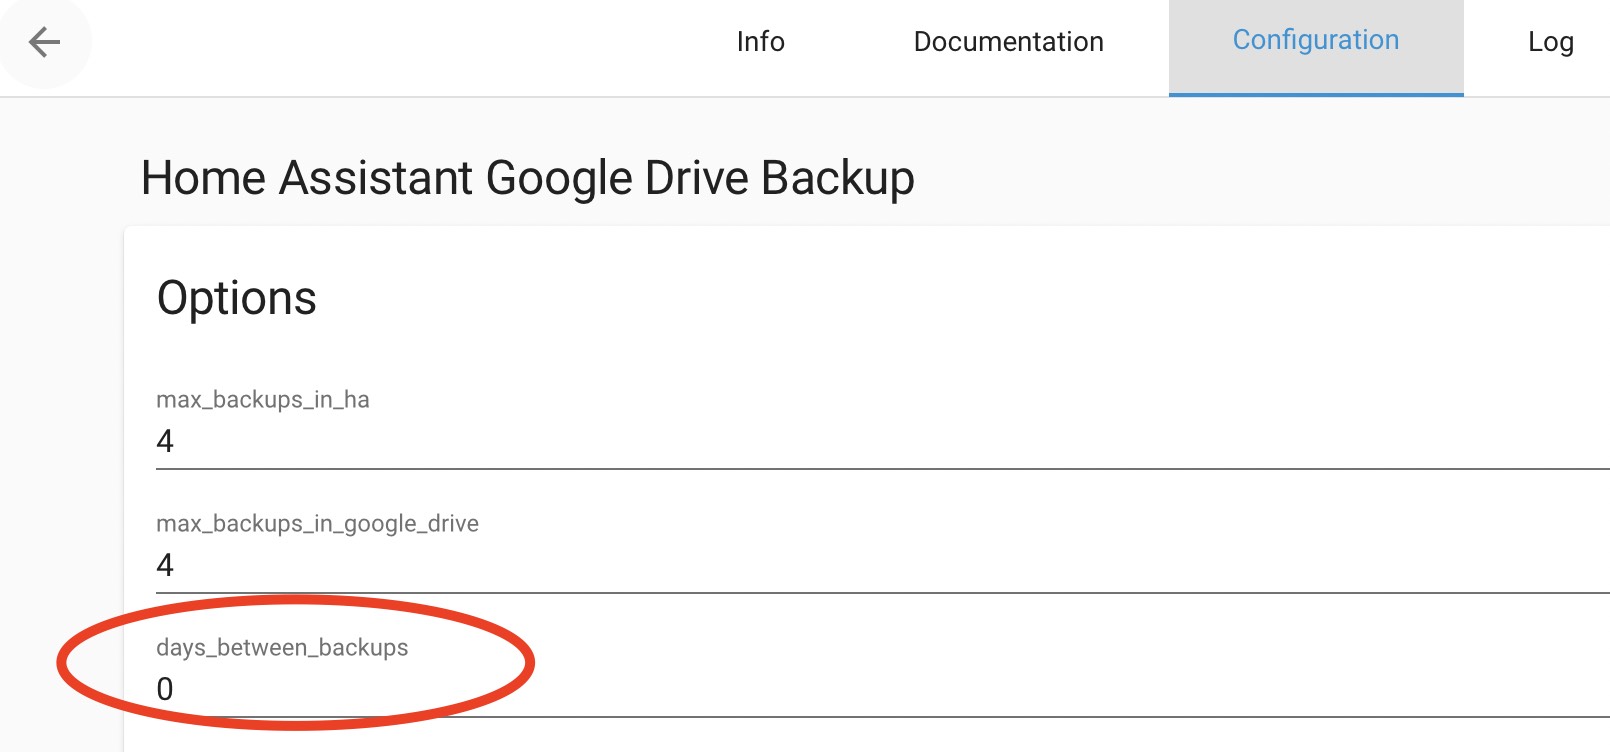
That will tell the Home Assistant Google Drive Backup not to try to create new backups and to use and upload the ones that it finds to Google Drive.
What if we have to restore Home Assistant?
Okay, we have automated Home Assistant backups now, but what if we have to restore?
- One of the possible scenarios is to restore to a new Home Assistant installation during the onboarding process. Where you have to click on the link at the bottom of the account creation page and to upload your backup file.
- Or you can restore on an existing Home Assistant installation by going to the Backup section of Home Assistant. Just press the “c” button and start typing Backup, then select Navigate Backups. Once you are there, select any of the existing backups there and click Restore or Select Upload Backup from the three dots menu in the upper right corner. Click on the folder icon to navigate to your backup archive file and select it.
If the backup you are uploading is more than 1GB in size, it can be faster and more efficient to make use of the Samba add-on in order to transfer files to the /backup directory.
Outro
If this article was useful to you and you actually implement any of the methods described here, please show this off somehow! For example by leave the #BackupOwned text in the comments bellow.
Of course, don’t forget to subscribe for my YouTube channel and ding that notification bell, so you will be the first to know when I release a new video. If you want to read more articles created by me – check for example this How to update your Home Assistant as safe as possible tutorial or any of my categories.
Join my Twitter and follow me on Discord or vice versa, stay safe and remember – Home Smart, But Not Hard!
I’m Kiril and I’m done writing.
I find about 1000 ways to backup home assistant but none on how to restore. If I find one, it says to go to snapshot and restore. I don’t have snapshot on the system, It’s not in configuration or addons. Can someone tell me how to restore home assistant on a PI from an samba backup?
You have to install Homeassistant supervised. Check out the homepage: https://www.home-assistant.io/installation/
But in the end, check out peyanskis channel how to best install it! https://www.youtube.com/watch?v=0IWTWsN4yYc
When adding the repository:
Cmd(‘git’) failed due to: exit code(128) cmdline: git clone -v –recursive –depth=1 –shallow-submodules https://github.com/thomasmauerer/hassio-addons/tree/master/samba-backup /data/addons/git/da55f798 stderr: ‘Cloning into ‘/data/addons/git/da55f798’… fatal: repository ‘https://github.com/thomasmauerer/hassio-addons/tree/master/samba-backup/’ not found ‘