Home Assistant Energy Management is huge. These days everyone is trying to make their homes as energy efficient as possible and of course to save some money. But you cannot improve your efficiency or increase your savings if you don’t have a centralised and reliable energy measurement and monitoring system. Home Assistant and the new Home Energy Management section is here to help. Let’s see how to set it up.
Table of Contents
What is Home Assistant Energy Management?
What actually is Home Assistant Energy management? The whole idea is to have an all-in-one dashboard showing you how much energy you’re consuming in total, is the energy coming from the power grid or from your solar panels (if you happen to have such) and which devices are consuming your energy.
Having all that data in one place is not just great, but it is also kind of must have for any Smart Home.
How typical home is connected?
A Typical home is connected to the electricity grid and the energy consumption is tracked by an energy meter. It is also possible to have different tariffs, for example cheaper night or off peak tariff and more expensive day or peak tariff.
Your energy meter is the best place to get all of your consumption, so let’s start with the possible ways to get that data in Home Assistant.
How to add your energy meter to Home Assistant?
Here are three ways to add your energy meter in Home Assistant:
- First thing that I recommend is to search if your Electric provider is listed in the available Home Assistant integrations within the Energy Section – LINK.
If you see your electricity provider there, then you are lucky and you just have to follow the provided instructions to add your energy consumption in Home Assistant. - If you didn’t saw your Electric Provider within Home Assistant integration, but you are located in Netherlands, Belgium or Luxembourg you can buy this ready to use ESPHome based device and just plug it in your power meter – LINK.
ESPHome is working almost natively with Home Assistant you will be ready in no time. - And If just like me you are not located in that part of the world (Benelux) and your Electricity Provider is not listed as supported in Home Assistant – then we have the following options:
- Option A, is to DIY a device like the Home Assistant Glow – LINK. Home Assistant Glow is an ESP32 device that also runs ESPHome, but more importantly it makes possible reading the consumption from a non-smart energy meter based on how fast the LED of the energy meter is blinking.
- Option B, you can buy (or DIY) a clamp based device like the Shelly EM or Shelly 3EM. Shelly devices have pretty good local integration with Home Assistant and you can integrate those devices very easily.
No matter where you live and which option you like best you can subscribe for my newsletter, so you won’t skip a beat – My Newsletter Link.
Also don’t forget to subscribe for my YouTube Channel and click on the bell to get notification when I release a new video.
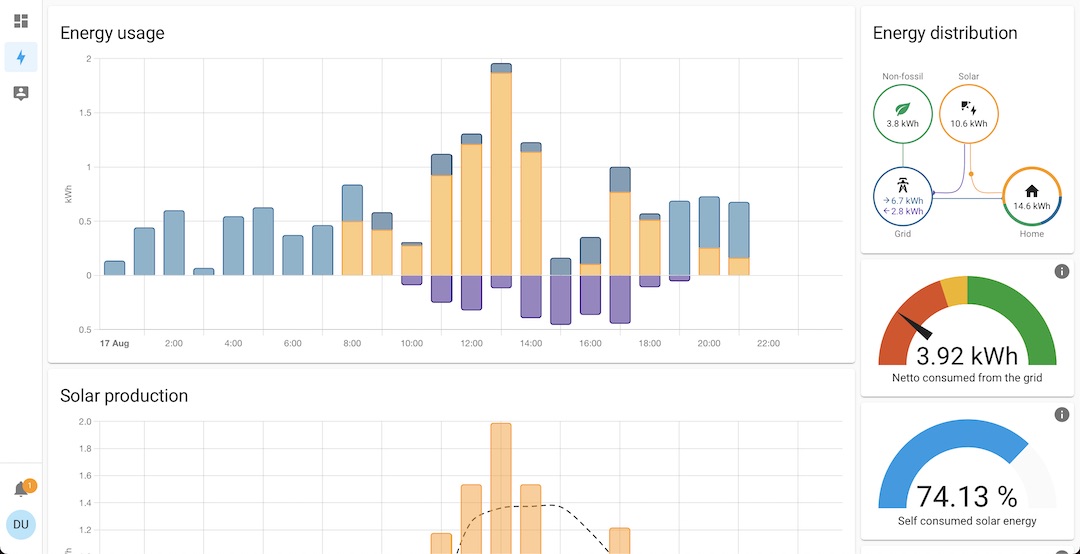
Home Assistant Energy Management dashboard
Time to see and setup the Home Assistant Energy Management dashboard. This is the part where you can add the energy meter total consumption, different tariffs, solar panel and individual devices in one place.
Open your Home Assistant and go to Energy section from the left sidebar.
TIP! If you already configured some parts of the Energy Dashboard, you can go to Configuration > Energy and you will reach the same menus.
Grid Consumption
On the first step (step 1 of 3) you can configure the Grid Consumption. Click on the Add Consumption button.
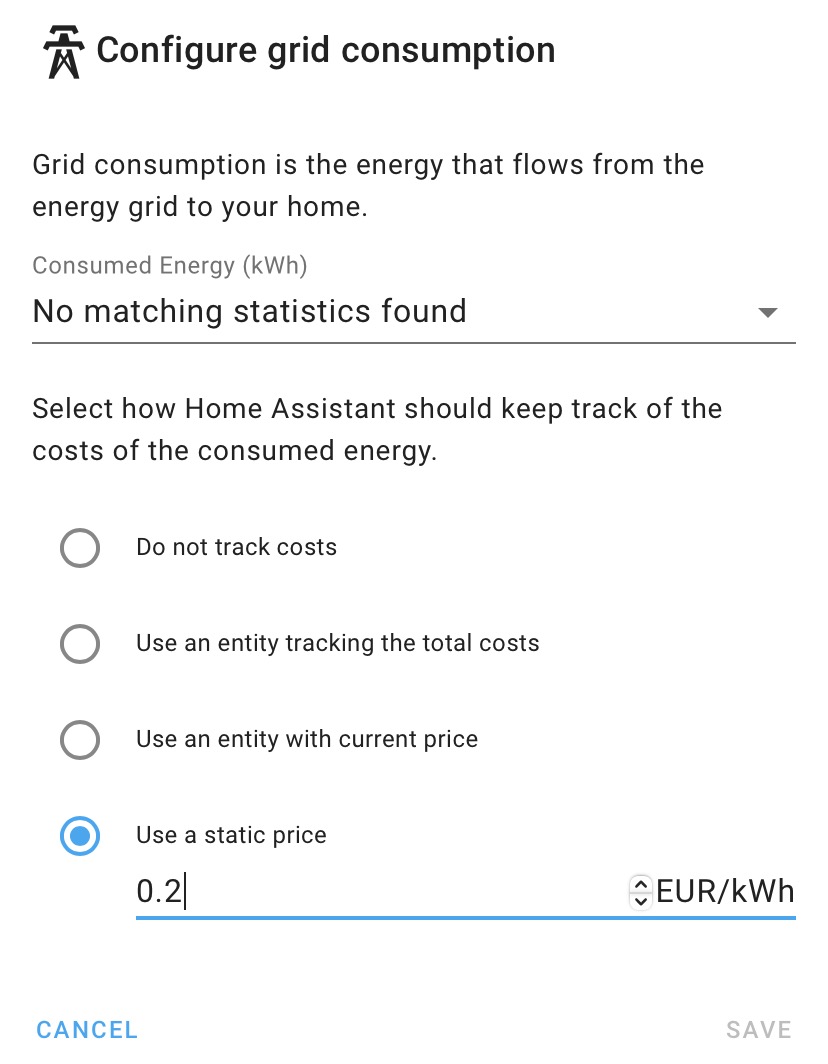
From Consumed Energy (kWh) dropdown menu you can select your total energy consumption that you added using one of the ways described in the How to add your energy meter to Home Assistant? section.
To track the exact cost – select a static price or an entity coming from your electricity provider integration showing you the current electricity price.
TIP! To change the currency of the static price, go to Configuration > General > Currency.
Return to grid
Under Return to grid section you can setup the energy that flows from your solar panels back to the grid.
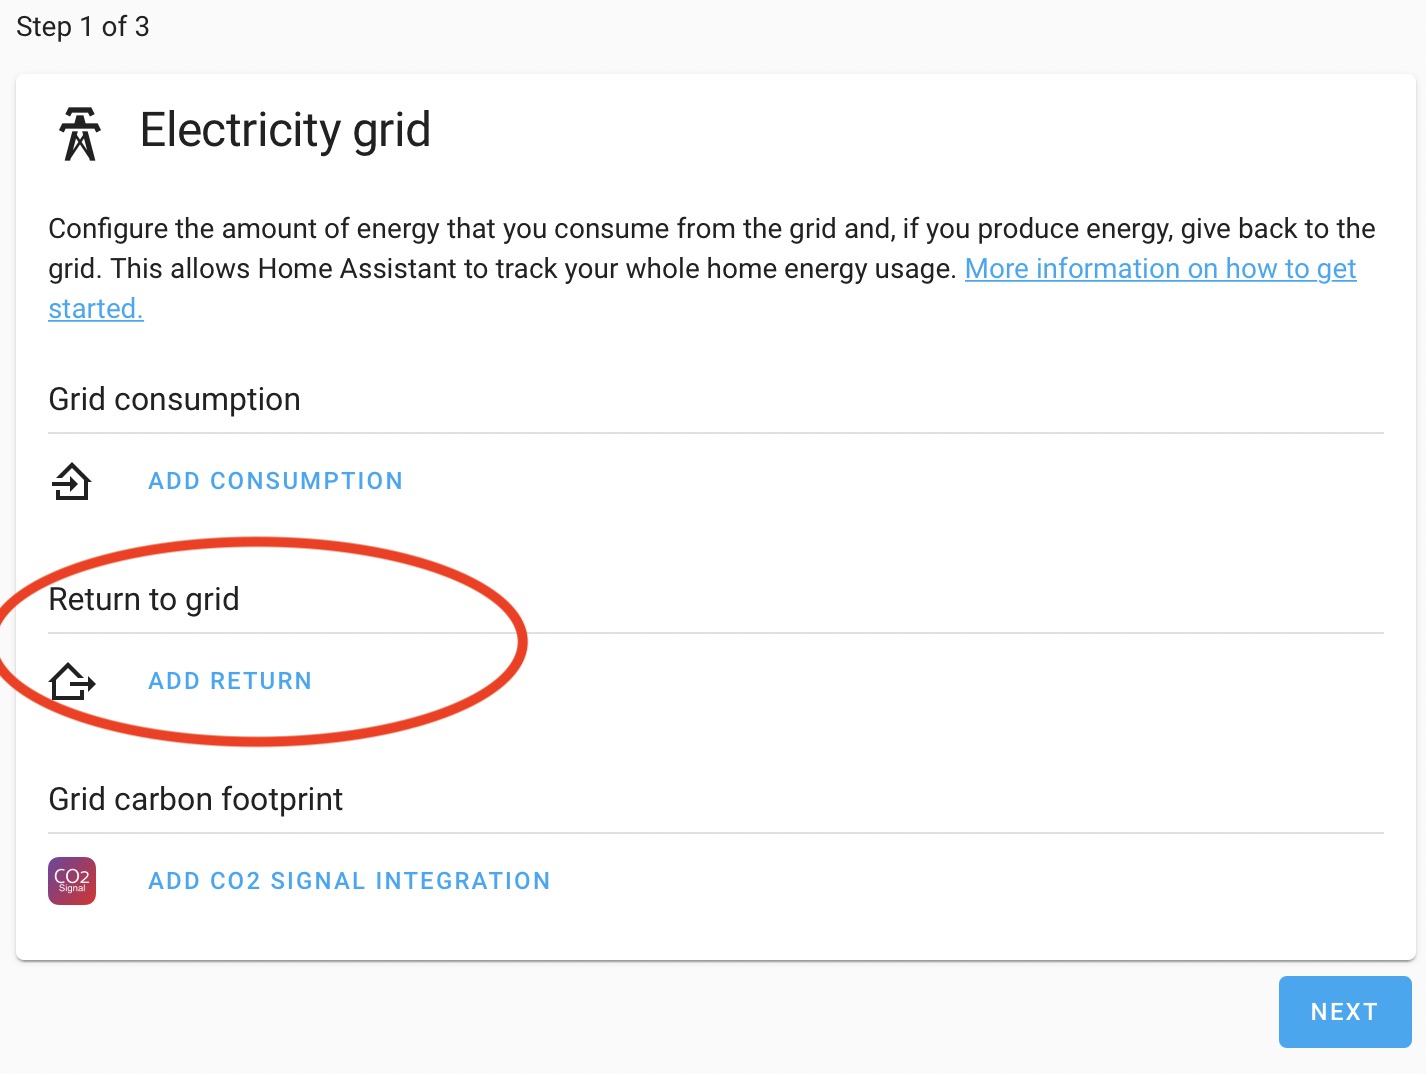
The dialog that follows is the same as in the Grid Consumption section.
Grid carbon footprint
To add the CO2 signal integration – visit https://co2signal.com/ to request a token. You have to sign up for their newsletter and you will receive the access token that you can use in Home Assistant for free.
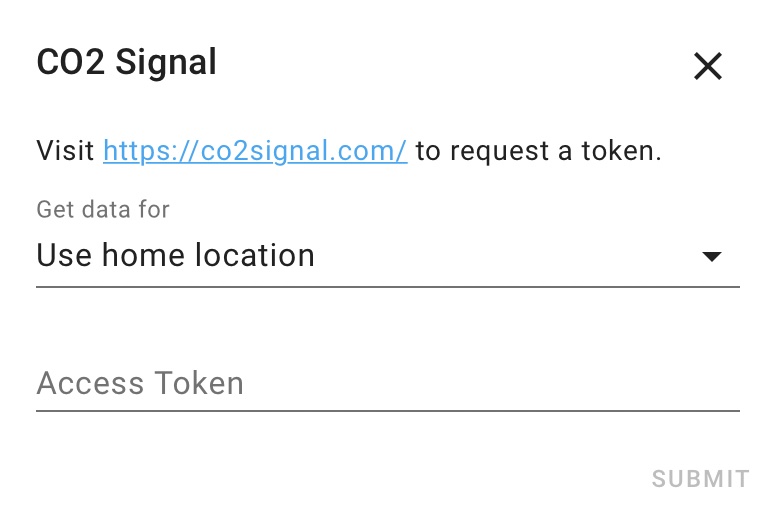
When you successfully setup this CO2 signal, you will have a Non-fossil energy consumed card that will tell you about the energy grid of your country based on the data provided by co2signal website. And on this percentage you cannot influence very much.
Integrating Solar Panel
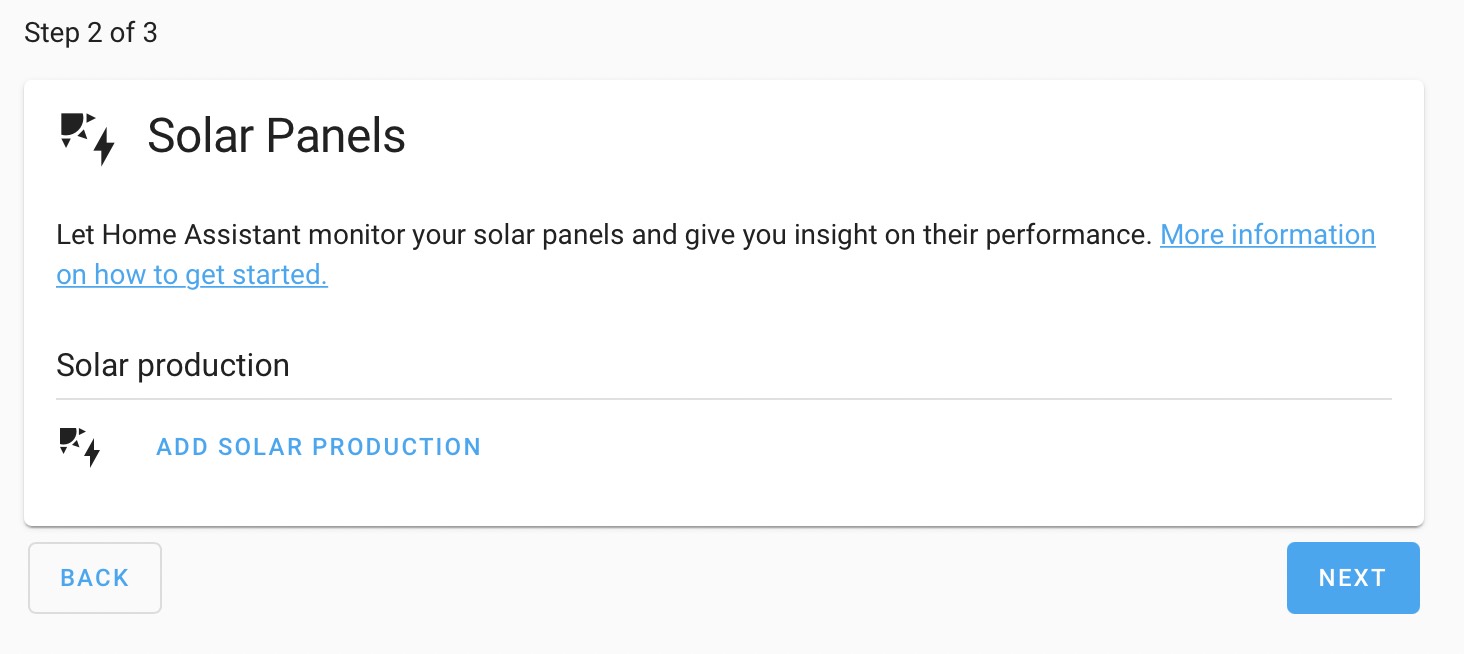
That is step 2 of 3 of configuring Home Assistant Energy Management Dashboard. On this step, by integrating your solar panels into Home Assistant you can gain useful data about your energy production.
If you also set up the Solar Forecast integration, you will be able to see expected solar production and automate based on planned production.
Adding individual devices
On the final step (Step 3 of 3) you can add to the Home Assistant the energy usage of individual devices like: smart plugs, smart relays and even bulbs that have power consumption capabilities. That way you can see the impact of these individual devices on your total energy consumption.
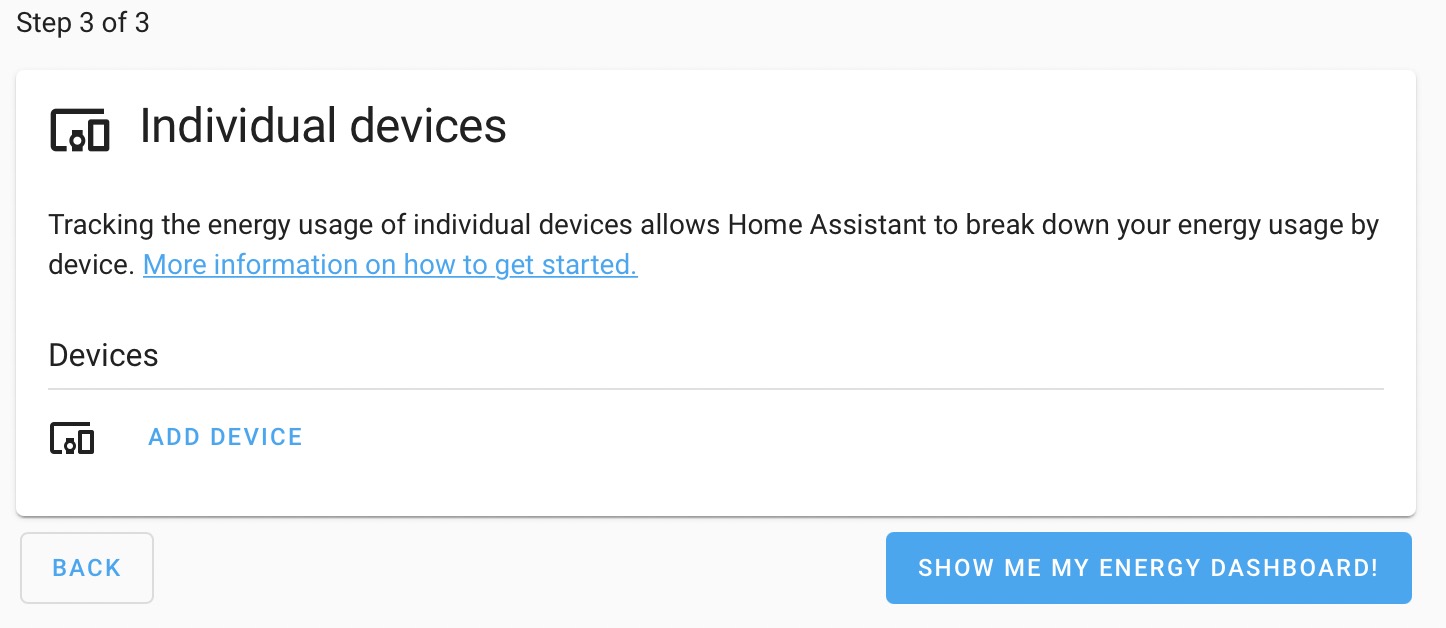
TIP! After setting up a new device, it can take up to 2 hours for new data to arrive in your energy dashboard.
When you are done configuring this final section you will be able to click on the Show Me My Energy Dashboard and you will see the Home Assistant Energy Management Dashboard. This Energy Dashboard will show everything that is needed in one place.
Need some help from you!
I have to say that I’m seriously consider whether to buy a Solar Panel system and to integrate it with my Home Assistant. I need to read a bit more and to get some more info before I finally decide.
That is why I’m asking you for help! Share your Solar Panel(s) experience, for example: what’s your system, how much it cost, and how much it saves you in the comments below. This can be very valuable info for all of us.
Also, feel free to join my Discord server where we already have a brand new energy channel discussing just that – LINK.
Follow me on Twitter where I’m trying to post regularly, stay safe and don’t forget – Home Smart, but not Hard!
Thank you for reading and I will see you next Wednesday!