If you want to enable Home Assistant Gmail notifications this video article is for you.
You can use notifications in Home Assistant for many different things.
For Example:
- Silently logging events.
- Show notifications on the Home Assistant web interface.
- To send Telegram Notifications
- To inform you about state changes in your smart home.
- Or even to display emergency messages that includes pictures from security cameras.
Home Assistant support wide variety of platforms for notifications.
By the end of this How-To you will able to receive Gmail notifications from Home Assistant when there is some state change in your Smart Home.
The described method can be used for any SMTP (Simple Mail Transfer Protocol) enabled mail provider out there with some minor modifications of the server hostname and eventually the port.
In this article/video I will also show you how to create an automation that will monitor for state changes of the Presence Sensor and when that happens a Gmail notification will be created
To complete this tutorial you will need:
- Working Home Assistant!
- To Subscribe to my mail list 🙂
If you don’t have Home Assistant yet you can read my article and watch my video – here
Of course you can search for “SMTP” in the integration section in home-assistant.io or you can directly hit the following link – https://www.home-assistant.io/integrations/smtp/
Home Assistant Gmail notifications
To enable the Home Assistant Gmail notifications – watch the video above or follow these steps:
- Go to your Google Account.
- On the left navigation panel, choose Security.
- On the “Signing in to Google” panel, choose App Passwords. If you don’t see this option:
- 2-Step Verification is not set up for your account.
- 2-Step Verification is set up for security keys only.
- Your account is through work, school, or other organization.
- You’ve turned on Advanced Protection for your account.
- At the bottom, choose Select app and choose the app you’re using. For example: Mail
- Choose Select device and choose the device you’re using. For example: Mac
- Choose Generate.
- Follow the instructions to enter the App Password. The App Password is the 16-character code in the yellow bar on your device.
- Copy the App Password and store it somewhere safe. We will need it for the configuration.yaml file in Home Assistant
- Choose Done.
- Add the following sample configuration in your Configuration.yaml file and customize it for your needs:
# Example configuration.yaml entry
notify:
- name: gmail
platform: smtp
server: smtp.gmail.com
port: 587
timeout: 15
sender: [email protected]
encryption: starttls
username: [email protected]
password: APP_Password_From_Point_7_Above
recipient:
- [email protected]
- [email protected]
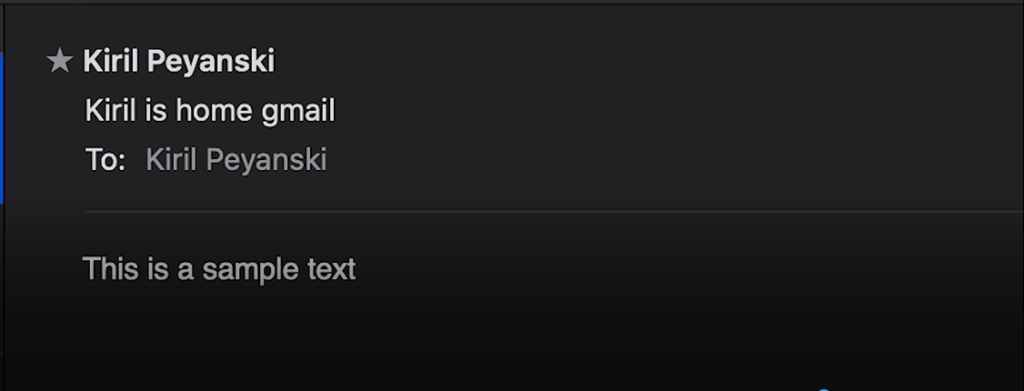
sender_name: My Home Assistant You can add the following automation in the automation.yaml file of if you want to test the Home Assistant Gmail Notifications. Of course you can customize it to suit your needs:
# Example automation.yaml entry
- id: '123434561'
  alias: I'm home gmail
  description: ''
  trigger:
  - entity_id: person.kiril
    from: away
    platform: state
    to: home
  condition: []
  action:
  - data:
    message: find it on peyanski.com/newsletter
    title: Subscribe to my newsletter
service: notify.gmail- Restart your Home-Assistant to activate your new configurations.
- To test your configuration – go to States tab on Developer Tools. Then simulate the needed state changes of the sensor to trigger the automation. Just as I’m showing in the video you have to change the state of presence sensor “person.kiril” from “away” to “home”
- Check your Gmail account for new notification
Of course you can use the newly configured service notify.gmail in your Home Assistant for everything you want and not only for presence detection notifications.
Support my blog
Above all – any sort of engagement on my YouTube channel or/and my website – peyanski.com, does really help out a lot with the YouTube and Google algorithm, so make sure you hit the Subscribe, Like and Bell buttons If you enjoy this post & video.
Also feel free to add me on Twitter by searching for KPeyanski username. I post there pretty much daily.
I really hope that you manage to follow the steps in this video till the end and you have working Gmail notifications in your Home Assistant at the moment.
Don’t forget to subscribe to my newsletter here – https://peyanski.com/newsletter/
Stay safe and see you next time.
I am wondering if it is possible to configure some notifications for different recipients. There are some notifications that I only want to get, but there are others that I would like other family members to get. For example: If there is a leak somewhere I would want everyone in the house to get the notification, but if it is a minor issue like HASS has restarted I am the only one that really needs the notification. Thanks for your time and your great work!
Sure you can do that Mark. You just have to create several automations in Home Assistant. Join my Discord server if you have difficulties doing this we will try to help you there.
Oh, thanks for your quick response! I will join your discord server I’m sure it will be helpful since I am pretty much a newbie! I will try not to ask the question previously asked! Thanks!
The automation script results in an error: end of the stream or a document separator is expected at line 3, column 1
If I paste your script to https://jsonformatter.org/yaml-formatter, it shows the same error.
Thanks Colin, It was bad formatting. I think I fix it. Can you please try again?
Thanks Kiril! Works great!!
FYI – sender_name is incorrectly NOT indented in your YAML