Hello, this article will be a step-by-step tutorial of how to setup secure Home Assistant remote access using NGINX reverse proxy & DuckDNS.
In other words you will be able to access your Home Assistant via encrypted connection with a legit, trusted certificate when you are outside your local network, but at the same time when you are connected to your local home network you will still be able to use the regular non-encrypted HTTP connection giving you the best possible speed, without any latencies and delays. The best of all – it is all totally free.
Table of Contents
Home Assistant Remote Access using reverse proxy DuckDNS & NGINX – prerequisites
For this tutorial you will need a working Home Assistant with Supervisor & Add-ons store. That means, your installation type should be either Home Assistant OS or Home Assistant Supervised.
Quick Tip: If you want to know more about the different official and not so official Home Assistant installation types, then you can check my free Webinar available at https://automatelike.pro/webinar. Go watch that Webinar and you will become a Home Assistant installation type expert.
Back to the requirements for our Home Assistant remote access using NGINX reverse proxy & DuckDNS project. The next and final requirement is: access to your router interface as we will do one quick port forward rule, but more on that later, because now we will continue with DuckDNS domain creation.
How to create DuckDNS sub-domain?
Creating a DuckDNS is free and easy. All you have to do is the following:
- Go to https:///duckdns.org and login with any of the available options (I used Twitter)
- Type a unique domain of your choice and click on Add Domain. I will use smash-the-like.duckdns.org domain for the rest of this demo.
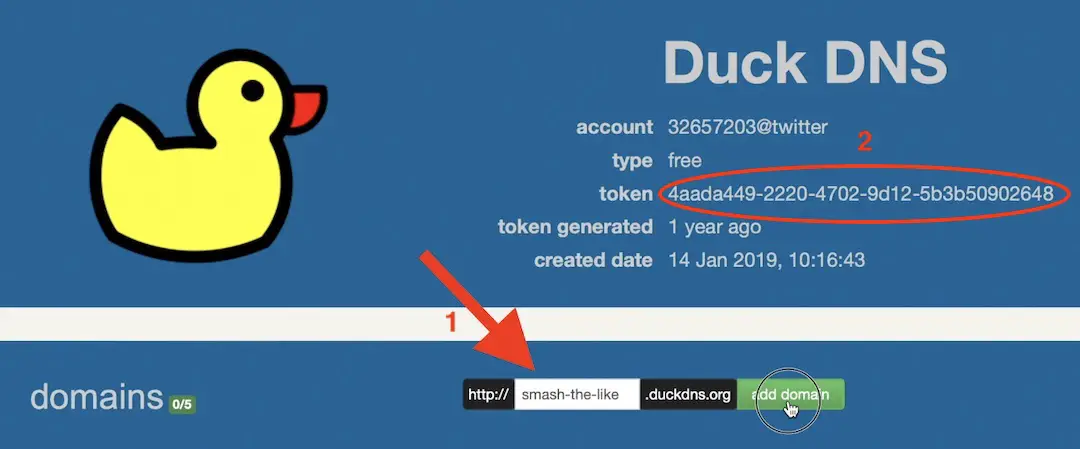 .
. - After that, if it is needed, update the current ip field with your real IP address (usually duckdns auto detect that field, so you don’t have to do anything).
- Then copy somewhere safe the generated token.
What is your favorite?
DuckDNS domain is created, but can you share what is your favorite Dynamic DNS service? Is it a DuckDNS, or it is a No-IP or FreeDNS or maybe something completely different. Let me know in the comments section below.
How to install Home Assistant DuckDNS add-on?
Next step is to install and configure the Home Assistant DuckDNS add-on. This is very easy and fast.
Open your Home Assistant:
- Press the “c” button to invoke the search bar and start typing Add-ons, select Navigate Add-ons > search for DuckDNS add-on > click Install. Alternatively, click the My Home Assistant link below:


- After the DuckDNS Home Assistant add-on installation is completed. Go to the Configuration tab of the add-on and add:
- Your DuckDNS sub-domain under
domains:section - Change
accept_terms: falsetoaccept_terms: true
- Your DuckDNS sub-domain under
- At the end your Home Assistant DuckDNS Add-on configuration should look similar to the one below:
aliases: []
domains:
  - YOUR_DOMAIN.duckdns.org
lets_encrypt:
  accept_terms: true
  algo: secp384r1
  certfile: fullchain.pem
  keyfile: privkey.pem
seconds: 300
token: YOUR_DUCKDNS_TOKEN- Save the changes and start the Home Assistant DuckDNS Add-on from the Info tab.
What is a reverse proxy?
I’m ready with DuckDNS installation and configuration. It is time for NGINX reverse proxy. But first, Let’s clear what a reverse proxy is?
The purpose of a reverse proxy setup in our case NGINX is to only encrypt the traffic for certain entry points, such as your DuckDNS domain name.
What is NGINX?
If you are wondering what NGINX is? Here is a simple explanation: it is lightweight open source web server that is within the Top 3 of the most popular web servers around the world.
How to install NGINX Home Assistant Add-on?
Fortunately, there is a ready to use Home Assistant NGINX add-on that we will use to reverse proxy the Internet traffic securely to our Home Assistant installation. Let’s install that Home Assistant NGINX add-on:
- Press the “c” button to invoke the search bar and start typing Add-ons, select Navigate Add-ons > search for NGINX add-on > click Install. Alternatively, click the My Home Assistant link below:
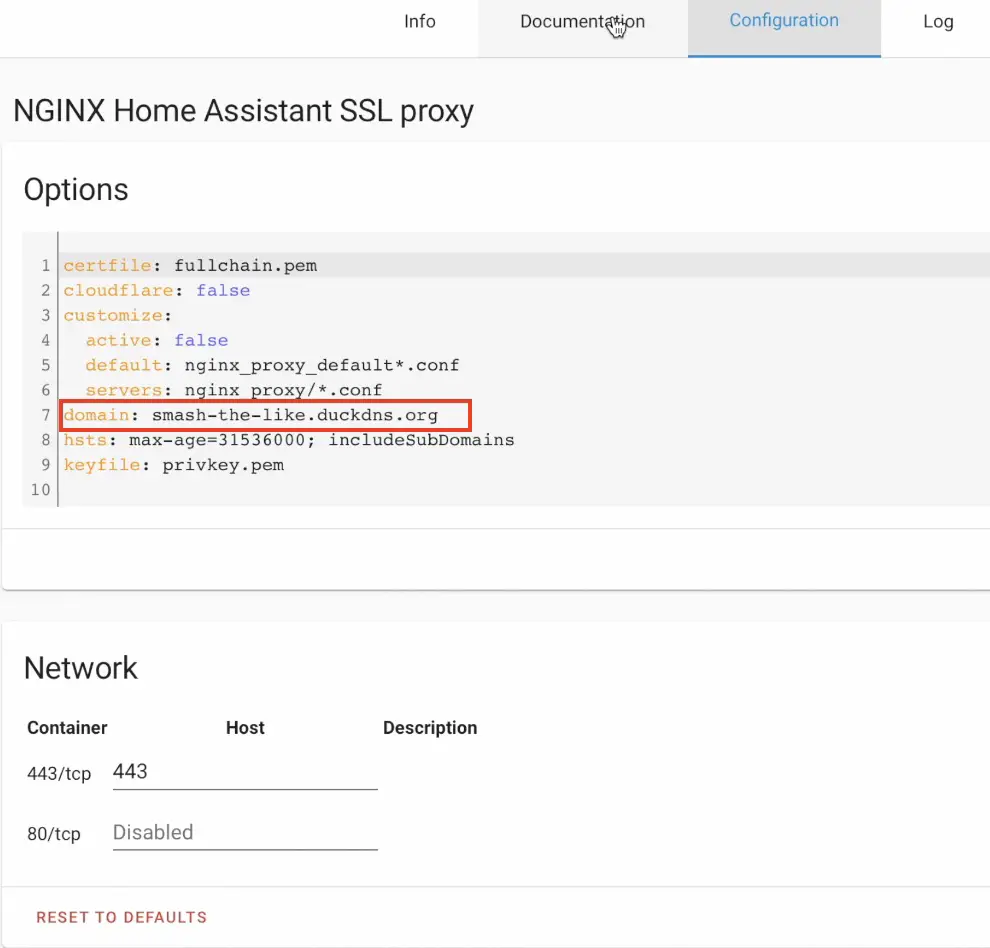
- After the NGINX Home Assistant add-on installation is completed. Go to the Configuration tab of the add-on and add your DuckDNS domain next to the domain section and Save the changes.
- Your NGINX configuration should look similar to the picture below (of course, you should change smash-the-lke sub-domain with your own).
When using a reverse proxy, you will need to enable the use_x_forwarded_for and trusted_proxies options in your Home Assistant configuration. Requests from reverse proxies will be blocked if these options are not set. To add them open your configuration.yaml file with your favourite editor and add the following section:
# configuration.yaml entry
http:
  use_x_forwarded_for: true
  trusted_proxies:
    - 172.30.33.0/24
Exposing your Home Assistant installation to the outside world is a moderate security risk. To make this risk very low you can add few more lines (last two lines from the example below), so you can protect yourself further and if someone tries to login three times with wrong credentials it will be automatically banned.
The next lines (last two lines below) are optional, but highly recommended.
# configuration.yaml entry
http:
  use_x_forwarded_for: true
  trusted_proxies:
    - 172.30.33.0/24
  ip_ban_enabled: true 	        # use this to enable auto IP ban
  login_attempts_threshold: 3 	# set the number of allowed login attempts
After you are finish editing the configuration.yaml file. Save the changes and restart your Home Assistant.
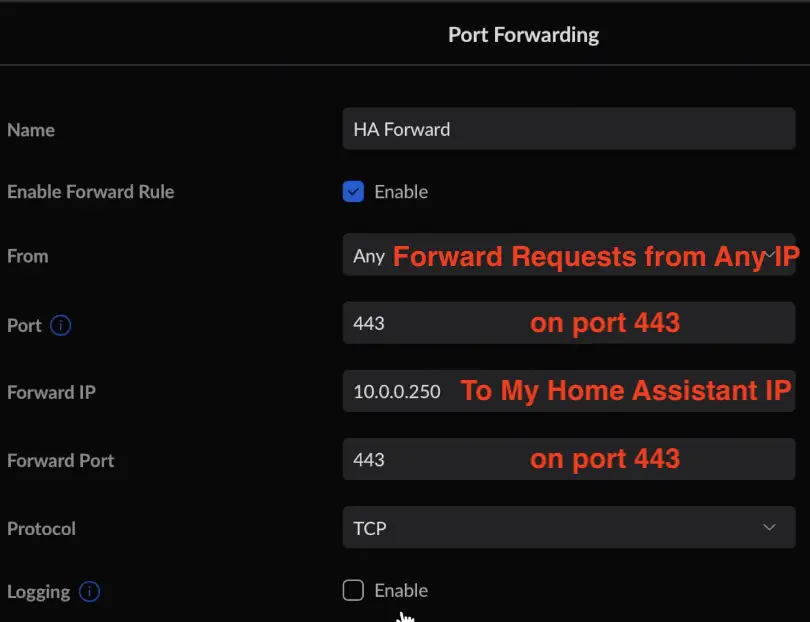
Port Forwarding rule
The final step of the Home Assistant Remote Access using NGINX Reverse Proxy & DuckDNS is to do some port forwarding in your home router. This part is easy, but the exact steps depends of your router brand and model.
The port forwarding rule should do the following: Forward any 443 port income traffic towards your Router WAN IP (Or DuckDNS domain) to port 443 of your local IP where Home Assistant is installed.
If you don’t know how to do it type in YouTube the following:
your_router_brand port forward
For example: linksys port forward
Below is a screen of how I configured this port forwarding rule in Unifi Dream Machine router.
Testing the Home Assistant Remote Access using NGINX Reverse Proxy & DuckDNS
Time to test our Home Assistant Remote Access using NGINX Reverse Proxy & DuckDNS setup.
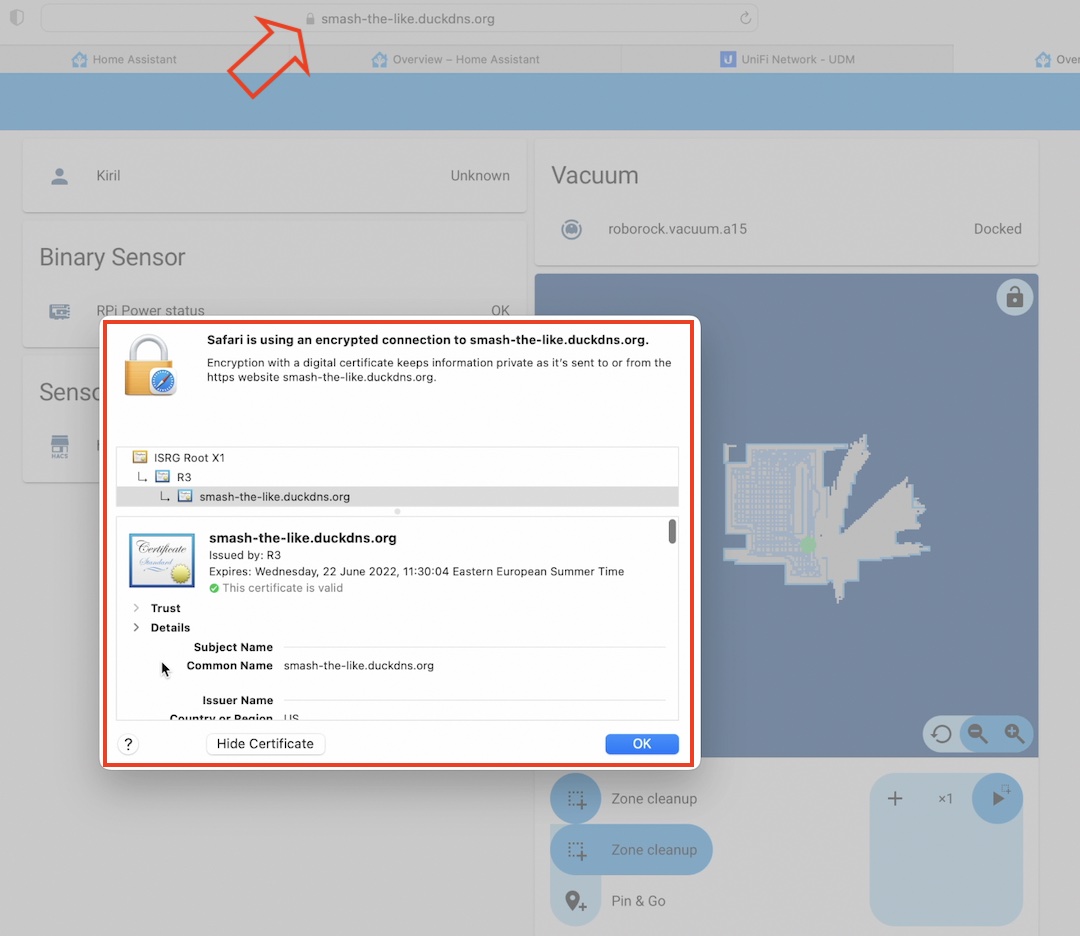
- If I try to open the https://smash-the-like.duckdns.org it will work! And I will have a trusted certificate from Let’s Encrypt Certificate Authority (CA) that will auto renew from now on.
- If I try to open http://smash-the-like.duckdns.org the request will be converted to secure https connection and I will open my Home Assistant. This is very convenient as it will not matter whether you type http or https when you try to reach your Home Assistant from the outside.
- If from my local network I type https://MY_HA_LOCAL_IP:8123 it will not work, but this result is wanted and expected.
- And if I try non-encrypted http://MY_HA_LOCAL_IP:8123 connection it will work just fine. Exactly as I wanted.
Outro
If some of the abbreviations and acronyms that I’m using are not so clear for you, download my free Smart Home Glossary which is available at https://automatelike.pro/glossary.
I’m Kiril and I’m done writing. Bye!
Hi – I’ve heard/read other instructions which also set up port forwarding for port 80 to make sure a browser will redirect an http request for the domain to https. Is it advisable to follow this as well or can it cause other issues?
I have a problem with my router that means I can’t use port forwarding on 443 (if I do, I lose the ability to use the router’s admin interface).
For folks like me, having instructions for using a port other than 443 would be great. Is as simple as using some other port (maybe 8443) and using https://:8443 as my external address?
Hey @Kat81inTX, you pretty much have it. So the instructions vary depending on your router, but essentially you want to tell it to listen on a particular port, like https://:8443 and “divert” (route) those to the local IP address of your Home Assistant device, like: 192.168.0.123:443
I am a noob to homelab and just trying to get a few things working. I got Nginx working in docker already and I want to use that to secure my new Home Assistant I just setup, and these instructions I can’t translate into working. I have setup the subdomain and when I try to access it via a web browser I get a 400 error, when I try to connect the iOS app it says 400 error Shared.WebhookError 2. I have tried turning websockets and tried all the various options on the ssl tab but I’m guessing it’s going to need something custom or specific in the Advanced tab, but I don’t know what. Any pointers/help would be appreciated.
Where do you get 172.30.33.0/24 as the trusted proxy? Should mine be set to the same IP?
Yes, you should said the same. These are the internal IPs of Home Assistant add-ons/containers/modules.
I am a NOOB here as well. I followed the instructions above and appear to have NGINX working with my Duck DNS URL. I have had Duck DNS running for a couple years ago but recently (like a few weeks ago) came across this thread and installed NGINX.
I am seeing a handful of errors in the Home Assistant log for the NGINX SSL Proxy. Any suggestions on what is going on? Things seem to be working despite the errors:
1) connect() failed (111: Connection refused) while connecting to upstream, client: , server: .duckdns.org, request: “GET /api/websocket HTTP/1.1”, upstream: “http://172.30.32.1:8123/api/websocket”, host: “.duckdns.org”
2) connect() failed (111: Connection refused) while connecting to upstream, client: , server: .duckdns.org, request: “POST /api/webhook/ HTTP/2.0”, upstream: “http://172.30.32.1:8123/api/webhook/”, host: “.duckdns.org”
3) SSL_do_handshake() failed (SSL: error:141CF06C:SSL routines:tls_parse_ctos_key_share:bad key share) while SSL handshaking, client: 104.152.52.237, server: 0.0.0.0:443
For errors 1 and 2 above I added “172.30.32.0/24” to the trusted proxies list in my HA config file. This is in addition to what the directions show above which is to include 172.30.33.0/24. I think that may have removed the error… but why?
For error 3 there are several different IPs that this shows up with (in addition to “104.152.52.237”). I don’t recognize any of them.
Any help would be greatly appreciated!
I excluded my Duck DNS and external IP address from the errors…
Hi. After using this kind of setup for some time, I got an error “NSURLErrorDomain -1200” in companion app. To my understanding this was due to renewed certificate (by DuckDNS/Let’s Encrypt add-on), but it looks like NGINX did not notice that and continued serving the old one. Restart of NGINX add-on solved the problem.
Do you know how I could get NGINX to notice the renewal so that this kind of situation would not happen again?
This was an awesome walkthrough – thanks! Very concise! I setup the SSL on an alternate port but this still works perfectly and quickly.
Different port is not an issue, on the opposite sometimes help preventing script attacks that target default ports
It’s 2025, this is still the best explanation. Thank you so much for this clear and working explanation. I chose to use port 8443, and it works perfectly.
Hi. Thanks for this. It worked great.
I had to tweak one thing:
# configuration.yaml entry
http:
use_x_forwarded_for: true
trusted_proxies:
– 172.30.33.0/24 -> 172.30.33.0/23
this can be found by checking in ha terminal “ha network info” -> output “docker address” – for noobs like me