
Table of Contents
Why Home Assistant Remote Access is a must?
In today’s fast-paced and interconnected world, the concept of a Smart Home has evolved from a novelty to a necessity. With the rise of Internet of Things (IoT) devices, having control over your home’s various systems from anywhere has become a game-changer. Imagine adjusting your thermostat, turning on the lights, or even checking your security cameras, all while you’re away.
This level of convenience and control is what the smart home revolution promises. However, it also brings with it the critical need for secure and easy remote access to your home automation system, ensuring that you’re always connected, regardless of your physical location.
What is Tor?
Do you know what is Tor, or The Onion Router? This is a tool designed to provide anonymity and privacy to Internet users. Tor operates by routing your online traffic through a series of volunteer-operated servers, making it incredibly difficult for anyone to trace your online activities back to you.
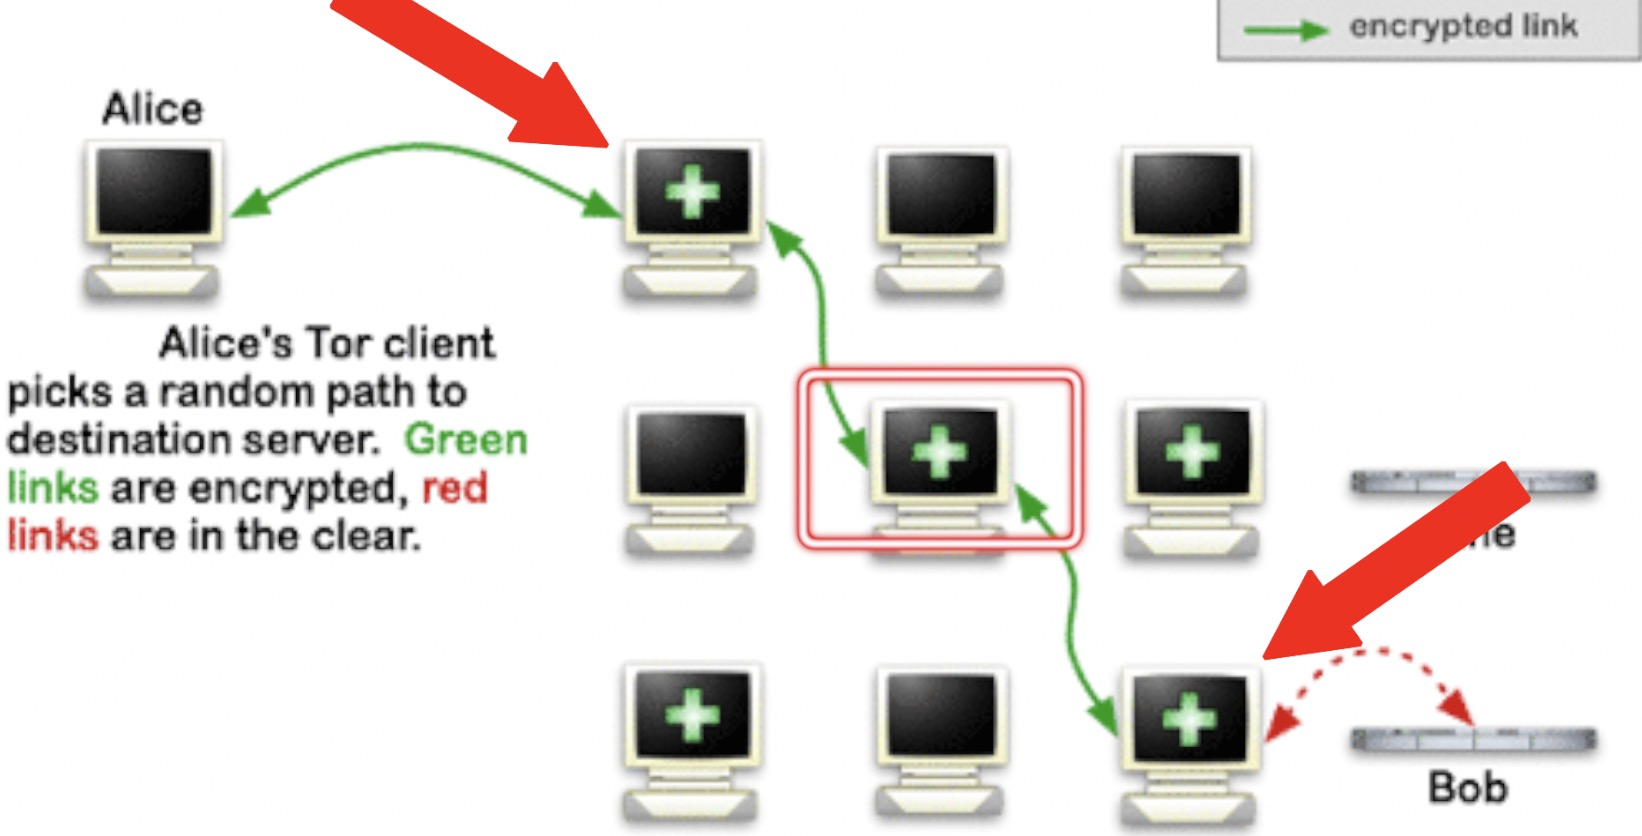
Think of it as a digital version of passing through a series of secret tunnels, with each server only aware of the server before and after it in the chain. The result? Your data is shrouded in layers of encryption and obfuscation, ensuring that your online presence remains truly private.
Can I use Tor to access Home Assistant?
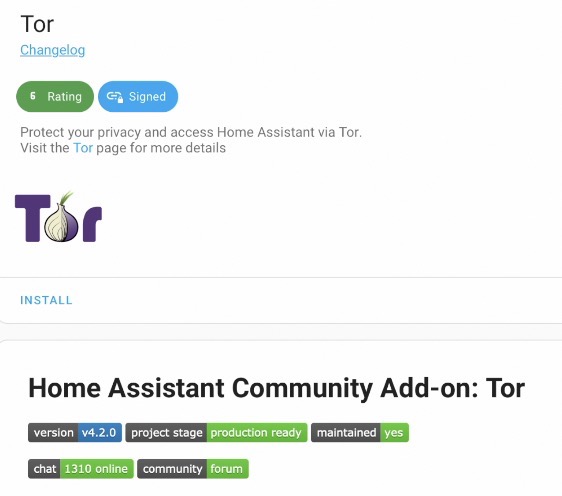
What’s even more intriguing is Tor’s potential for enabling secure remote access to your Home Assistant setup. The Tor add-on, available as a one-click installation in the Home Assistant add-on store, facilitates accessing your Home Assistant instance remotely as an .onion site.
The beauty of this approach is that it eliminates the need to open firewall ports or configure SSL certificates, all while maintaining a secure HTTPS connection. In simpler terms, you can access your Home Assistant setup remotely without exposing it to potential security vulnerabilities.
The configuration process for enabling Home Assistant remote access via Tor is surprisingly straightforward. Let’s walk through the steps:
Installing the Tor Add-on
- Open your Home Assistant dashboard and navigate to the add-on store.
- Look for the Tor add-on (or click on this My Home Assistant link) and click the install button.
- Wait a moment while the installation process completes.
Tor Configuration
Once the add-on is installed, it’s time to configure it to work with your Home Assistant setup.
Spoiler Alert: Home Assistant Tor add-on will start and will work with the default configuration, so if nothing special is required you can just run it.
On the other hand, if you want to tweak, the configuration involves specifying various settings to tailor the behavior of Tor to your preferences.
- log_level: This setting determines the level of detail in the logs generated by Tor. Setting it to “info” provides a good balance between information and verbosity.
- socks: By default, the socks option is set to false. Changing it to true opens port 9050 to listen for connections from SOCKS-speaking applications. This can be useful if you want other applications on your network to utilize the Tor network.
- hidden_services: Set this option to true to enable the creation of an Onion service for your Home Assistant instance.
- stealth: When set to true, the traffic to and from your Home Assistant instance over Tor is hidden even from other nodes on the Tor network. While this enhances security, it may require additional configuration on your Tor clients. For the sake of simplicity, we’ll set it to false in this example.
- client_names: This optional setting allows you to specify client names that are allowed to access the Onion service. Use this if you want to restrict access to specific clients.
- ports: Here, you define which ports and IPs will be published via a Tor Onion service. In most cases, you’ll list your Home Assistant IP and the default Home Assistant port (8123).
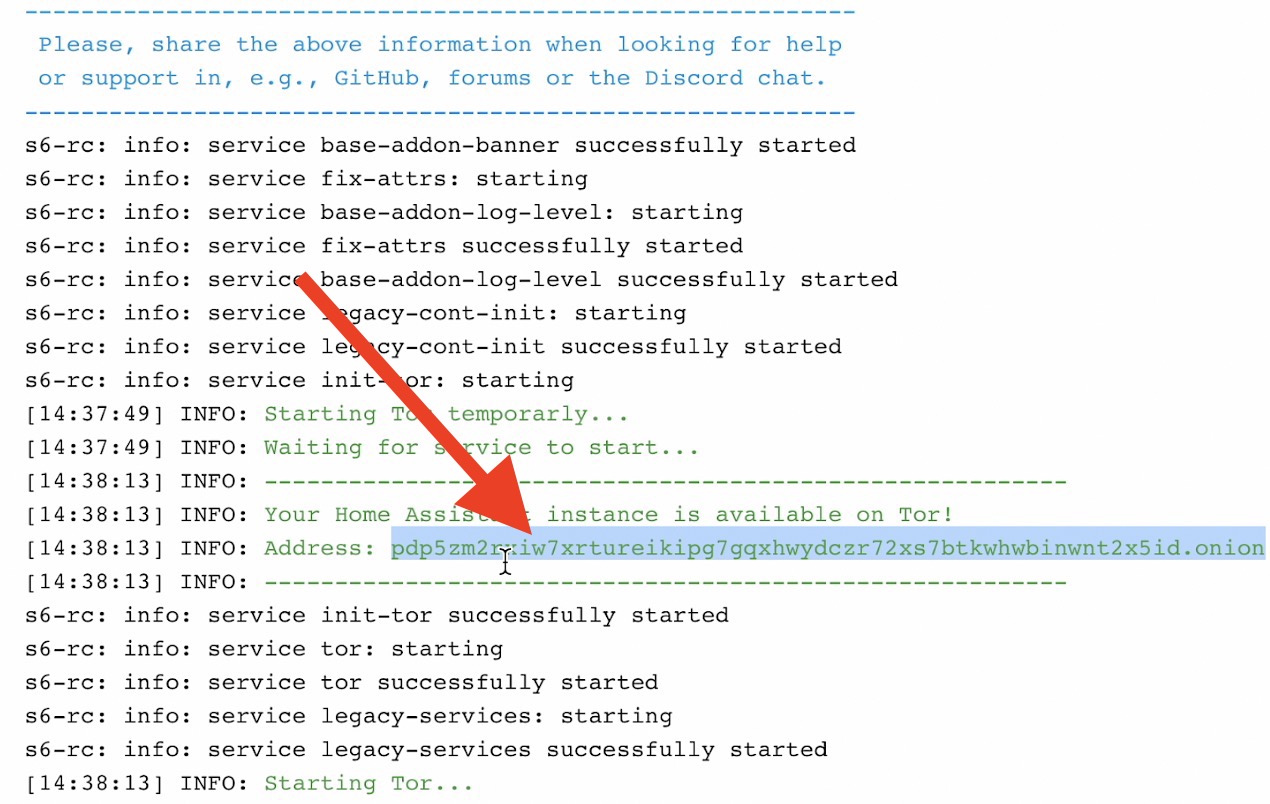
With the configuration set, save your changes and start the Home Assistant Tor add-on.
Accessing Your Home Assistant Instance via Tor
Now that the add-on is up and running, you’re just a few steps away from accessing your Home Assistant instance remotely using Tor. Here’s how:
- Head over to the “logs” tab in the Tor add-on to find your .onion address. This unique address is what you’ll use to access your Home Assistant remotely.
- To access your Home Assistant instance, you’ll need a Tor-enabled browser. The Tor Project offers the official Tor Browser, available for Windows, Linux, Mac, and Android. For iOS, you can use the Onion Browser.
- Install and open the Tor Browser (or Onion Browser on iOS).
- Paste your .onion address in the browser’s address bar and hit enter.
And there you have it! You’re now securely connected to your Home Assistant setup, even when you’re miles away from home. Whether you’re adjusting your smart devices, checking the status of your home security system, or simply exploring the possibilities of your Smart Home, Tor provides a safe and private conduit for your remote interactions.
Are there any Tor drawbacks?
While Tor offers a myriad of benefits, it’s important to acknowledge that there are some trade-offs. Due to the nature of bouncing your internet traffic through multiple servers, your connection speed may be slower compared to regular browsing. This is a small price to pay for the enhanced security and privacy that Tor provides, but it’s worth keeping in mind.
If Tor is not your thing you can check my other Home Assistant remote access tutorials here – https://peyanski.com/?s=remote+access
Final thoughts
In conclusion, the Tor add-on for Home Assistant offers an intriguing and powerful solution for secure and easy remote access. It empowers you to harness the full potential of your Smart Home while maintaining the highest standards of privacy and security. As technology continues to evolve, ensuring that your smart home remains both connected and protected is of utmost importance. With Tor, you can confidently explore and manage your Home Assistant setup from anywhere in the world, knowing that your data and devices are safeguarded by layers of encryption and anonymity.
And before I let you go, I have an exciting bonus for you. To dive even deeper into the world of Home Assistant and its endless possibilities, I invite you to join my upcoming Home Assistant webinar. In this exclusive session, I’ll delve into the different official Home Assistant installation types and unveil a secret method to set up Home Assistant on a PC in under 5 minutes. Trust me; this is one webinar you won’t want to miss!
Secure your spot today by visiting: https://automatelike.pro/webinar
Thank you for joining me on this journey of exploration and innovation.
Here’s to a future where our smart homes are not only technologically advanced, but also completely secure.
Catch you in the next one! Kiril.
P.S. Download my Smart Home Glossary PDF, if some of the terms here are not so clear for you
I was wondering what the pro’s and cons are between this TOR methode and the in a previous mentioned methode with namecheap and cloudflare.
Cons are: possible slower speed/connection to HA, additional Tor browser/client that is required and it is not possible to use Home Assistant Companion app that way. Pros are a lot, super easy implementation, anonymity, it is secure, it can work on all type of networks including CGNAT and the method is entirely free. Overall it is a great Backup method in my humble opinion and why not Primary