
As you may know Elon Musk recently acquired 100% of Twitter and I want to show you one of his latest, breaking tweets where he’s saying that native Home Assistant Twitter integration will be one of the things that he is going to do.

And this tweet is totally not photoshopped!
Okay, the picture above is photoshopped and there is a working Home Assistant Twitter integration already. I am going to show you how to activate it, and how to use it in this article. Read this to the last line to see how you can test this integration and how you can use it in automations.
Table of Contents
Home Assistant Twitter Integration – Prerequisites
Before we continue further here are some prerequisites to make this Home Assistant Twitter integration to work.
- First, you’ll need a working Home Assistant!
- Second, you’ll also need a Twitter account. One easy way to check if your Twitter account is working properly is to follow me on Twitter – https://twitter.com/kpeyanski. If you succeed then everything is fine and you can proceed further.
- Third, you will also need a Twitter developer account. To get one, just go to https://developer.twitter.com and apply for one. It is free and the procedure is very easy.
Get all Twitter Credentials that are needed
After you are ready with the above prerequisites, login with the Twitter developer account in the Twitter developer portal (https://developer.twitter.com/en/portal/dashboard) and create a new Twitter app.
- The Create App button is located under Projects & Apps > Overview menu

- Then, pick a unique name for your new Twitter app and click Next.
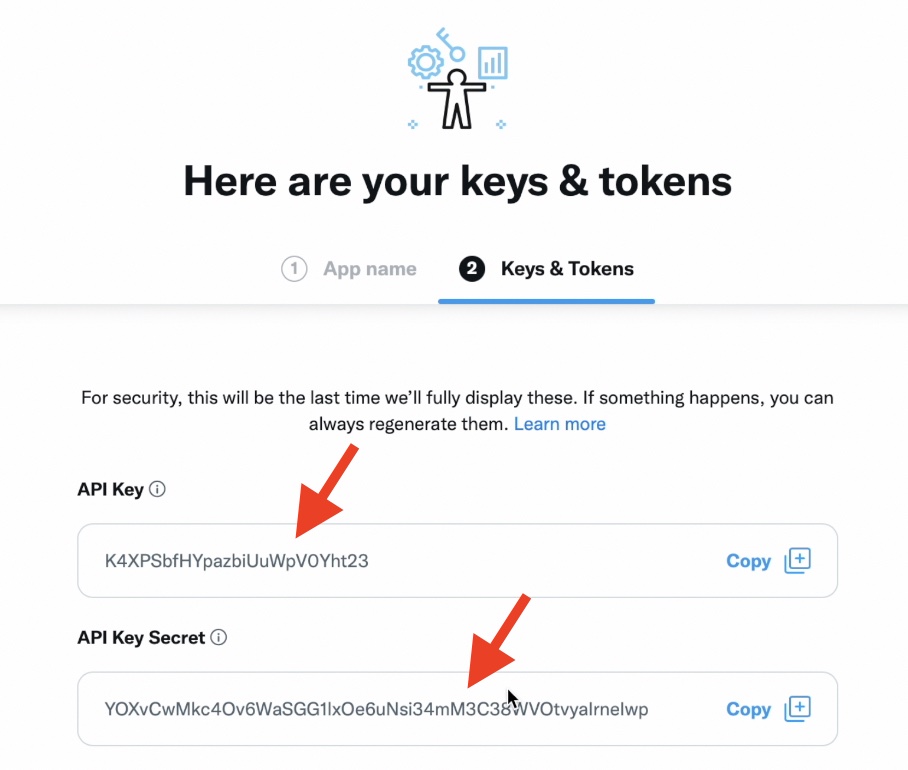
- Copy the API Key & API Key Secret somewhere safe. We are going to use them later in Home Assistant.
Bear with me as we need some more secret stuff!
- Go to App Settings (in the lower right corner) > click on Set up (under User Authentication settings)
- Enable the OAuth 1.0a switch and select Read and Write and Direct Message option.

- Finally enter https://twitter.com (or anything you wish) for Callback URI / Redirect URL & Website URL. Click Save and then Yes buttons.
- After that, go to Keys & tokens tab and next to Access Token and Secret, click on the Generate button.
- Copy the generated Access Token & Access Token Secret somewhere safe.
With that, our job within the Twitter developer portal is completed and now we will head on to Home Assistant where we will use all of these keys & tokens.
Adding Twitter Configuration in Home Assistant
We are done with the Twitter keys & tokens generating part. Now it is time to add these keys in the Home Assistant configuration. Here is what you have to do.
- Open your Home Assistant
configuration.yamlfile and paste the following lines inside:
# Example configuration.yaml entry
notify:
  - name: twitter
    platform: twitter
    consumer_key: YOUR_API_KEY
    consumer_secret: YOUR_API_SECRET
    access_token: YOUR_ACCESS_TOKEN
access_token_secret: YOUR_ACCESS_SECRET- Replace all 4 values starting with YOUR_... with your real Twitter Keys and Tokens generated in the previous step.
If you leave this configuration that way, when you use the notify.twitter Home Assistant service, you will tweet a tweet on your Twitter feed. That means – all notifications that are coming from Home Assistant using this notify service will go to your feed and everyone that follows you on Twitter will see them.
If you wish to use direct messages instead, you just have to add one more line with your Twitter username as follows:
# Example configuration.yaml entry
notify:
  - name: twitter
    platform: twitter
    consumer_key: YOUR_API_KEY
    consumer_secret: YOUR_API_SECRET
    access_token: YOUR_ACCESS_TOKEN
    access_token_secret: YOUR_ACCESS_SECRET
    username: YOUR_TWITTER_USERNAME
When you are ready, save the changes in your configuration.yaml file and restart your Home Assistant.
Quick test of the Home Assistant Twitter integration
If you wish to quickly test if the Home Assistant Twitter integration is working as expected, go to Developer Tools > Services and invoke the notify.twitter service with some test message.
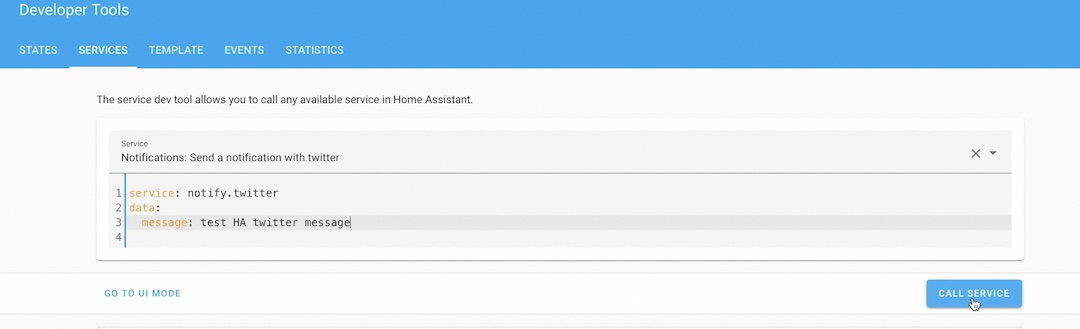
If you receive your test message on your Twitter feed or as Twitter Direct Message – then you are winning the game. You can use this new service in Scripts & Automations from now on. And you will see how exactly in the next section.
I want you in my Team!
If you reached this point and If you enjoyed the process so far, but using Home Assistant Automations and Scripts is kind of foggy for you – I want you in my Team.
Go to my other website: https://automatelike.pro/webinar and register for my free Home Assistant Webinar. Watch the entire event (it is around 45minutes) and decide if there is a match.
I’m waiting you there.
Home Assistant Twitter Automation
Now, let’s see that Home Assistant Twitter automation in action. I will create a demo automation that will send a Twitter notification if you left a smart bulb on for 5 seconds.
The automation below is just a demo. In my YouTube video about the Home Assistant Twitter integration – I’m using the Home Assistant Graphical Automation Editor, but here in my article I will paste the YAML of the same automation.
alias: 'HA twitter test automation '
description: ''
trigger:
  - platform: state
    entity_id: light.shellybulbduo_8caab5616d5c #change this with your entity
    to: 'on'
    for:
      hours: 0
      minutes: 0
      seconds: 5
condition: []
action:
  - service: notify.twitter
    data:
      message: Your bulb Is left on for 5 seconds
mode: single
If you change the entity_id with something yours (smart bulb, switch, plug, etc) and enable this smart entity for 5 seconds you should receive a Twitter notification. That is because of Home Assistant, Twitter & Elon Musk and most of all the automation above.
Outro
Hope that Elon Musk will not buy Home Assistant next as well. The way it is now is the best.
I also hope that this Home Assistant Twitter Integration article was useful for you. If so, I’ll see you next week when I will release my new article. If you don’t want to miss it – subscribe for my newsletter.
I’m Kiril and I’m done writing. Bye!
Very helpful!
Is there a way to use this integration as a sensor that tracks tweets that fit a certain search criteria?
not sure about that…
I followed these instructions, and also get a green success message in the developer tools service call, but I never get a tweet or direct message. 🙁 any help would be appreciated.
some changes in twitter with the. release of v2 API… time for an updated tutorial