
After you finish reading this Home Assistant UniFi Integration article you will be able to do presence detection, block network access for any clients, check bandwidth and uptime sensors and more.
Everything that you will need is Home Assistant and UniFi network equipment.
Table of Contents
What is needed for Home Assistant UniFi integration?
Let’s clear this out before we move forward:
- If you have Ubiquiti UniFi equipment, but you don’t have Home Assistant, check this article of mine 👉 LINK
- And If you have Home Assistant, but you don’t have any UniFi equipment then you can check my article about the UniFi Dream Machine which is all-in-one product that I use 👉 LINK
If you have both things then we can continue.
What Home Assistant UniFi integration is all about?
Home Assistant UniFi integration means that you can add all of your UniFi clients in Home Assistant using a native integration functionality of Home Assistant. These UniFi clients will be then seen as devices and entities in Home Assistant and you can check their status and sensors and control their network access. All of these things are very useful for Smart Home and home automation that we all looking for.
The Home Assistant UniFi integration is rated as Platinum.
That means best of the best integration possible and it also means that it should be super fast and with excellent user experience.
BUT we are not going to blindly trust this rating and we are going to verify it by trying to control the UniFi clients and by doing presence detection from Home Assistant. Later in the article we will also create some Home Assistant UniFi automations.
Let’s start this!
Home Assistant UniFi integration
It is quite likely the UniFi integration to be auto-discovered by Home Assistant if UniFi controller and Home Assistant are in the same network. In that case you just have to click on Configure button of the UniFi integration. Otherwise you should add the UniFi integration manually, which is also super easy.
In your Home Assistant go to Configuration > Integrations and search for UniFi. You can also click on the My Home Assistant link below:

Click on the Configure button on UniFi integration and in the dialog:
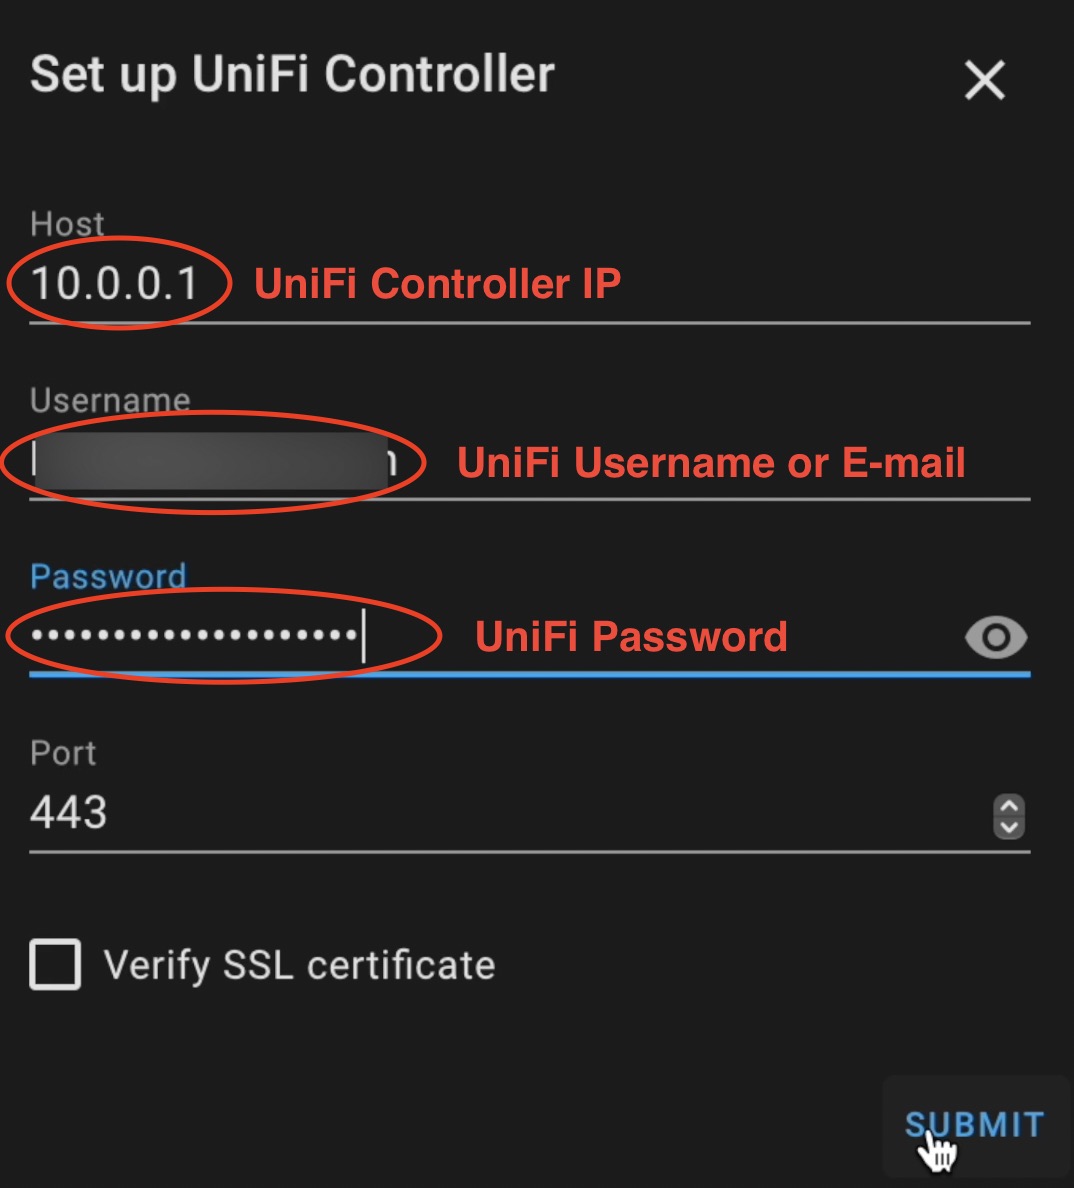
- Enter your UniFi Controller IP,
- Enter your UniFi username or E-mail,
- Enter your UniFi password
- Click Submit
The user that you are entering here needs to have administrator privileges in your UniFi controller for best results.

At the end you should see something similar.
Home Assistant UniFi integration Options
Have in mind that some options are only available when Advanced Mode is enabled on your user profile page.
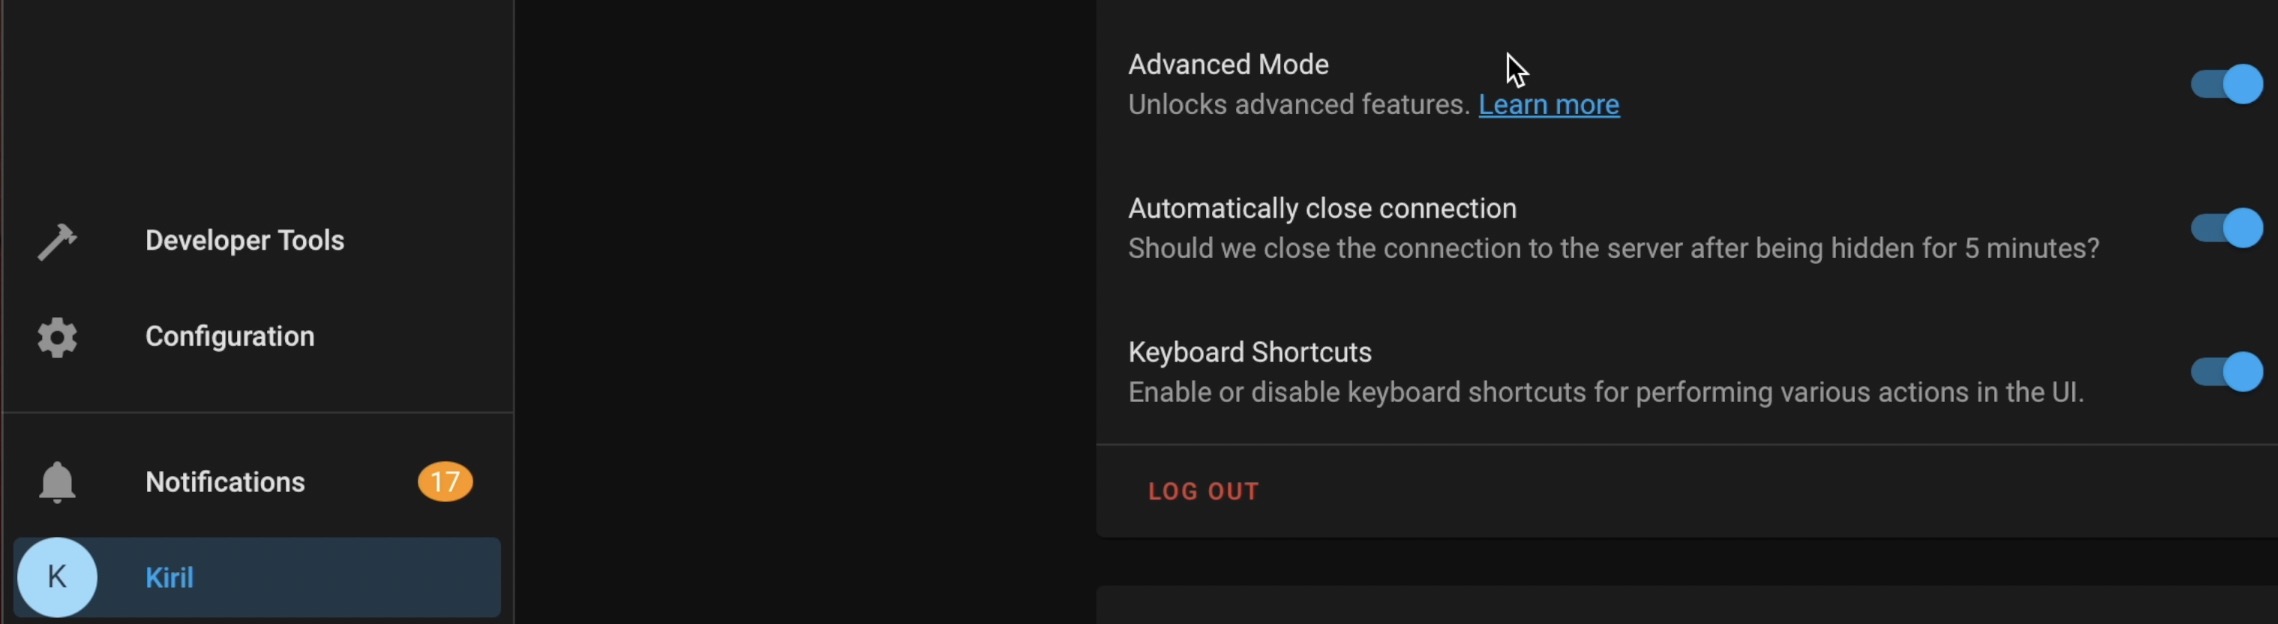
After you enable the Advanced mode, you can click on the Options button of Ubiquiti UniFi Home Assistant integration to fine tune your integration.

From the first window you can select/deselect options like:
- Track network clients
- Include wired network clients
- Track network devices (Ubiquiti devices)
- Select SSIDs to track wireless clients on
- Time in seconds from last seen until considered away
- Disable UniFi wired bug logic (Can anybody enlighten us what is this for?)
TIP: I selected the first three options here and I changed the “considered away” seconds from 300 to 30.
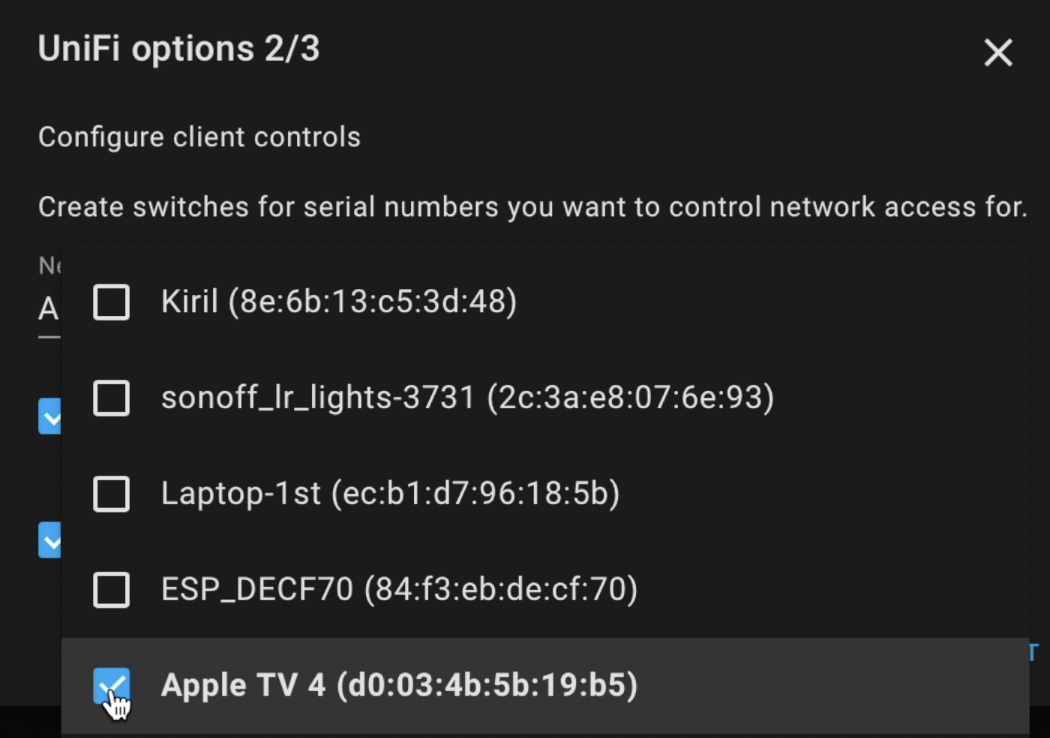
When you click Submit button you will go to the next page of UniFi options, where you can select all of the devices that you want to control their network access.
Home Assistant UniFi Configure client controls
To control network access of the clients connected to the UniFI from Home Assistant you have to add them in the integration. Here is how you can do it.
On UniFi options page 2/3 – click the dropdown menu and select all of the devices that you want to control from Home Assistant.
Home Assistant UniFi bandwidth & uptime sensors
On the last page of Home Assistant UniFi integration options you can select / deselect:
- Bandwidth usage sensors for network clients
- Uptime sensors for network clients
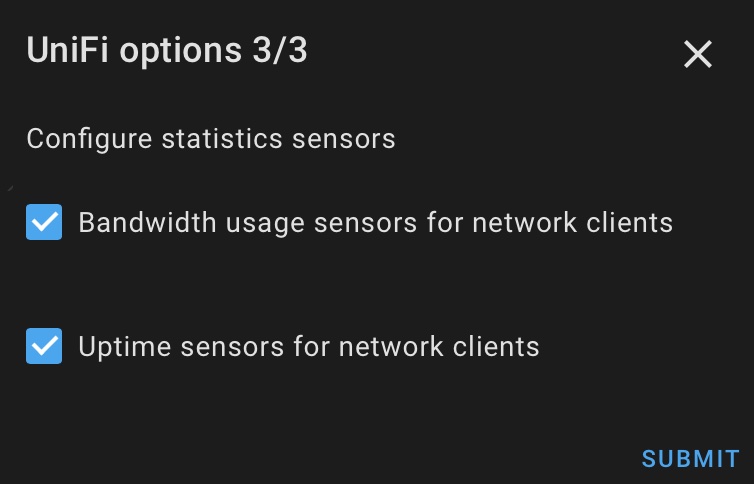
TIP: Enable the Bandwidth & Uptime sensors as we are going to use them later in the Home Assistant automations
Add Home Assistant card with UniFi sensors and switch
We can now add a Home Assistant card with a switch to block network access to whatever client we want as well as bandwidth & uptime sensors. To do that:
- Click on devices link under the UniFi integration,
- Select the device from the list and click on it,
- From Entities card of the device – click on Add to Lovelace button twice.

Home Assistant UniFi integration – clients uptime sensor fix
Unfortunately the uptime sensor is not working out of the box as it always is showing thousands of weeks ago.
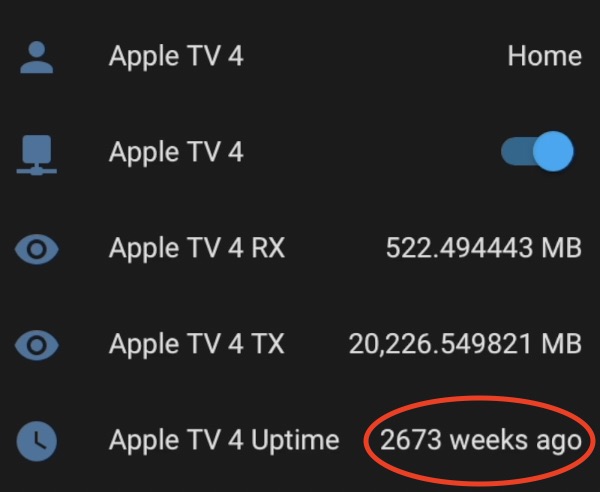
I think the native uptime sensor is using the Unix time, which is starting from year 1970, but that is another topic.
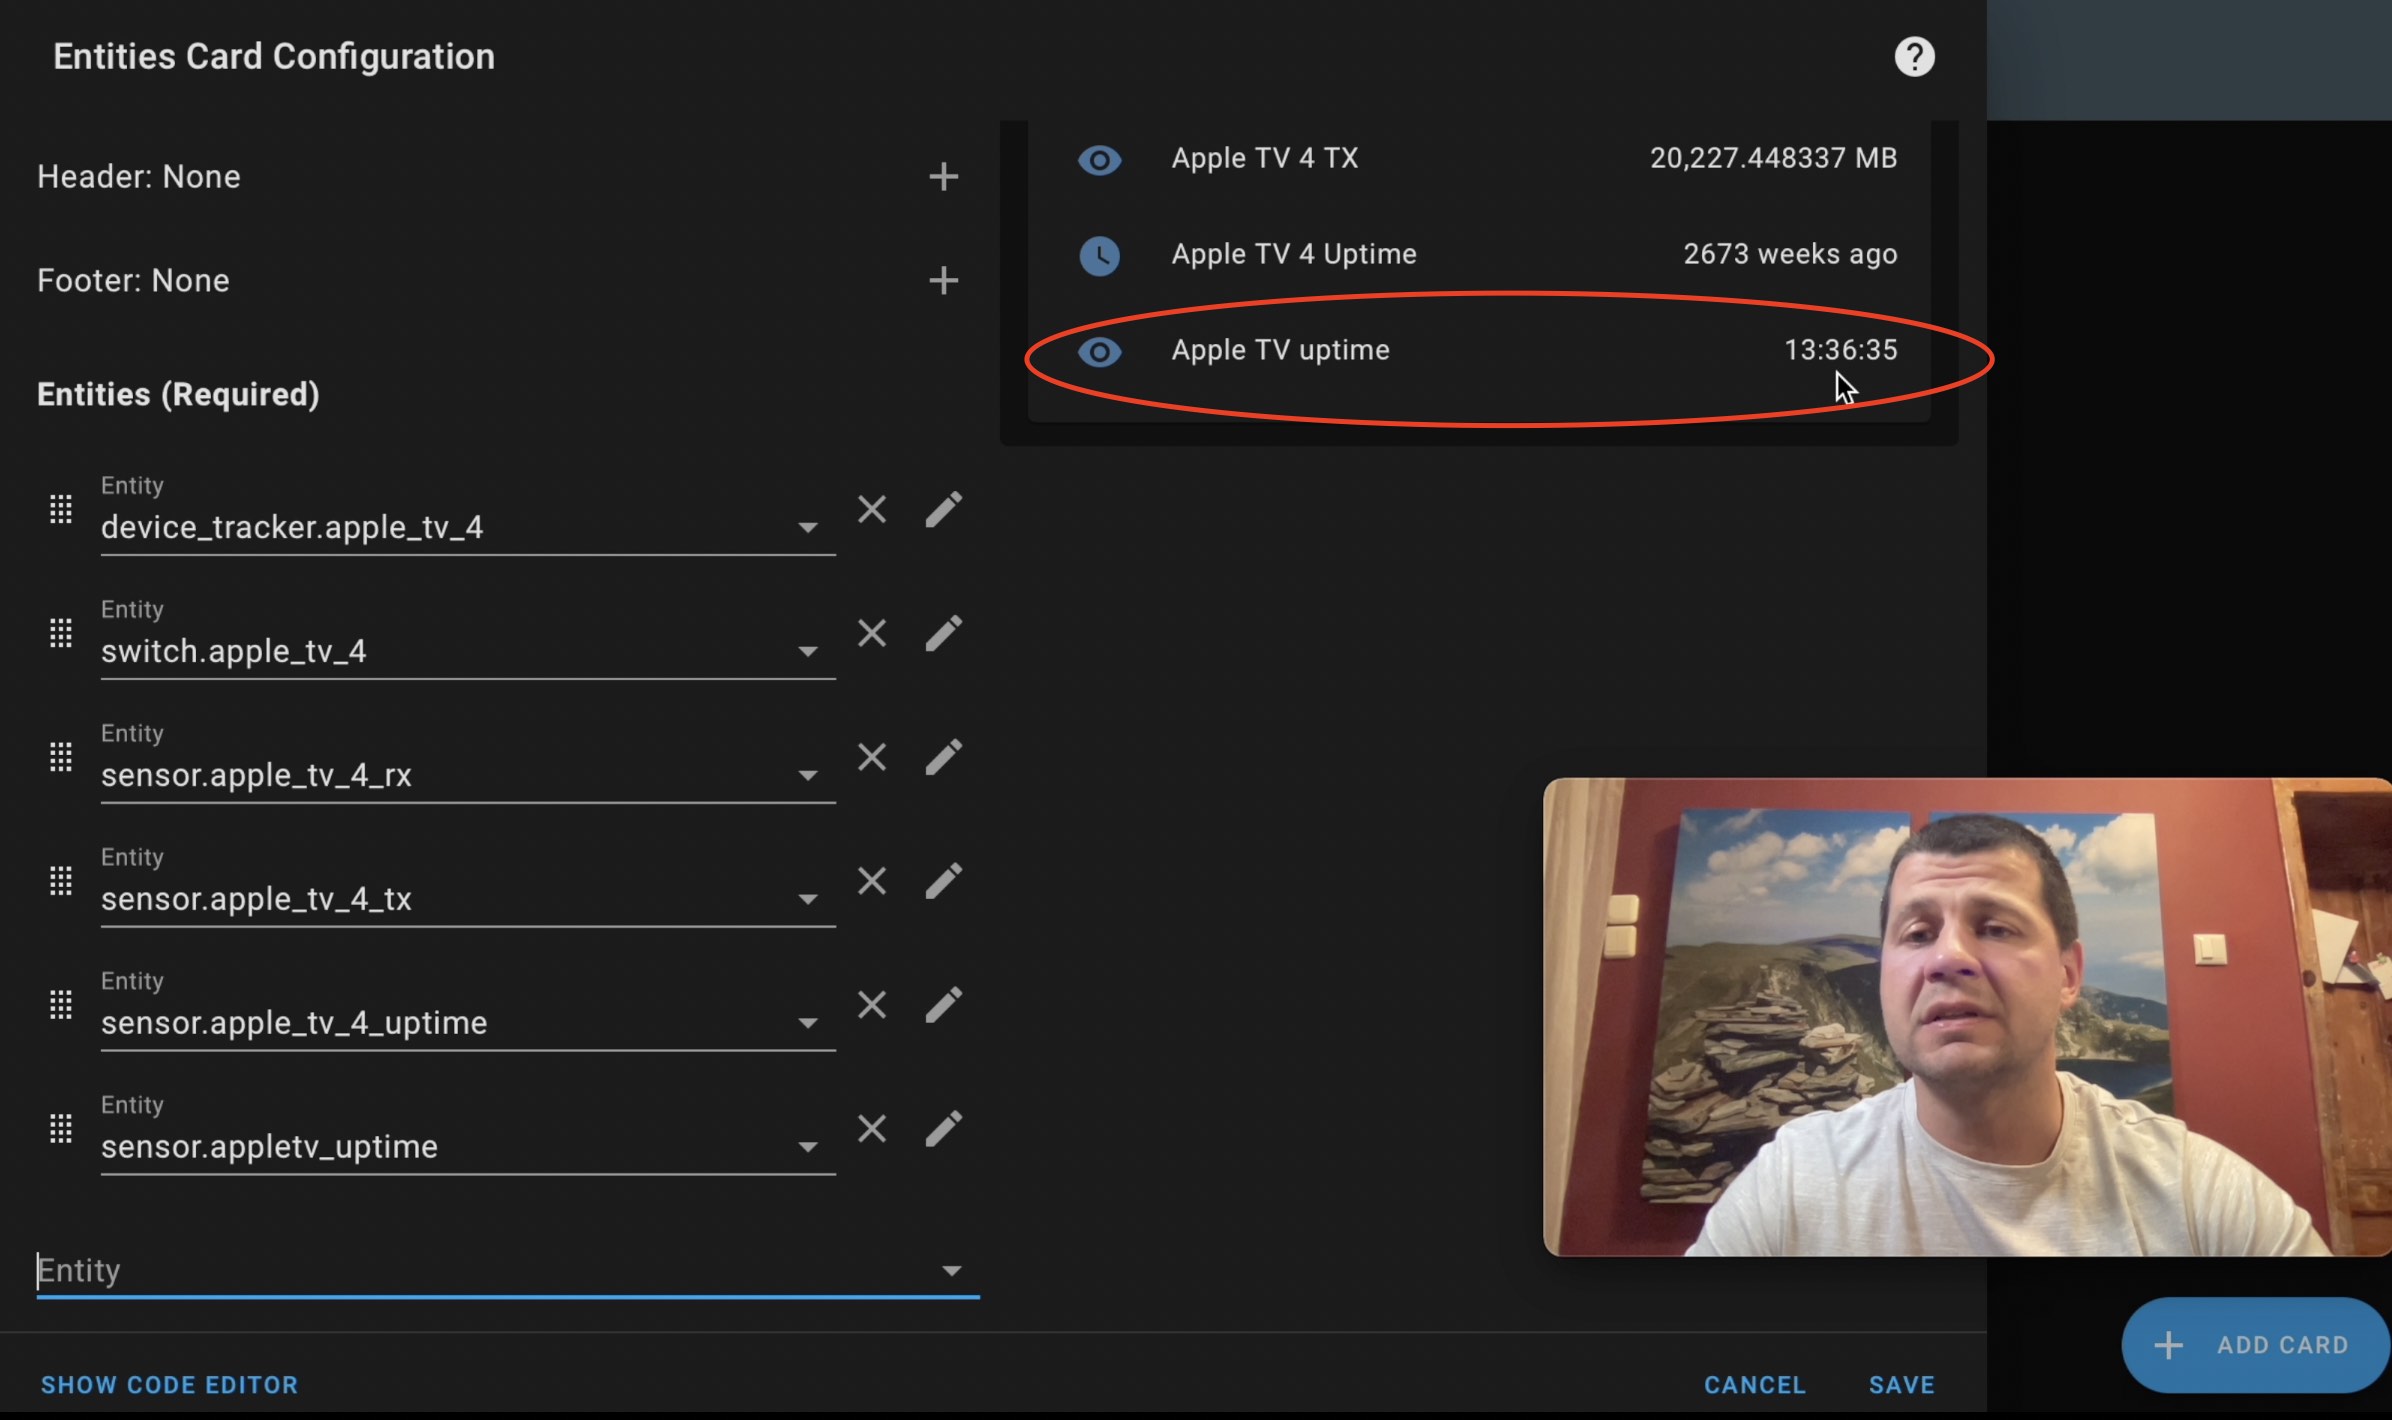
There is an easy fix for that – you have to create another template sensor from the native uptime sensor. This is how you can do it.
Open you configuration.yaml file and paste the following YAML code inside:
# configuration.yaml entry
sensor:
  - platform: template
    sensors:
      YOUR_NEW_SENSOR_NAME_uptime:
        friendly_name: “WHATEVER YOU WISH“
        value_template: "{{states('sensor.YOUR_UPTIME_SENSOR_uptime').split('T')[1].split('+')[0]}}"
If you have sensor: section already, paste the last five rows, otherwise paste everything. Change the text with capital letters to suit your needs and be careful with the sensor.YOUR_UPTIME_SENSOR_uptime. You have to use the exact name of the native uptime sensor (the one that showing thousands of weeks ago).
Save the configuration.yaml file and restart you Home Assistant. Go back and edit your Home Assistant card and add there the new template sensor that we just created.
Consider This!
If you read all of this until now – congratulations. We are now officially two persons in the world managed to do that – you and me 😂
That is worth celebrating and what is better than subscribing for my free newsletter? Nothing can stop you after all, right? If you do that as well you will receive new articles like this on a weekly basis. You can always unsubscribe if you don’t like what you get, which will make my hair grey 👽
Newsletter link 👉 CLICK HERE
Have in mind that the newsletter is with double opt-in enabled. That means you will enter your first name and email, and then you will receive a confirmation mail where you have to confirm your subscription. If you don’t receive it – check your junk/spam folder.
Home Assistant UniFi presence detection
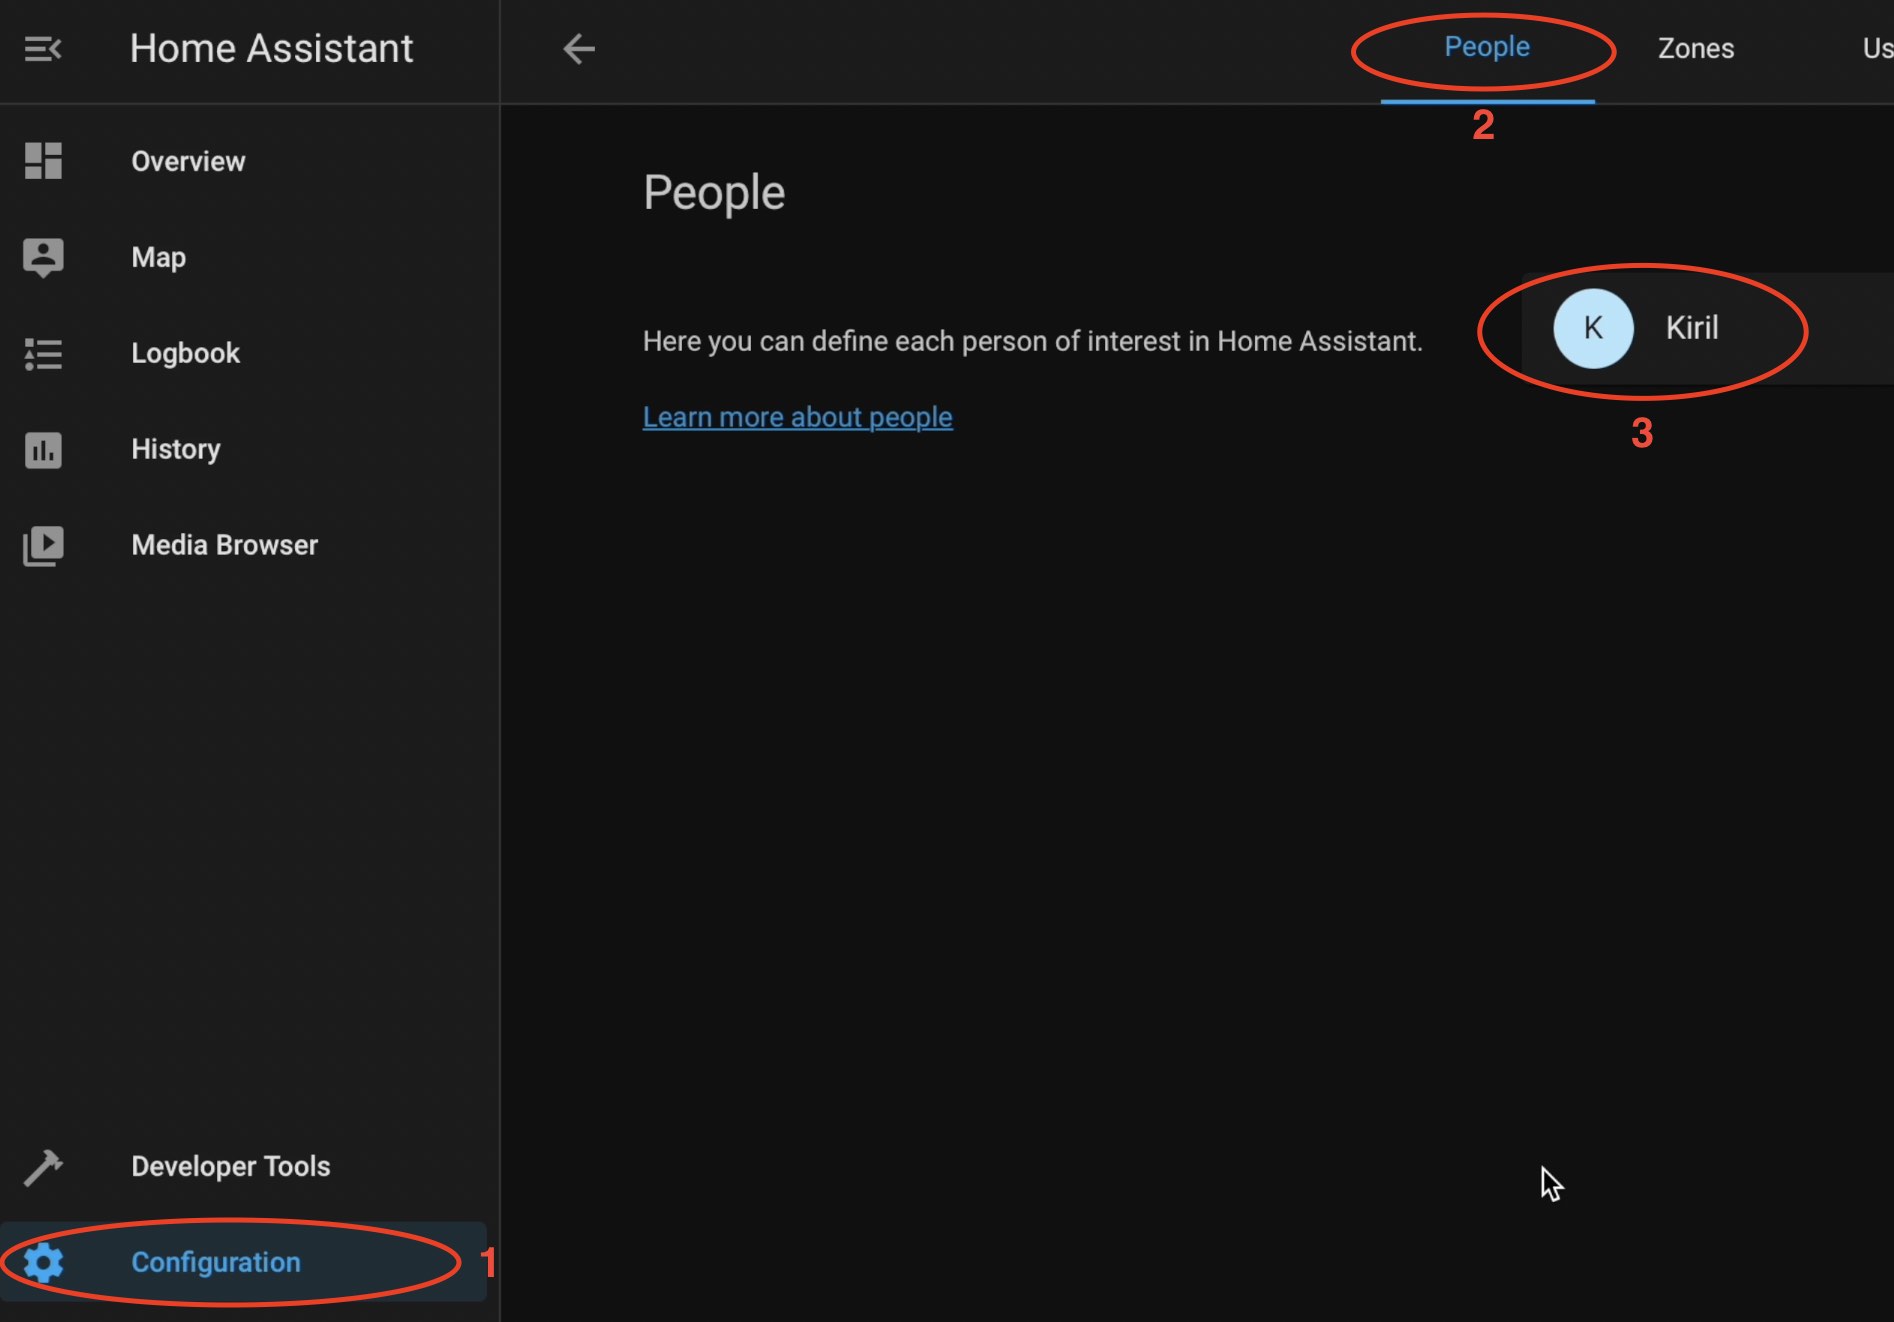
Let’s create a Home Assistant person and track this person using the device tracker functionality.
Go to Configuration > People or use the direct My Home Assistant link below

From the Add Person button in the lower right corner you can add as many persons as you want. There should be at least one person already added with the same name as your Home Assistant username. In my case my Home Assistant username is Kiril and the existing person is again Kiril.
Click on your person and pick a device to track from the dropdown list. Thanks to the Home Assistant UniFi integration the list will be full of devices (actually all of the devices that are connected to your Wi-Fi should be there). It is good idea to choose a mobile device like a phone or smart watch that the person of interest is wearing most of the time.
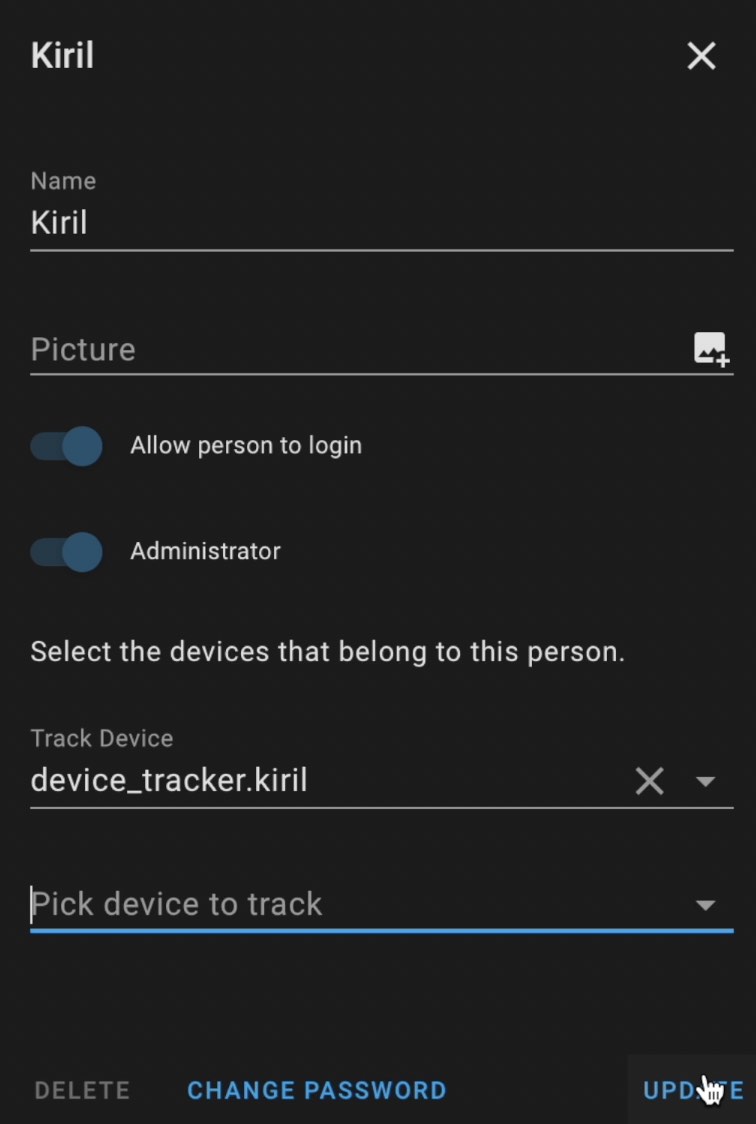
You can add many devices that belongs to the person to track him/her better.
Finally click Update button and you can test if it is all working. When the device that you track is connected to your home Wi-Fi – the person will be considered at home and vice versa when the device is not connected the person will be away. Simple as that.
Beware that presence detection depends on accurate time synchronisation between Home Assistant and the UniFi controller. If the time differs you can expect issues. So set your clocks right.
Home Assistant UniFi Automation example
We have presence detection, we can control network access and we have bandwidth and uptime sensors in Home Assistant because of to the UniFi integration.
The only thing that is missing is smashing the subscribe button for my YouTube channel if you haven’t done that already. When you are done with this easy, but important task for which I will be thankful forever – we can continue further and we can put everything together in a Home Assistant automation.
You have two options for creating the Home Assistant UniFi automation:
- To use the graphical automations editor as I’m doing in the video.
- To edit your automations.yaml file like I’m going to do right now.
The choice is yours 🤨
Open your automations.yaml file with your favourite editor or Home Assistant add-on and paste the following YAML code:
# automations.yaml entry
alias: If Apple TV uptime reached and Kiril is not home
description: ''
trigger:
  - platform: state
    entity_id: sensor.YOUR_UPTIME_SENSOR
    to: '00:00:10'
condition:
  - condition: device
    domain: device_tracker
    entity_id: device_tracker.YOUR_DEVICE_THAT_YOU_TRACK
    type: is_not_home
action:
  - service: switch.turn_off
    target:
      entity_id: switch.YOUR_SWITCH_THAT_BLOCKS_NETWORK_ACCESS
mode: single
The automation will do the following: when uptime of a device of our choice (sensor.YOUR_UPTIME_SENSOR) reach 10seconds and when tracked device (entity_id: device_tracker.YOUR_DEVICE_THAT_YOU_TRACK) of our choice is not at home – block network access of device that we want (entity_id: switch.YOUR_SWITCH_THAT_BLOCKS_NETWORK_ACCESS)
Of course you have to replace all capital letters with yours devices and sensors to make this work.
That way you can make any sort of nasty… I mean useful automations that blocks internet access of devices when something happens at your Smart Home.
Conclusion
I will just say that the Home Assistant UniFi integration deservers its platinum rating!
I hope that you find this information useful and I would love to hear your feedback in the comments section below.
Feel free to add me on Twitter where I’m trying to post frequently. You can also find me on my Discord server where we talk about Home Automation a lot 👉 INVITE LINK
Stay safe and don’t forget – HOME SMART, BUT NOT HARD!
Thank you for reading, I will see you next time!
Failed to connect.
Are you sure this will work when home assistant and unifi controller is not on the same network without adding some rules in unifi controller?