
Since my last video/article about Home Assistant Community Store (HACS) a lot has changed so I decided to make an up-to-date version and to show you how to install, configure and use HACS these days.
Table of Contents
What is Home Assistant Community Store (HACS)?
Home Assistant Community Store or HACS for short is a manager for installing and easily update custom elements for Home Assistant.
If you like custom things, if you like custom themes and possibility to quickly find, install, update or remove these custom stuff without hurting your Home Assistant installation – HACS is just for you.
There is a catch here, if you are trying really hard you can eventually break your Home Assistant, so do backups, use test environments and you will be fine.
What are HACS requirements?
The requirements to complete this tutorial are:
- Working Home Assistant (you can check this tutorial of mine if you still don’t have one LINK
- GitHub account which is free,
- Around 10minutes of your time,
- You have seen my Free Home Assistant Webinar, so you know what are the different Home Assistant installation types. Link to my Webinar https://automatelike.pro/webinar
Now let’s continue.
Initial Install of Home Assistant Community Store (HACS) on Home Assistant OS or Supervised
I will show you instructions about how to install Home Assistant Community Store if you are using Home Assistant OS or Home Assistant Supervised versions. These are the two of the supported installation methods of Home Assistant where you have Supervisor menu and Add-On store inside.
- Click on your Home Assistant username (in the lower left corner) and enable Advanced Mode if it is disabled. Otherwise you won’t see the SSH add-ons needed in the next steps.
- Press, the “c” button to invoke the search bar, type add-on and navigate to Add-On store > type ssh > select the Terminal & SSH under the Official add-ons section > hit Install.
- When the installation of the add-on is finished, click Start and then on the OPEN WEB UI button to access the ssh console.
- Paste the following commands inside and hit Enter. This is the HACS install script.
wget -O - https://get.hacs.xyz | bash -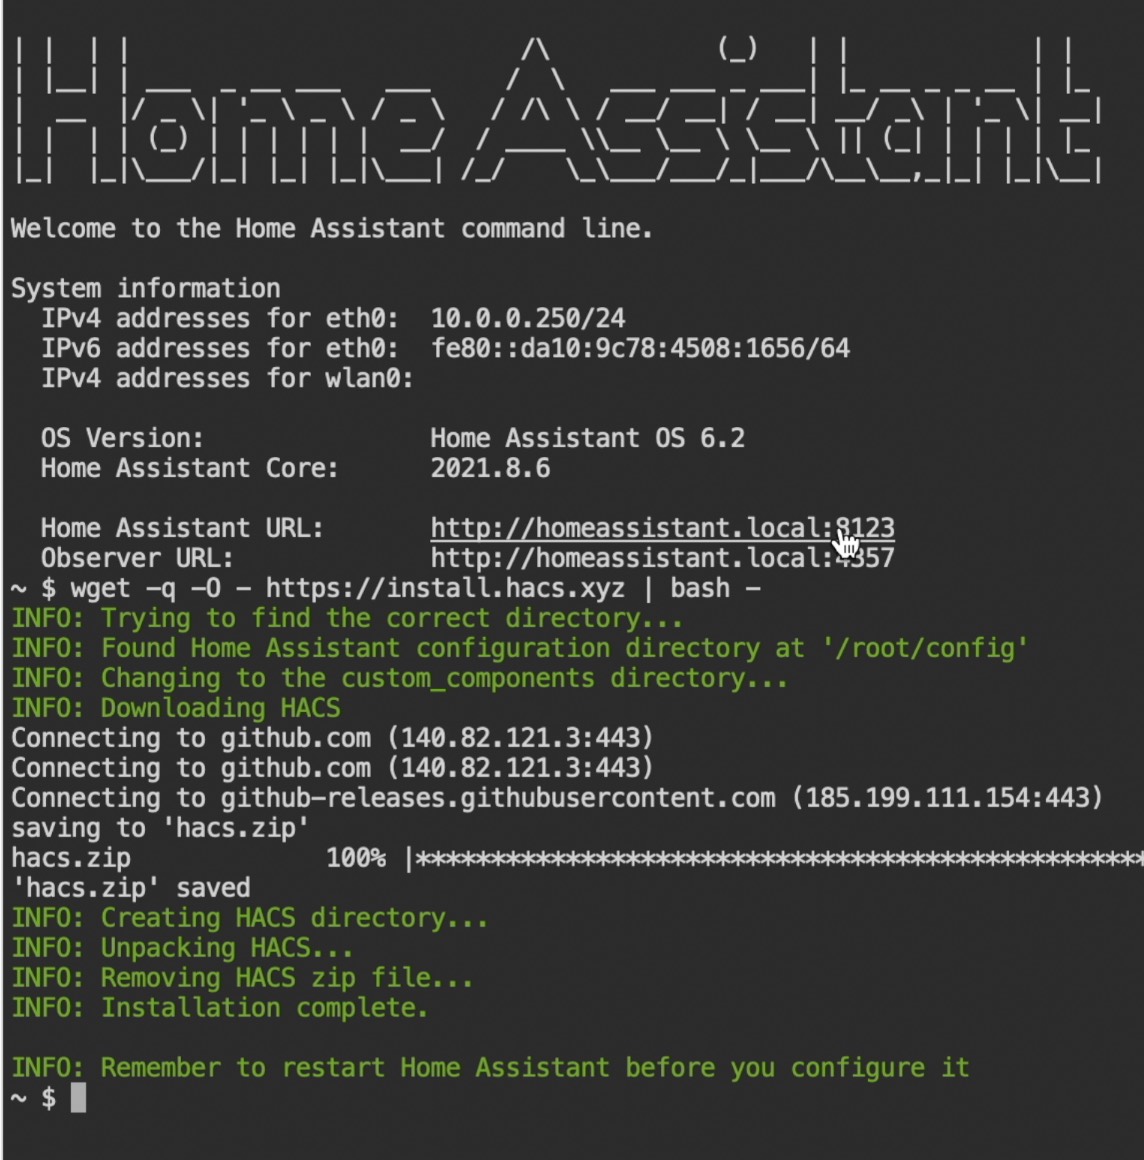
When you are ready with everything go to the Add HACS in Home Assistant Integrations section as the next one is all about Home Assistant Container version.
Initial install of Home Assistant Community Store (HACS) on Home Assistant Container
In this section we will quickly go through HACS installation on Home Assistant Container version, which is actually Home Assistant running in Docker. If you have such installation read ahead, otherwise go to the next section as advised above.
With Home Assistant Container version you have two options:
Option 1:
- Run the installer script from the Host machine
- Change directory to your Home Assistant configuration directory
- Run the HACS install script
wget -O - https://get.hacs.xyz | bash -Option 2:
- Run the installer inside the container.
- Go inside the container with
docker exec -it homeassistant bash - Run the HACS install script
- Go inside the container with
wget -O - https://get.hacs.xyz | bash -Add Home Assistant Community Store (HACS) in Home Assistant Integrations
No matter the Home Assistant installation method – we have the HACS files in the right place, but that is still not enough. We have to go through the HACS initial configuration.
Here is how.
- First, restart your Home Assistant. Press the “c” button to invoke the search bar, start typing restart and select Restart Server.
- After Home Assistant has started, hit refresh button on your browser (or even you can clear your cache).
- Press the “c” button to invoke the search bar, start typing integrations and select Navigate Integrations > Add Integration (lower right corner) > search for hacs > click on the result and after a while you will see a dialog where you have to select every checkbox (4 of them) and to click Submit button.
- On the next dialog, you will have a link to GitHub and a code. Copy the code and click on the link. Log in with your GitHub account and paste the code, then hit the continue > authorize hacs buttons.
Enable AppDaemon & NetDaemon apps in HACS
You can further enable AppDaemon and NetDaemon apps discovery & tracking. In simple words these are more option to customize your Home Assistant. To enable them just go to HACS options and check the boxes next to AppDaemon and NetDaemon apps, then click submit.

Installing Home Assistant Themes using HACS
Time to have some fun! Let’s enable Themes in Home Assistant Community Store. We will try to search and install some.
- To enable themes I have to edit my
configuration.yamlfile a bit. I will use the File editor add-on for that, but you can use anything you like. Just paste the following lines inside that file:
frontend:
themes: !include_dir_merge_named themesTIP: Make sure that you don’t have frontend: section in your configuration.yaml file already.
- Save the changes and restart your Home Assistant.
- Go to HACS section (in the left sidebar of Home Assistant) > Frontend > Explore & Add Repositories
- Search for a theme that you like, for example the iOS Dark Mode Theme (the most rated one at the time of writing this article) and click on it > click on Install this repository in HACS button (lower right corner) > install
- For the iOS Dark Mode Theme add the following line to your
lovelace-ui.yamlor use the RAW editor (Overview > three dots menu in the upper right corner > Edit Dashboard > three dots menu in the upper right corner > Raw configuration editor):
background: var(--background-image)TIP: For other themes the previous step may not be needed. Check their documentation!
- Finally, go to your Home Assistant username (lower left corner), under Theme dropdown menu select your new theme.
Install Custom Integrations & Components using HACS
One of the most commonly used features that Home Assistant Community Store allows is easy installation of custom integrations and components. Here is how to do this.
- Go to HACS section again (in the left sidebar of Home Assistant) > Integrations > Explore & Add Repositories.
From this menu you can search & install a lot of custom integrations and if a custom integration is not listed there, you can add it though the three dots menu (upper right corner) > Custom repositories. Where you can paste the custom repo URL and to choose a category.
Summary
Home Assistant Community Store can be very useful, but you have to use it with caution as everything inside HACS is custom and it is not tested by the Home Assistant core team.
That doesn’t mean it is not tested at all, there are some HACS custom integrations that have very vivid communities and thanks to the open source possibilities a lot of eyes are looking at their code.
Anyways, If you face any issues you can always disable or even remove Home Assistant Community Store from your Home Assistant and live without it, but I must admit that it is more fun to have it around. Give it a chance and decide by yourself.
Subscribe for my YouTube channel and don’t forget the notification bell! You will not skip a beat that way, as you will receive notification when I release new video.
Feel free to join my Discord server where we discuss Smart Home, IoT, Home Assistant and more LINK.
Follow me on Twitter where I’m trying to post regularly!
Stay safe and don’t forget – Home Smart, but not Hard!
See you next Wednesday!
A very helpful page. The *only* thing missing from here, which I found on the main HACS page, was the instruction to clear the browser cache. Or, if you did mention it, I perhaps missed it. For me, I just opened an incognito window and logged in, giving the same effect as clearing the cache.
These instructions don’t work. Total waste of time. After running the HACS install script and restarting several times, and then selecting HACS as an install from the Integrations and restarting again, I am left completely without a HACS install.
Most probably you are not doing something correctly or you are skipping something. The instructions are working! I used them again last week for one test Home Assistant installation.
None of these instructions work. Clicking on HACS on the left hand icon list opens the Home Assistant Community Store with a list or repositories. There are no ‘integrations’ or ‘frontend’ buttons or options. I think everything is now done in HA under settings, but this also does not provide access to frontend or plugins. I am completely stumped as most HACS packages ask you to use plugins or frontend but don’t explain how you can get there
Simon, something is wrong with your HACS installation, there are integrations & frontend buttons inside HACS and none of this is under the HA settings, please double check the instructions and watch the video. Good luck