In this video I will show you how you can use TensorFlow to perform real-time object detection using images streamed from the Raspberry Pi Camera.
During my last video I asked you whether you are interested in image recognition/object detection software and you said: “Yes” – big time, so I listen and execute.
Table of Contents
Requirements
To complete this tutorial you will need:
- Raspberry Pi with Raspbian OS – https://amzn.to/2S1IZrv
- Connected and configured Pi Camera (either of these two below will work):
- 1080p Raspberry Pi Camera Module V2 – 8 Megapixel – https://amzn.to/2Sx1Sll
- Cheaper Camera Module + Holder – https://amzn.to/2UCh4jN
- Some kind of monitor connected to the Raspberry Pi to see the camera stream.
- (really Optional) Coral USB Accelerator – https://amzn.to/2tvmFgp
- And as usual smashed SUBSCRIBE button if you haven’t done that already.
What is TensorFlow?
It is an open source library to help you develop and train Machine Learning models. You can run TensorFlow locally on your devices and no info or images are sent to the cloud. So privacy concerned guys this is just for you.
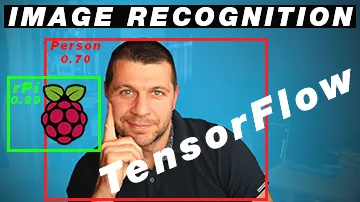
How objects detection looks like?
You will see it in details at the end of the video, but basically when you put some objects in front of the Raspberry Pi camera you’ll see color boxes drawn around objects that the model recognizes. The recognised objects will have a label and probability score. Higher score means that the model is pretty sure that the object is what is written on the label.
TensorFlow Lite vs Tensorflow
We are going to install TensorFlow Lite which is much smaller package than TensorFlow.
I will test this on my Raspberry Pi 3, if you have Pi 4 it will run even better.
So, Without further ado lets install this TensorFlow lite on a Raspberry Pi and start to classify images:
Steps to execute:
Pi camera check
- To enable Raspberry Pi camera type the following in the Raspberry terminal:
sudo raspi-config
- then go to Interfacing Options\Camera and on the dialog choose <Yes>
- To test the camera type:
raspistill -o ~/Desktop/like_this_video.jpg
- You can then open the ~/Desktop/like_this_video.jpg file to check that you have a still image from your Pi camera
Python version check
- If everything is OK with your camera, check your installed python version by:
python3 —version
- Then go to the TensorFlow python quickstart – https://www.tensorflow.org/lite/guide/python
- Copy the URL matching to your python version and OS and put it after pip3 install. example: pip3 install YOUR_URL.
- If you have a python version 3.7.x you can use the following command:
TensoFlow Lite installation
pip3 install https://dl.google.com/coral/python/tflite_runtime-2.1.0-cp37-cp37m-linux_armv7l.whl
- Clone TensorFlow examples repo to your Raspberry Pi like this:
Git repository clone
git clone https://github.com/tensorflow/examples --depth 1
- Enter inside this folder with the the command below:
cd examples/lite/examples/object_detection/raspberry_pi
- Then use the script below to install a couple Python packages, and download the MobileNet model and labels file. The script takes an argument specifying where you want to save the model files
Download Machine Learning models
bash download.sh /tmp
Start the object detection
- Run the example with this:
python3 detect_picamera.py \
 --model /tmp/detect.tflite \
 --labels /tmp/coco_labels.txt
- Congratulations, you should see the camera feed appear on the monitor attached to your Raspberry Pi.
The Goal
The ultimate goal for me is to make this TensorFlow Lite image classification to work with any RTSP enabled camera and of course with Home Assistant and Node-RED.
So you will be able to receive notifications only when there is motion detected by person and not a cat or wind for example. That will be really nice feature to any Smart Home security system.
Question?
It is possible to build and train your own Machine Learning models. What kind of object detection with TensorFlow will be most beneficial for you to be trained? Let me know in the comments section below.
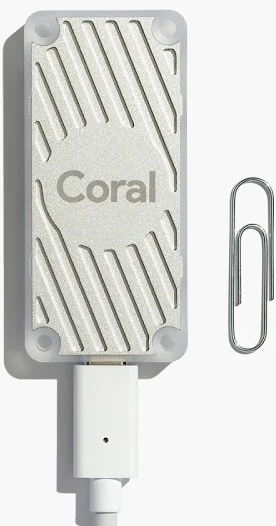
Coral USB Accelerator
It is possible to accelerate the image classification by 10X by using the Coral USB Accelerator – https://amzn.to/2Uf8WW8 This is a small usb drive capable of performing 4 trillion operation per seconds with very low consumption power and it is compatible with TensorFlow and Raspberry Pi.
Unfortunately I don’t have such device, so I cannot show you this at the moment. But If I manage to find one I will create a follow-up video.
Support my work
Any sort of engagement on this channel does really help out a lot with the YouTube algorithm, so make sure you hit the subscribe, Like and Bell buttons If you enjoy this video.
Also feel free to add me on Twitter by searching for this username. I post there pretty much daily.
I really hope that you find this information useful and you now can do object detection on your Raspberry Pi using TensorFlow lite.
Thank you for reading or watching, stay safe and see you next time.
Hi, very nice tutorial.
I also would like to make TensorFlow Lite work with my RTSP camera. Did you discover something?
Not unfortunately. I didn’t have time to research. So this is still in my TODO list 🙂 Thanks for your comment and I’m glad you like the turoial.
How can I use these object detection results to control a Servo. For example, person go to 0 position, if dog go to 180 position? Thanks.
As I told you in the video comments Roberto. Probably there is a way to do it, but I don’t know it. You either have to write it for yourself or you can try to adapt something existing. Wish you luck.