We will find out is UDM still worth it, or you better search for alternatives. You can expect to see my honest opinion about the UniFi Dream Machine. I will share my experience with this product and I will show you how I managed to setup my home network for Smart Home in mind.
In other words, using different VLANs and Firewall rules, so my IoT devices to stay separated from my main network, with possibility to access my Home Assistant server(s) if that is needed.
Table of Contents
What is UniFi Dream Machine (UDM)?
Released in late 2019, UniFi Dream Machine is an all-in-one device that combines multiple network components into one package. These components are:
- A 4-port Gigabit switch,
- Wireless Access Point,
- UniFi Controller (used to manage UniFi Network),
- Router & Firewall device.
UDM doesn’t look like router at all, but actually, it is exactly that. And it is expensive one – around $299.
Check the current price in Amazon 👉 LINK
But is UDM still worth it?
My UDM Story short
I had a UniFi Dream Machine for a year and a half, but now it is officially dead ☠️. No LEDs, no factory reset, no nothing. I still don’t know what happened, probably some kind of electric shock or something.
I have to admit – Ubiquiti support is superb! This is my personal opinion, as I didn’t experienced such attention from any other vendor so far. I was able to live chat with their representative in a matter of 5 minutes (several other persons were waiting in the queue before me). The guy on the other side ask me to try some stuff with the UDM, but when he realise that my Dream Machine is really dead, he recommended to file a RMA.
UDM Successor – UniFi Dream Router
Anyways, to recover my local network, I needed another Dream Machine, so I went to the Ubiquiti website. And there I saw a new device, a Dream Machine successor called – UniFi Dream Router.
This new device is WiFi 6 capable with PoE Ports and it is 3 times cheaper than the Dream Machine.
Soon after, my excitement went to the recycle bin 🗑, as I understood that the UniFi Dream Router was released only in some kind of early access form, it was completely sold out, with no ETA.
That means I missed that train, unfortunately.
UniFi Dream Router Question For You!
If you are lucky enough and you managed to buy a Dream Router. Leave few words in the comments section below. What is your opinion about UniFi Dream Router? Are you happy with that device or not?
UniFi Network Configuration for Smart Home
Fast forward, I sent my old UDM for replacement and I ordered and received a brand new one. If everything is successful with my RMA I will have two Dream Machines, not that I know what will I do with them, as they cannot mesh.
Anyways, because I had no backup of my network configuration (silly me) I had to setup everything from scratch. This time I decided to use not the old Classical Interface, but the UniFi Brand New User Interface.
Settings > User Interface > New User Interface
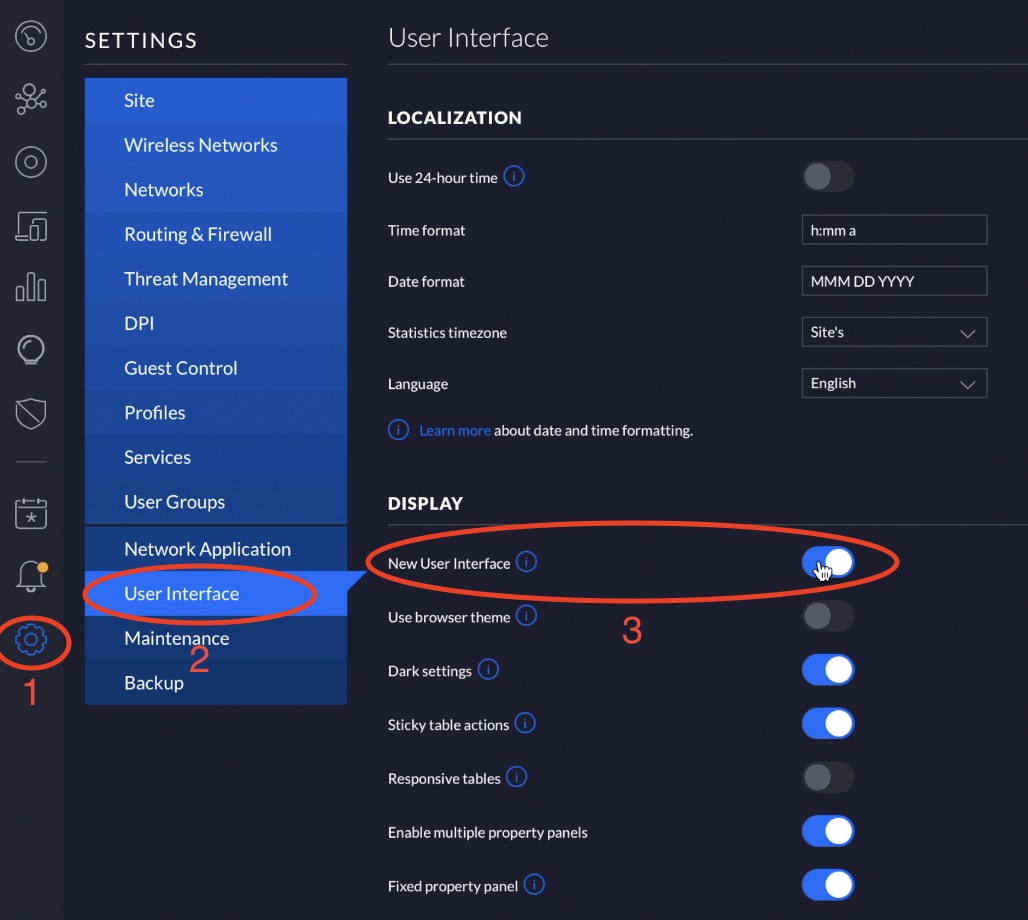
What can I say, it feels like I have a totally new device, everything looks different, but it is nice and I even have a cloud backup option now. In case Dream Machine burns again.
Shout out to The Hook Up!
The network configuration I used is in fact slightly modification of the The HookUp instructions for his UDM Pro device (link to his video). He explains everything there in great details, so all the credits for the following parts goes to him. I just translated his work from UDM Pro to the regular UDM as there are some minor differences, but the essentials are exactly the same.
Now, let’s start!
How to create new Networks in UniFi?
The first thing that I did was was to create four more networks and now I have 5 different networks in total. The process of network creation is stupid simple, you just have to go to Settings > Networks > Add New Network.
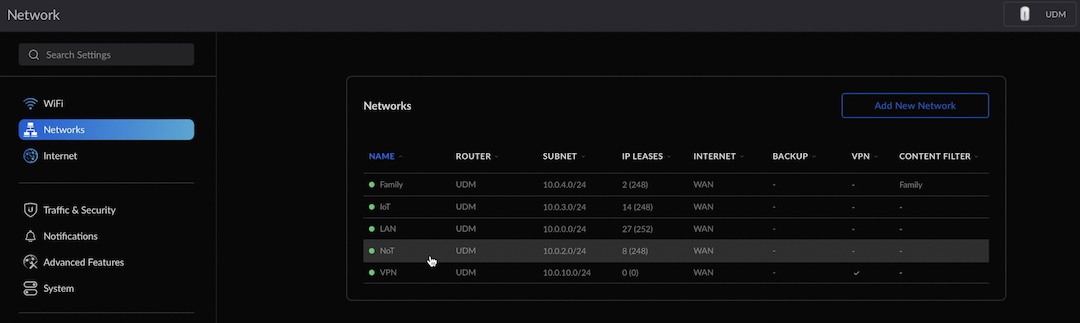
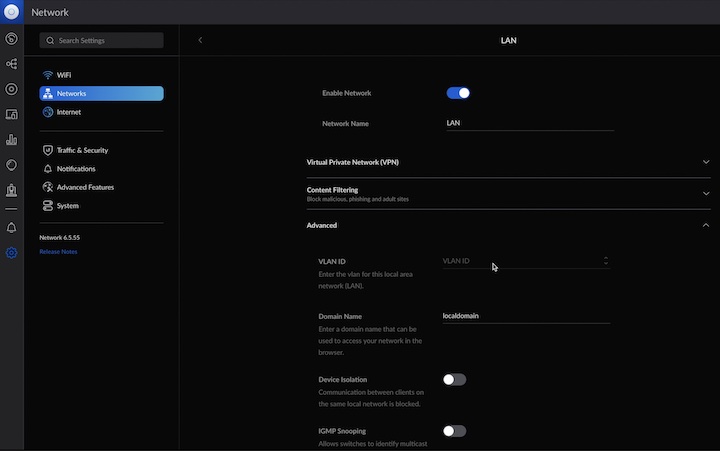
How to configure LAN network in UniFi?
My main LAN network have no VLAN assigned on purpose as it will have almost no restrictions. My desktop computers, laptops, tablets, phones and so on are going to be connected there.
- I set the Content Filtering to None.
- I leave the VLAN ID empty.
- I disabled Device Isolation, IGMP Snooping & Auto Scale Network.
- I changed the Gateway IP/Subnet to: 10.0.0.1/24 and I clicked on the Auto-configure button next to DHCP Range section to update the IP range. Have in mind that this whole bullet (last one from the list) is optional. You can leave the default settings suggested from the UniFi controller.
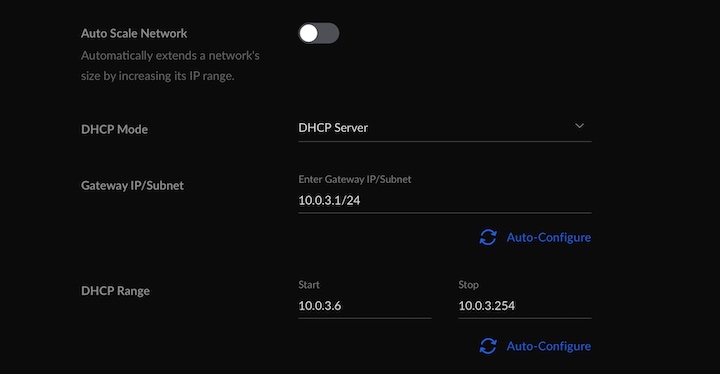
How to create IoT network in UniFi?
I created a new network with name IoT. This network will be dedicated to all of my IoT devices that need Internet access to operate. Example of such devices are: Amazon Echo, Apple TV, Aqara, Tuya, SwitchBot and so on. All of these devices will have no access to my main network, but I will be able to access them if I want to. For my IoT network I did the following:
- I set the Content Filtering to None
- I set a VLAN ID to 3
- I disabled Device Isolation, IGMP Snooping & Auto Scale Network.
- I changed the Gateway IP/Subnet to: 10.0.3.1/24 and I clicked on the Auto-configure button next to DHCP Range section to update the IP range. Have in mind that this whole bullet (last one from the list) is optional. You can leave the default settings suggested from the UniFi controller.
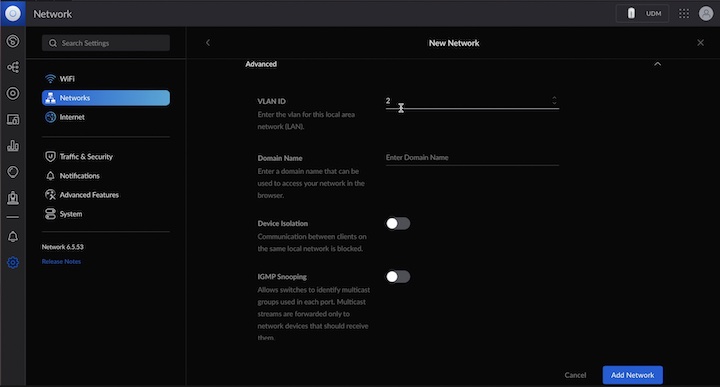
My UniFi NoT Network
After that, I created a NoT network. NoT stands for Network of Things and again all the credits for the clever name going to The Hook Up. In this network I will connect all of my IoT devices that don’t need Internet connection to operate. For example, these are all of my Tasmota, ESP32 and Arduino devices. They only need access to my Home Assistant servers.
- I set the Content Filtering to None
- I set a VLAN ID to 2
- I disabled Device Isolation, IGMP Snooping & Auto Scale Network.
- I changed the Gateway IP/Subnet to: 10.0.2.1/24 and I clicked on the Auto-configure button next to DHCP Range section to update the IP range. Have in mind that this whole bullet (last one from the list) is optional. You can leave the default settings suggested from the UniFi controller.
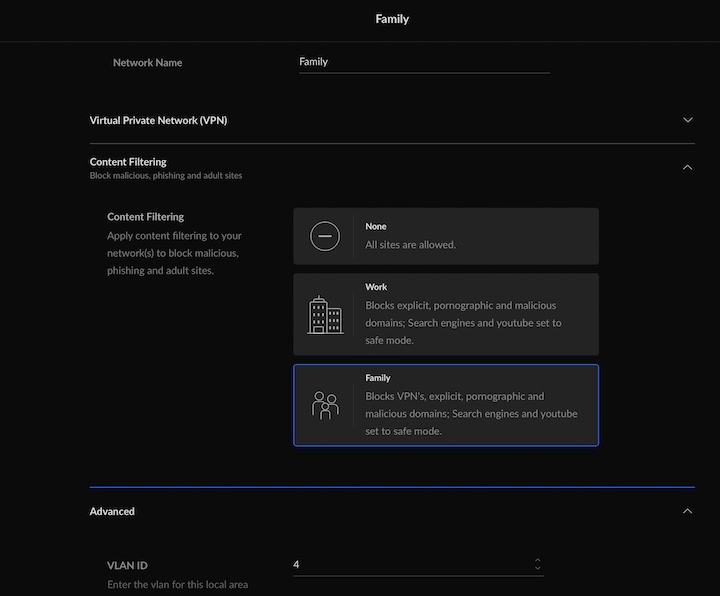
How to create Family Network in UniFi?
Then, I created a Family network, on which I will have content filtering enabled, so most of the adult and malicious domains will be blocked, making this network perfect for Kids.
- I set the Content Filtering to Family
- I set a VLAN ID to 4
- I disabled Device Isolation, IGMP Snooping & Auto Scale Network.
- I changed the Gateway IP/Subnet to: 10.0.4.1/24 and I clicked on the Auto-configure button next to DHCP Range section to update the IP range. Have in mind that this whole bullet (last one from the list) is optional. You can leave the default settings suggested from the UniFi controller.
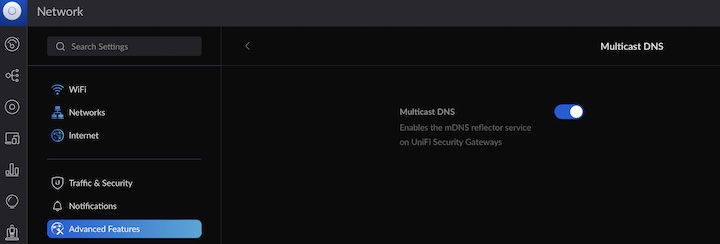
Multicast DNS (mDNS)
Multicasting is normally limited to the subnet the device sending the multicast is in. mDNS echoes the multicast to other subnets. Versions of mDNS are used by printers, Apple devices, Chromecast etc.
So, I enabled the Multicast DNS option from the Advanced Gateway Settings:
Advanced Features > Advanced Gateway Settings > Multicast DNS
How to setup a VPN in UniFi?
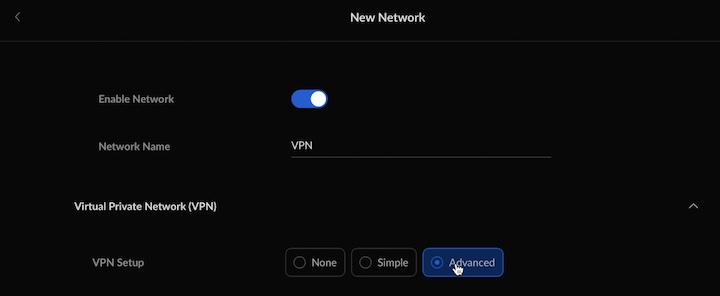
And last, but not least I created a VPN network with different subnet. Here is how I managed to setup the VPN in UniFi.
- I created a new network from Settings > Networks > Add New Network.
- I set the Network Name as VPN.
- Then I expanded the Virtual Private Network (VPN) and as VPN Setup I selected Advanced.
- I selected the Remote Access from VPN Connection section.
- VPN Protocol should stay L2TP (Recommended), which is selected by default.
- For Pre-Shared Secret Key it is recommended to select good passphrase with above 10 characters that includes Numbers, small & capital letters and special symbols. I used the suggested one from the UniFi controller as it seems strong enough.
- Then in User Authentication section, I clicked on the Create a new user button.

- In the shown dialog I entered a Username and a Password. As example, I used Smash as username and Thelike for password (this of course can be anything you wish). Then I clicked on the Create User button.
- I expanded the Advanced section, where I changed the Gateway/Subnet from the suggested one (192.168.2.1) to one that I like more – 10.0.10.1
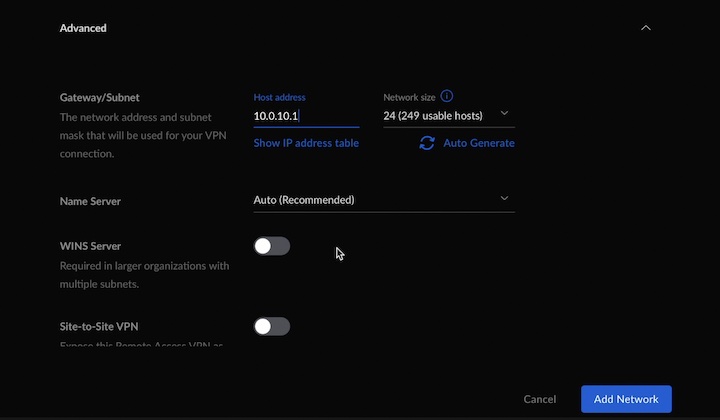
- At the end, I happily clicked on the Add network in the lower right corner.
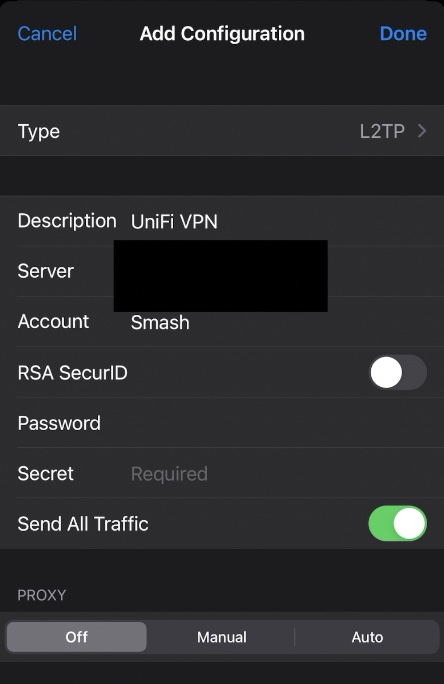
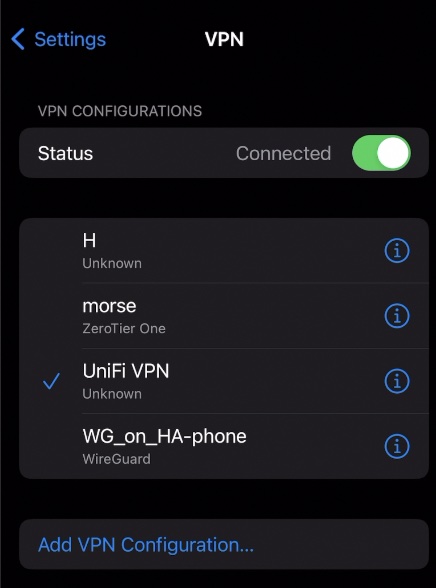
How to configure iOS VPN client to connect to UniFi VPN?
You can use the Windows, Linux, macOS & Android VPN native clients to connect to the UniFi VPN. Here is how you can use the iOS Client:
In iOS (Apple) device, go to Settings > VPN > Add VPN Configuration.
- Change Type to LT2P.
- Enter a Description. For example, UniFi VPN.
- In the Server field, type your Real IP (This is the IP that your Internet Provider is giving you) or Dynamic DNS hostname that you are using.
- Under Account, enter your Radius Username, that you defined in the above section. In my case it was Smash.
- Under Password, enter your Radius Password, that you defined in the above section. In my case it was Thelike.
- Under Secret, enter your Pre-Shared Secret Key that you defined in the above section.
- Finally, tap on Done button.
To test the configured VPN, just select the newly created VPN configuration and tap on the switch next to Status label.
How to configure UniFi WiFi networks?
I’m now ready with the network basics and I can move to the WiFi section. In this section I created 4 different Wi-Fi spots and I assign the already defined networks to them.
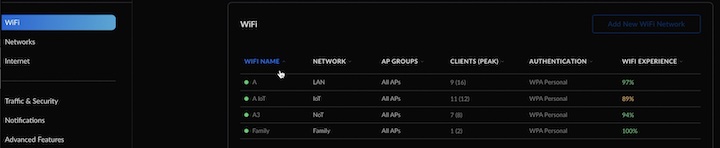
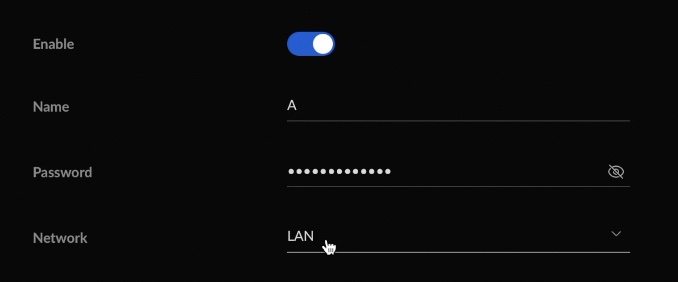
For example, I created a WiFi network named A and I selected the main LAN network here.
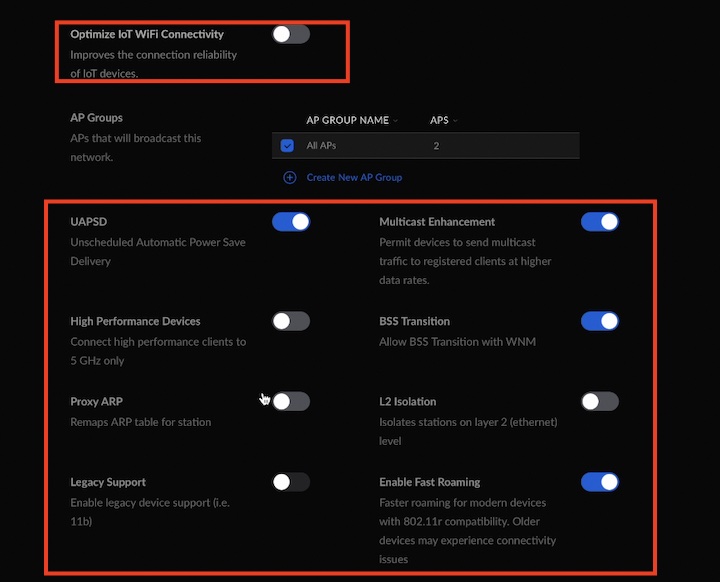
In advanced section I disabled the Optimize IoT WiFi Connectivity option and I enabled UAPSD, Multicast Enhancement, BSS Transition & Fast Roaming.
I did exactly the same for my Family network. The only difference here is the name, password and the selected network, which is Family in my case.
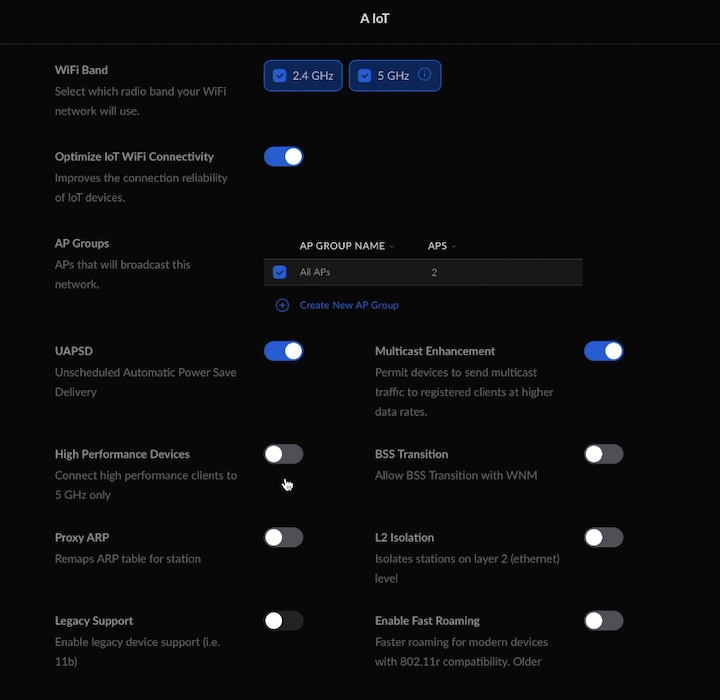
For my IoT network I enabled the Optimize IoT WiFi Connectivity option and I disabled everything else, except for the UAPSD & Multicast Enhancement.
Similarly, for the NoT network I enabled the Optimize IoT WiFi Connectivity option, but this time I enabled only Multicast Enhancement as I don’t have any battery powered devices in this network.
UniFi Traffic & Security options
Now, when I have all of my networks sliced as pizza 🍕it is time to define some rules saying who can eat what. I can do that with several firewall rules.
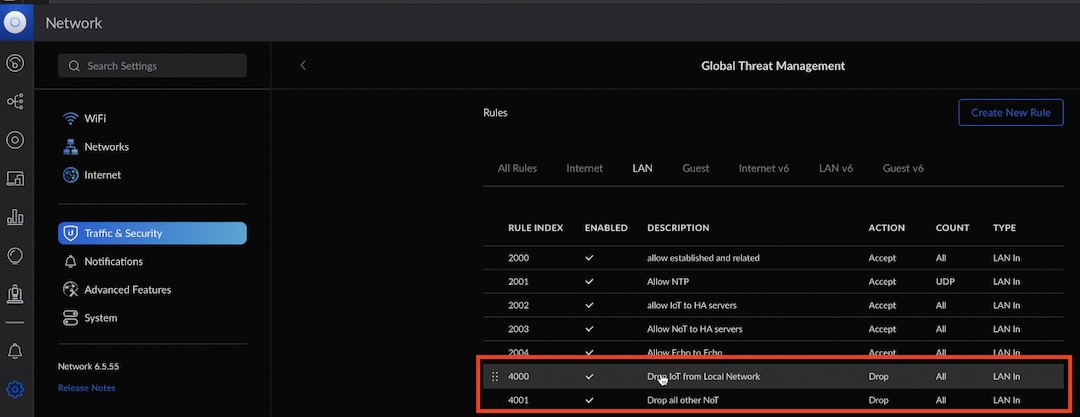
From Traffic & Security menu > Global Thread Management > I enabled Detect & Block Intrusions and I set the System Sensitivity to Balanced. Of course, you should decide for yourself do you need to Detect & Block intrusions or to only detect them or to do nothing.
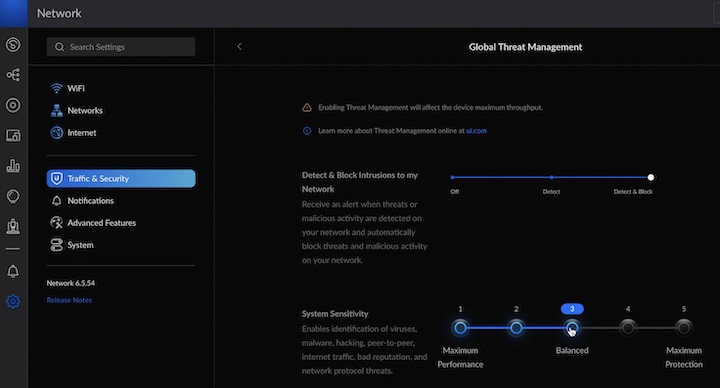
Have in mind that if you enable Detect & Block Intrusions options, your network throughput can be reduced. In case of the UniFi Dream Machine this can go to 850Mbps, which is still a lot higher than typical home Internet speeds.
I can recommend to enable Detect & Block Intrusions options and to test your network speed. If everything is fine leave it on, otherwise fine tune it or disable it completely.
Set Firewall rules in UniFi
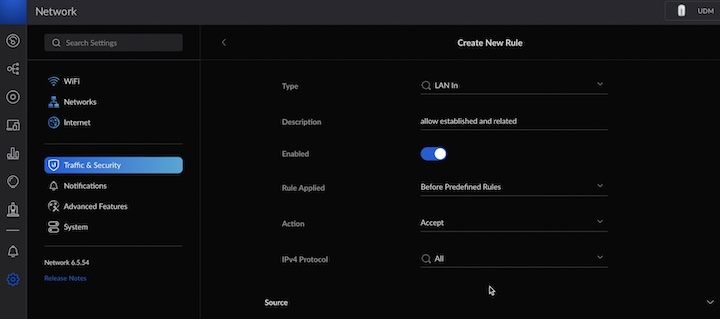
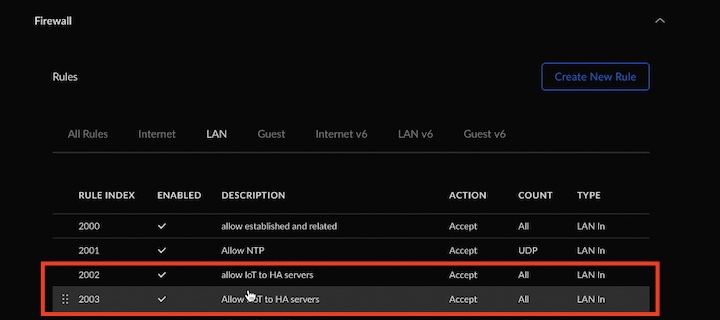
Allow Established and Related FW rule
In the exact same section (Traffic & Security menu > Global Thread Management) the Firewall options are located. Luckily, managing the firewall rules in UniFi controllers is very easy.
To allow established and related sessions I created a new rule from Type LAN In, I added a description, I enabled the rule, I leaved the Before Predefined Rules, Action to Accept, For Source & Destination I selected Any Address or Port Group.
In the Advanced section I enabled the Match State Established & Match State Related options.
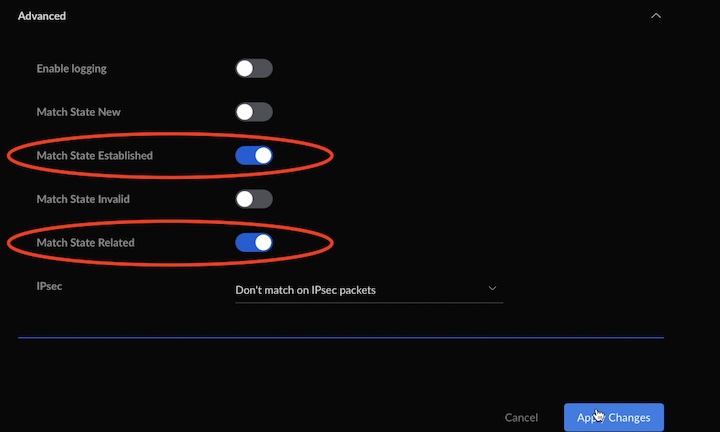
This established and related rule makes possible for the connected devices to answer when other devices in different VLANs are requesting something from them.
Allow NTP access FW rule
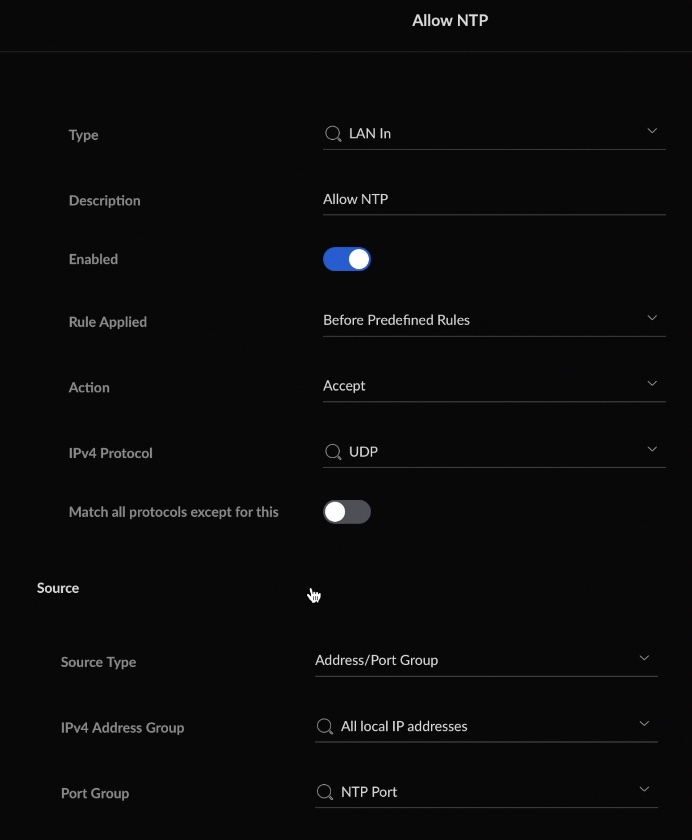
Then, I allowed NTP port for all of my devices in all of my networks with this rule.
NTP stands for Network Time Protocol and it is used to sync the time. The default NTP port is 123 UDP.
Next, are two important firewall rules which allowing the devices connected to IoT & NoT networks to access my main and test Home Assistant Servers.
Allow Casting devices
If you have any casting enabled devices like Chromecast, Apple TVs and so on you probably have to add dedicated allow rules for their specific ports. That is In order casting and announcing services of these devices to continue to work as expected.
For Amazon Echo these ports should be open across VLANs:
- Output TCP: *, 80, 8080, 443, 40317, 67, 68
- Output UDP: *, 53, 123, 40317, 49317, 33434, 1900, 5000, 5353
- Input TCP: 8080, 443, 40317
- Input UDP: 53, 67, 68, 1900, 50000, 5353, 33434, 49317, 40317
For Apple TV these ports should be open across VLANs:
- TCP port 123 is used to communicate with a network time server.
- TCP port 3689 is used to communicate with iTunes while using the iTunes Library Sharing feature.
- UDP port 5353 is used by Apple TV for automatically finding computers with iTunes on your network using Bonjour.
- TCP port 80 is used for communicating with podcast servers.
- TCP port 80 and 443 are used for basic and secure communications with the iTunes Store via the Internet.
- TCP port 53 is used for regular DNS.
For Chromecast these ports should be open across VLANs:
TCP: 8008, 8009, 5556, 5558, 5353
Drop IoT and Not from Local Network FW rules
Then I created two drop rules, doing the following: If a device connected to my IoT or NoT networks wants to access my main network and If this doesn’t meet any of the Allow rules stated above, then drop this attempt.
Is UDM still worth it now?
With that, my local network configuration in UniFi Dream Machine is complete!
Ant the main question is: Is it still worth it to buy a UniFi Dream Machine? The short answer is: No! Especially If at the time of reading this article the UniFi Dream Router is already on the market. If this is the case – just buy the Dream Router instead.
But, if you are in a hurry and you can’t wait for the UDR to pop, and you want a device that is simple yet powerful enough, also the price is not bothering you, consider buying the Dream Machine as it is still a very good option.
If you are a network guy and you are willing to learn and combine, then check the pfSense alternatives.
Having said that, don’t forget to subscribe for my YouTube channel 👉 LINK and to subscribe for my Newsletter.
Follow me on Twitter 👉 LINK, join my Discord Server 👉 LINK and remember – Home Smart, but Not Hard!
I’m Kiril and I’m done writing. Bye!
For the Family network, I believe you have a typo in your instructions, where you say: “I set the Content Filtering to None”. I believe it should say, “I set the Content Filtering to Family”
Thanks Tim, I will fix that immediately! Many, many thanks 🙂
For the Amazon Alexa firewall rules
Output TCP: *, 80, 8080, 443, 40317, 67, 68
Output UDP: *, 53, 123, 40317, 49317, 33434, 1900, 5000, 5353
Input TCP: 8080, 443, 40317
Input UDP: 53, 67, 68, 1900, 50000, 5353, 33434, 49317, 40317
Is the output LAN OUT rules?
Source being the group of Amazon devices?
Destination being VLANs you want to communicate with?
Then are you blocking all vlan traffic from home to the IOT? Or just IOT cannot talk to NOT or home and is isolated from all except for homeassistant?
Thanks!