
In todays article I will show you how to install KODI on a Raspberry Pi using LibreELEC and then we will add Kodi to Home Assistant.
If you don’t know what is Kodi we will talk about that later in the video. I’m pretty sure that you will find something new even if you are experienced user, so let’s go:
Table of Contents
What is Kodi?
- Kodi is the ultimate entertainment center!
- Kodi has a community like no other!
- Kodi runs on just about anything and it will put your smart TV to shame.
- If something is missing in Kodi there is an Add-On for that.
These are the messages that you will see when you open the Kodi website.
I decided to show you how to add KODI to Home Assistant, so you can try it out and check if everything they say is true.
Install Kodi using LibreELEC
Let’s first install Kodi using LibreELEC.
As the authors of the LibreELEC are saying – LibreELEC is just enough Operating System for Kodi.
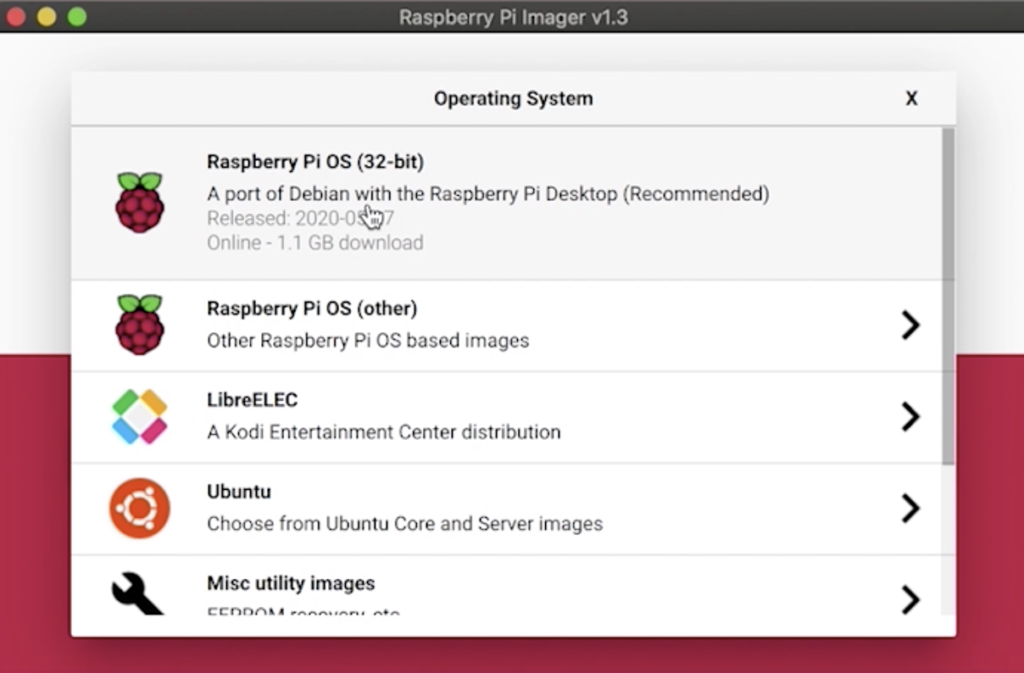
Go to the download section of https://raspberrypi.org and get the Raspberry Pi Imager for your operating system.
Start it and insert a SD card in your computer or SD card reader and burn the LibreELEC image on the card.
Now you can insert the SD card with LibreELEC in your Raspberry, and attach it to a monitor or TV using HDMI cable.
On what devices Kodi runs?
I will use my Raspberry Pi 3 for Kodi which is just perfect for this task, it is powerful more than enough, it can run over WiFi and you can find it very cheap these days – check the current price in Amazon right now.
Of course you can use whatever you want and have. Just go to download section of the KODI website and choose your OS appropriate for your device.
Setting Kodi username and password
I won’t go through the initial KODI Wizard, because it is pretty self explanatory and straightforward.
Instead I will focus more on the Kodi to Home Assistant part and I will only show you the important KODI options for that.
To access your Kodi from Home Assistant in a secure way you have to go to in Kodi:
System settings > Services > Control – enable Allow remote control via HTTP and set your Username & Password

Adding Kodi to Home Assistant
Let’s now add the KODI to Home Assistant. This will allow us to control it.
Insert the following lines in your configuration.yaml file with your favourite text editor:
# Example configuration.yaml entry
wake_on_lan:

media_player:
  - platform: kodi
    host: YOUR_KODI_IP
    username: kodi
    password: smash-the-like
    turn_on_action:
      - service: wake_on_lan.send_magic_packet
        data:
          mac: 00:11:22:33:44:55
          broadcast_address: 192.168.255.255
    turn_off_action:
      service: kodi.call_method
      data:
        entity_id: media_player.kodi
        method: System.Shutdown
This will add Kodi to Home Assistant and it will enable the possibility to turning on your Kodi using Wake on LAN and turning it off.
You should replace: host, username, password, mac & broadcast_address with yours to make it work for you.
Then check your configuration and restart your Home Assistant.
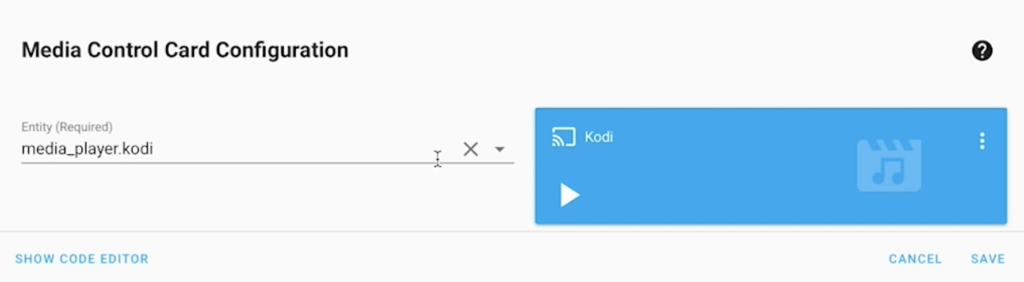
After successful Home Assistant boot, click on the:
Three dots menu (in the upper right corner of Home Assistant) > Configure UI > Plus button (in the lower right part of Home Assistant) > and search for Media Control in the search field.
Then select media_player.kodi as Entity from the dropdown menu of the Media Control Card and click SAVE.
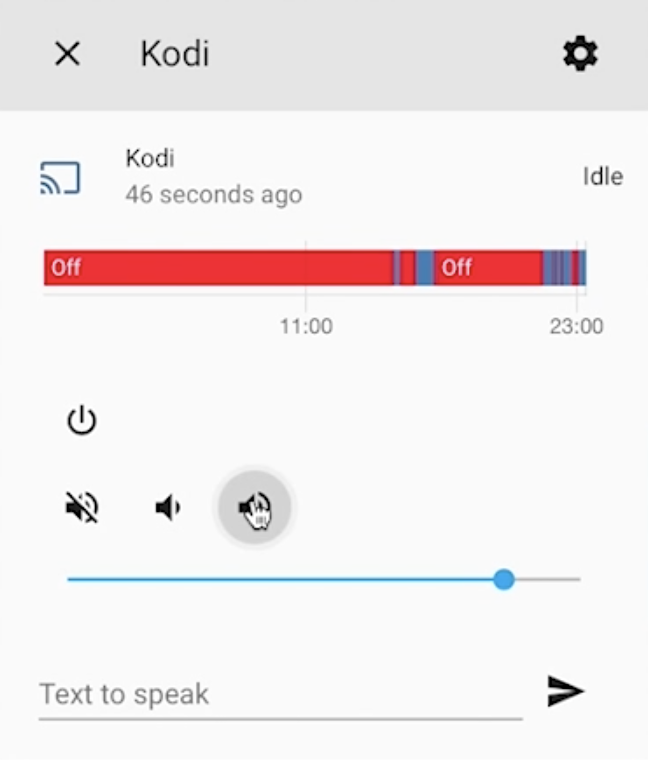
Now you can try to Increase/Decrease or Mute the Kodi volume, to turn off and eventually to turn on the Kodi.
Also you can try “Text to speak”. Just enter some text and send it to Kodi and if everything is OK you will hear this text from your speakers.
Turning on my Kodi on Raspberry Pi using Wake on LAN didn’t worked for me for some reason. If you manage to make it work – let me know how you did that.
Subscribe
If you like what you read so far, maybe you will want to know that I’m releasing a new Smart Home related article every Wednesday.
If you wish you can subscribe to my Newsletter and my YouTube channel and you will not miss a thing from now on.
I promise that I will not spam you and if you are not happy for some reason you can always unsubscribe from the link in the received message.
[sibwp_form id=2]
Scan for Kodi video library updates
If you have a shared video library added in your KODI you may want to trigger a scan for updates from time to time and I will show you how you can do that from Home Assistant.
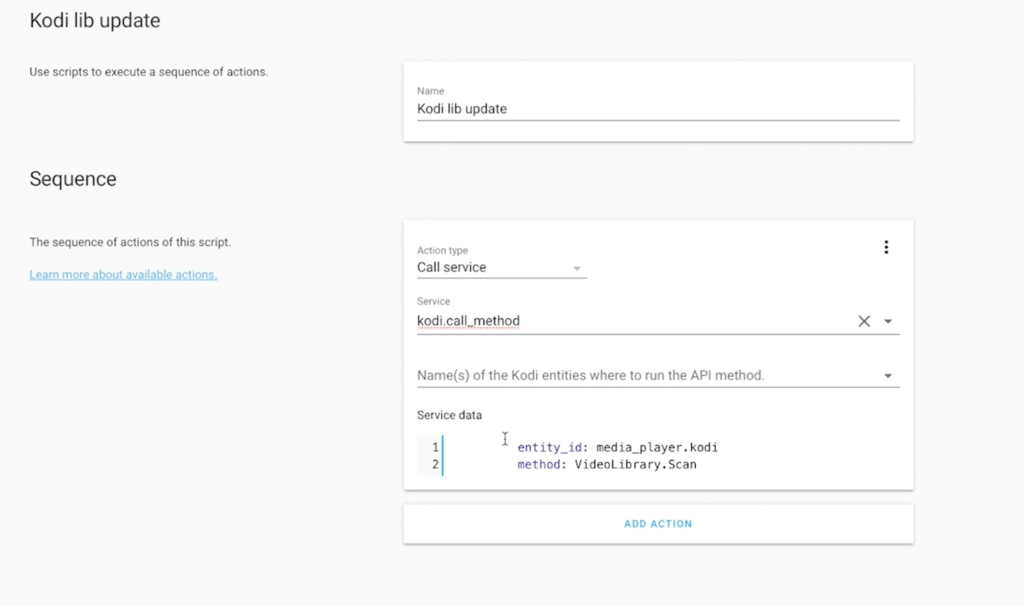
Add the following lines in your scripts.yaml file that can be located in your Home Assistant configuration folder.
script:
  update_library:
    alias: Update Kodi Library
    sequence:
      - alias: Call Kodi update
        service: kodi.call_method
        data:
          entity_id: media_player.kodi
          method: VideoLibrary.Scan
or add the last two rows from above in a new script from Scripts menu available in Home Assistant Interface like I’m showing in the picture below
Both methods are virtually the same, so choose the one that you like more.
To test if it’s working go to Home Assistant web interface:
Configuration > Scripts and click on the play button next to your script name:
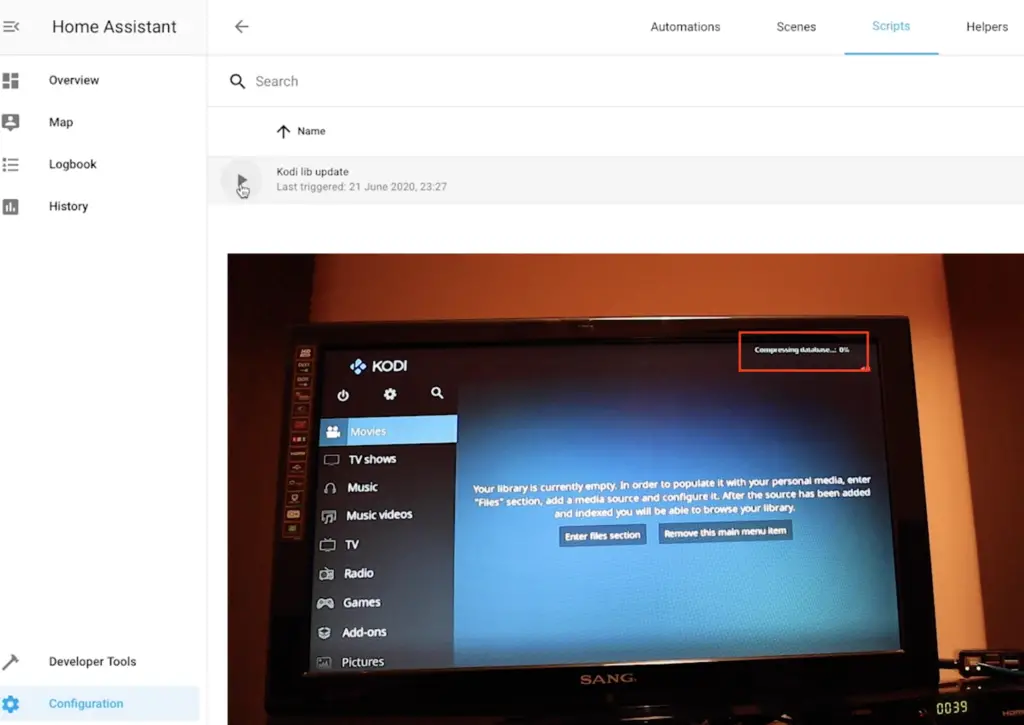
In the upper right corner of your Kodi screen you should see a “Compressing database” label flashing really fast.
Question for You!
What is your favourite Kodi Add-on?
Type only the name or give more details like installation instructions in the comments bellow.
I will try to gather them in one place and add them below.
| Name | Repo/Link | Comment |
|---|---|---|
| YouTube | link | The official YouTube Add-on for Kodi |
| Trakt | link | Keep a comprehensive history of everything you’ve watched. Sent by @Torx from my Discord |
Thank you!
Notifications from Home Assistant to Kodi
You can send notifications from Home Assistant to KODI which is a really nice way to interrupt someone during the most interesting part of their favourite TV series. I will show you how to do it.
Add these lines in your configuration.yaml file in you Home Assistant.
# Example configuration.yaml entry
notify:
  - platform: kodi
    name: NOTIFIER_NAME
    host: IP_ADDRESS
Replace NOTIFIER_NAME with a name of your choice and IP_ADDRESS with the IP of your Kodi.
Save the file and restart your Home Assistant.
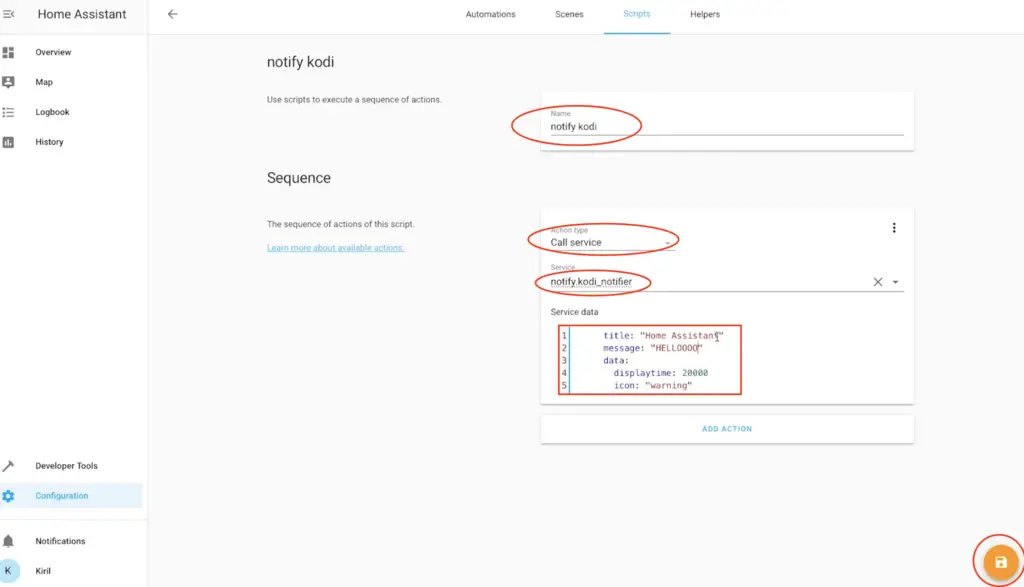
Then add these lines below in scripts.yaml
kodi_notification:
  sequence:
  - service: notify.NOTIFIER_NAME
    data:
      title: "Kodi to Home Assistant"
      message: "Subscribe to peyanski.com/newsletter!"
      data:
        displaytime: 20000
        icon: "warning"
Or add the last 5 rows in a new script from the Home Assistant GUI in the exact same way as in the Kodi Library Update.
To test if notifications are working – execute the script from the Home Assistant UI > Configuration > Scripts by click on the play button next to your script name:
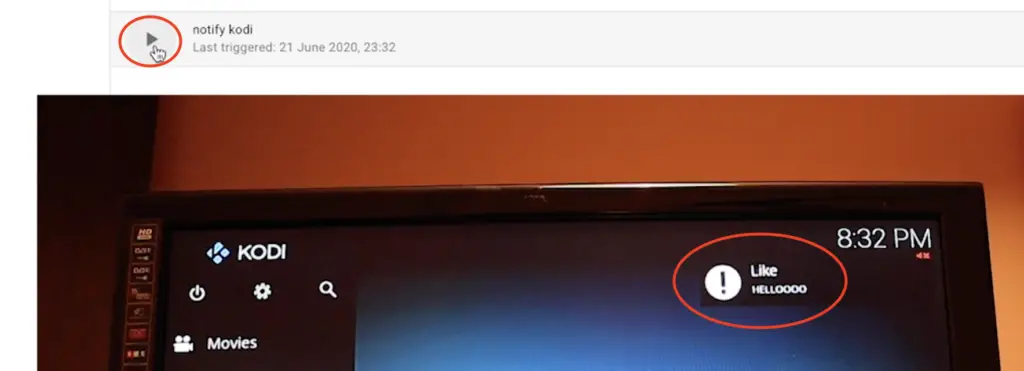
You should see your notification in the upper right corner of the Kodi.
Support my Work!
Any sort of engagement on this website or in my YouTube channel does really help out a lot with the Google & YouTube algorithm, so make sure you hit the subscribe, Like and Bell buttons If you enjoy this video article.
Also feel free to add me on Twitter by searching for @KPeyanski. You can find me on my Discord server as well.
I really hope that you find this information useful and you now know how to add KODI to Home Assistant using LibreELEC and how to control it.
Thank you for reading and don’t forget Home Smart, but not Hard!
See you next time.
A couple things about the wake on LAN part.
The “mac” configurable variable is a string, so you can enclose that with quotes “00:11:22:33:44:55” and then also make sure you are using the correct broadcast address for your network. For a lot of home networks that will be 192.168.1.255 and not 192.168.255.255. If neither of those work for you, try using the default of 255.255.255.255.
https://www.home-assistant.io/integrations/wake_on_lan/
Hi.
Raspberry Pi doesn’t support WoL. That’s why it didn’t work.
Yes, it seems so. Thanks for sharing this.