Today I will review you one very solid product with industrial quality – PowerDIN 4PZ, that have LAN ethernet port / Wi-FI & NFC and can be used to control devices locally using 7 different Open protocols or from the cloud.
The device is comes from a vendor called Netio which is located in Europe. I will show you what this PowerDIN 4PZ device is capable of and I will integrate it with Home Assistant.
Table of Contents
What will you see in this article?
Do you know what is Zero Current Switching or S0 pulse counting? Me neither, until very recently, but now I have the NETIO PowerDIN device that support these stuff and I already know about them.
Don’t worry I’m going to explain them to you while I’m showing you the other features of PowerDIN 4PZ and I’ll demonstrate Home Assistant integration. Starting Right now.
NETIO PowerDIN 4PZ Unboxing
Let’s first see what we have in the box and then we are going to continue further with the setup of PowerDIN 4PZ and its features review. The PowerDIN 4PZ have electricity meter and it is designed to fit on a DIN rail.

Inputs
Both of the device inputs can handle up to 16A that is 3600W and they support S0 counting
What is S0 counting?
S0 pulse counting is an industry-standard pulse output of electricity meters, water meters, gas meters, and so on. That means this device will remember the state of the S0 counter even after power outage.
Outputs
PowerDIN 4PZ have 4 outputs:
- Outputs 3 & 4 can handle 230V / 2A AC or 48V / 2A DC.
- Outputs 1 & 2 can support max voltage of 230V / 16A AC in total and they can display variety of measurements like A, W, Wh, TPF, V, Hz. They also support Zero Current Switching.
What is Zero Current Switching?
Zero Current Switching or ZCS significantly extends the lifetime of the connected equipment, especially in case of frequent on/off switching of devices that are not designed for that. And I’m talking about devices such as servers, computers, LED lights, electric motors and other IT equipment.
Connecting the Netio PowerDIN 4PZ
Let’s connect this industrial bad boy to the power grid so we can set it up and access its interfaces.
To connect the device you have several options depending of what do you want to achieve.
Just for the demo I connected one Zemismart Donwlight to one of the AC outputs (remember output 1 & 2).

Pairing Netio PowerDIN 4PZ to the Wi-Fi
You can use the PowerDIN 4PZ either from Wi-Fi or using the LAN ethernet cable. Using the wired connection is very easy, you have nothing to do there except to plug the LAN cable and you are ready.
I decided to connect to the Netio Smart device using Wi-Fi. If you have Android phone you can download the official Netio app and you can try the NFC pairing.
Factory reset Netio PowerDIN 4PZ
If you don’t have Android you have to put the device in AP pairing mode by doing the factory reset procedure:
- Remove the Netio plate
- Press and hold the default button that is located under the Netio green plate.
- While you hold the default button, power on the Device and continue to hold the button until you see a quick green LED blink
- release everything and wait several seconds, you have to see the Wi-Fi Led to start blinking rapidly in yellow.

Then you have to connect to the new Wi-Fi network that the device will create when enter in AP paring mode. The Wi-Fi name should be something like PowerDIN-AP-XX.
Connect to that network and follow the instructions that will guide you through the process. If you face some difficulties check my video.
Connect Home Assistant and Netio PowerDIN 4PZ
We can control the Netio PowerDIN 4PZ from it’s web interface already, let’s now try to connect and control it from Home Assistant.
First you have to enable the JSON API located in the M2M API Protocols menu in the Netio PowerDIN 4PZ web interface.
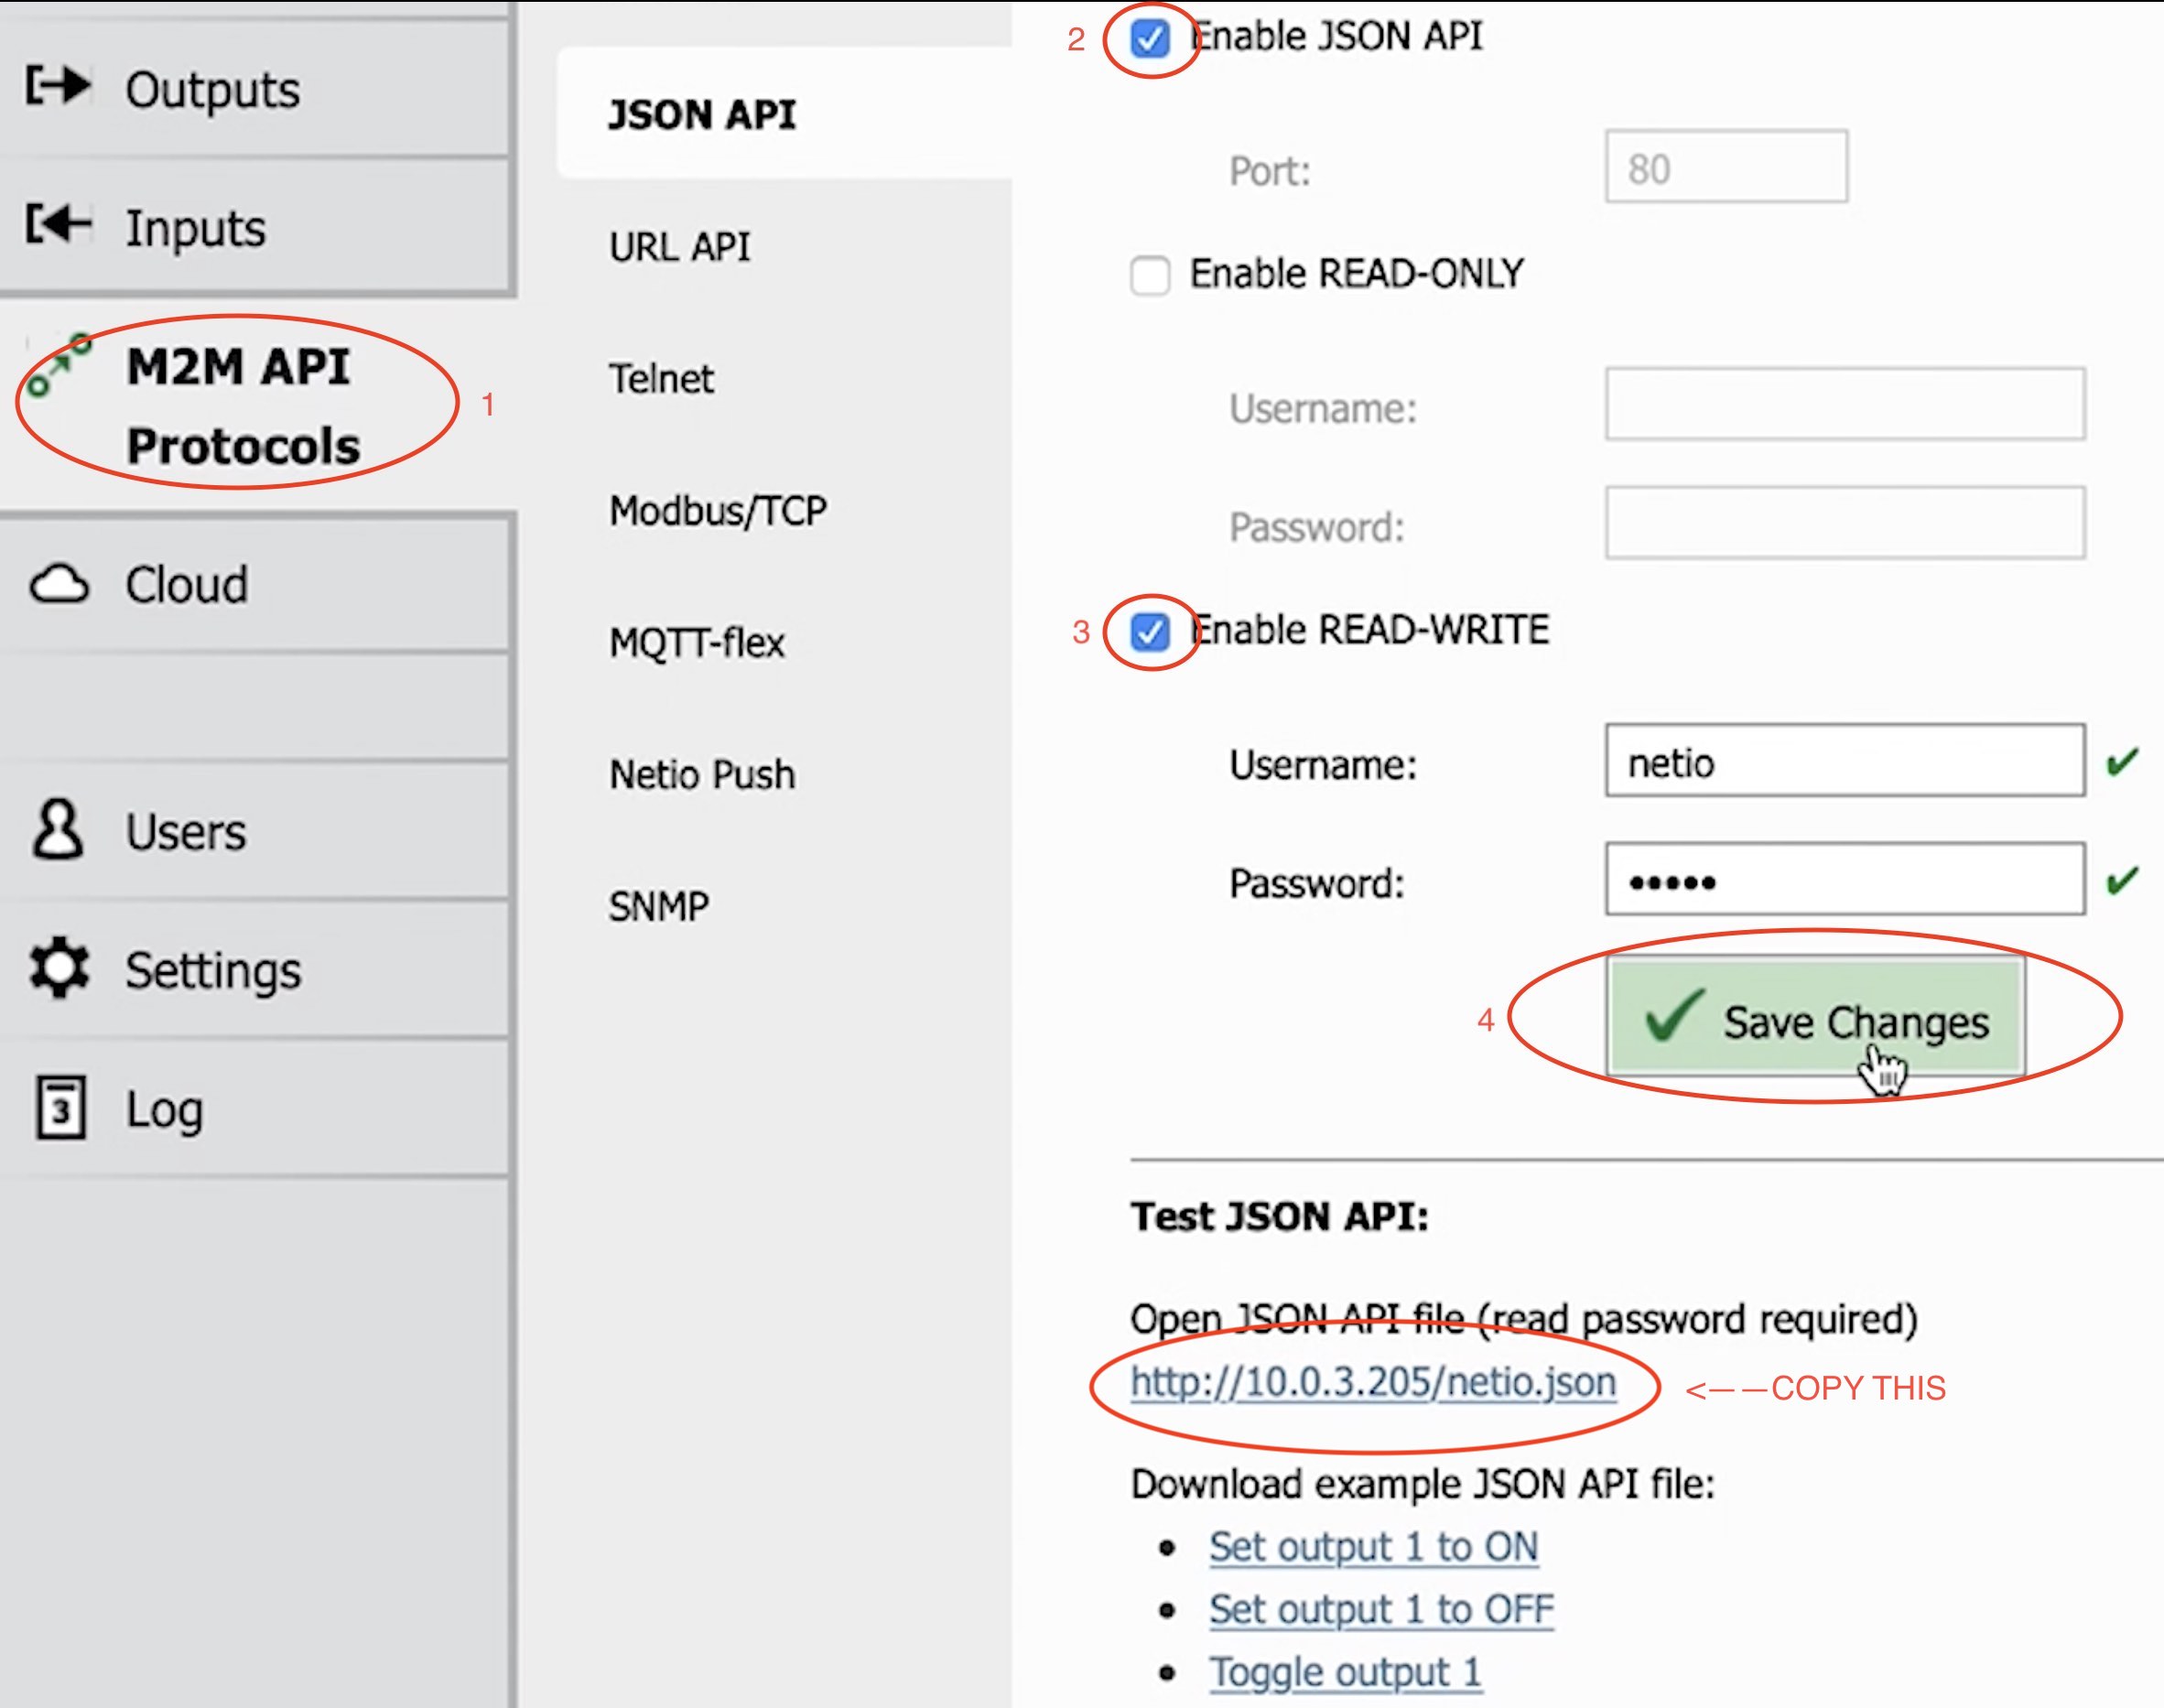
Copy the URL as shown in the above picture. Then open your Home Assistant and paste the following YAML code in your configuration.yaml file.
# configuration.yaml entry
# Get the State and all measurements of the Output 2
sensor:
  - platform: rest
    resource: http://10.0.3.205/netio.json
    name: PowerDIN 4PZ Output 2
    json_attributes_path: "$.Outputs[1]"
    json_attributes:
      - Name
      - State
      - Action
      - Delay
      - Current
      - PowerFactor
      - Phase
      - Energy
      - ReverseEnergy
      - Load
    value_template: '{{ value_json["Outputs"][1]["State"] }}'

# toggle PowerDIN 4PZ output 2
rest_command:
  toggle_output2:
    url: "http://10.0.3.205/netio.json"
    method: post
    payload: '{ "Outputs": [{  "ID": 2,  "Action": 4 }] }'
    username: netio
    password: netio
You may want to change the resource: & url: values with yours (the IP of your device may differ from the above). And you may want to change the output that you want to monitor and control.
For the monitoring in the sensor section change the number in “$.Outputs[1]” to the output that you would like to have in your Home Assistant as a sensor. Where 0 is output 1, 1 is output 2 and so on.
For the control in the rest_command section change the ID value to the output that you want to control. Where “ID”: 1 is output 1, 2 is for output 2 and so on.
PowerDIN 4PZ entities in Home Assistant dashboard
To gather the fruits of your work and to consume them you can add the sensor and the REST command that we define earlier – right in the Home Assistant Lovelace.
Script to toggle PowerDIN output
It is a good idea to create a Home Assistant script for the REST command that toggle the PowerDIN output 2 on and off. You can use the Home Assistant graphical Scripts editor (as I’m showing in the video) or you can paste the following YAML in your scripts.yaml file.
# scripts.yaml entry
toggle_output_2:
  alias: Toggle Output 2
  sequence:
  - service: rest_command.toggle_output2
    data: {}
  mode: single
  icon: mdi:power
You may wish to change the exact service name if yours is with different name. And then you can add the created script as Button card in Home Assistant Lovelace:
Adding the PowerDIN sensor in Home Assistant
For the sensor part just create a new Entity card inside Home Assistant and select the PowerDIN output as entity.
Support my Work!
If you want to secure this blog existence you can become one of my supporters. You can see exactly how in this section of my site.
Any other sort of engagement on this site and my YouTube channel does really help out a lot with the Google & YouTube algorithms, so make sure you hit the subscribe, as well as the Like and Bell buttons.
You can also check my Free Home Assistant webinar right here -> LINK
I really hope that you find this information useful and you now know more about NETIO PowerDIN 4PZ, Zero Current Switching, S0 Counting and Home Assistant Rest Interface
Also feel free to add me on Twitter by searching for @KPeyanski. You can find me on my Discord server as well.
Stay safe and don’t forget – Home Smart, But Not Hard!
Thank you for reading, I will see you in the next article.