
The new Home Assistant Drag & Drop aka Sections feature is finally here, and some say it is the coolest thing since sliced bread. Or is it? Let’s dive deep into this topic and see what’s really going on.
For years, the one feature that everyone seemed to want in the Home Assistant community was Drag & Drop functionality. And now, it seems the developers have finally manage to do it, by introducing this feature in a fresh and intriguing way through the incorporation of sections filled with tile cards. It sounds promising and exciting, right? But before we get ahead of ourselves, there are a few crucial bits of information you need to know to make the most out of this new addition.
Here is a list of 5:
Table of Contents
#1 First Things First: Accessing Drag & Drop
To get your hands on this new Drag & Drop feature, you need to be running Home Assistant 2024.3 release or higher. If you’re reading this before the official release, you might be able to test out the features through beta versions or nightly builds, giving you early access to what’s coming.
#2 Setting Up for Success
For those who are either new to Home Assistant or have stuck with the default dashboard up until now, you’ll need to take a pivotal step – switching to manual control. This is a critical move as it allows you to fully engage with the Drag & Drop functionality. That is because there is only an automatic arrangement of devices and sensors when Home Assistant default dashboard is used.
#3 Creating Your New Playground
Starting this journey requires you to either create a new Home Assistant dashboard, a new view, or both. This is your first real step into customization, allowing you to lay the groundwork for what’s to come.
Tired of reading? Here is a video
Check my video about this topic if you don’t want to read anymore…
#4 Sections
It’s important to note that the Drag & Drop feature, also known as Sections, is not the default view at the moment. You’ll need to explicitly opt for “Sections” when creating a new view.
Furthermore, it’s currently impossible to convert existing views into sections – meaning you’ll have to start from scratch. This might seem like a limitation, but it also ensures that your current dashboards and views remain untouched and safe from unwanted changes.
#5 Experimental Features Ahead
Remember, the whole Sections concept is still in an experimental stage. This means that what you see now might get some changes in future releases. The goal is for sections to eventually become the default view for Home Assistant, but only after ensuring everything works seamlessly.
Smart Home Glossary?
If some of the terms that I’m using are not so clear, then feel free to get my Smart Home Glossary, which is full of Smart Home words and acronyms and their simple, but useful explanation.
The Glossary is absolutely free – https://automatelike.pro/glossary
Diving into Drag & Drop
Creating a new view with sections is straightforward. You just need to create a new view (or a new dashboard and a view)
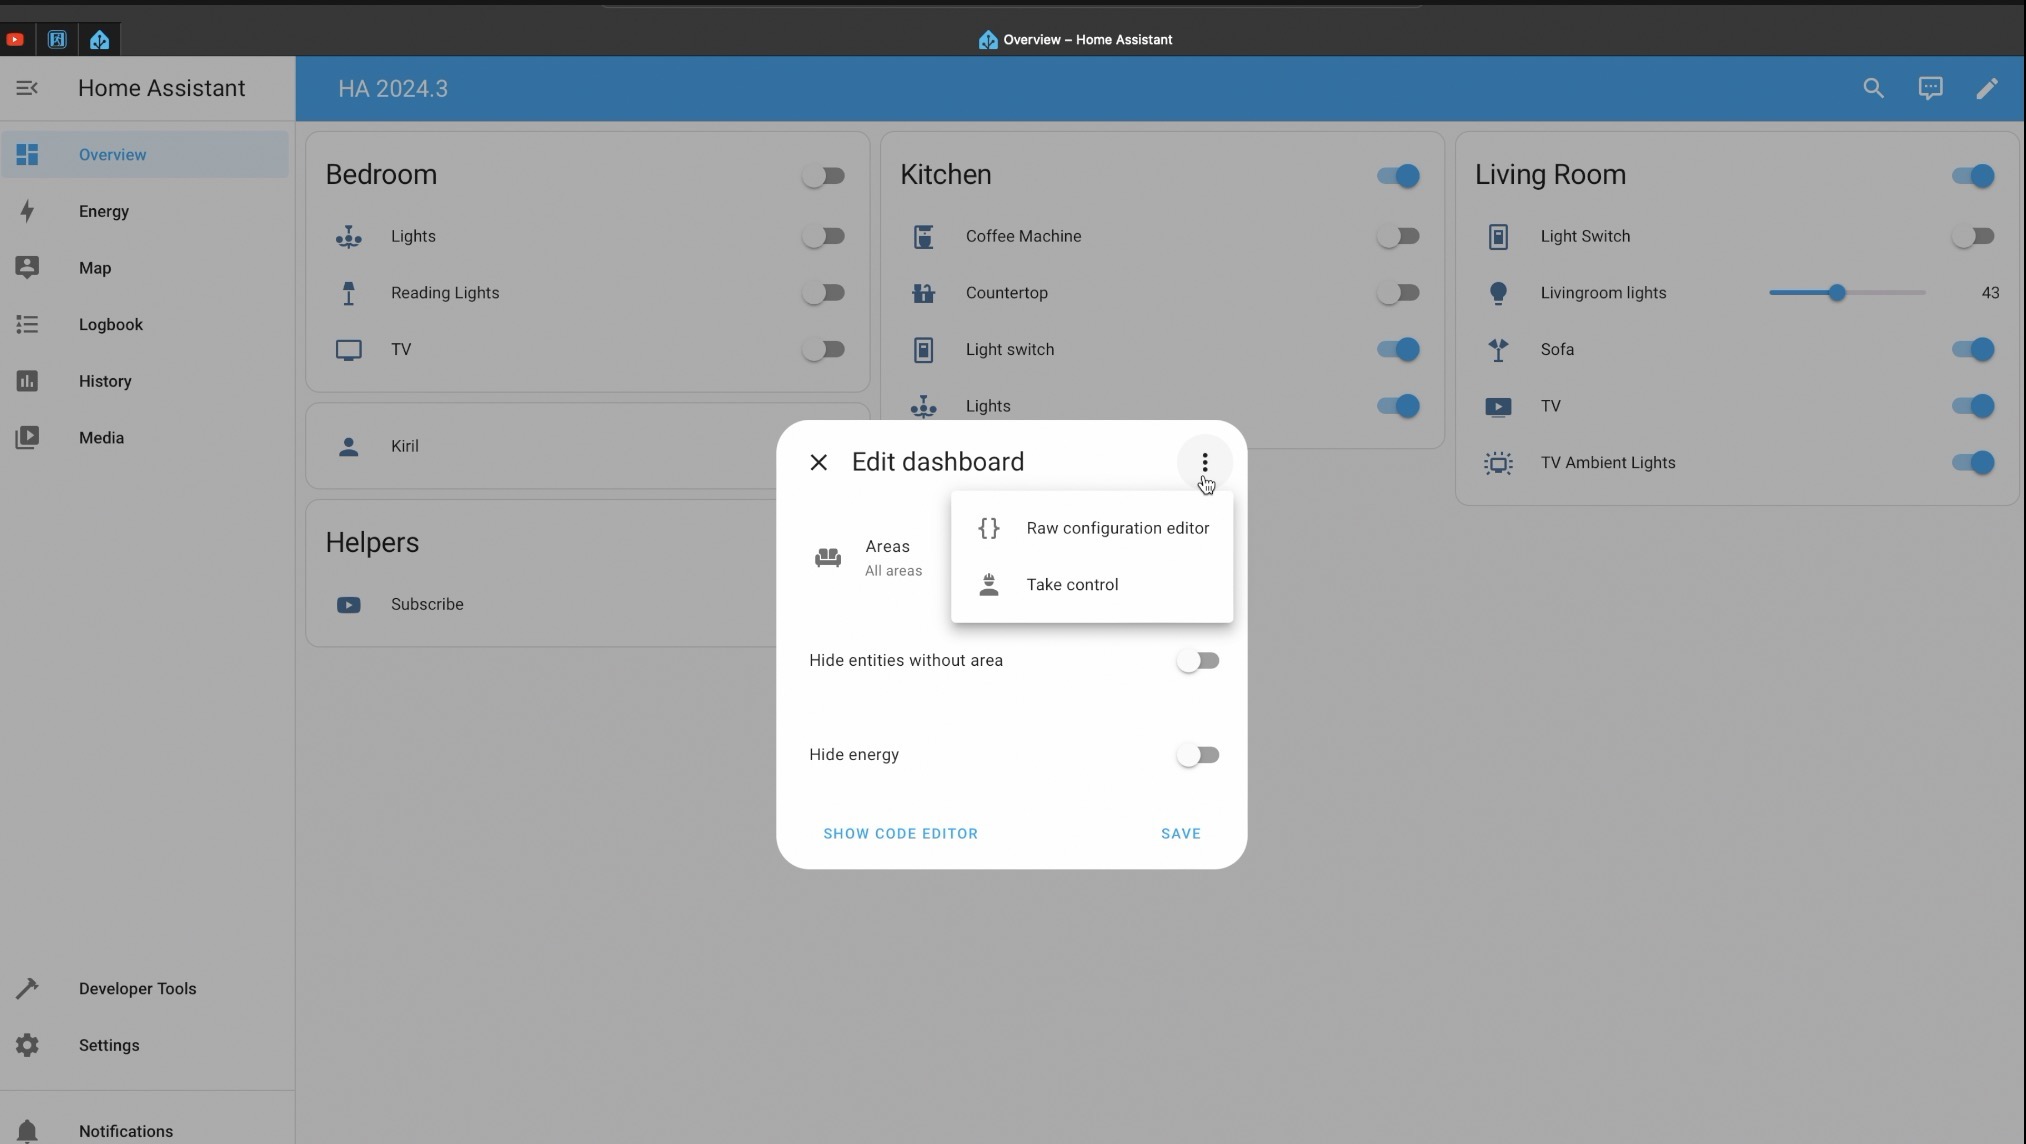
- In the top right of the screen of Home Assistant, select the pencil icon.
- If this is your first time editing a dashboard, the Edit dashboard dialog appears.
- By editing the dashboard, you are taking over control of this dashboard.
- This means that it is no longer automatically updated when new dashboard elements become available.
- To continue, in the dialog, select the three dots menu, then select Take control.
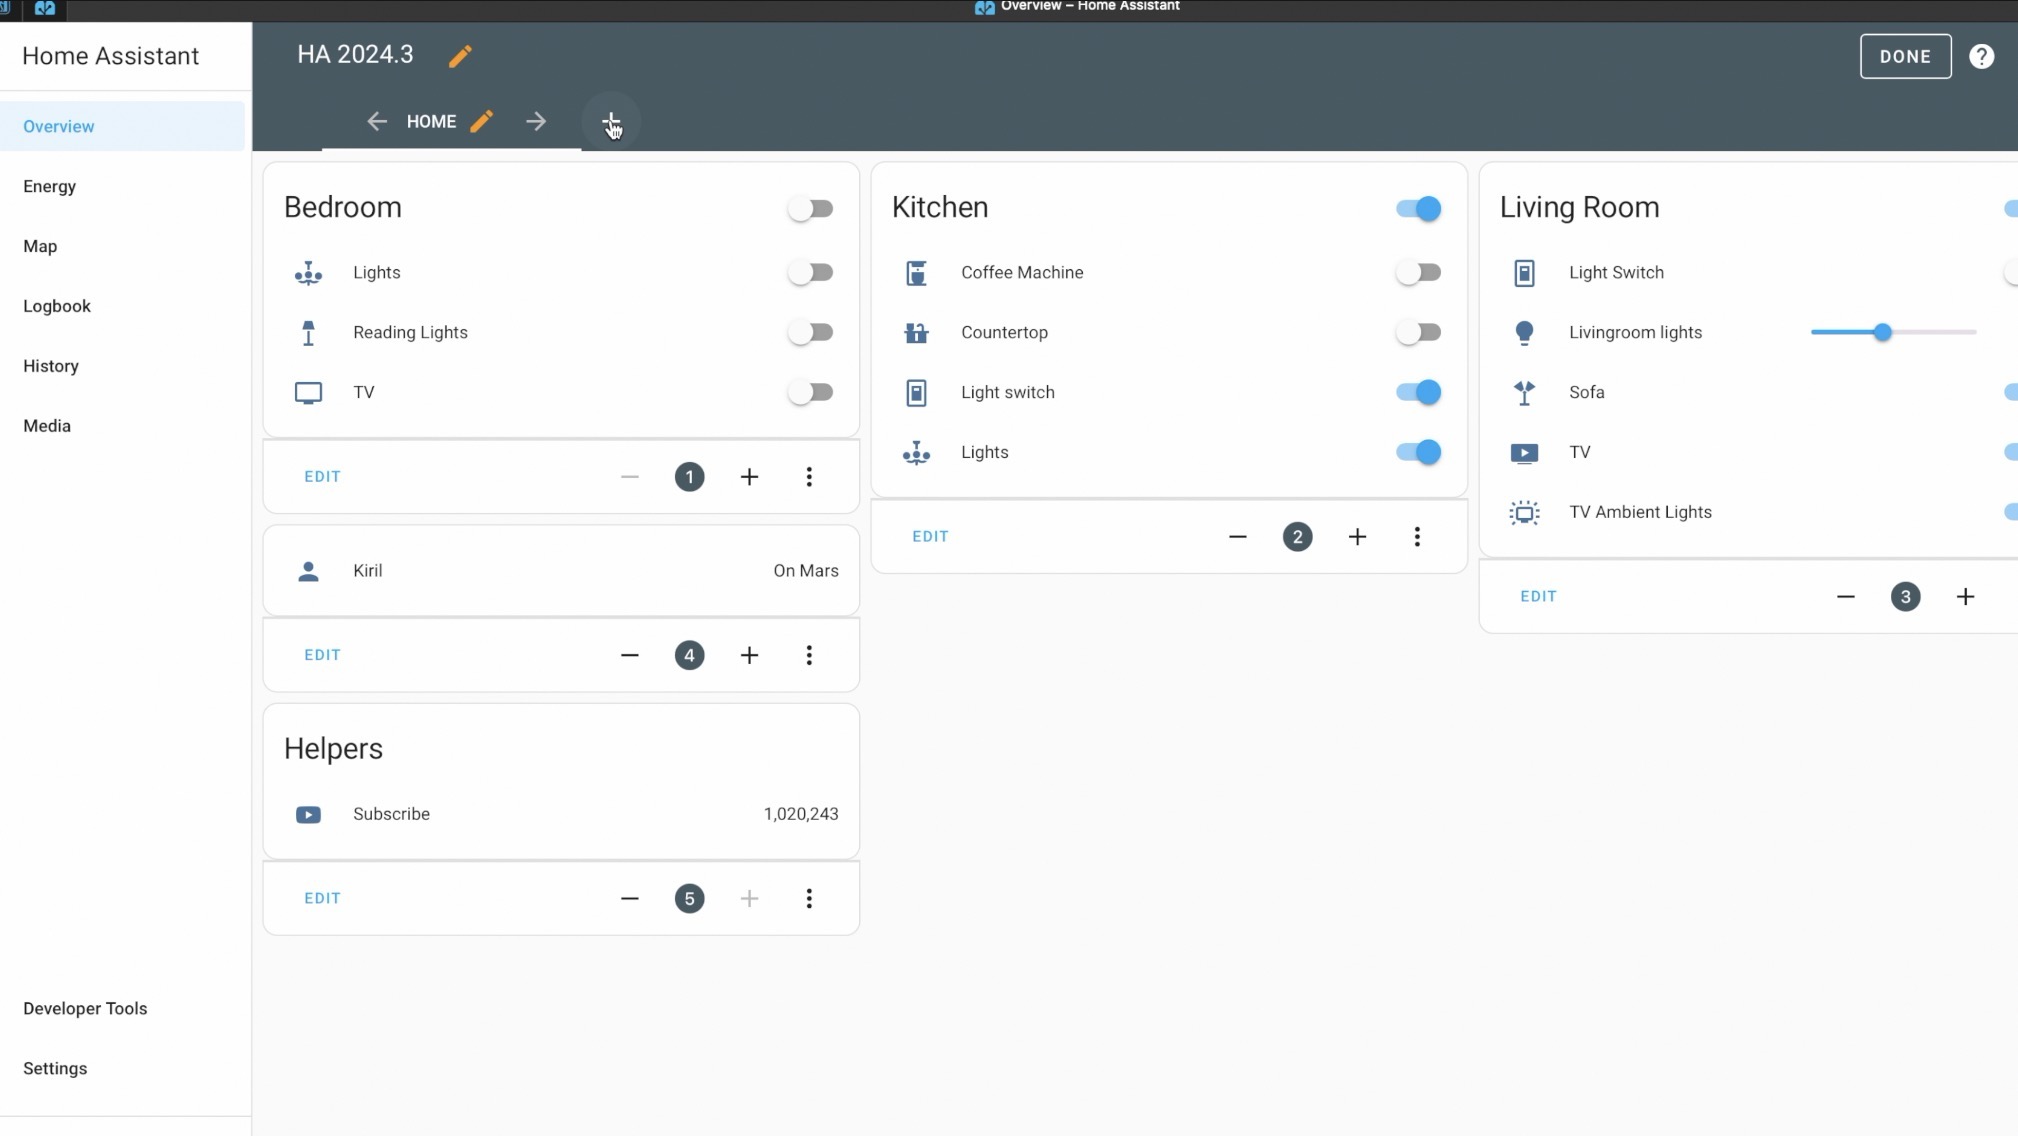
- click the plus sign to create a new view, give your view a name, and optionally select an icon.
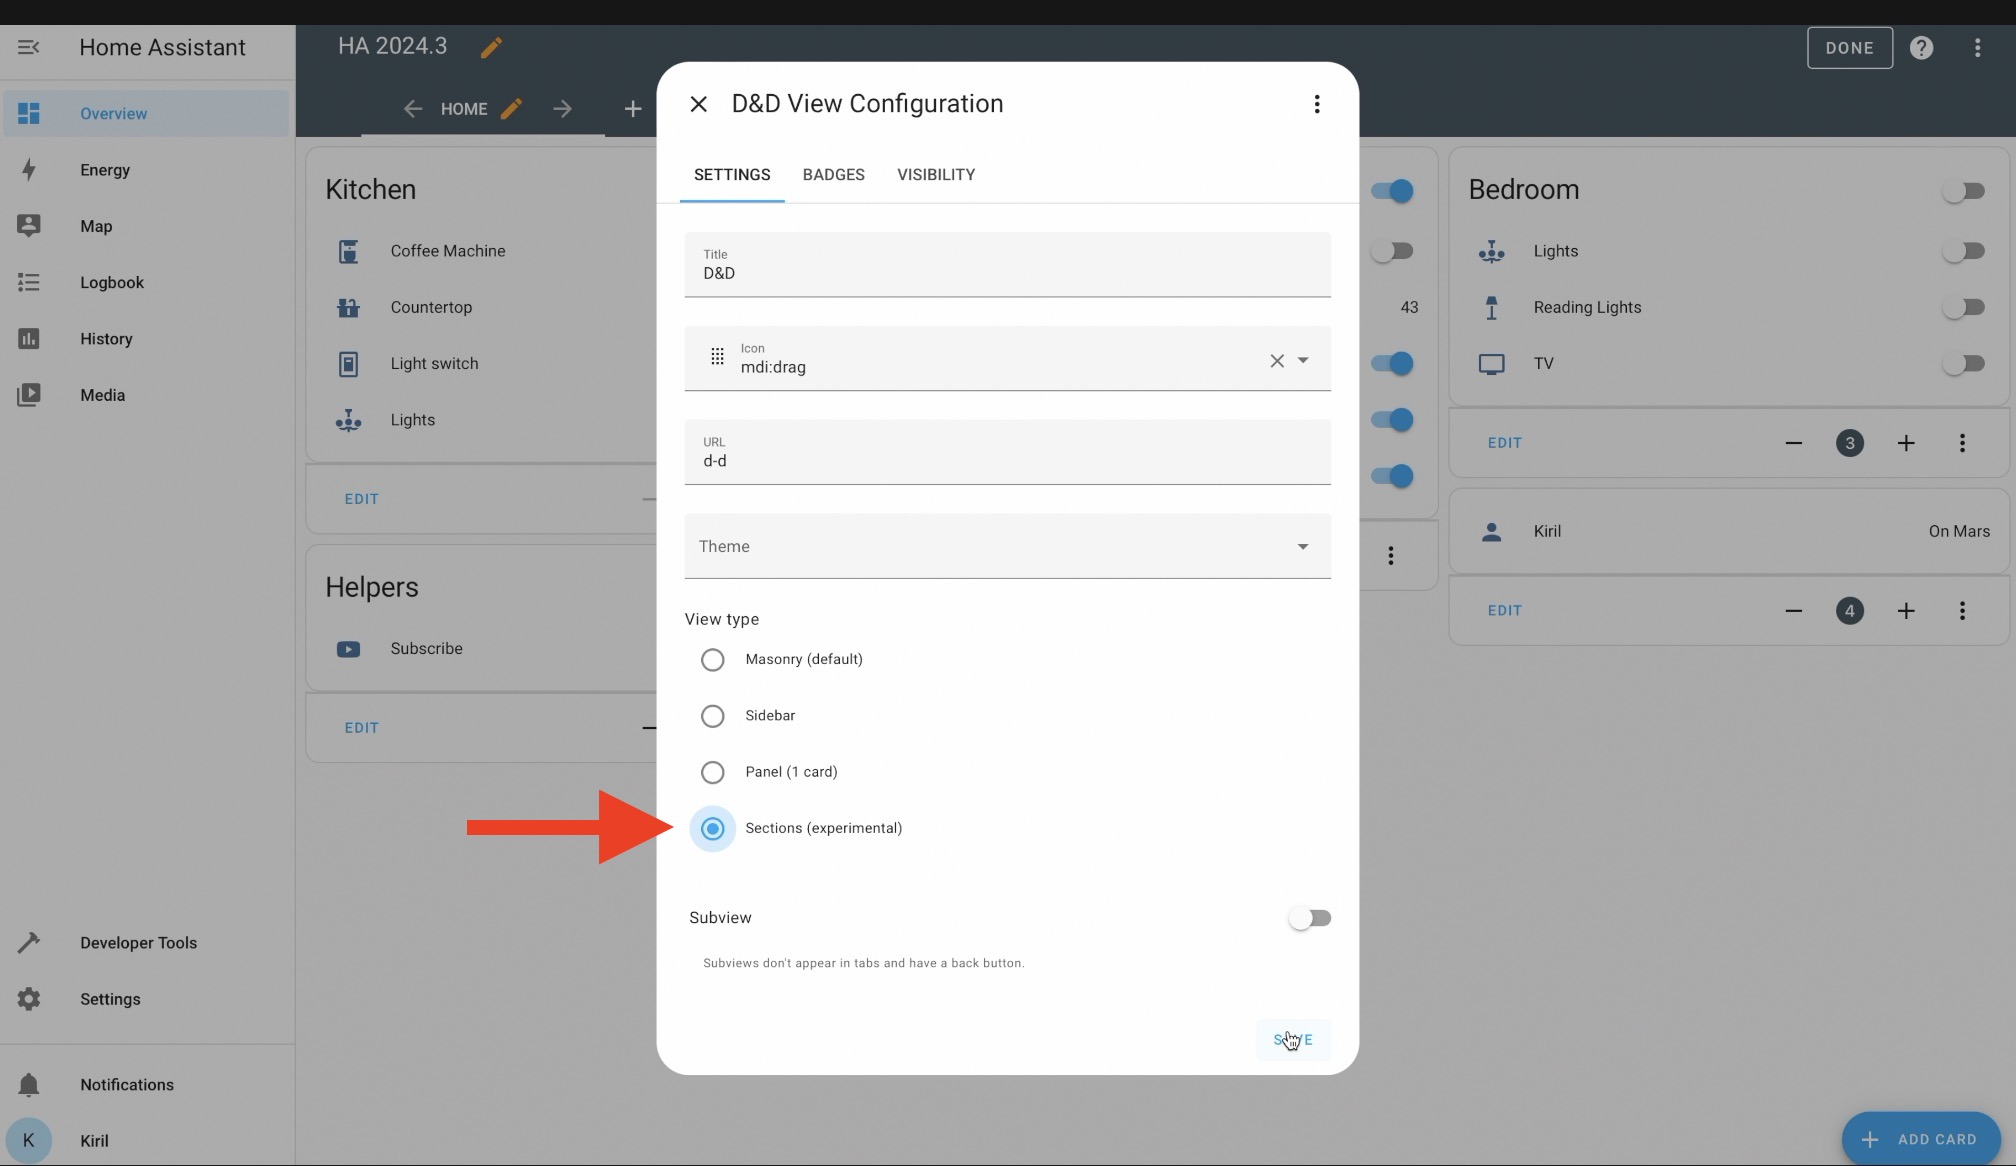
- The crucial part here is to choose “Sections (Experimental)” before saving.
- If this is your first time editing a dashboard, the Edit dashboard dialog appears.
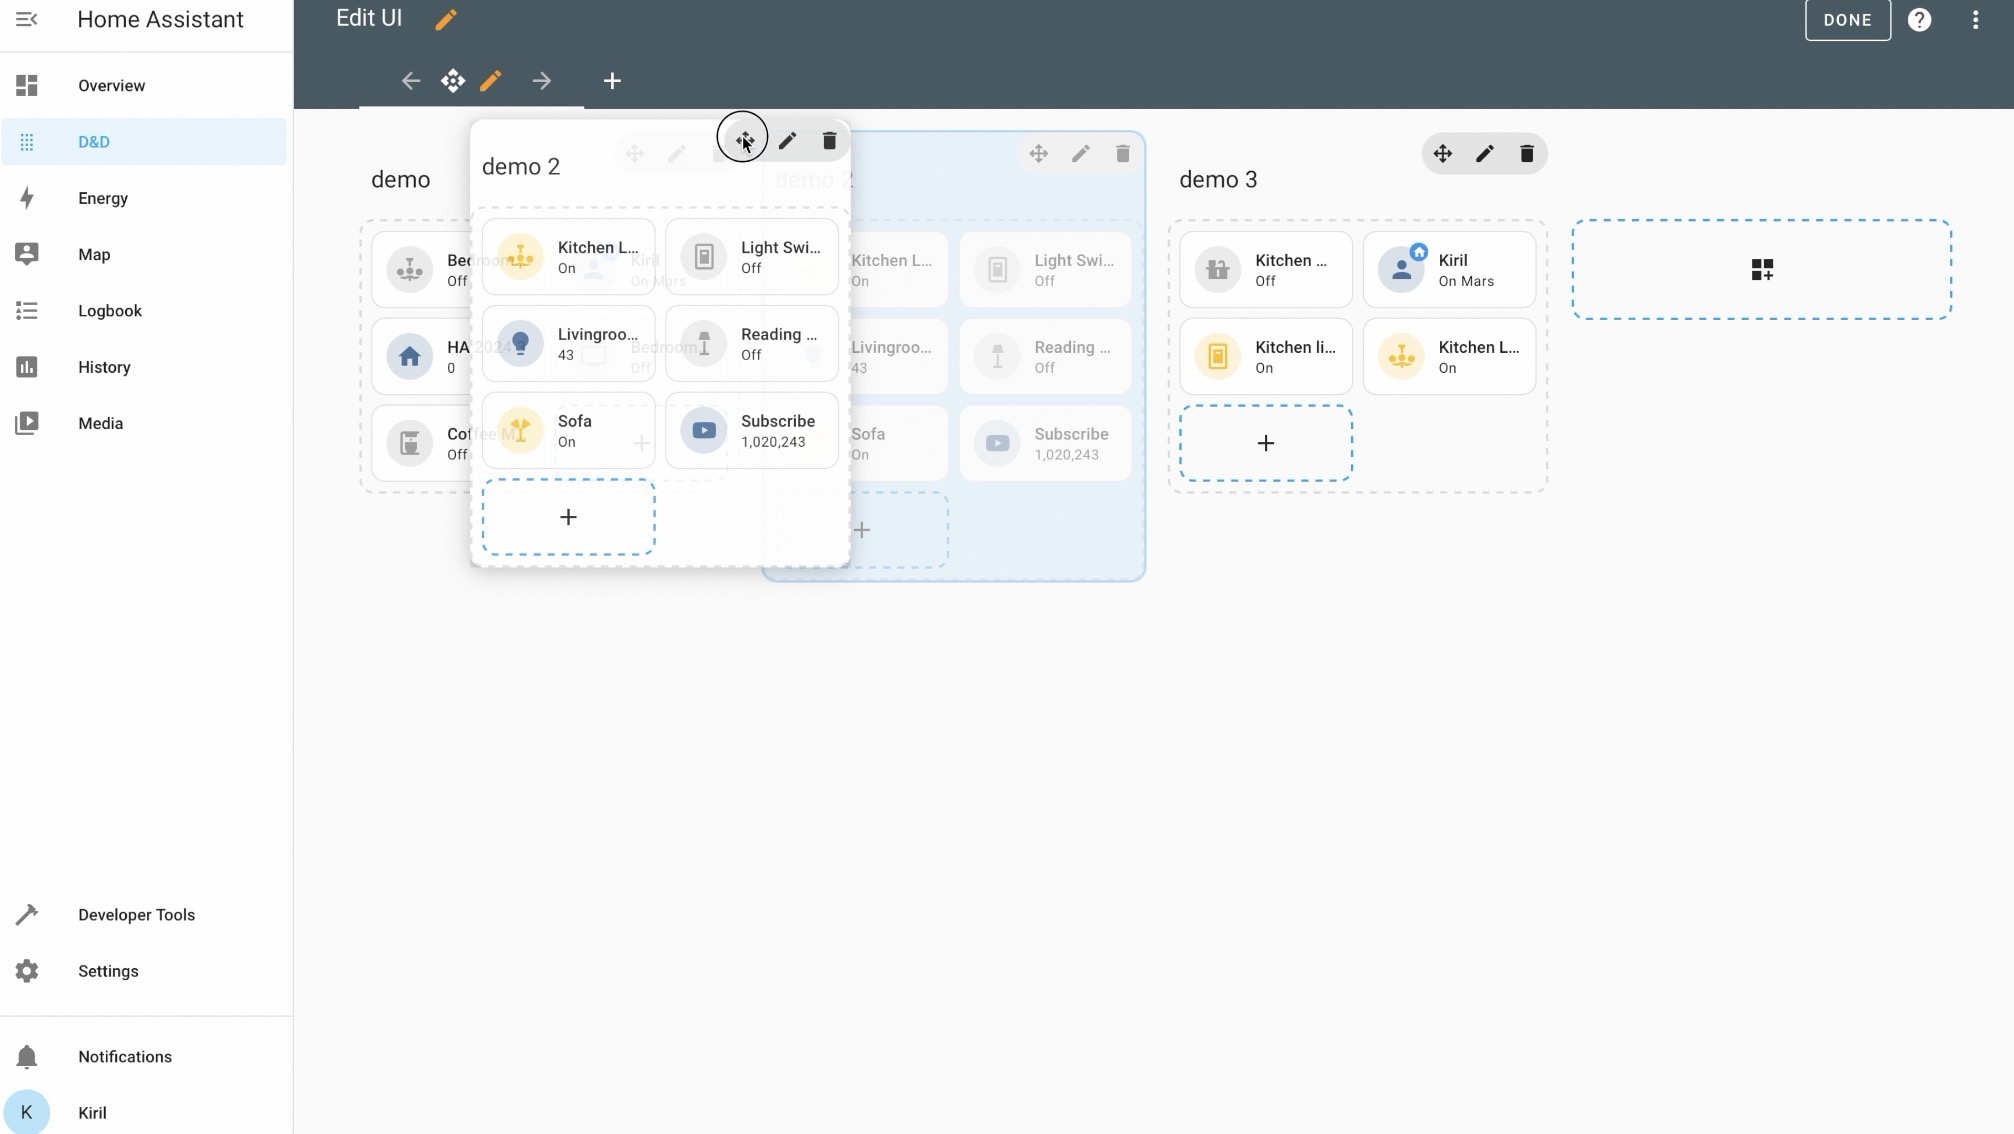
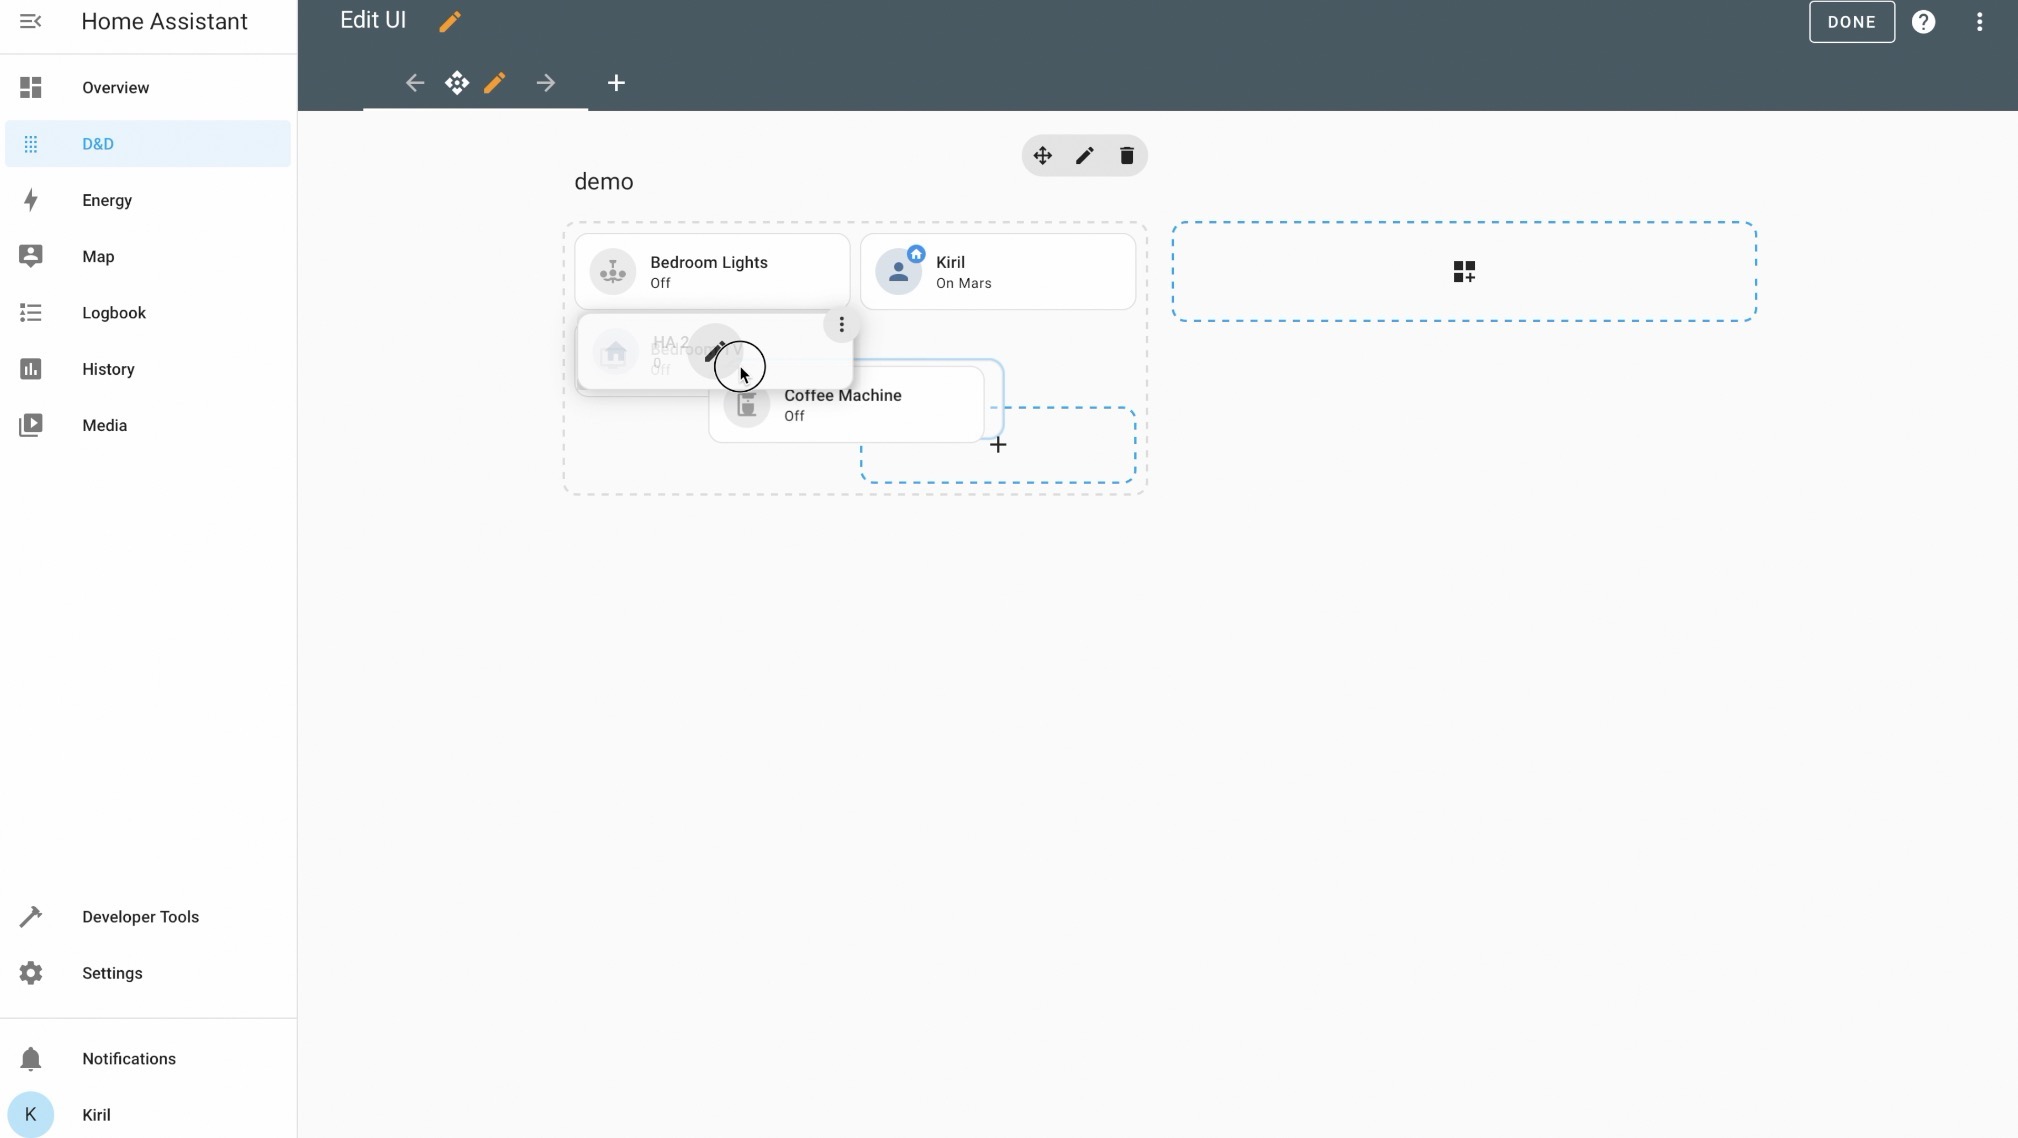
From there, you’re ready to start adding sections and enjoying the flexibility of dragging and dropping.
This new feature offers customization capabilities, allowing you to move things around freely, duplicate cards, and even adjust aspect ratios for a tailored dashboard appearance.
However, this brings us to a critical question: will everyone embrace this new Drag & Drop feature with open arms, or will there be a faction within the community that prefers the classic masonry view? While it’s hard to predict the future, the introduction of such a feature suggests a significant shift towards more personalized and flexible home automation setups.
What’s Next?
In a worst-case scenario, this new feature might not receive the warm welcome anticipated, leading to a preference for the traditional masonry view. However, considering the demand and excitement surrounding the introduction of Drag & Drop functionality, this seems unlikely.
The introduction of Drag & Drop in Home Assistant marks a moment to remember in the platform’s evolution, offering users the chance to further customize and control their smart home setups in ways previously not possible. While it’s still early days, and the feature is labeled as experimental, the potential for making Smart Home & home automation more accessible and tailored to individual needs is limitless.
As we look towards the future, it’s clear that the community’s feedback will play a crucial role in shaping how this feature develops. Whether you’re a fan of the new Drag & Drop functionality or have reservations, your input is valuable.
Conclusion
In conclusion, the new Drag & Drop feature in Home Assistant represents an exciting step forward in home automation customization. While it requires a few extra clicks and for users to start fresh with new dashboards or views, the potential for personalized and efficient home setups is significant. As with any new feature, there will be adjustments and improvements based on user feedback, but the foundation laid by this update is promising.
I’m interested to hear your thoughts on this development. Are you excited about the possibilities it opens up, or do you have concerns about its implementation? Share your opinions in the comments below.
Thanks for joining me in exploring the new Drag & Drop feature in Home Assistant. See you in the next discussion. Meanwhile check my other Home Assistant articles!