In today’s article we will go to the fun part of a Smart Home and that will be the Media in all forms. To help us with that we will use Plex Media Server right from the Home Assistant Add-on store.
Table of Contents
Common Situation in Smart Homes
Here’s a common situation that a lot of people find themselves in and that includes me.
You have media files: music, movies, TV shows, and even photos, but you don’t have an easy way to access them on your devices. As end result you don’t watch them and they just sit somewhere and waiting.
But their time never comes and at the end you eventually delete them to free up some disk space. And you consume (watch/listen/read them) not even once. That is sad.
If you’re looking for a no-headache way to watch your media anywhere – Plex Media Server installed from Home Assistant is one of the best and easy ways in my opinion.
Plex Media Server and Home Assistant
Plex Media Server is a user-friendly way to store all your movies, shows, pictures and other media in one place–and make it accessible from any device, whether you’re at home or on-the-go.
There are a lot of ways to install Plex Media Server, but one of the most easiest one is using the Home Assistant Add-on store.
And I will show you exactly that!
After that I will integrate Plex Media Server with Home Assistant so the clients playing media from Plex Media Server with show up as Home Assistant media players.
They will report their playback status as a Sensor in Home Assistant as well.
Plex Media Server Explained
Even for people with lot of experience – managing media and get all your devices accessing the same collection it’s a huge pain.
It doesn’t have to be that way, though. Plex is a centralized media server system that eliminates virtually every problem you run into while managing a large personal media collection.
The Plex Media Server solution is simple:
- You link all your media on a single computer with the Plex Media Server installed,
- And then you install Plex on all your other devices.
You can install Plex on Windows, Linux, or Mac as well as Android, iOS, video consoles like Xbox and PlayStation, Apple TV, and even some smart TVs that come with Plex built in.
Then from any of those devices, you can remotely access your entire media library and watch it with no hassle.
Furthermore, because the Plex model is a server – client one, you don’t have to worry about copying files to your various devices and dealing with issues like playback quality, video resolution, and other details.
Your Plex server will, transcode all your media content on the fly, so that it plays properly on whatever device you’re using.
Birthday Alert
And because yesterday was my Birthday if you wouldn’t mind smashing the Subscribe button for my Newsletter would be THE BEST Birthday present ever. I promise that there will be no spam.
I just want for my Birthday the Subscribe button to be destroyed and that will be great that’s all I want!
So let’s go and start this:
Installing Plex Media Server from Home Assistant
Go to your Home Assistant and click on the Supervisor menu, then on Add-on store and search for “Plex”
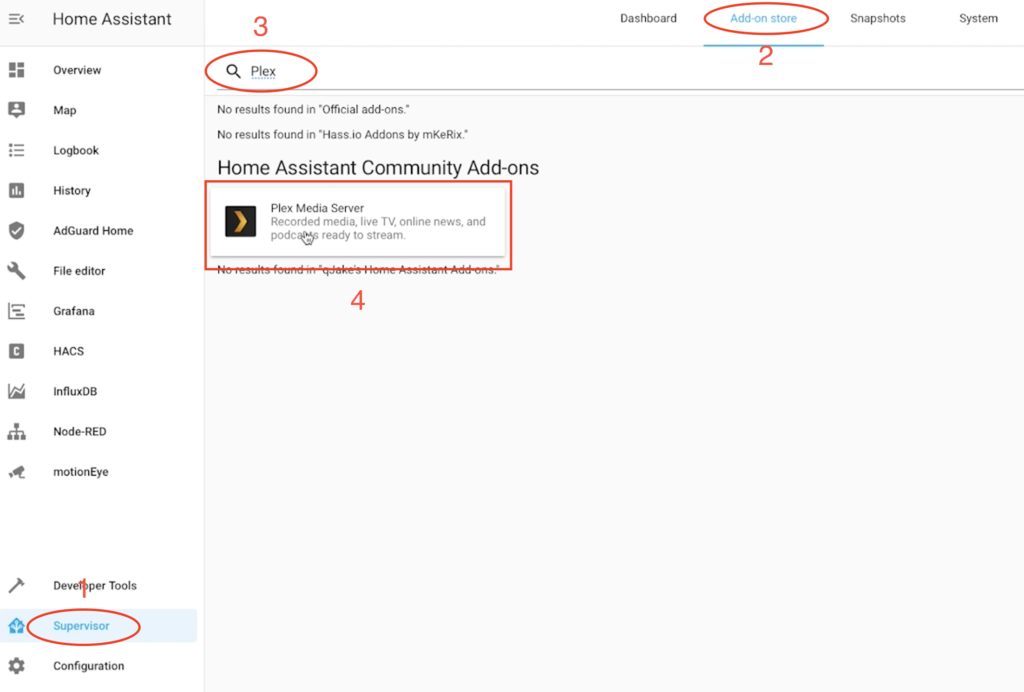
Then you have to click on the “INSTALL” button. That was not hard right?
And before you click on the “START” button, go to the Configuration tab.
On this page you will see all of the ports that Plex Media Server is using. And if there is such need you can change them.
But the most important part is to get and add your claim code. To do that just go to https://www.plex.tv/claim log in or create a user and you should see yours.
Copy your code and paste it in the configuration as shown in the screen below.
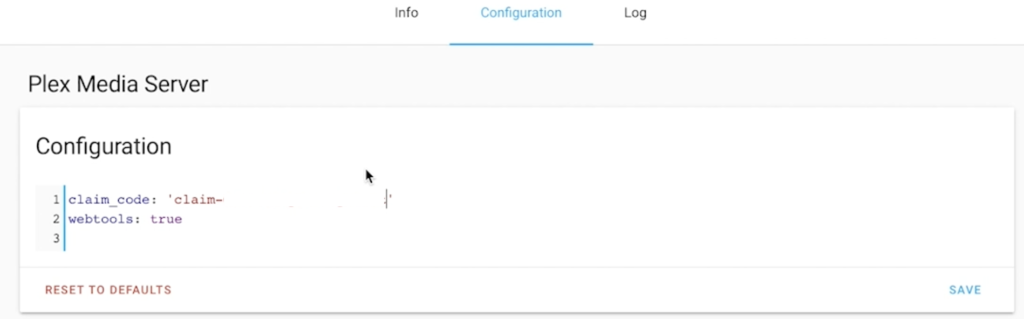
The other option shown on the picture is webtools. Webtools is a Plex plug-in that contains collection of tools. Namely:
- Manage Subs (Subtitles)
- Logs (PMS)
- UAS (Unsupported App Store)
- FindMedia
- PlayLists
- TechInfo
By default this is set to false, but if you set it to true you will enable these tools for your Plex installation.
Click “SAVE” button and you are ready to Start the Plex Media Server for the first time.
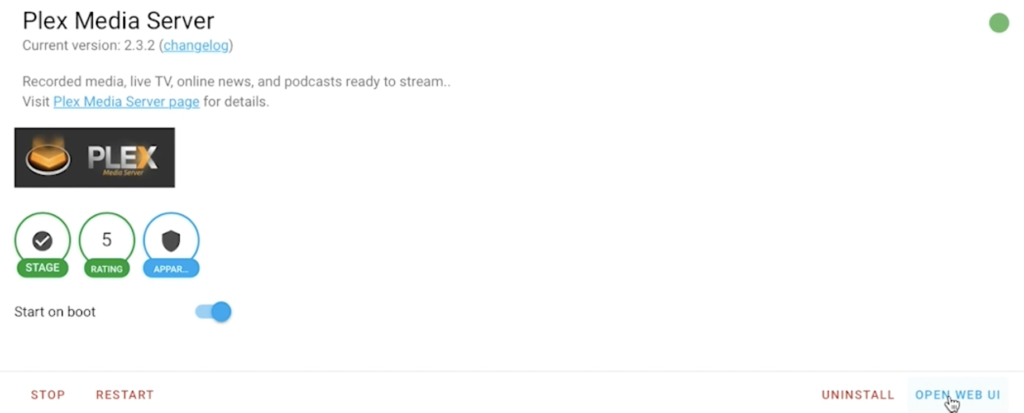
To do that just go back again to the Info tab and click on the “START” button.
If there are no errors in the logs (last tab) you can try opening the Plex Media Server User Interface by either click on the “OPEN WEB UI” button like so:
or by open the a new tab/browser and enter the following address:
http://YOUR_HOME_ASSITANT_IP:32400
If you need more info you can check the GitHub page of the project.
With Plex Media Server Not only you get on-demand streaming to all your devices but you get absolutely beautiful metadata and art to go along with it.
Before seeing this you will have to go though a very basic setup process where:
- You can opt-in for Plex Pass (premium service that is optional).
- Then you have to name your Plex Media Server.
- You can add your local library (more on that later)
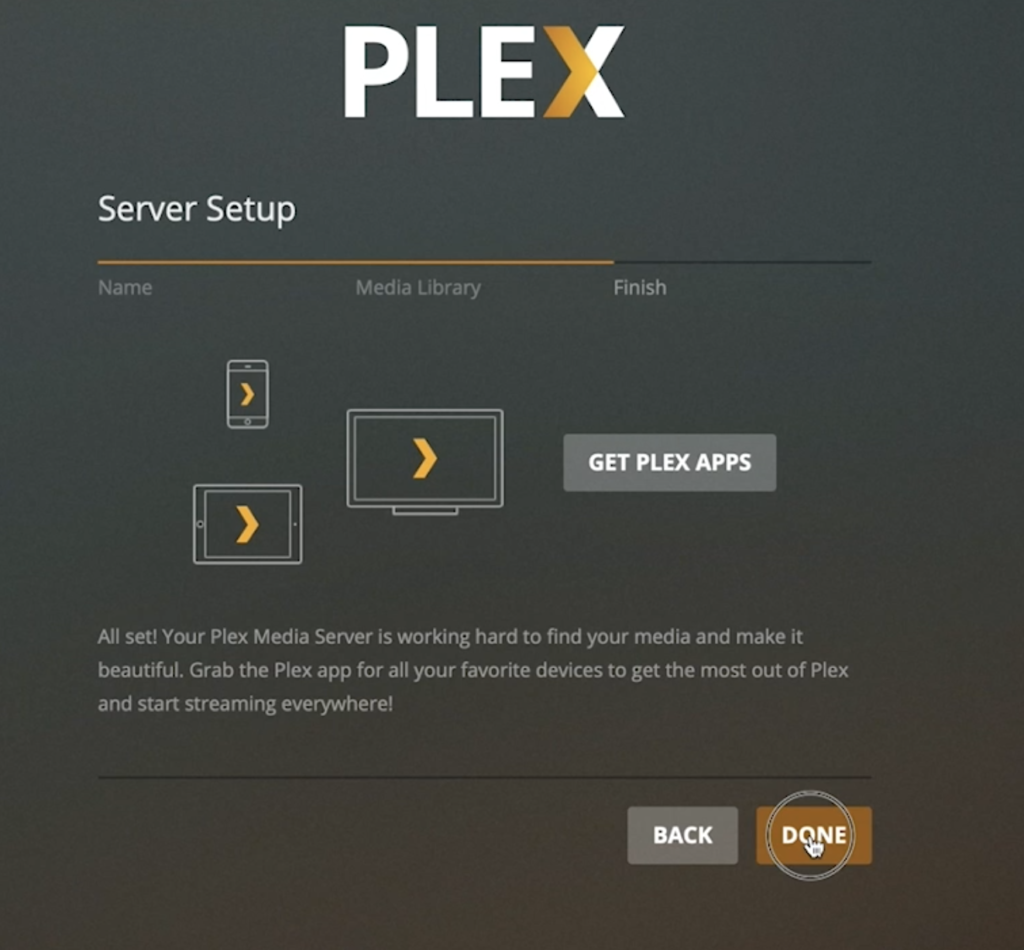
When you are ready click “DONE”.
If you follow everything until now you should be greeted by the beautiful Plex Media Server dashboard.
Plex Media Server settings
One of the recommended options that you can set immediately after you look around what the new toy is offering is adding “Custom server access URLs”.
This is needed to protect yourself from eventual connectivity issues that you may face if that is not set.
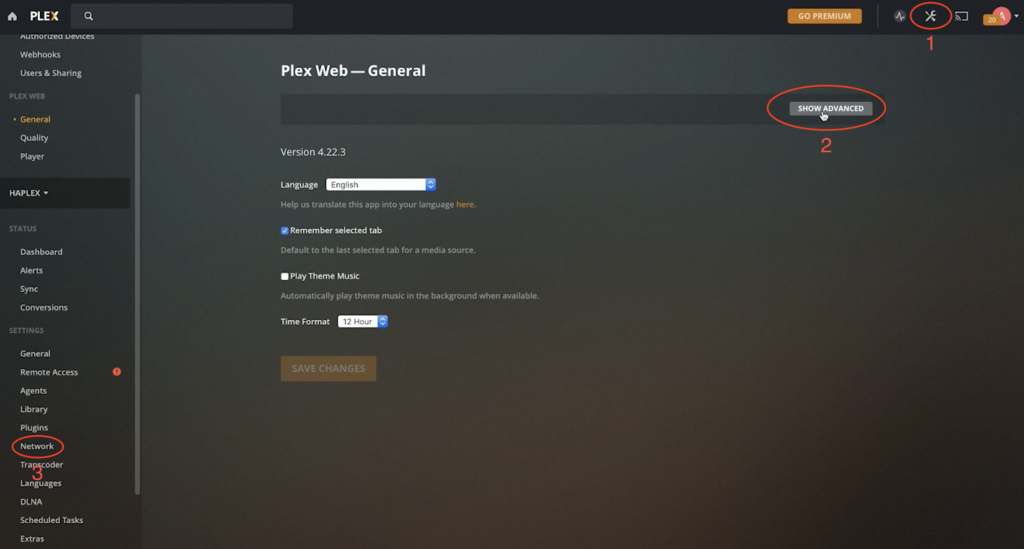
Just go to the Settings -> Show Advanced -> Network as shown above and paste your local Home Assistant IP and port 32400 under the “Custom server access URLs”
http://YOUR_HOME_ASSISTANT_IP:32400
you are now immune against connection issues with Plex 😎
Question for You
What kind of software are you using to manage your media?
Let me know your answers in the comments section below.
Adding Plex Local Media library (Updated)
One of the most useful feature of Plex Media Server is adding your entire local library into one place.
I’m running Plex Media Server from Home Assistant OS (HassOS) on VirtualBox.
To add my local library to Plex I tried to use VirtualBox Shared Folders feature, but it didn’t do the trick.
Then I tried to use smblcient and mount from within Home Assistant OS, but I did not succeed either.
And just when I give up – Dave stepped in and saved the day. Thanks to @davefrooney I managed to mount my SAMBA/Windows shared folder where my Media library is. You can meet Dave in my Discord server.
So Dave’s solution is simple, but very effective – we just have to use mount, but with another File System type – namely CIFS.
The steps that I executed were these:
- I Logged in to my HassOS with the user root
- Then I typed login to access the actual file system on which Home Assistant is running.
- I used the following command to create a folder where Plex will see it after I mount my library. All the credits for showing me that folder are going to @cogneato from Home Assistant Discord server. Thank you @cogneato!
mkdir /mnt/data/supervisor/share/media_library
- After that I used the Dave hints and executed the following command:
mount -t cifs -o username=YOUR_USER,password=YOUR_PASSWORD //YOUR_SHARED_SERVER_IP/YOUR_SHARED_FOLDER /mnt/data/supervisor/share/media_library
The command above mounted my shared local library under the folder that I created in the third bullet above (media_library).
Now I just have to open my Plex Interface and to ask the Plex Media Server to scan and add the /share/media_library folder as Library.
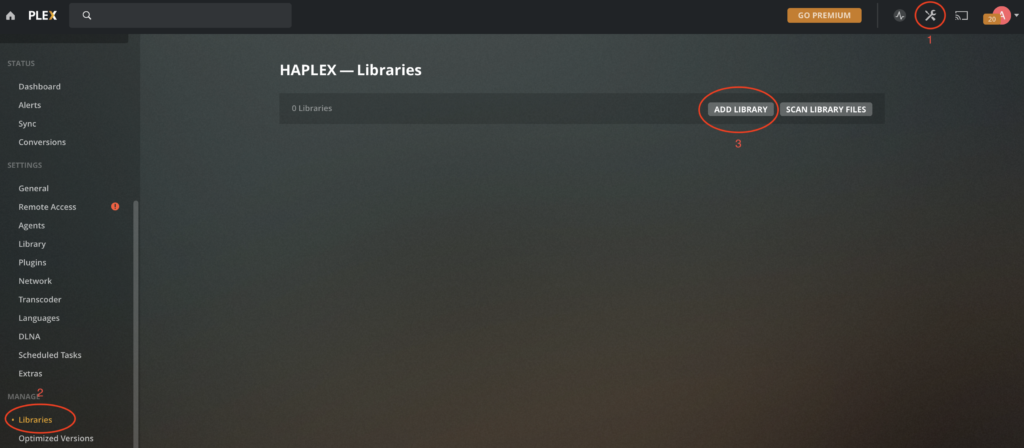
The final thing is to add the /share/media_library.
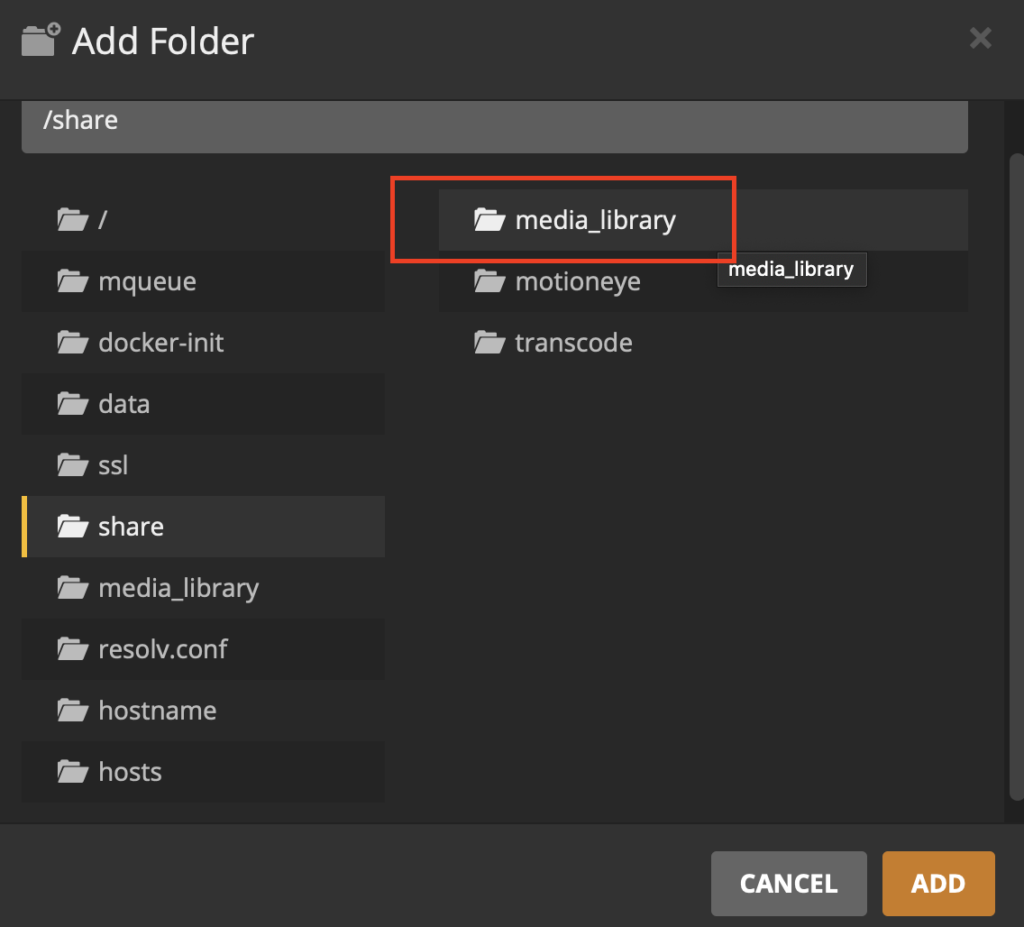
Under the share folder I can select media library and click “ADD” button
Now the only part that is left is to mount that folder every time the server reboots automatically. Unfortunately I cannot use /etc/fstab as in normal Linux distros, because it is read only.
I guess I have to read more about this buildroot that HassOS is based on.
But if you already know a solution for this – type it in the comments below! It will help a lot. I promise to update this article and to give all of the credits to YOU.
Thanks in advance whoever you are 😉
Support my work:
Any sort of engagement on this channel does really help out a lot with the YouTube algorithm, so make sure you hit the subscribe, Like and Bell buttons If you enjoy this video.
Also feel free to add me on Twitter by searching for @KPeyanski. You can find me on my Discord server as well.
If you are come so far and If you liked what you just read you can find more articles on the link https://peyanski.com/blog
I really hope that you find this information useful and you now know how to manage your media collection using Plex Media Server and Home Assistant and of course watch that media on all your devices.
Thank you for watching, stay at home, stay safe and see you next time.


9 Comments
wero · 27/05/2020 at 6:01 pm
Hello thank you very much for the information, finally I find this after a lot of time searching on the internet. However I get an error about the cifs filesystem type, the only difference between your setup and mine is that I’m using a Synology nas to keep the media. Do you know if this is the issue here? can you please help?
pacos · 01/12/2020 at 10:13 pm
Sorry my English, I’m from Brazil and I don’t speak this language.
I was unable to share a folder on Plex.
When I use the command “mount -t cifs -o username = YOUR_USER, password = YOUR_PASSWORD // YOUR_SHARED_SERVER_IP / YOUR_SHARED_FOLDER / mnt / data / supervisor / share / media_library”, the following error appears “bad option for several filesystems (eg nfs cifs ) you might need a / sbin / mount. type helper program “.
You can help?
Kiril · 03/12/2020 at 9:41 pm
hey there you change the YOUR_ keywords with your real one right? Also you don’t have to use spaces like that / mnt / data… it should be /mnt/data.. the same is valid for // YOUR_… should be //YOUR_
PAULO ARCELINO · 18/06/2022 at 6:49 am
Hi Kiril, thanks a lot for the help, I think it was the spaces in the command line. I take this opportunity to say that I really enjoy your videos/tutorials.
Thanks!
KIril Peyanski · 18/06/2022 at 8:37 am
Hi Paulo, many thanks for the good words about my content. More is coming so stay around!
Matt · 23/02/2021 at 1:19 am
maybe stupid question but in the “your password” and “your user” field that is your windows username and password, correct? Or is it your HASS password?
Jandor · 01/04/2021 at 1:16 pm
Hello, i’m new to Hassio, Plex and a lot of stuff… here’s what i managed to accomplish:
I mounted a folder to be visible in Hassio media browser:
in configuration.yaml i added a command:
shell_command:
mount_media_folder: mount -t cifs -o user=xxx,pass=xxx,vers=1.0 //192.168.1.254/sdb1/MUSICA /media
I added the folder for the media browser:
homeassistant:
media_dirs:
media: /media
In Automations i set up to call service shell_command.mount_media_folder on Home assistant startup
I can se all my files in media browser.
In plex I try to add the /media folder but it’s empty: I also try to do the same thing under /share/library, but no success. PLs help!
Kiril · 02/04/2021 at 8:34 am
I have no working Plex at the moment so I cannot help much. Maybe someone else will jump in and resolve your issue.
Claus · 13/02/2022 at 4:40 am
hi Kiril, thank you so much to teach us, I have learned a lot from your YT videos and blogs. My goal is to install Frigate NVR to HA and record the footage of my cameras to an external share in my local network. I found your post here and followed until successful installation of Plex. Now, I have the same problem as you. I got stuck to edit fstab. I found a discussion within HA community:https://community.home-assistant.io/t/mount-remote-smb-share-on-hassio/116734/28. The guys seem to have found a way successfully to avoid the fstab challenge. It is still a hack.
I thought you might be interested, I am still far away from my goal, but every journey starts with a short step. Good luck! Claus