
Today we are going to the next level of smart home presence detection by start tracking the room occupancy with great accuracy.
For that I will use the Bluetooth of a phone and a smart watch, Raspberry Pi and Room Assistant.
Table of Contents
Why you need Presence Detection?

The presence detection or the possibility to know “is anybody home” is crucial for a real Smart Home.
Base on that you can start a lot of really cool automations.
For example:
When you come back from work – to automatically unlock the doors, to turn the lights and TV on, to start the heating or cooling and respectively turn off and lock everything when you leave.
The Problem?
But imagine the following scenario:
You have a good WIFI signal and you get connected to your home network from across the street. So you will need a minute or two until you actually enter in your home.
In that case you will have to delay your Automation on purpose to catch the right moment and to hear the greeting from your Smart Speaker for example.

However you can first enter in different room like the bathroom and you will miss the whole magic.
The solution is Room-Assistant
To make this the right way I will hit the Subscribe button and then I will show you how to use room-assistant which is actually a really cool project that helps you track devices using the following integrations:
- Home Assistant (using MQTT),
- Bluetooth Low Energy,
- Bluetooth Classic,
- Omron D6T,
- Grid-EYE,
- GPIO (PIR motion sensors)
What you will learn?
I will quickly show you how to Install Room Assistant using Home Assistant Add-on Store. This method is great if your home assistant is installed on a Raspberry Pi.
If that is not the case you can use Docker and I will show you how.
Both ways are pretty easy.
Then I will show you how to configure Room Assistant and Home Assistant.
And at the end we will create an automation that will start the lights when you got home.
Let’s Start
Apart from your phone or your smart watch you will need one or more raspberry pi version 3, 4 or Zero W now let’s go.
Room Assistant in Home Assistant
If you still don’t have Home Assistant and MQTT broker go check this tutorial of mine and then come back here.
Go to “Supervisor” menu in your Home Assistant and then choose “ADD-ON STORE“.
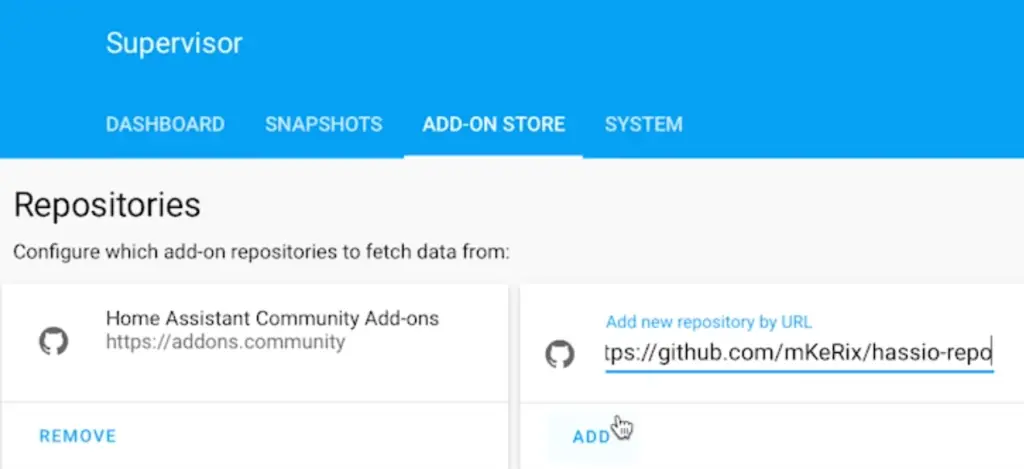
After that simply paste the URL in the “Add new repository by URL” field and click the “ADD” button
URL to paste:
https://github.com/mKeRix/hassio-repo
Search for “Room Assistant” and install the Add-On. Be careful not to install the beta here, unless you know what are you doing.
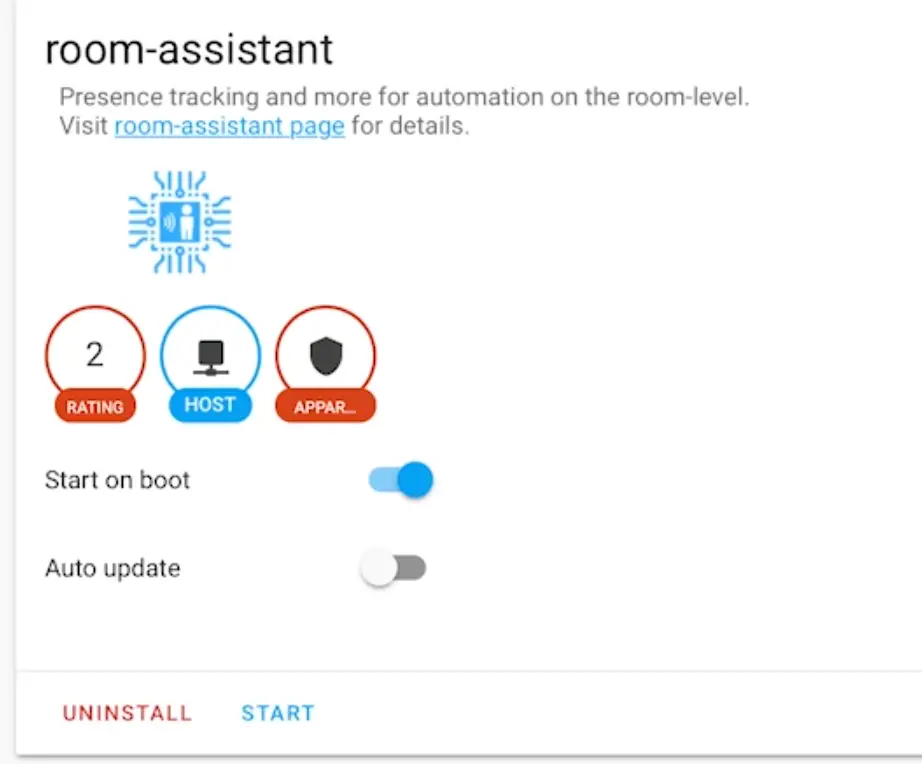
After you see this screen you can continue to the configuration part.
IMPORTANT if you have issues finding your devices in Home Assistant you should enable MQTT auto discovery in your MQTT section within configuration.yaml file like so:
mqtt:
discovery: true
Configuring Room Assistant on one host
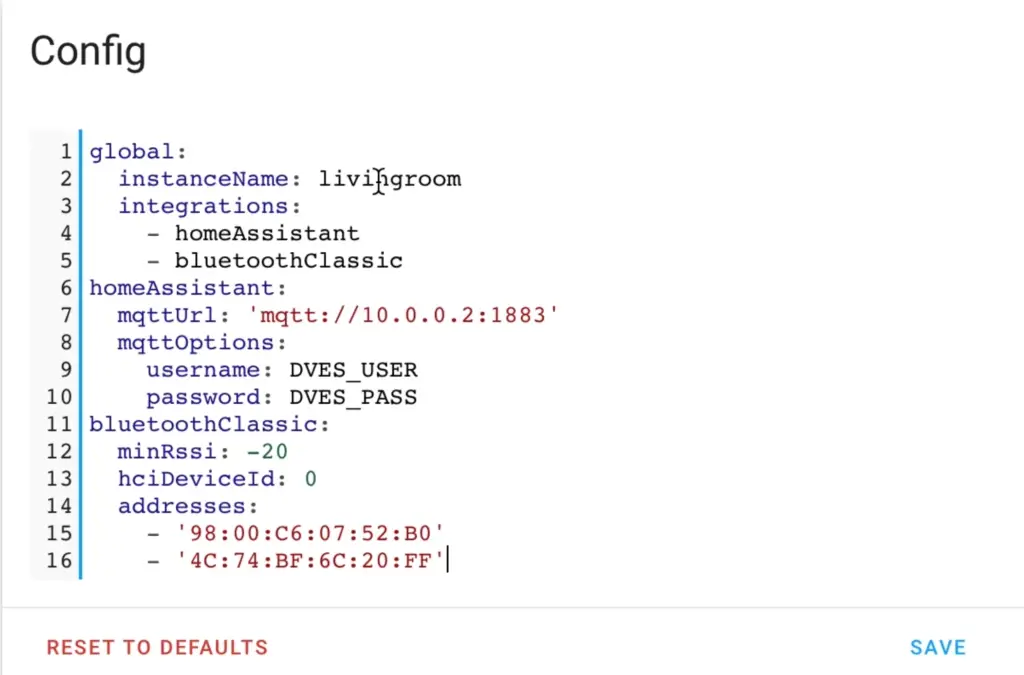
I will focus on the Bluetooth Classic and Home Assistant, because I think that these are the most popular integrations.
Scroll down until you see the Config section of the Room-Assistant and paste the following configuration (of course you can adapt it to your needs).
global:
   instanceName: livingroom
   integrations:
     - homeAssistant
     - bluetoothClassic
 homeAssistant:
   mqttUrl: 'mqtt://YOUR_MQTT_BROKER:1883'
   mqttOptions:
     username: YOUR_USER
     password: YOUR_PASS
 bluetoothClassic:
   minRssi: -20
   hciDeviceId: 0
   addresses:
    - '01:02:03:04:05:06'
    - '06:05:04:03:02:01'
Probably you wish to change the instanceName with something that is more suitable for you (this is the room name).
As well as the mqttURL with username and password and definitely the addresses. The addresses should the be the Bluetooth MAC addresses of the devices that you want to track.
The only thing left to do is to scroll up and click the “START” button.
If there are no errors in the logs you can freely continue to the “Configuration” and then “Integrations” menus of the Home Assistant.
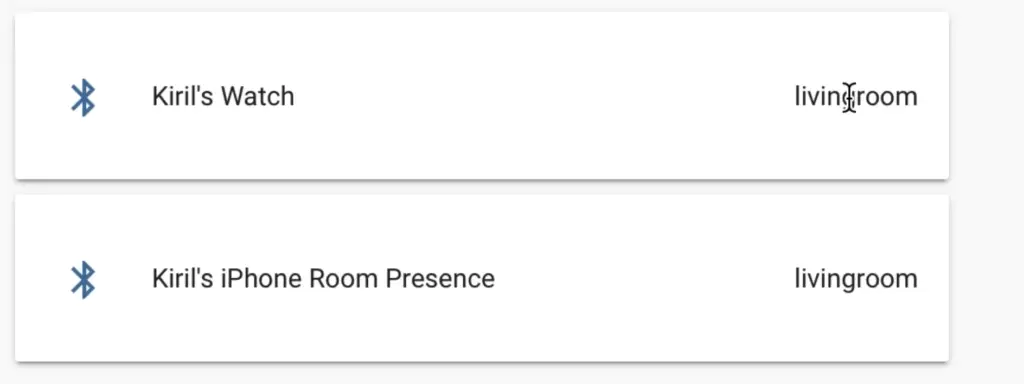
Here in MQTT section you can add your devices as Home Assistant sensors.

You should see here your devices that you configured earlier by typing their Bluetooth Mac addresses in the Room-Assistant configuration section.
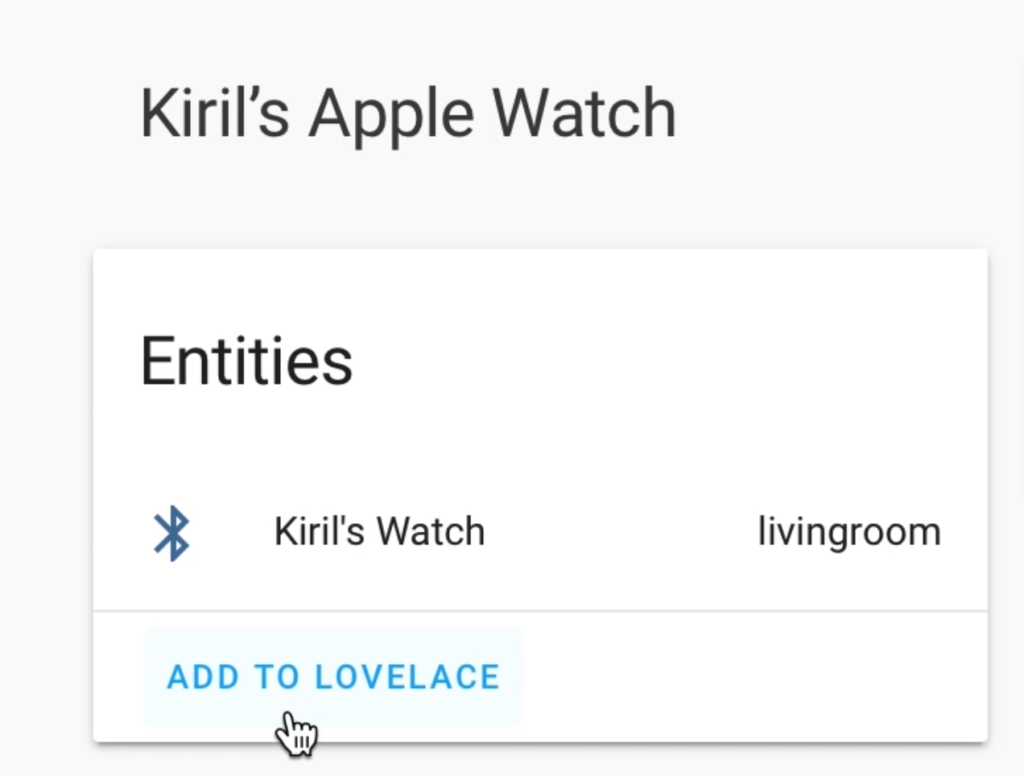
Click on them and Add them to Lovelace
If everything is ok you should see something similar as below at the end:
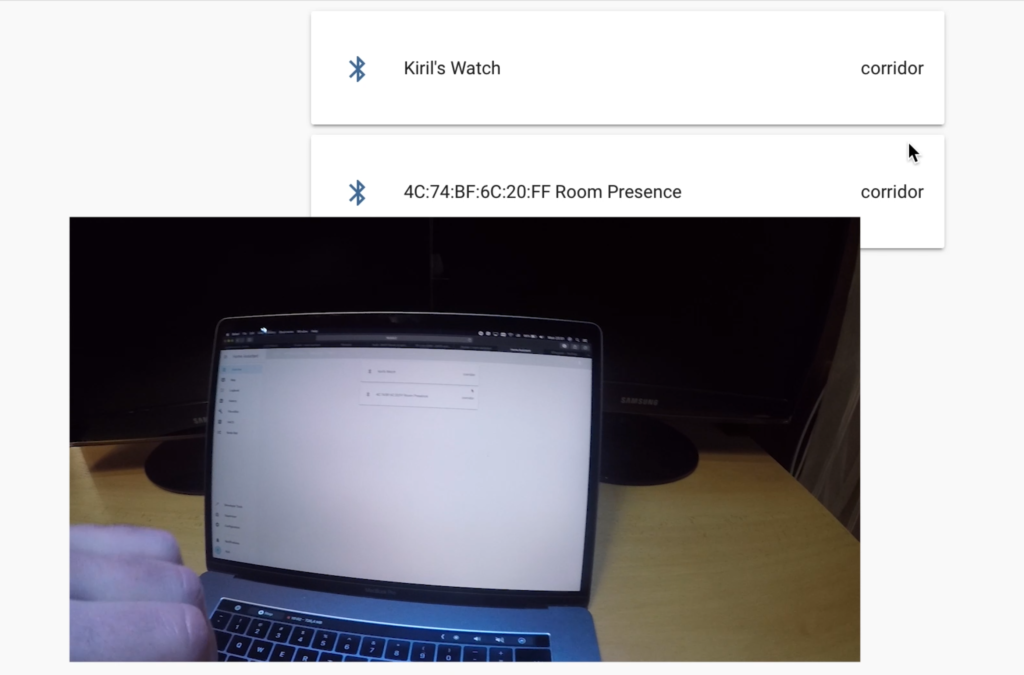
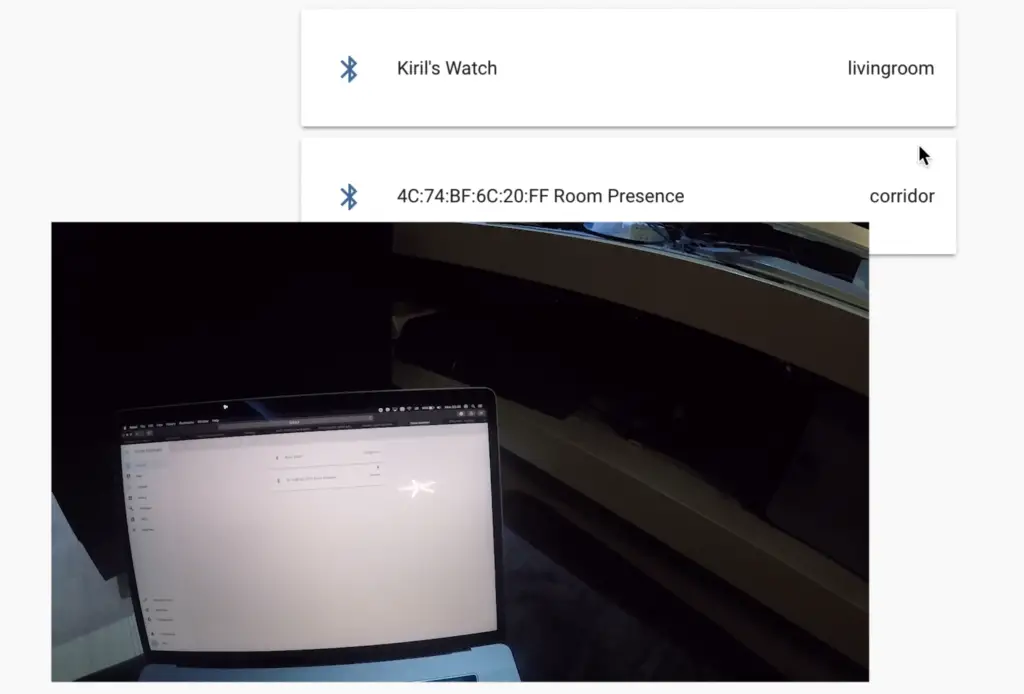
You can test if everything is working by disabling the Bluetooth of the device and your sensor should become in “not_home” state.
Quick Hint: you can enable the “Flight Mode” if you have such, which will disable all of the device communications.
Question for You!
I have a quick question for you: What are you currently using for presence detection in your smart home? And if you still don’t have anything are you going to try Room Assistant?
Installation of Room-Assistant using Docker
You can use Docker to install Room-Assistant. To do that execute the following commands (assuming you are using Raspberry Pi).
Create a new folder for room-assistant configuration file.
mkdir -p ~/room-assistant/config
Then create the config file named local.yml using this:
nano ~/room-assistant/config/local.yml
paste the Room-Assistant configuration inside it (for example as described above) and save the file.
Then create a docker compose file by executing the following:
nano ~/room-assistant/docker-compose.yml
Paste this config inside the file:
version: '3'
 services:
   room-assistant:
     image: mkerix/room-assistant
     restart: unless-stopped
     network_mode: host
     volumes:
       - /var/run/dbus:/var/run/dbus
       - /home/pi/room-assistant/config:/room-assistant/config
The final step is to execute the docker-compose up command like so:
docker-compose up
You should now check the logs for errors and if there aren’t any BIG RED ones you are good to go.
Creating a cluster of two Raspberry Pi
If you have more than one Raspberry Pi devices you can create a Room-Assistant cluster.
In that way you can detect where exactly in your Home is your tracked device. You need to place your Raspberries in different rooms.
This is actually the real beauty of this project. So let’s try it.
Room-Assistant cluster configuration
Add the following configuration on the first Raspberry PI (code name: corridor)
global:
   cluster:
     autoDiscovery: false
     port: 6425
     peerAddresses:
       - 10.0.0.22:6425
   instanceName: corridor
   integrations:
     - homeAssistant
     - bluetoothClassic
 homeAssistant:
   mqttUrl: 'mqtt://YOUR_MQTT_BROKER:1883'
   mqttOptions:
     username: YOUR_USER
     password: YOUR_PASS
 bluetoothClassic:
   minRssi: -20
   hciDeviceId: 0
   addresses:
    - '01:02:03:04:05:06'
    - '06:05:04:03:02:01'
On the second Raspberry PI (code name: livingroom) add the following configuration.
global:
   cluster:
     autoDiscovery: false
     networkInterface: eth0
     port: 6425
     peerAddresses:
       - 10.0.0.2:6425
   instanceName: livingroom
   integrations:
     - homeAssistant
     - bluetoothClassic
 homeAssistant:
   mqttUrl: 'mqtt://YOUR_MQTT_BROKER:1883'
   mqttOptions:
     username: YOUR_USER
     password: YOUR_PASS
 bluetoothClassic:
   minRssi: -20
   hciDeviceId: 0
   addresses:
    - '01:02:03:04:05:06'
    - '06:05:04:03:02:01'
Don’t forget to change the following things with yours if needed: networkInterface, instanceName, mqttUrl, username, password and addresses.
Restart your Room-Assistant instances and give them a good test like this one below.
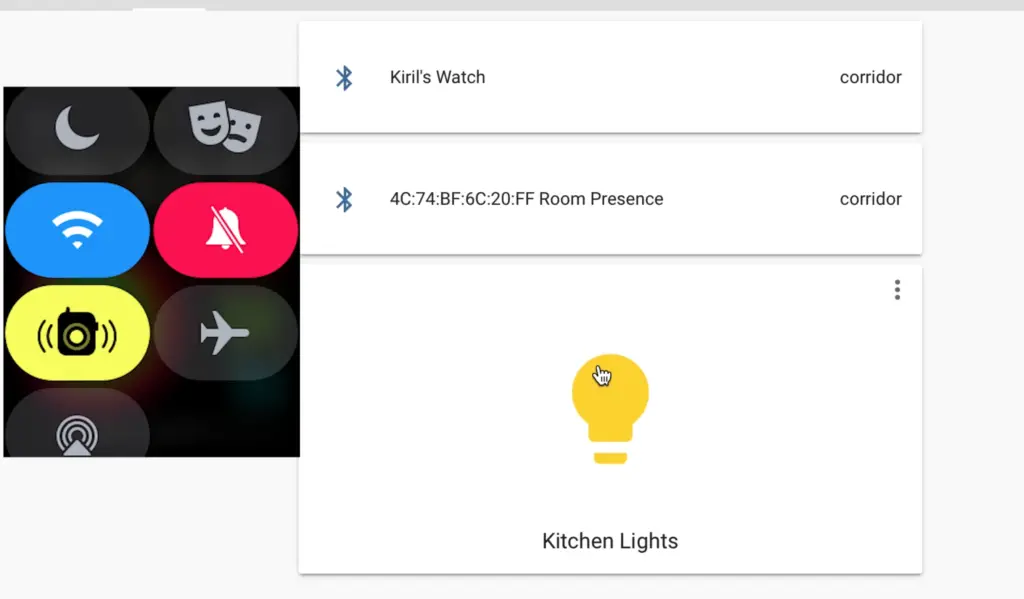
I’ve added my devices that I wanted to track let’s create an automation in Home Assistant.
Automation based on Room Assistant sensors
Add the following lines to your automations.yaml file in Home Assistant config folder:
# presence detection with room assistant
 - id: '1574110134678355'
   alias: Lights ON when I got home
   description: 'When Im home'
   trigger:
     platform: state
     entity_id: sensor.YOUR_DEVICE_HERE
     from: not_home
     to: corridor
   action:
   - data:
       entity_id: light.YOUR_LIGHT_HERE
     service: light.turn_on
   - data:
       entity_id: light.YOUR_2ND_LIGHT_HERE
     service: light.turn_on
The things that you should change are the entity_id with your Room Assistant sensor and the light switches.
Now when you go from ‘not_home‘ to ‘corridor‘ the lights should automagically turn on.
Support my work:
Any sort of engagement on this site or my YouTube channel does really help out a lot with the Google or YouTube algorithms.
So make sure you hit the subscribe, Like and Bell buttons If you enjoy this video.
Also feel free to add me on Twitter by searching for @KPeyanski.
I really hope that you find this information useful and you now know how to accurately track who is home using Home Assistant, Raspberry Pi and Room Assistant.
Thank you for watching/reading, stay safe and see you next time.
Thanks, this is an awesome write up!
I am also looking into using the device_tracker.see function to add this sensor to the device_tracker library to use with the person entity. I will post once I have it worked out.
A quick question though, you show connecting an apple watch and being able to track it, although I have had no success in tracking my apple watch 3. Is there something you did to get this to work?
I’m also using the series 3 of the Apple Watch. Are you sure that you are getting the Bluetooth MAC address and not the WIFI MAC address?
Yes i have confirmed that i am using the ble mac address.
Can you please join my Discord server and share your configs there? I will try to help you later today.
sure not a problem
Could you please post your configuration.yaml section for the devices? … Much Thanks! 🙂
Hey WillsWeb, which devices exactly are you interested ?
What do I need in the configuration.yaml to bring it all together?
Sample from my configuration.yaml
– platform: mqtt_room
device_id: d578xxxxx
name: “Tile Pro”
state_topic: “room_presence”
timeout: 5
away_timeout: 0
– platform: mqtt_room
device_id: fe913xxxxx
name: “iBeacon-1xxxxx”
state_topic: “room_presence”
timeout: 5
away_timeout: 0
– platform: mqtt_room
device_id: fe9132xxxxx
name: “iBeacon-2xxxxx”
state_topic: “room_presence”
timeout: 5
away_timeout: 0
– platform: mqtt_room
device_id: c85c1xxxxx
name: “MYZONE-000xxxxx”
state_topic: “room_presence”
timeout: 5
away_timeout: 0
I’m guessing my room assistant and ra-raspberrypi are working great in the cluster mode. If I go to mqtt and listen to # – getting tons of info rolling in … ex:
Message 101 received on room-assistant/sensor/ble-fe9xxxxx/attributes at 3:31 PM:
{
“distance”: 1.6,
“last_updated_at”: “2020-04-03T19:31:52.912Z”
}
these are my MQTT entries:
mqtt:
discovery: true #disable this if it makes problems default is false
broker: 10.0.0.2
port: 1883
username: !secret mqtt_user
password: !secret mqtt_pass
sensor:
– platform: yr # weather prediction
– platform: mqtt
name: “Temperature-2nd”
state_topic: “tele/D1-2/SENSOR”
value_template: “{{ value_json[‘AM2301’].Temperature }}”
unit_of_measurement: “C”
– platform: mqtt
name: “Humidity-2nd”
state_topic: “tele/D1-2/SENSOR”
value_template: “{{ value_json[‘AM2301’].Humidity }}”
unit_of_measurement: “%”
– platform: mqtt
name: “Temperature”
state_topic: “tele/D1-1/SENSOR”
value_template: “{{ value_json[‘AM2301’].Temperature }}”
unit_of_measurement: “C”
– platform: mqtt
name: “Humidity”
state_topic: “tele/D1-1/SENSOR”
value_template: “{{ value_json[‘AM2301’].Humidity }}”
unit_of_measurement: “%”
light:
– platform: mqtt
name: “Kitchen Lights”
command_topic: “cmnd/klights/POWER”
state_topic: “stat/klights/POWER”
– platform: mqtt
name: “Livingroom Lights”
command_topic: “cmnd/sonoff_lr_lights/POWER”
state_topic: “stat/sonoff_lr_lights/POWER”
switch:
– platform: mqtt
name: “NAS server”
command_topic: “cmnd/NAS/POWER”
state_topic: “stat/NAS/POWER”
– platform: mqtt
name: “Heating”
command_topic: “cmnd/HEAT/POWER”
state_topic: “stat/HEAT/POWER”
Appreciate the help 🙂 …. but I can’t get the room-assistant devices to show up in HA as devices or entities … or sensors. Seem to be missing something here. I know they are working properly in room-assistant .. confirmed with the mqtt # listen.
Is your MQTT discovery turned on? Try with this if it is not
mqtt:
discovery: true
That was the missing piece of the puzzle – working great now! I have a “tile” which is a fantastic client for room-assistant along with 2 iBeacons … the setup is complete and I can now wrap some automation around the closest RA is picking up the sensor.
Well Done WillsWeb 🙂 You nail it! Can you please share me some links to your “tile” and iBeacons to check them out in details. I need to buy something like that soon.
How did you figure out the mac address of the tile?
Hi Kiril, first of all thanks a lot for sharing room-assistant! I have a few android phones as well as smartwatches (Amazfit and Fitbit). 3 rpi’s shall run as cluster for presence detection. I’ve started with bluetoothClassic but came across the note to simply install “Beacon Scope” on the phones to simulate a beacon. Benefit would be to avoid having two BT devices per rpi to scan for classic and BLE devices. So I gave it a try setup bluetoothLowEnergy. What are the pro’s and con’s from your point of view to go with bluetoothLowEnergy config option like I tried? Are there any benefits like higher distance (to be indentified), faster identification etc… ? I did only few tests but I had no issues with Beacon Scope, it survived an android reboot and wasn’t killed by the OS, what is you experience with that approach? I’m asking because, I went back to bluetoothClassic since mqtt was flooded by RA within microseconds with messages while I tested presence detection with bluetoothLowEnergy option, distance attribute was updated every microsecond. It might be due to missconfiguration by myself. If I stay now with classic unfortunately I cannot track the smartwatches.
Another question I have is, if all three rpi’s shutdown the inquiry device in HA says “unavailable” but the sensor for the phone shows the latest known rpi it was registered to. What automation do you use to fix that? Thanks in advance, Sven
Thank you for this write up! If I can ask you for help please with my mqtt_room configuration. I cannot get the mqtt_room configuration to be valid. I’m running Home Assistant Core in a Docker container and when I try to add mqtt_room to the configuration.yaml, I get the error: “message”: “Value is not accepted. Valid values: \”mqtt\”.”,
sensor:
– platform: mqtt_room
device_id: “xxxx”
If you can help, it would be great.
try only with mqtt, not mqtt_room
Hi Paul! I am running the same issue “Value is not accepted. Valid values: \”mqtt\”.”, did you find how to fix this?
Hello,
I have the following problem: none of the Bluetooth devices are displayed in the mqtt integration even though the discovery is set on true
logins:
– username: myxxx
password: myxxx
anonymous: false
customize:
active: false
folder: mosquitto
certfile: fullchain.pem
keyfile: privkey.pem
require_certificate: false
discovery: true
The room-assistant config looks like
global:
instanceName: bedroom
integrations:
– bluetoothLowEnergy
– homeAssistant
– bluetoothClassic
homeAssistant:
mqttUrl: ‘mqtt://xxxxxxx:1883’
mqttOptions:
username: xxxx
password: xxxx
bluetoothLowEnergy:
addresses:
– ‘0C:61:CF:AB:83:BF’
– ‘0C:61:CF:AB:84:96’
– ‘D1:00:00:03:E6:42’
– ‘E8:2A:3C:B2:B8:07’
– ‘F1:4F:16:3F:25:B0’
In room-assistant logs looks some devices are sniffed
7/6/2020, 8:23:14 PM – info – BluetoothLowEnergyService: Discovered new BLE peripheral Radioland-R2beacon with ID 00001803494c4f474943544543480000-1-2 and RSSI -70
7/6/2020, 8:23:14 PM – info – BluetoothLowEnergyService: Discovered new BLE peripheral Blaze with ID e82a3cb2b807 and RSSI -74
7/6/2020, 8:23:14 PM – info – BluetoothLowEnergyService: Discovered new BLE peripheral MJ_MR_V1 with ID 74a34ab5cd30 and RSSI -49
7/6/2020, 8:23:14 PM – info – BluetoothLowEnergyService: Discovered new BLE peripheral 7b5b4ba71cd0 with ID 7b5b4ba71cd0 and RSSI -76
7/6/2020, 8:23:14 PM – info – BluetoothLowEnergyService: Discovered new BLE peripheral 56179111fdcf with ID 56179111fdcf and RSSI -61
7/6/2020, 8:23:14 PM – info – BluetoothLowEnergyService: Discovered new BLE peripheral Versa with ID f14f163f25b0 and RSSI -51
7/6/2020, 8:23:15 PM – info – BluetoothLowEnergyService: Discovered new BLE peripheral 74d0822e206e with ID 74d0822e206e and RSSI -62
7/6/2020, 8:23:15 PM – info – ClusterService: bedroom has been elected as leader
7/6/2020, 8:23:15 PM – info – EntitiesService: Refreshing entity states
7/6/2020, 8:23:15 PM – info – BluetoothLowEnergyService: Discovered new BLE peripheral 007c2df71879 with ID 007c2df71879 and RSSI -82
7/6/2020, 8:23:15 PM – info – BluetoothLowEnergyService: Discovered new BLE peripheral Oclean X with ID 702845633c1f and RSSI -81
7/6/2020, 8:23:20 PM – info – BluetoothLowEnergyService: Discovered new BLE peripheral Oclean X with ID 702845633a6f and RSSI -85
7/6/2020, 8:24:46 PM – info – BluetoothLowEnergyService: Discovered new BLE peripheral 37e7afe9b41a with ID 37e7afe9b41a and RSSI -101
7/6/2020, 8:26:13 PM – info – BluetoothLowEnergyService: Discovered new BLE peripheral 62934b16b1ea with ID 62934b16b1ea and RSSI -68
7/6/2020, 8:27:05 PM – info – BluetoothLowEnergyService: Discovered new BLE peripheral 4109430cc588 with ID 4109430cc588 and RSSI -73
7/6/2020, 8:27:05 PM – info – BluetoothLowEnergyService: Discovered new BLE peripheral 4117ff0d3a86 with ID 4117ff0d3a86 and RSSI -73
7/6/2020, 8:27:18 PM – info – BluetoothLowEnergyService: Discovered new BLE peripheral 495005cc2de0 with ID 495005cc2de0 and RSSI -60
However, none of them are displayed in mqtt integration.
I have tried to set manually like this
– platform: mqtt_room
device_id: “00001803494c4f474943544543480000-1-2”
name: “Beacon 1”
state_topic: “room-assistant”
timeout: 5
away_timeout: 0
mqtt only seems to be invalid
Invalid config for [sensor.mqtt]: [device_id] is an invalid option for [sensor.mqtt]. Check: sensor.mqtt->device_id.
Could you advise me what to do? Thanks a lot
Hello,
I have the issue, and i cant find what to do to fix this.
Hello from France !! As usual, Great job 🙂 I installed and followed all the steps that you indicate. I use room assistant to monitor my Iphone and my apple Watch. It was working fine until a few days ago… I have now a issue with the BluetoothClassicService…
In my logs i have the following message :
error – BluetoothClassicService: Command failed: hcitool -i hci0 cc “44:4A:DB:5B:7F:5C” && hcitool -i hci0 rssi “44:4A:DB:5B:7F:5C”
Invalid device: Network is down
My two devices are well connected to bluetooth.
My MQTT broker works fine.
I can’t explain that 🙁 it suddenly appeared
Do you have any idea?
That is really strange, are you sure that you didn’t change or update anything in HA?
Any idea if this integrates with NodeMCU or ESPHome? I have NodeMCU multi sensors built into each room. Would seem like an overkill to also put a Pi in each as well.
Not sure if that is possible, as far as I know it is designed for raspberries.
Hi Kiril
I have this error in log:
5/3/2022, 9:45:53 AM – error – undefined: “bluetoothLowEnergy.addresses” is not allowed [Value: [“58:2D:34:10:89:CF”]].
This is my local.yml:
global:
instanceName: livingRoom
integrations:
– homeAssistant
– bluetoothClassic
– bluetoothLowEnergy
bluetoothClassic:
minRssi: -20
hciDeviceId: 0
addresses:
– ’30:4B:07:5F:EB:43′
bluetoothLowEnergy:
addresses:
– ’58:2D:34:10:89:CF’
Room Assistant starts, gives this address, but continues to register existing BLE devices in the room without assining them in MQQT
5/3/2022, 9:45:54 AM – warn – BluetoothLowEnergyService: The allowlist and denylist are empty, no sensors will be created! Please add some of the discovered IDs below to your configuration.
Here is the device I entered in local.yml:
5/3/2022, 9:45:54 AM – info – BluetoothLowEnergyService: Discovered nearby BLE peripheral ClearGrass Temp & RH with ID 582d341089cf and RSSI -70
There is also this error in log:
5/3/2022, 9:45:54 AM – error – ClusterService: Failed to start mdns discovery (dns service error: unknown)
I have only one RPI4 with HASS.IO Add-on Room Assistant and Mosquitto MQQT broker.
I understood that I don`t have to put anything in local.yml about MQQT broker as it will be discovered automatically in my case.
I also have mqqt descovery true in HASS.IO main configuration.yaml
Could you help me with this?