
Do you want to access your Raspberry Pi (or any other device that you have) from anywhere in the world without exposing your Pi directly to the Internet totally free of charge? If yes, then watch this video we will use some ZeroTier power here.
Table of Contents
Introduction
For a real Smart Home setup, connecting to your local network from outside is vital.
In this video/article I’m going to demonstrate you how you can easily connect to your local network and your Raspberry pi from anywhere in the world. The best part is that you don’t have to open any ports in your router, you don’t need static IP or dynamic DNSes and you don’t have to go through complicated certificate creation process. On top of that the whole setup will cost you nothing.
If you don’t have Raspberry yet, you can buy one from the affiliate links below:
- Raspberry Pi 4 – https://amzn.to/2qs0Dtw
- Power supply for it – https://amzn.to/2pwE1HL
- Micro SD card – https://amzn.to/2Os6cA3
ZeroTier vs OpenVPN
The well-known method of doing this it is to use a VPN. The most trivial solution is to use OpenVPN, but I will show you another way with a product called – ZeroTier.
OpenVPN can be really hard to set up and maintain, provisioning of new devices can be a pain with having to generate certificates and complicated configurations. ZeroTier on the other hand, can be installed with a single bash script, and your virtual network can be managed within a Web panel which enables you to provision devices, assign static IPs and more.
With that being said let’s setup a VPN on our Raspberry Pi:
Getting Started
There are a few things you have to do first:
- Head over to https://my.zerotier.com and create an account in ZeroTier network management portal.
- Go to this URL: https://www.zerotier.com/download.shtml and Download and install ZeroTier for your OS
- For Raspberry PI and any other Debian and RPM based Linux distribution you can use the following script below. When this script finish its execution, you will have ZeroTier client intstalled on your system.
You can try this one liner
curl -s https://install.zerotier.com | sudo bashOr If you have GPG installed, a more secure option is available:
 curl -s 'https://raw.githubusercontent.com/zerotier/ZeroTierOne/master/doc/contact%40zerotier.com.gpg' | gpg --import && \
 if z=$(curl -s 'https://install.zerotier.com/' | gpg); then echo "$z" | sudo bash; fi
For other than Debian based distributions or for other OS, better check the official guide on https://zerotier.com/download/
Have in mind that all of the commands below requires sudo/root persmissons on Linux/Unix/Mac or administrator elevated command prompt on Windows:
To ensure ZeroTier starts on system boot, run:
sudo systemctl enable zerotier-one
Check if everything is working OK by running the command below. It should return 200 info [ID] [version] ONLINE if all is fine:
sudo zerotier-cli status
Creating your first network
Now that you have the client installed, and your account created, it’s time to create your first ZeroTier network. You’ll need two or more devices to join to ZeroTier network in order to test it 🙂
- click the “Networks” button on the top of the screen:
- Then click the “Create” button”
- This will create a new private ZeroTier network and it will show up on the page like so:
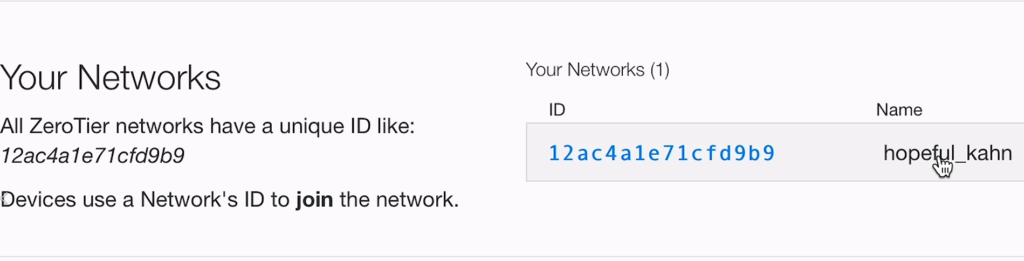
The 16-digit code is your Network ID. Your actual network ID will be different. This network ID is what you’ll use to join your devices to the network from the ZeroTier Client.
Join a ZeroTier Network
Raspberry Pi (or any other Linux)
Open your Raspberry terminal and simply type, where ############### being the 16-digit network ID of the network you wish to join:
sudo zerotier-cli join ################
MacOS
On macOS, find the ZeroTier app in your menu bar. Launch the ZeroTier One app bundle if it’s not already running. Click the ⏁ icon on your menu bar and select Join Network.
Windows
On Windows, the ZeroTier one UI app lives in the system tray. Right click on the ZeroTier icon and select Join Network.
ZeroTier also has iOS and Android apps – you can find them in the App Store or Google market or on ZeroTier download page – https://www.zerotier.com/download/
Once the machines are joined, I will click on the network that we just created.
This will take me to the network configuration page. There are a lot of settings here, but don’t worry about them – for simple networks like ours, we will leave almost all of these settings alone and everything will work out of the box. All we need right now is authorising the computers that we added in our network and to type a description that mean something to you. These settings have to be in the Members section.
Authorize devices
Click the check boxes under the “Auth?” column, and your device will be authorised to join the network. Now you will be able to communicate with this device by using the IP address listed in the Managed IPs column.
To have your Raspberry Pi automatically join the virtual network on system boot, simply run the following command:
sudo touch /var/lib/zerotier-one/networks.d/[Network ID].conf
To Check that your Raspberry Pi is properly connected you can run:
sudo zerotier-cli listnetworks
and you have to see something like that 200 listnetworks […] OK PRIVATE […] [The IP(s) you assigned the Raspberry Pi]/24
After connecting your client devices to the same network, you can check that the other devices are resolvable using:
sudo zerotier-cli listpeers
Finally, you can connect to your Raspberry Pi by using the private IP address that is assigned to it by using SSH client for example:
ssh YOUR_USER@YOUR_ZEROTIER_IP
Conclusion
For me, using ZeroTier was a very pleasant experience. I can now access my Raspberry Pi from anywhere in the world with an Internet connection without having to worry about my local network security. And if you want to harden your security even more you can create a Firewall rule to block all inbound traffic to your ZeroTier except the one coming from your home and your ZeroTier IP address ranges.
Support my work
Any sort of engagement on my website or my YouTube channel does really help out a lot with the YouTube algorithm, so make sure you hit the subscribe, Like and Bell buttons If you enjoy this video.
If you want to see more Raspberry Pi related tutorials check these two:
Raspberry Pi as main Smart Home hub
How to Setup a Raspberry Pi Without a Monitor or Keyboard
Enter your questions in the comments section below, if you have an Idea for my next video – please share it there as well – all of this will help me a lot.
Also feel free to add me on Twitter by searching for KPeyanski. I post there pretty much daily.
I really hope that you find this tutorial useful and you now have working connection to your Raspberry Pi from anywhere in the world.
Thank you for reading/watching, stay safe and see you next time.