
I’m super excited because In this article I will review one of the latest Shelly products called Shelly Pro 4PM, then I will integrate it with Home Assistant and finally, I will show you how you can control the device using MQTT and HTTP.
Let’s start:
Table of Contents
What is Shelly Pro 4PM?
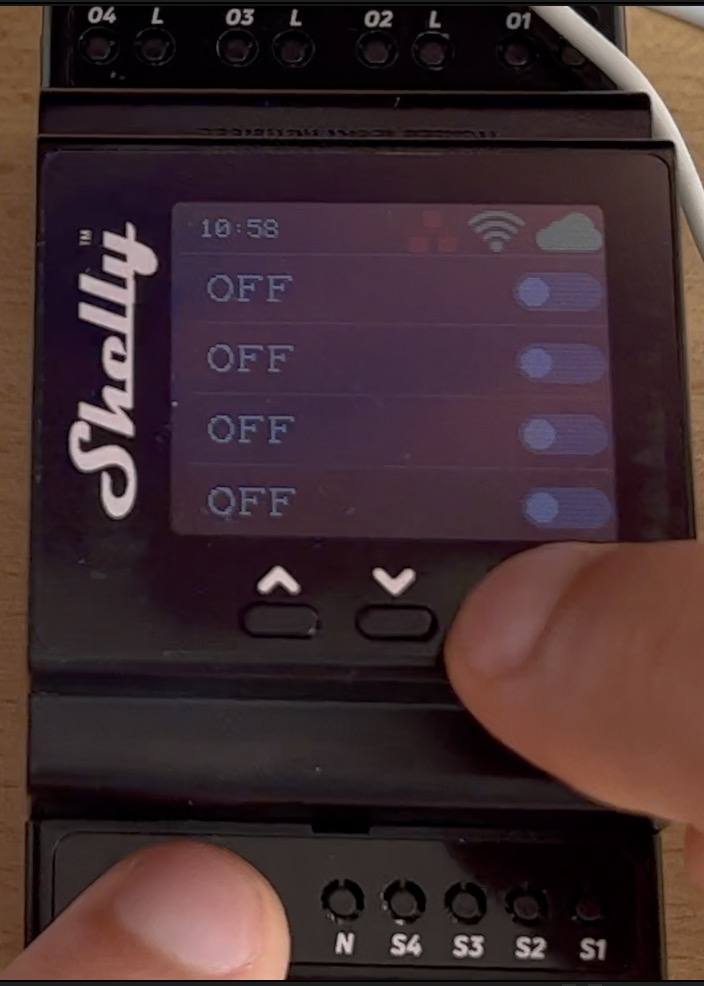
Shelly Pro 4PM is a professional 4 channels relay with Wi-Fi, LAN, and Bluetooth connection, where the Bluetooth is only used during the initial inclusion and pairing. It has 4 outputs with up to 16A per output and up to 40A for the whole device. It also have several safety features like overpower and over-voltage protection of the load, as well as device temperature protection.

The Shelly Pro 4PM is more than suitable for automations, because it is compatible with the most used home automation platforms including Home Assistant, as we will see later and allows remote control and precise power management. Shelly Pro 4PM is DIN rail mountable inside a breaker box and it has a 1.8-inch color screen with navigation keys.
That was Shelly Pro 4PM description, let’s wire it now.
How to wire Shelly Pro 4PM?
My first intention Is to just power up the device, so I can pair it using the Shelly mobile app.
I did the following:
- I removed the Shelly Pro 4PM covers, so I can screw the screws of the inputs.
- I connected the the Live wire to the L input (upper right input) of the Shelly Pro 4PM.
- I connected the Neutral wire to to the N input (lower left input).
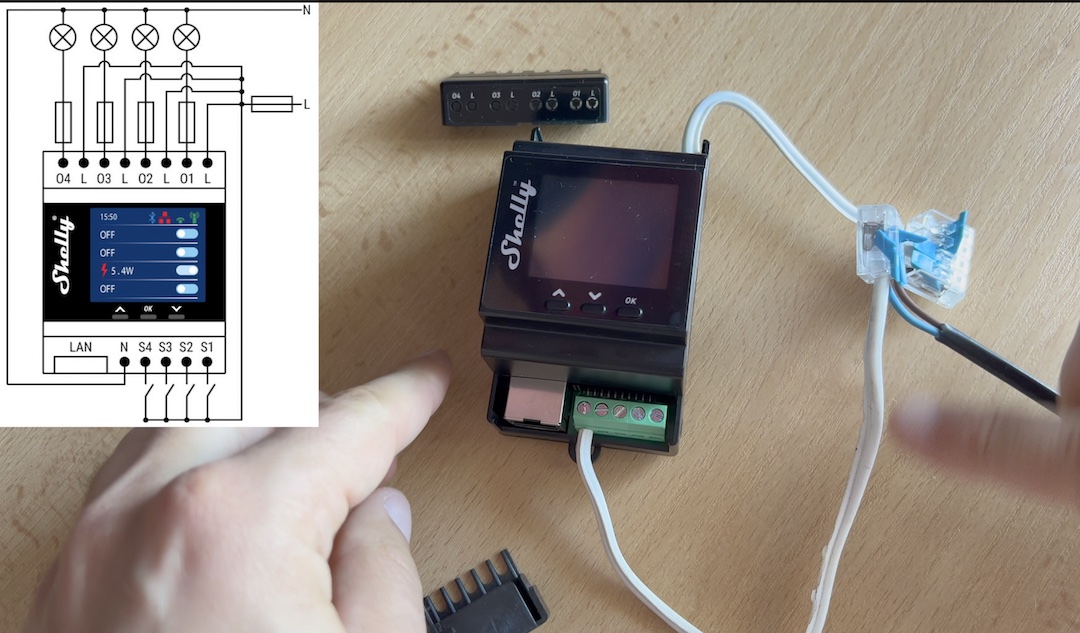
The above steps are absolutely enough for the beginning and the Shelly Pro 4PM can now be turned on and I can use the Shelly mobile app to pair it with my local network.
I will not describe the whole pairing procedure due to several main reasons:
- The procedure is really simple! The Shelly mobile App will guide the whole way you and you just have to follow the instructions.
- I’m really lazy right now. On top I did that procedure in the video in details. Just check it out there if you face any difficulties.
How to connect appliances to Shelly Pro 4PM?
The device Is connected to my local network and the good thing about all Shelly products is that you can stay that way if you wish. Only local connection is possible and optionally you can enable Cloud services to control your device from anywhere in the World. Of course, you can enable local and Cloud connection simultaneously where the choice is yours.
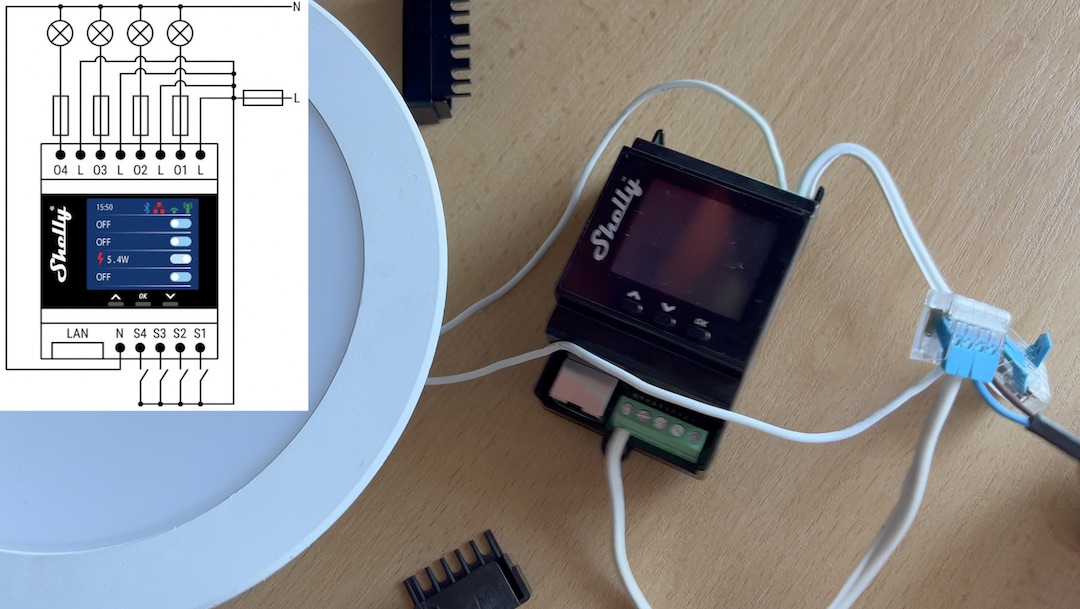
Now, let’s connect something to the output channels of the Shelly Pro 4PM and to see how can we control it.
I will use again the diagram that Is shown above and one downlight just for the demo. Later on, I will add the Shelly device in my breaker box.
This is what I did:
- The L wire of the downlight goes to the 01 input of the Shelly device.
- The Neutral wire of the downlight goes to a connector where the Neutral wire from the power grid and the wire to N input of the Shelly are connected.
Shelly Pro 4PM Home Assistant integration How-To
Time for Shelly Pro 4PM Home Assistant integration demo. After that we will see how to control the device using MQTT & HTTP as well and you will hear my thoughts about the Pros and Cons of this Shelly smart relay.
- First, upgrade your Shelly device to the latest possible firmware. This can be done from the Web interface of the device or from the Shelly mobile app. Do not skip this step as you may face an Device unsupported firmware version error as I did in the video.
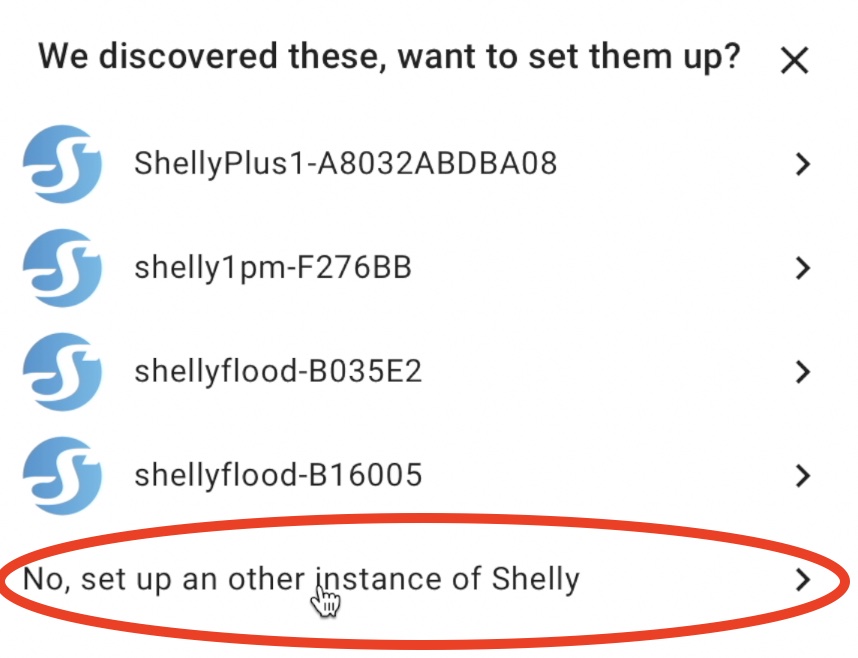
- In Home Assistant, go to Configuration > Integration > Add integration and search for Shelly. Alternatively, you can click on the My Home Assistant button below, which will lead you to the same/correct place.

- If your device is not auto discovered in the next dialog, click on the “No, set up an other instance of Shelly” link.
- On the next dialog enter the IP of the Shelly Pro 4PM device. You can get the IP either from the Status menu of the device itself or from your router interface. Finally, click Submit button.
- A window with big Success! label should appear giving you the possibility to add the device in a specific area. Click Finish button and Shelly device will be added in Home Assistant.
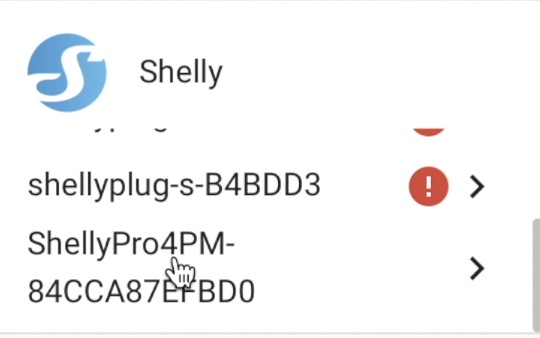
- Find the Shelly Integration in the Home Assistant Integrations list and click on the ShellyPro4PM-XXXX device twice.
- A window with Device Info, Automations, Scenes, Entities & Scripts will be shown. Under Entities section click on the Add to Lovelace button to add the device entities as card in Home Assistant dashboard.
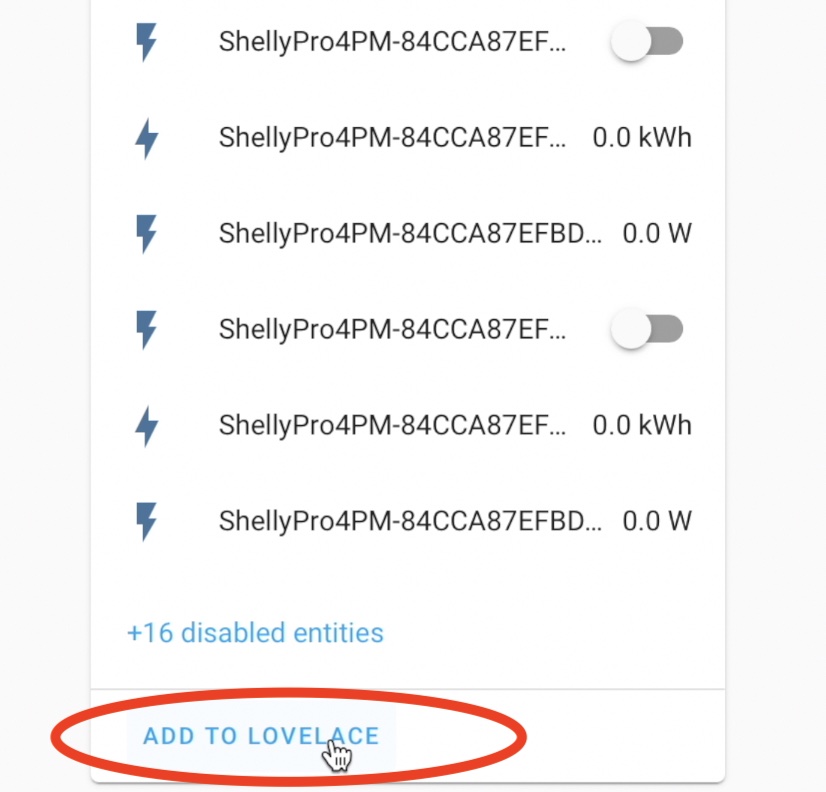
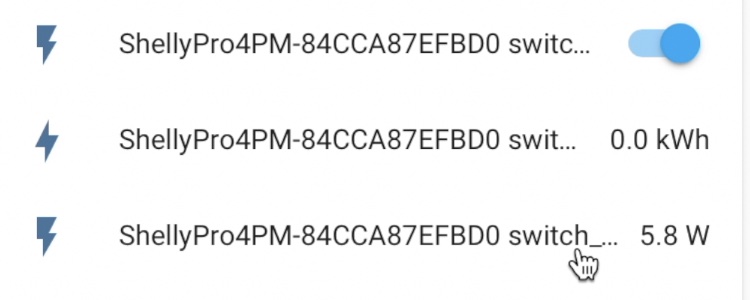
From now on, you can control and monitor power consumption on all 4 channels of the Shelly device right from the comfort of the Home Assistant Dashboard.
How to create Shelly Pro 4PM Home Assistant automation?
To create an automation you can use the graphical automation editor available in Home Assistant exactly as I did in the video or you can paste some YAML code in your automations.yaml file located in Home Assistant config folder.
Here is an example demo automation that will create a Home Assistant persistent message when channel 0 of the Shelly device is activated.
alias: when ShellyPro4pm switch 0 is turned on
description: ''
trigger:
  - platform: device
    type: turned_on
    device_id: d7d5498950980ceac30a096db8c88db7
    entity_id: switch.shellypro4pm_84cca87efbd0_switch_0
    domain: switch
condition: []
action:
  - service: persistent_notification.create
    data:
      message: when ShellyPro4PM switch 0 is turned on
mode: single
To make this automation to work for you:
- Copy & paste the above code in your
automations.yamlfile. - Change the device_id & entity_id values with yours and save the changes.
- Reload automation from Configuration > server controls.
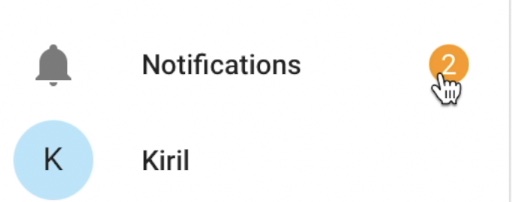
If everything is fine when you activate channel 0 on the Shelly device you have to receive a notification in the lower left corner in your Home Assistant.
Shelly Pro 4PM MQTT Integration How-to
Let’s see a quick Shelly Pro 4PM MQTT demo. First, enter your MQTT credentials in the Shelly device web interface:
- In Shelly Web interface, go to Networks > Mqtt section and enter your MQTT server, username & password. Click Apply when you are ready.
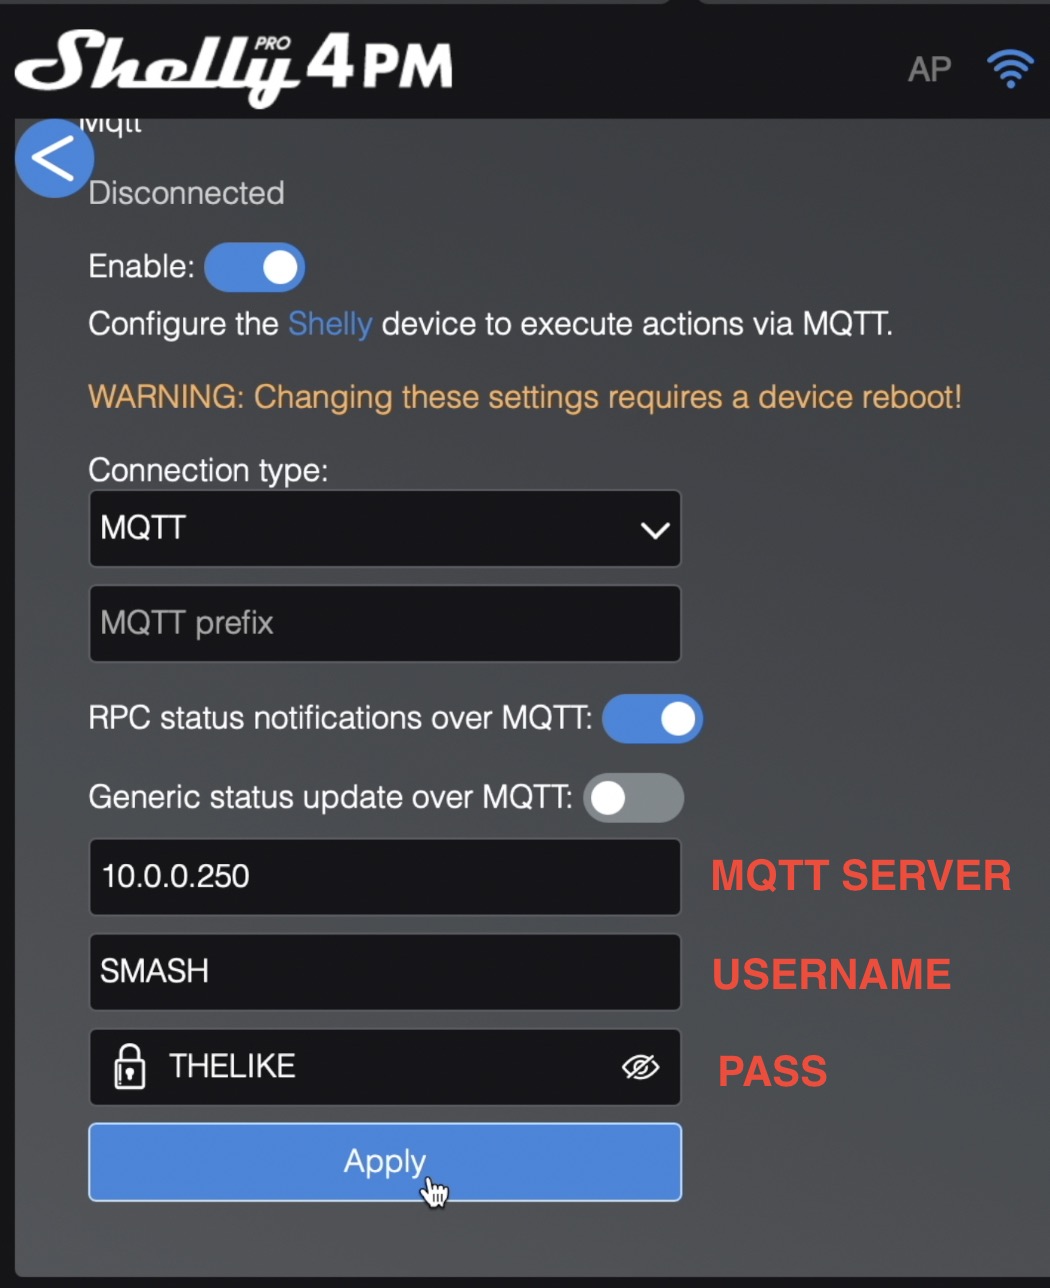
- The device will reboot and it will connect to your MQTT server if everything is fine.
- To control the Shelly Pro 4PM using MQTT you can use any kind of MQTT client like the graphical MQTT Explorer or command line
mosquitto_pub. - If you are using the
mosquito_pubMQTT client type the following to turn on the channel 0 of the Shelly device:
mosquitto_pub -h MQTT_SERVER_IP -p MQTT_PORT -t shellypro4pm-YOUR_ID/rpc \
-m '{"id":123, "src":"user_1", "method":"Switch.Set", "params":{"id":0,"on":true}}'- If you want to control another channel, change “id”:0 to “id”:1 and you will control the channel/output 1 of the Shelly device. Use 2 or 3 to control the other channels.
- If you change “on”:true to “on”:false you will deactivate the channel.
- When you are using the MQTT Explorer tool you have to go to the shellypro4pm-YOUR_ID/rpc topic and in the JSON field you can paste the following:
{"id":123, "src":"user_1", "method":"Switch.Set", "params":{"id":0,"on":true}}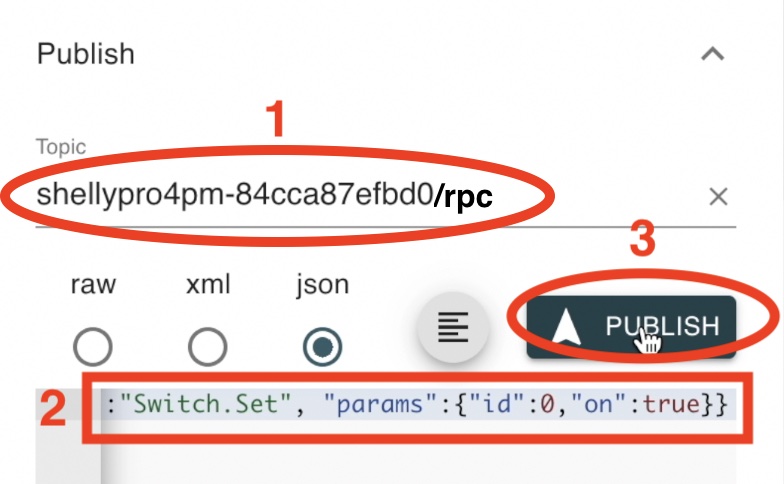
- Press the Publish button and the channel 0 of the Shelly device should be activated.
- Same remarks as above about the id for the channel and on for the state are valid.
Shelly Pro 4PM HTTP Integration How-to
Moving to a Shelly Pro 4PM HTTP post demo. I will use curl command which is preinstalled on Linux and Mac, on Windows you have to download and install it – LINK.
- You will need the IP of your Shelly device. Get it either from the Status menu of the device itself or from your router interface.
- Open a Terminal and paste the following command:
curl -X POST -d '{"id":0, "on”:true}’ "http://YOUR_SHELLY_IP/rpc/Switch.Set"- Don’t forget to change YOUR_SHELLY_IP with your real Shelly IP
- Hit Enter key and you should activate channel 0 on your Shelly device.
- To change the channel just change the “id”:0 to “id”:1 for example and you will control the second channel of the device.
- To deactivate a device channel, change “on”:true to “on”:false.

Shelly Pro 4PM Pros and Cons
Next, you can find my Shelly Pro 4PM Pros and Cons sections. I will start with the things that I didn’t liked so much.
Shelly Pro 4PM Cons
The first one is the Shelly Pro 4PM color display, although it looks cool it is useless to me. Don’t get me wrong here, there is nothing bad with the display itself, but I will not use it at all. The device will just stay closed in my breaker box and no-one will ever have to look at that display.
If I need some info from the device I will either get it from Home Assistant or from The Shelly Pro 4PM web interface. So, in my case the display will only consume energy without real use (although the device power consumption is below 4W).
Next minus, is again related to the display somehow as the name of the device is not shown there.
You can say that is not big deal and you are right, but Imagine if you have multiple Shelly Pro 4PM mounted side-by-side. To understand which device is which you have to label them manually somewhere with a marker or sticker.
The other way is to get the MAC address of the device from the device menu and to compare it in the device web interface in order to get the name.
Wouldn’t it be just easier to have the name of the display somewhere. Thankfully, that option can be added in one of the future Shelly Firmware updates and the name can magically appear after you update your device over the air.
Shelly Pro 4PM Pros
Let’s move to the Pros now, the biggest plus of this device in my humble opinion is the design! You can save space and gain functionality in your breaker box by replacing up to 4 breakers with just one single Shelly Pro 4PM. On top, after this procedure all of the 4 channels are going to be smart and can be controlled remotely with visible power consumption.
We already saw and discussed the other Pros, like the enchanted safety features, MQTT, HTTP & Websocket, Home Assistant support and so on.
In general I can recommend the Shelly Pro 4PM as the Pros are a lot and the Cons are negligibly small.
Where to buy Shelly Pro 4PM?
You can check the official Shelly store in Amazon here – https://amzn.to/34d88VR
The above links are affiliate links where I will earn a small commission if you click on the link and purchase an item. You are not obligated to do so, but it does help fund these articles in hopes of bringing value to you!
Outro
if you wish to secure this channel existence you can do one of the following or best all of them:
- Subscribe for my YouTube channel with the notification bell – https://youtube.com/kpeyanski
- Subscribe for my newsletter where you will receive articles like this one on weekly basis – LINK
- Check the available support methods in my support section and actually use one – LINK
- Join my Discord server where we help each other and discussing Smart Home & IoT – LINK
- Follow me on Twitter – LINK
Remember – Home Smart, but not hard!
I’m Kiril and I’m done writing. Bye!
Quero aprender a configurar