
I made a smart gyroscope and accelerometer a.k.a inertial sensor that works with Home Assistant for less than 5 dollars and I will show you how I did it, so you can make your own.

I will also list the needed parts, I’ll show how I connected them, as well as the used configuration that can be re-used by anyone and I will make some demo Home Assistant Automations utilizing my new and shiny Smart gyroscope & accelerometer sensor.
Table of Contents
Getting Started: Parts You’ll Need for Smart Inertial Sensor
To make this gyroscope and accelerometer a.k.a inertial sensor for Home Assistant, you’ll need:
- BMI160 inertial measurement unit (IMU) – approximately $1
- D1 mini board – under $3
- Four jumper wires
- Micro USB cable
And hey, if you purchase these parts through the provided links below, it helps support the YT channel and this site at no extra cost to you – win-win!
- BMI160 Gyro Accelerometer Sensor (AliExpress)- https://s.click.aliexpress.com/e/_DkCXWFP
- BMI160 Gyro Accelerometer Sensor (Amazon) – https://amzn.to/49yNdf1
- D1 Mini ESP8266 (Amazon) – https://amzn.to/3I6MR4V
- Micro USB Cable (AliExpress) – https://s.click.aliexpress.com/e/_DmMNO6L
- Micro USB cable (Amazon) – https://amzn.to/32tdxdF
- Jumper Wires (AliExpress) – https://s.click.aliexpress.com/e/_DEoCGxH
- Jumper Wires (Amazon) – https://amzn.to/3fRlXyK
- (Optional) USB adapter EU US UK (AliExpress) – https://s.click.aliexpress.com/e/_DcYrAil
- (Optional) USB adapter (Amazon) – https://amzn.to/3u2Tdvj https://amzn.to/3qXkJYS
- (Optional) Soldering Iron – https://s.click.aliexpress.com/e/_Desufz9
- (Optional) Hot Glue Gun – https://s.click.aliexpress.com/e/_DeJm1oF
- (Optional) Battery Shield for D1 Mini – https://s.click.aliexpress.com/e/_Dc9lfQt
I don’t want to read anymore…
Tired of reading? No problem, check my video instead…
Step 1: Wiring the Components
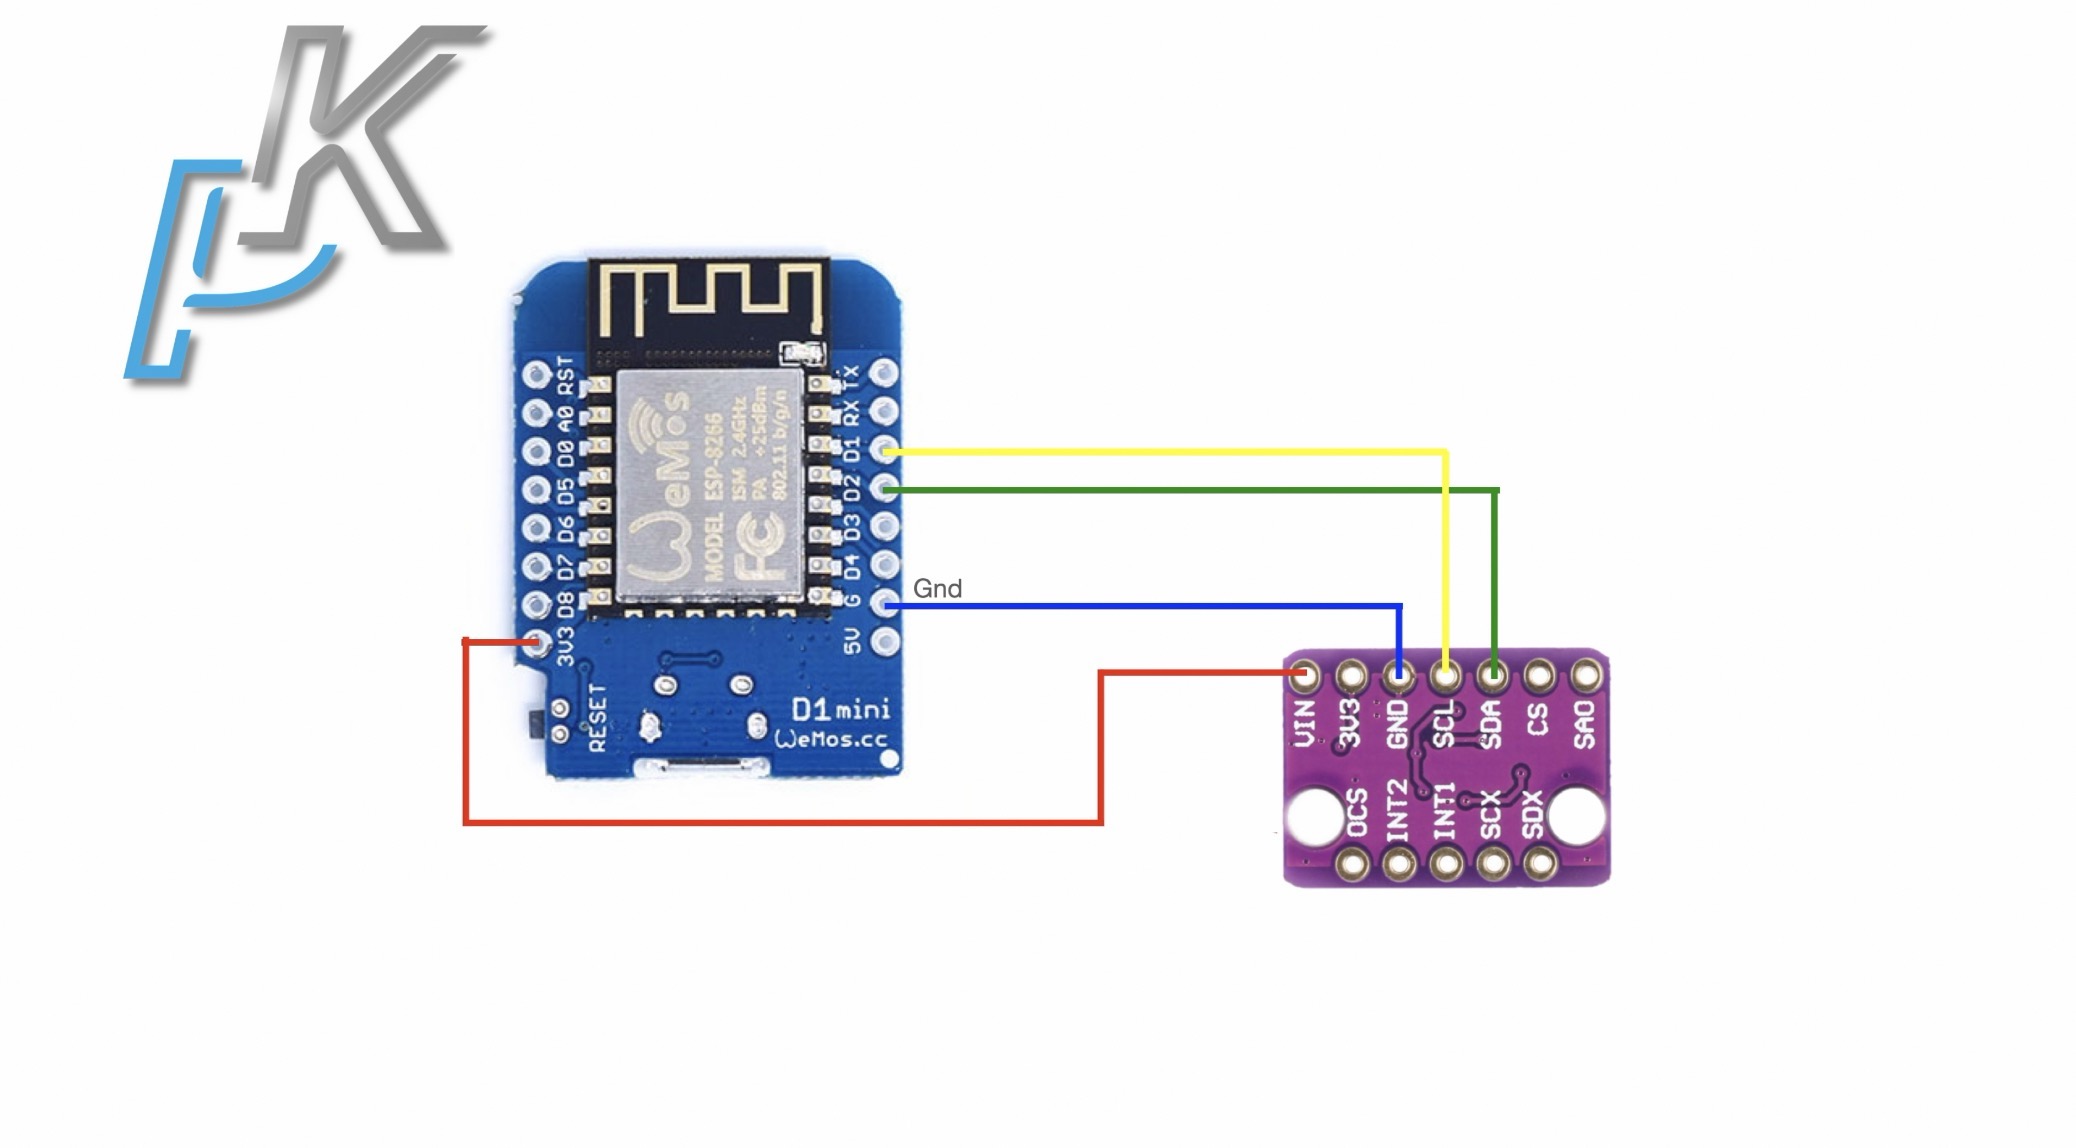
Now let’s get down to business. Here’s how I connected the BMI160 sensor to the D1 mini board:
- Connect VIN pin on the BMI160 to the 3v3 pin of the D1 Mini.
- Connect the Ground pin on the BMI160 to the Ground pin on the D1 Mini.
- Next, connect the SCL pin on the BMI160 to the D1 pin on the D1 Mini.
- Finally, connect the SDA pin on the BMI160 to the D2 pin on the D1 Mini.
Step 2: Setting Up Home Assistant
Assuming you have a running Home Assistant, preferably with ESPHome dashboard add-on installed, let’s proceed.
If not, don’t worry – you can join my free Home Assistant webinar to get started.
Step 3: Configuring ESPHome
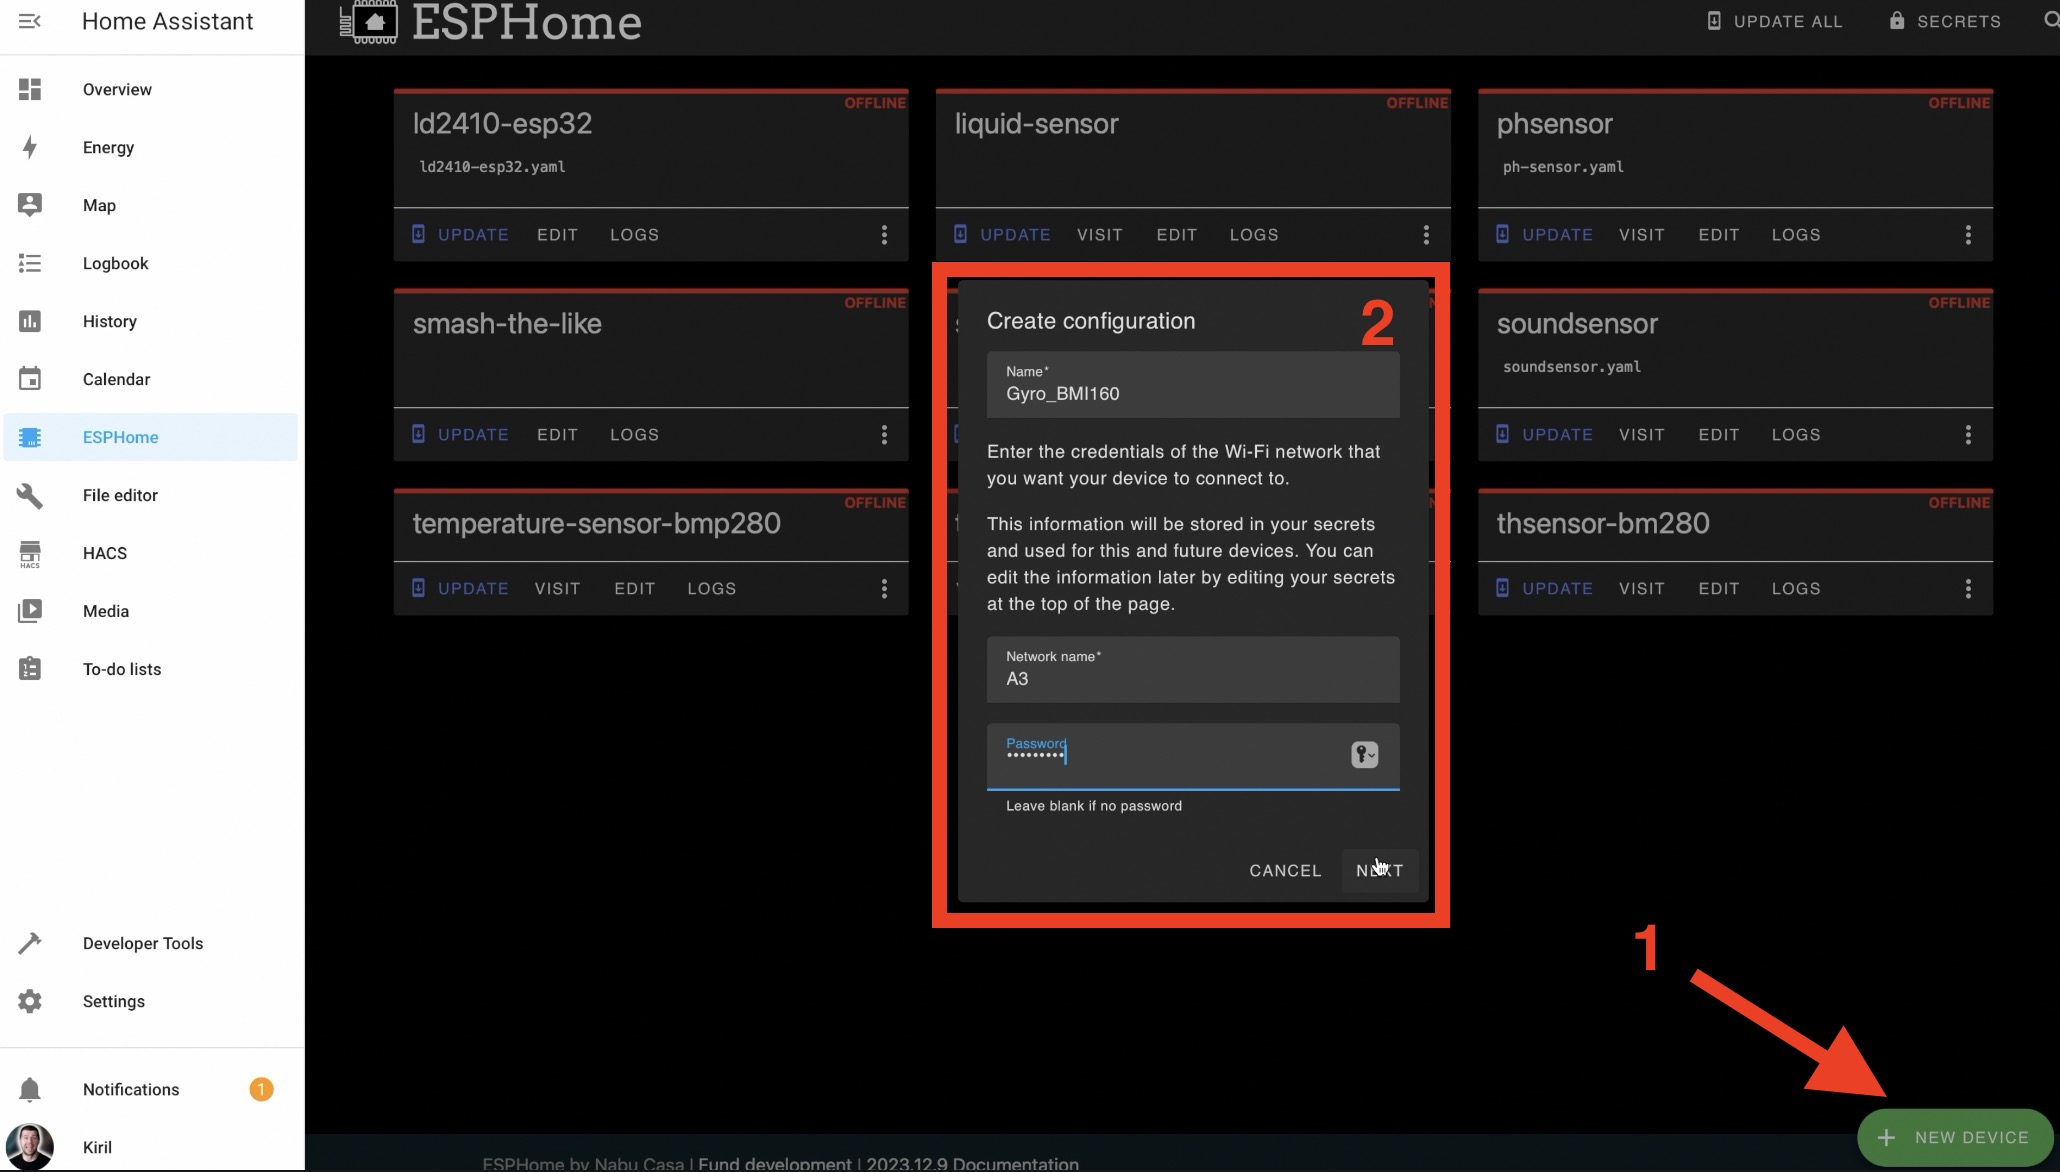
Now, open the ESPHome dashboard add-on in Home Assistant and create a new device. Enter the device name, your Wi-Fi credentials, and select ‘ESP8266’ as device type, since we’re using a D1 Mini board.
Then, instead of installing immediately, let’s edit the configuration. I used this code and you can re-use it:
My ESPHome code – https://gist.github.com/peyanski/bc86337f558a9f88ee4d035fd9b950be
In the above configuration, I added lines to describe the wiring of the sensor (the I2C section) and I included a web server for accessing sensor readings from any browser. Web server part is optional and you can comment it out if you don’t needed it.
The final thing in the code and a must have one is the sensor section, which is just like the one found in the ESPHome website documentation. And the most important thing here that may need some change is the address.
The default address is 0x68, but for my BMI160 sensor this address didn’t worked and I had to change it to 0x69.
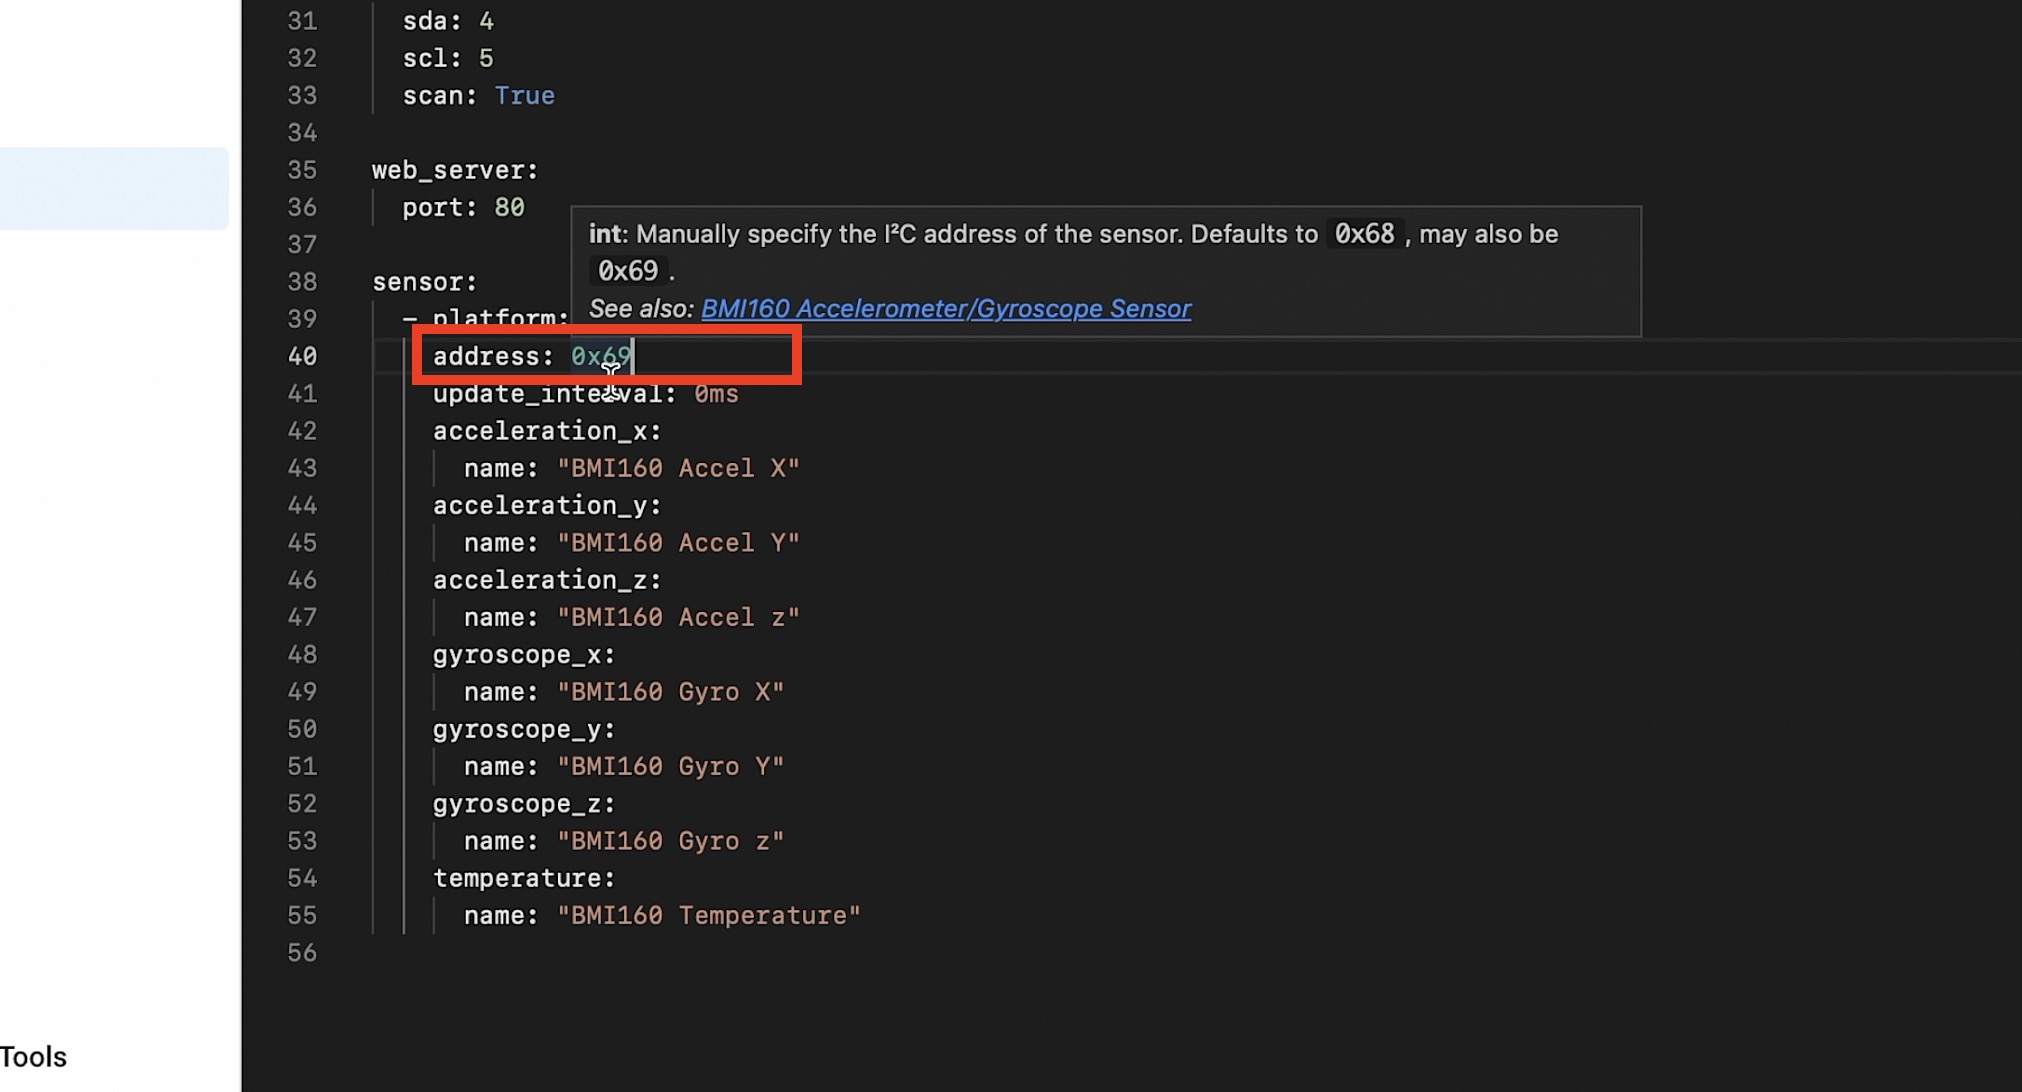
So, if your sensor is not showing any values after ESPHome uploading try to change the address here. If you bought the BMI160 sensor from my links in the video description then start with 0x69 address first and only if it doesn’t work, then change the address to the default one which is 0x68 and upload the ESPHome again.
Step 4: Uploading ESPHome
Connect the D1 Mini board with the attached BMI160 sensor to a USB port on your Home Assistant device.
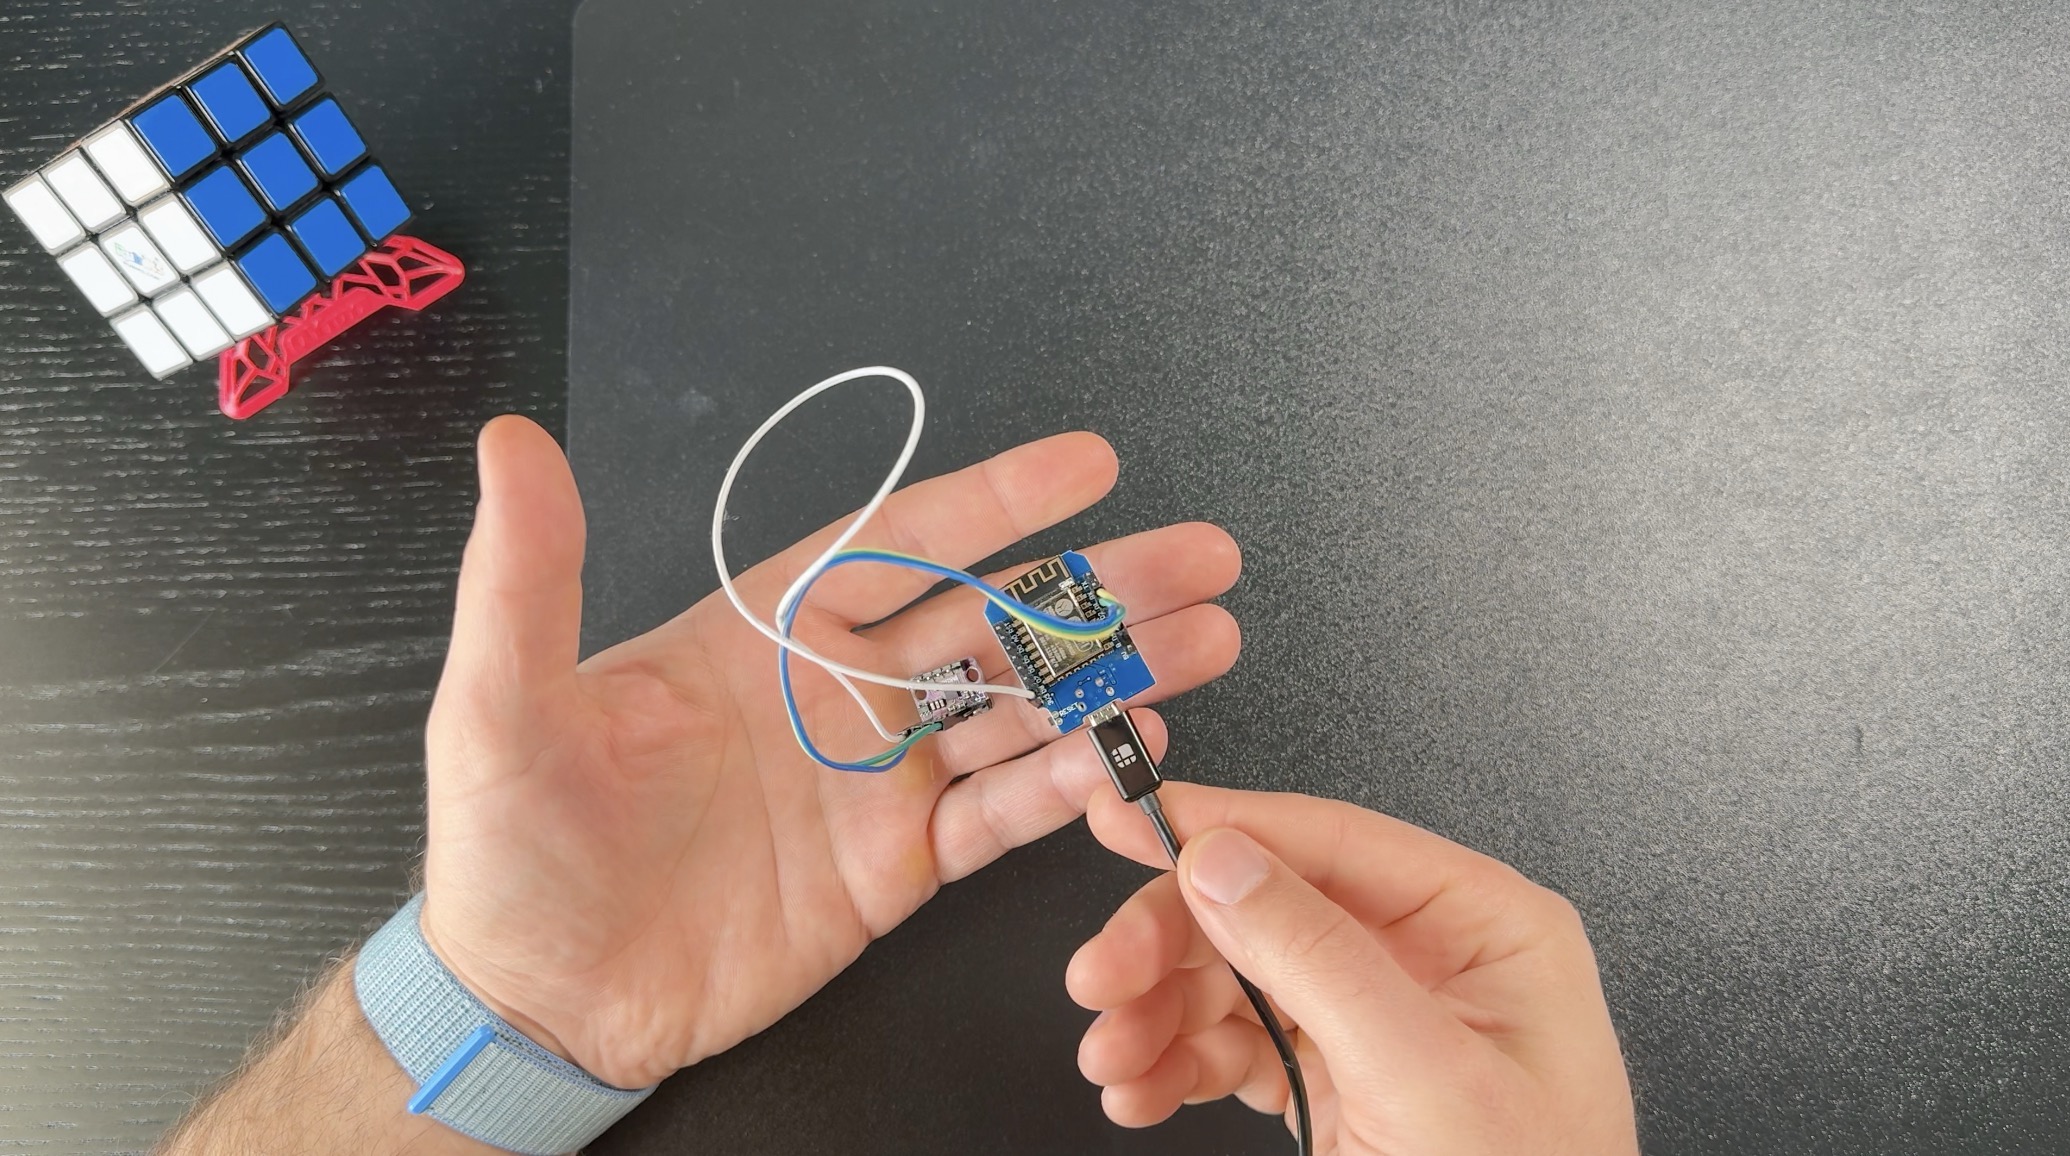
Hit install, select the appropriate port, and let the installation process run. After a few minutes, you should see the sensor readings updating live on your screen and in the web interface of our Gyro + Accel Smart Sensor.
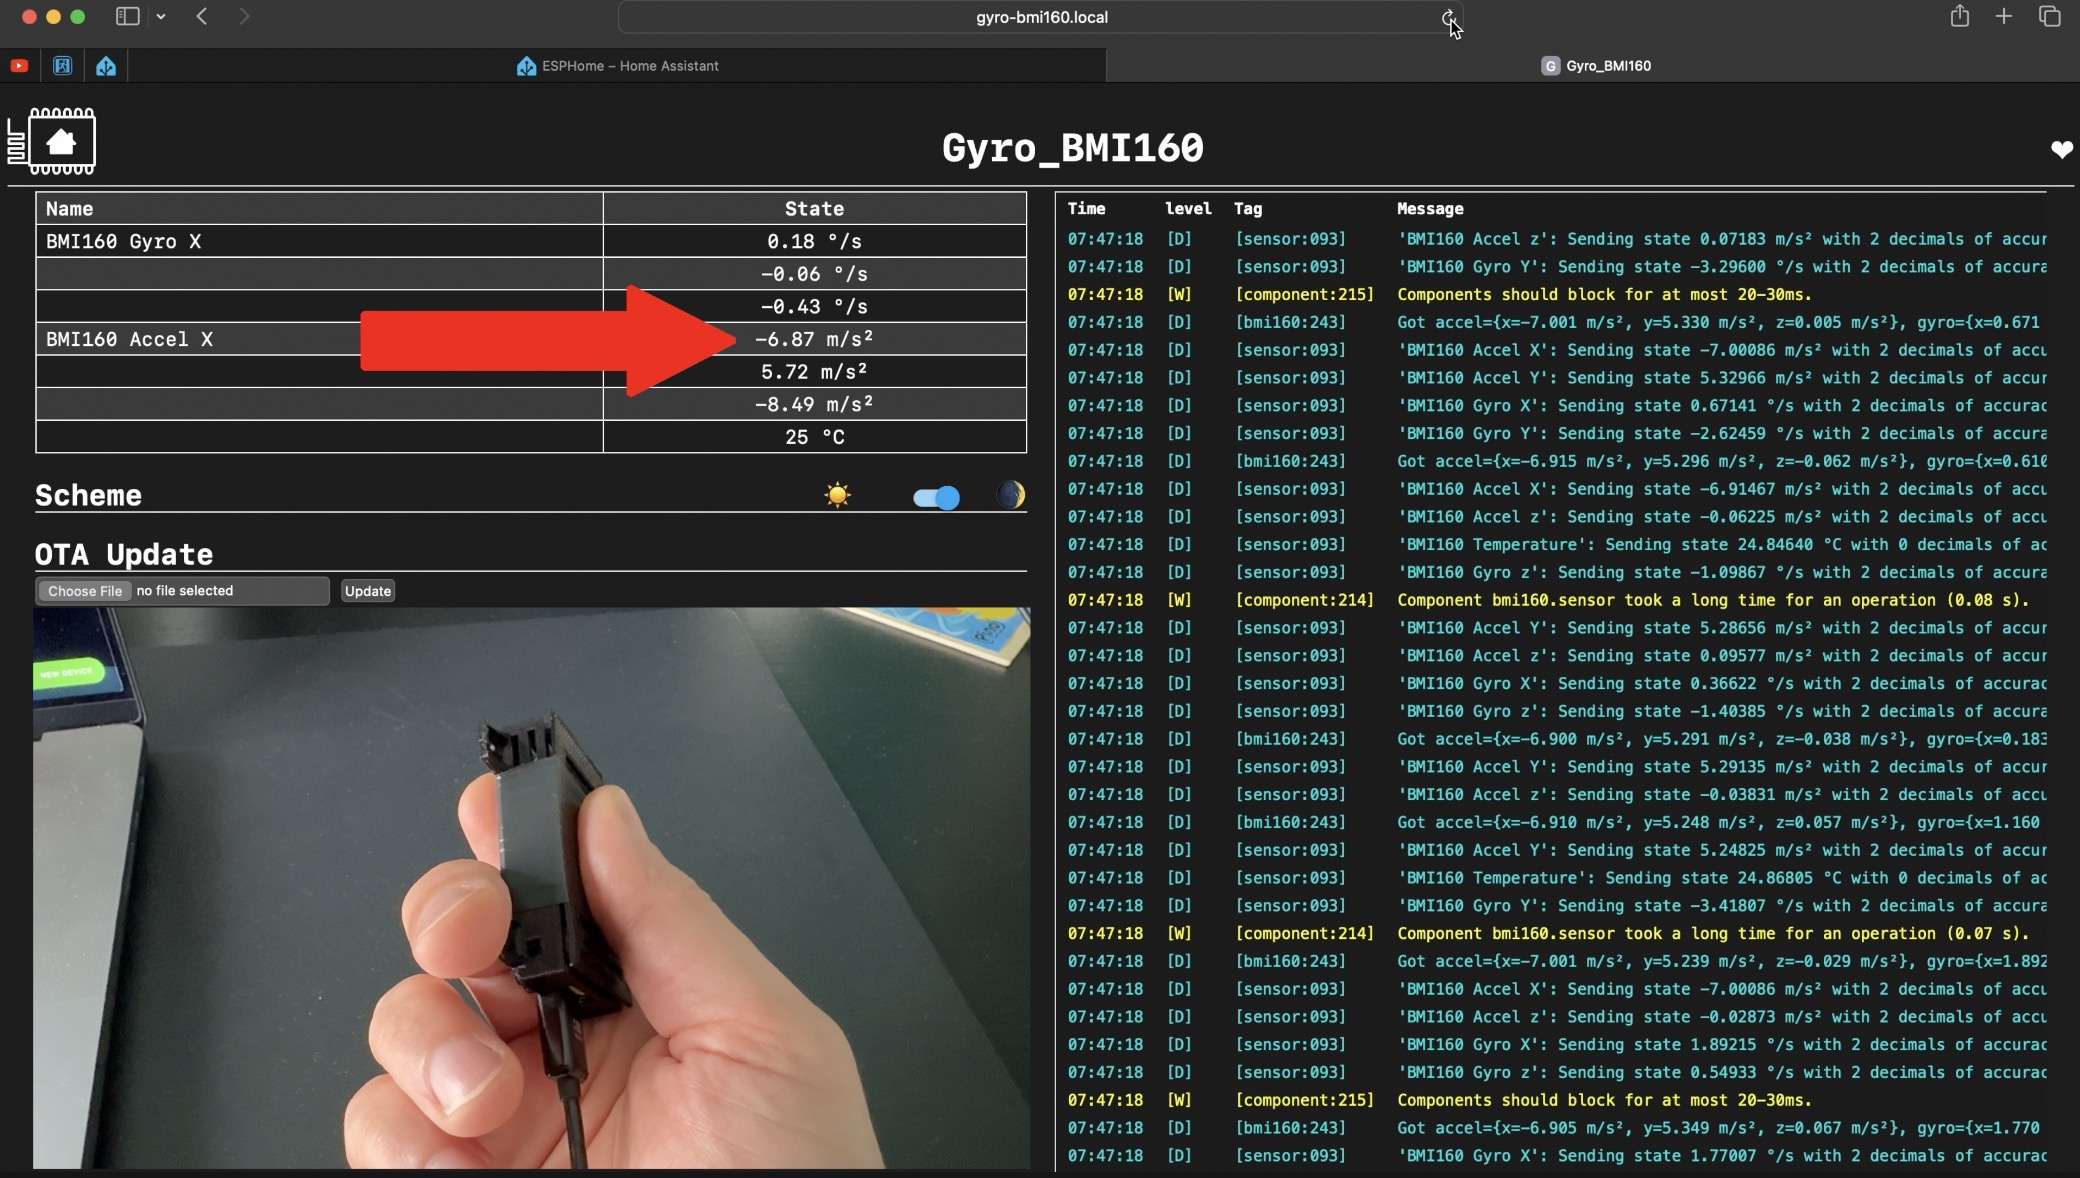
It is a promising sign of success, don’t you think?
Step 5: Adding a Case (Optional)
For a polished finish, consider 3D printing a case for your DIY sensor.
I’ve used this 3D model – https://www.thingiverse.com/thing:3698982
But feel free to explore other options – https://www.thingiverse.com/search?q=d1+mini&page=1
Smart Home Glossary
I just want to quickly admit that Smart home technology can be overwhelming, with all the different terms and acronyms out there. That’s why I’ve created a Smart Home Glossary to help you better understand the Smart Home terminology.
My glossary is absolutely free, it is coming as one big PDF file and you can instantly download it from my website – https://automatelike.pro/glossary
Step 6: Integrating with Home Assistant
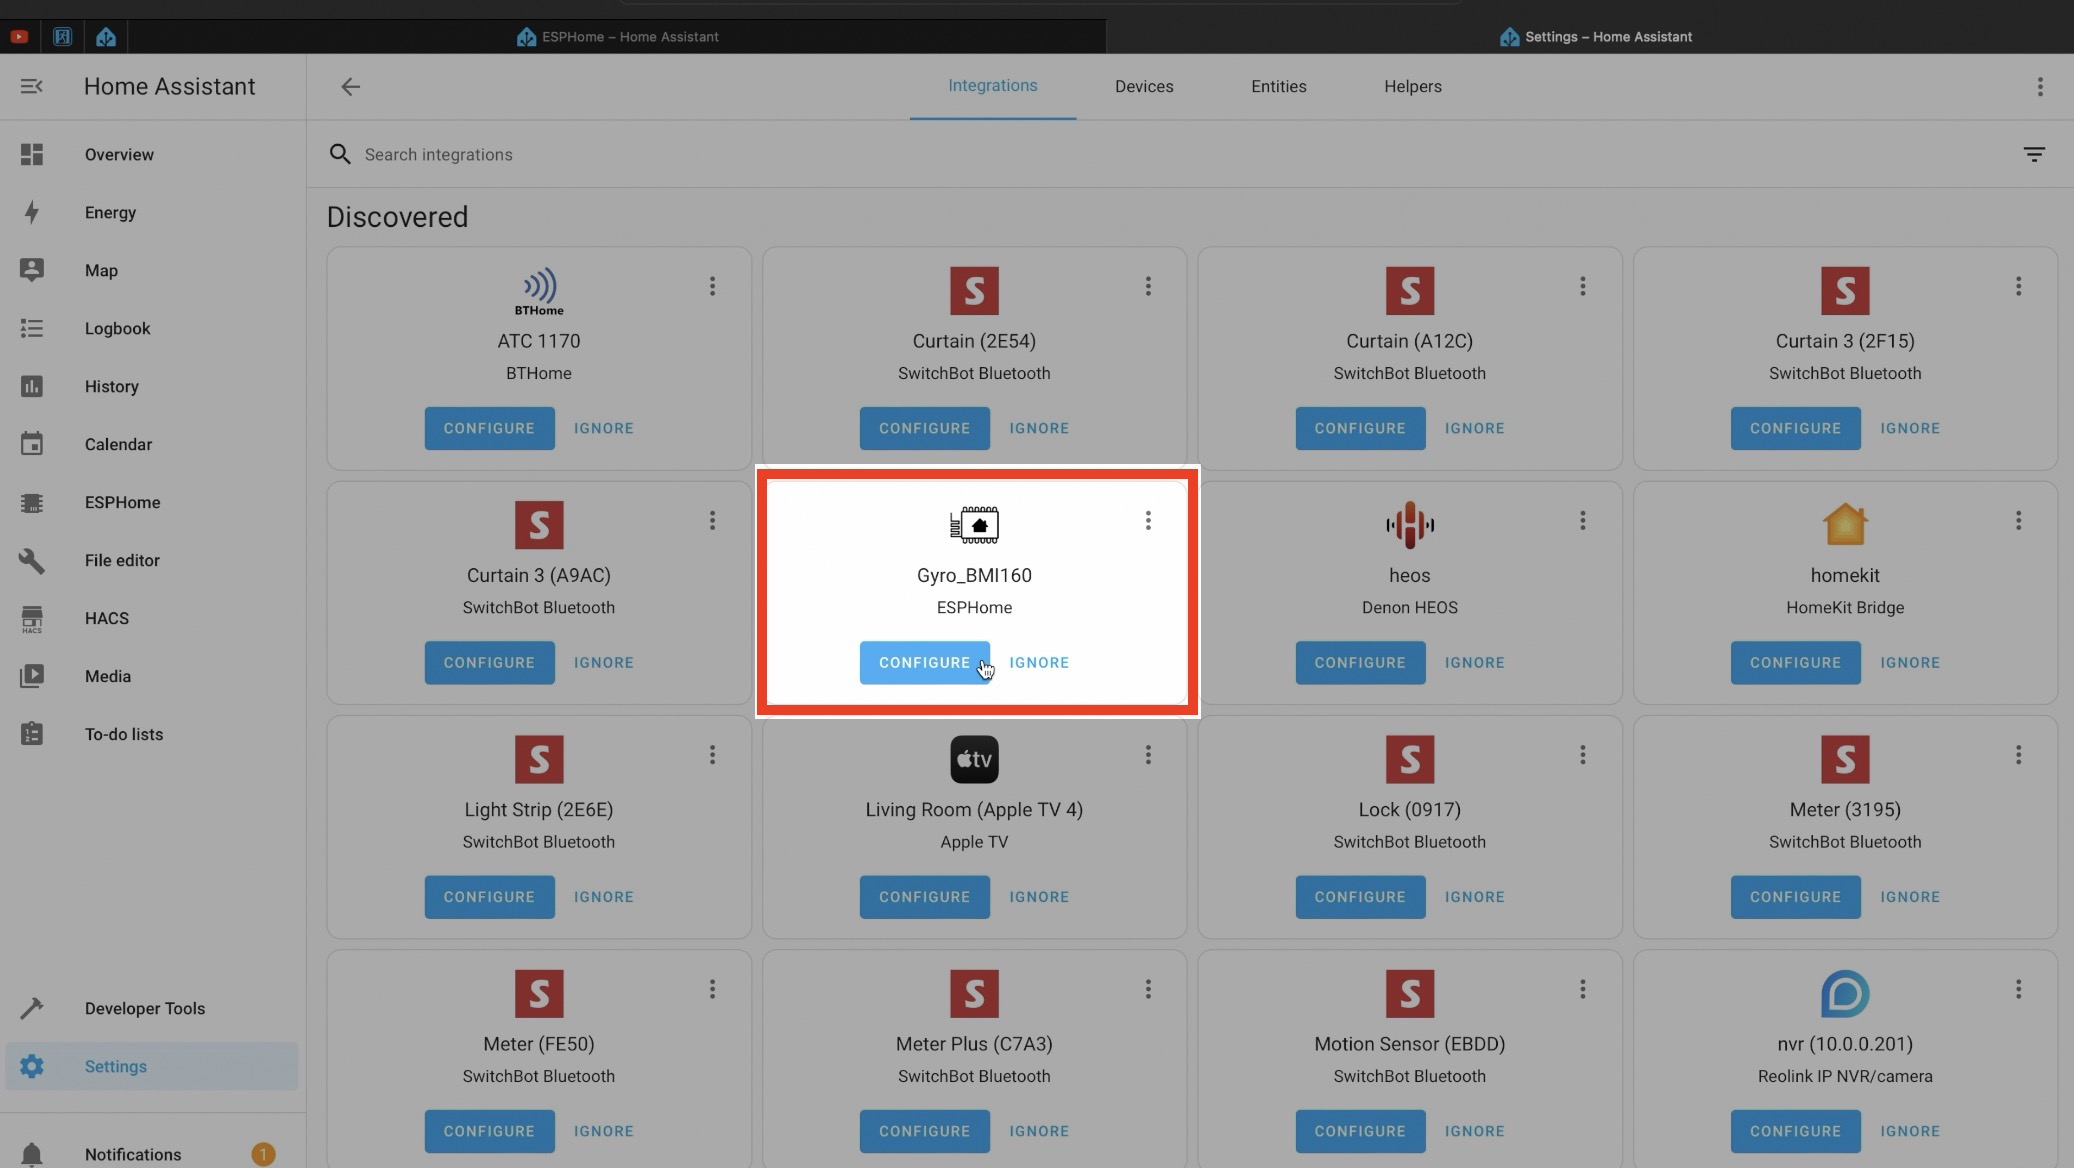
Now here comes the fun part – integrating our DIY sensor with Home Assistant! Just go to Integrations section of Home Assistant and you will find it auto discovered there. Then click on Configure button and pretty much that is it.
Step 7: Demo Automation
Using Home Assistant automations, you can unleash the full potential of our DIY gyroscope and accelerometer sensor. Recognize movement, rotation and gestures, etc.
In my demo automation, I’ve set up 4 triggers, which are triggered when you rotate the sensor in left, right, up & down directions. For every trigger different action is executed based on sensor movements. For example, if I rotate the sensor to the right it will turn on a Smart Bulb. If I turn it left it will turn it off.
You can find the complete YAML code of the automation here – https://gist.github.com/peyanski/bd553dc7fe9070a55ed1884489fe368b
Step 8: Expansion
To make our smart Inertial sensor for Home Assistant even better, it is possible a battery shield for the D1 mini to be added along with a compatible lithium battery.
- (Optional) Battery Shield for D1 Mini – https://s.click.aliexpress.com/e/_Dc9lfQt
This will make our Inertial sensor for Home Assistant battery powered and completely wireless, but that is entirely nice to have option and it is a topic for another article.
If you want to see such thing, let me know by type it in the comments and maybe I will make part two where I will add a battery to that sensor.
Conclusion
Congratulations, you’ve successfully created your own smart inertial sensor for Home Assistant on a budget! If you enjoyed this project, don’t forget to drop a comment with #GyroOwned to share your success with the community.
For more DIY smart home projects like this, be sure to check out my smart DIY sensors category.
Thanks for reading, and I’ll catch you in the next one!
Hello KIril Peyanski,
thanks for the idea and the video.
I have entered the D1 and the bmi160 into HA as you wrote.
However, I am not getting any values from the sensor and the following error message always appears;
Communication with BMI160 failed!
Component bmi160.sensor is marked FAILED
Can you help me?
Best regards
Daniel
This is the logging:
[14:21:40][C][i2c.arduino:071]: I2C Bus:
[14:21:40][C][i2c.arduino:072]: SDA Pin: GPIO4
[14:21:40][C][i2c.arduino:073]: SCL Pin: GPIO5
[14:21:40][C][i2c.arduino:074]: Frequency: 50000 Hz
[14:21:40][C][i2c.arduino:086]: Recovery: bus successfully recovered
[14:21:40][I][i2c.arduino:096]: Results from i2c bus scan:
[14:21:40][I][i2c.arduino:102]: Found i2c device at address 0x69
[14:21:40][C][bmi160:189]: BMI160:
[14:21:40][C][bmi160:190]: Address: 0x69
[14:21:40][E][bmi160:192]: Communication with BMI160 failed!
[14:21:40][C][bmi160:194]: Update Interval: 0.000s
[14:21:40][C][bmi160:195]: Acceleration X ‘BMI160 steffi Accel X’
[14:21:40][C][bmi160:195]: State Class: ‘measurement’
[14:21:40][C][bmi160:195]: Unit of Measurement: ‘m/s²’
[14:21:40][C][bmi160:195]: Accuracy Decimals: 2
[14:21:40][C][bmi160:195]: Icon: ‘mdi:axis-x-arrow’
[14:21:40][C][bmi160:196]: Acceleration Y ‘BMI160 steffi Accel Y’
[14:21:40][C][bmi160:196]: State Class: ‘measurement’
[14:21:40][C][bmi160:196]: Unit of Measurement: ‘m/s²’
[14:21:40][C][bmi160:196]: Accuracy Decimals: 2
[14:21:40][C][bmi160:196]: Icon: ‘mdi:axis-y-arrow’
[14:21:40][C][bmi160:197]: Acceleration Z ‘BMI160 steffi Accel z’
[14:21:40][C][bmi160:197]: State Class: ‘measurement’
[14:21:40][C][bmi160:197]: Unit of Measurement: ‘m/s²’
[14:21:40][C][bmi160:197]: Accuracy Decimals: 2
[14:21:40][C][bmi160:197]: Icon: ‘mdi:axis-z-arrow’
[14:21:40][C][bmi160:198]: Gyro X ‘BMI160 steffi Gyro X’
[14:21:40][C][bmi160:198]: State Class: ‘measurement’
[14:21:40][C][bmi160:198]: Unit of Measurement: ‘°/s’
[14:21:40][C][bmi160:198]: Accuracy Decimals: 2
[14:21:40][C][bmi160:198]: Icon: ‘mdi:axis-x-rotate-clockwise’
[14:21:40][C][bmi160:199]: Gyro Y ‘BMI160 steffi Gyro Y’
[14:21:40][C][bmi160:199]: State Class: ‘measurement’
[14:21:40][C][bmi160:199]: Unit of Measurement: ‘°/s’
[14:21:40][C][bmi160:199]: Accuracy Decimals: 2
[14:21:40][C][bmi160:199]: Icon: ‘mdi:axis-y-rotate-clockwise’
[14:21:40][C][bmi160:200]: Gyro Z ‘BMI160 steffi Gyro z’
[14:21:40][C][bmi160:200]: State Class: ‘measurement’
[14:21:40][C][bmi160:200]: Unit of Measurement: ‘°/s’
[14:21:40][C][bmi160:200]: Accuracy Decimals: 2
[14:21:40][C][bmi160:200]: Icon: ‘mdi:axis-z-rotate-clockwise’
[14:21:40][C][bmi160:201]: Temperature ‘BMI160 steffi Temperature’
[14:21:40][C][bmi160:201]: Device Class: ‘temperature’
[14:21:40][C][bmi160:201]: State Class: ‘measurement’
[14:21:41][C][bmi160:201]: Unit of Measurement: ‘°C’
[14:21:41][C][bmi160:201]: Accuracy Decimals: 0
[14:21:41][E][component:082]: Component bmi160.sensor is marked FAILED
And this ist the yaml Code:
esphome:
name: esphome-web-770b28
friendly_name: ESP32_D1Mini_Gyroscope_V2
min_version: 2024.11.0
esp8266:
board: esp01_1m
# Enable logging
logger:
# Enable Home Assistant API
api:
# Allow Over-The-Air updates
ota:
– platform: esphome
wifi:
ssid: XXXXXXXX
password: XXXXXXXXXXXXXXXXXXXXX
captive_portal:
i2c:
sda: 4
scl: 5
scan: True
web_server:
port: 80
sensor:
– platform: bmi160
address: 0x69
update_interval: 0ms
acceleration_x:
name: “BMI160 steffi Accel X”
acceleration_y:
name: “BMI160 steffi Accel Y”
acceleration_z:
name: “BMI160 steffi Accel z”
gyroscope_x:
name: “BMI160 steffi Gyro X”
gyroscope_y:
name: “BMI160 steffi Gyro Y”
gyroscope_z:
name: “BMI160 steffi Gyro z”
temperature:
name: “BMI160 steffi Temperature”