
If you’re like me, too lazy to get up and press the power button on your computer or another device, I have a solution for you. Or perhaps you want to save time and energy while controlling your devices remotely? Well, keep reading because I’m going to show you how to wake up devices from your Home Assistant dashboard with just the press of a virtual button or automatically— no more getting up, just laziness to its full potential (some say this is automation)
We’ll be using a feature called Wake On LAN (WOL), which allows you to send a “magic packet” over your local network to wake up a device that’s in sleep mode or even completely turned off (but still connected to power). The best part? Most of the devices you already have — computers, servers, and network-attached storage (NAS) — likely support this Wake On LAN functionality.
Table of Contents
What Is Wake On LAN?
Wake On LAN (WOL) is a network protocol that enables you to turn on devices remotely by sending a special network message called a “magic packet.” The packet contains the MAC address of the device you want to wake. When the device’s network adapter receives the packet, it tells the device to power on.
The good news is that most modern devices, even ones produced within the last 10-15 years, support WOL. This makes it easy to integrate into home automation systems like Home Assistant.
If You Want a Video instead
Tired of reading? No problem, check my video below:
Why Use Wake On LAN?
WOL is particularly useful for several reasons:
- Energy Efficiency: You can keep your devices powered off or in sleep mode when not in use, saving energy.
- Convenience: No need to get up to turn on a device manually. Control everything from your Home Assistant dashboard.
- Automation: You can integrate WOL into larger home automation routines, for instance, waking up your computer when you enter your office or when a specific device joins your network.
Want a Deeper Dive? Download My Free PDF
Before we dive in, I want to let you know that I’ve created a detailed PDF guide with step-by-step instructions and interactive exercises to help you master WOL. You can download it for free by following the link below. You’ll also join my mailing list, where I send weekly articles, updates, and exclusive offers. Don’t worry, you can unsubscribe anytime with a single click.
Now, let’s get back to business — waking up your devices remotely with Home Assistant.
Step 1: Ensure Your Device Supports Wake On LAN
Before you can set up WOL, you need to confirm that your device supports this feature. Although most devices built in the last decade have this functionality, it’s always good to double-check.
Here are some ways to verify WOL support:
- Contact the manufacturer’s support team and ask if your device supports WOL.
- Check the device’s manual (or the manual of the motherboard or network card if it’s a custom-built PC).
- Search online using your device’s make and model.
- Visit the BIOS/UEFI settings to see if there’s an option for WOL (more on that in a moment).
Step 2: Enable Wake On LAN
Even if your device supports WOL, it may be disabled by default. To use it, you need to enable WOL in two places — your BIOS (or UEFI) and eventually your operating system.
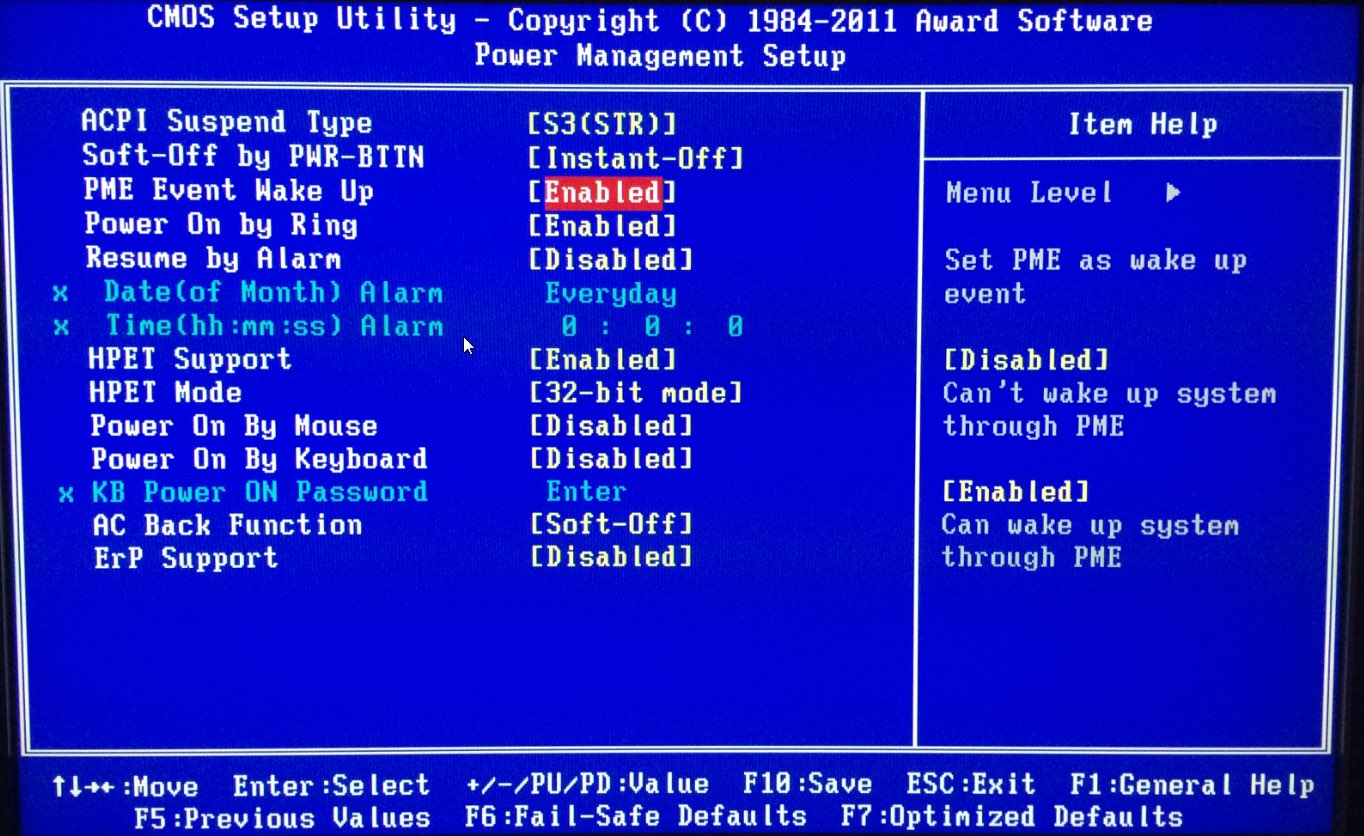
Enabling WOL in BIOS/UEFI
Here’s how you can enable WOL in your device’s BIOS:
- Enter the BIOS/UEFI: Restart your device and press the BIOS key (usually Del, F12, or F1) when the system starts booting.
- Locate the WOL setting: You’ll need to search through menus like Power Management, Advanced Settings, or something similar. Unfortunately, every motherboard manufacturer places this setting differently, so you may need to explore a bit.
- Enable Wake On LAN: Once you find the setting, enable it and save the changes before exiting the BIOS/UEFI.
Step 3: Find Your Device’s MAC Address
Now that you’ve confirmed and enabled WOL, the next step is to find your device’s MAC address (Physical address), a unique identifier assigned to its network interface card.
You can get the MAC address in several ways:
- Your Router: log into your Router web interface find the connected device that you want to wake up click on it and check its properties, search for MAC address.
- Windows: Open the Command Prompt and type
ipconfig /all. Look for the Physical Address under your network adapter. - Linux: Open a terminal and type
ifconfig. The MAC address will be listed under HWaddr. - macOS: Go to System Preferences > Network, select your connection, click Advanced, and find the MAC address under the Hardware tab.
Step 4: Set Up Wake On LAN in Home Assistant
Now that you’ve done the hard work — checking for WOL support, enabling it, and finding your MAC address — it’s time for the fun part: setting everything up in Home Assistant. Fortunately, this is the easiest part of the process.
Here’s a step-by-step guide to adding a WOL button to your Home Assistant dashboard:
- Open Home Assistant: Ensure your Home Assistant instance is up and running.
- Access Integrations: Press the C button on your keyboard to open the search bar, and type “Integrations.”. Then select “Navigate: Integrations”. Or go to Settings > Devices & Services.
- Add the Wake On LAN integration: Select + Add Integration and search for “Wake On LAN.” Select it.
- Input the MAC address: Enter the MAC address of the device you want to wake up. Home Assistant will also ask for the broadcast address (usually the default is 255.255.255.255) and the Broadcast port (typically 9 for WOL).
- Finish setup: Once you’ve entered the details, click Submit and you’re ready to go. You can assign the WOL button to an area or leave it as is.
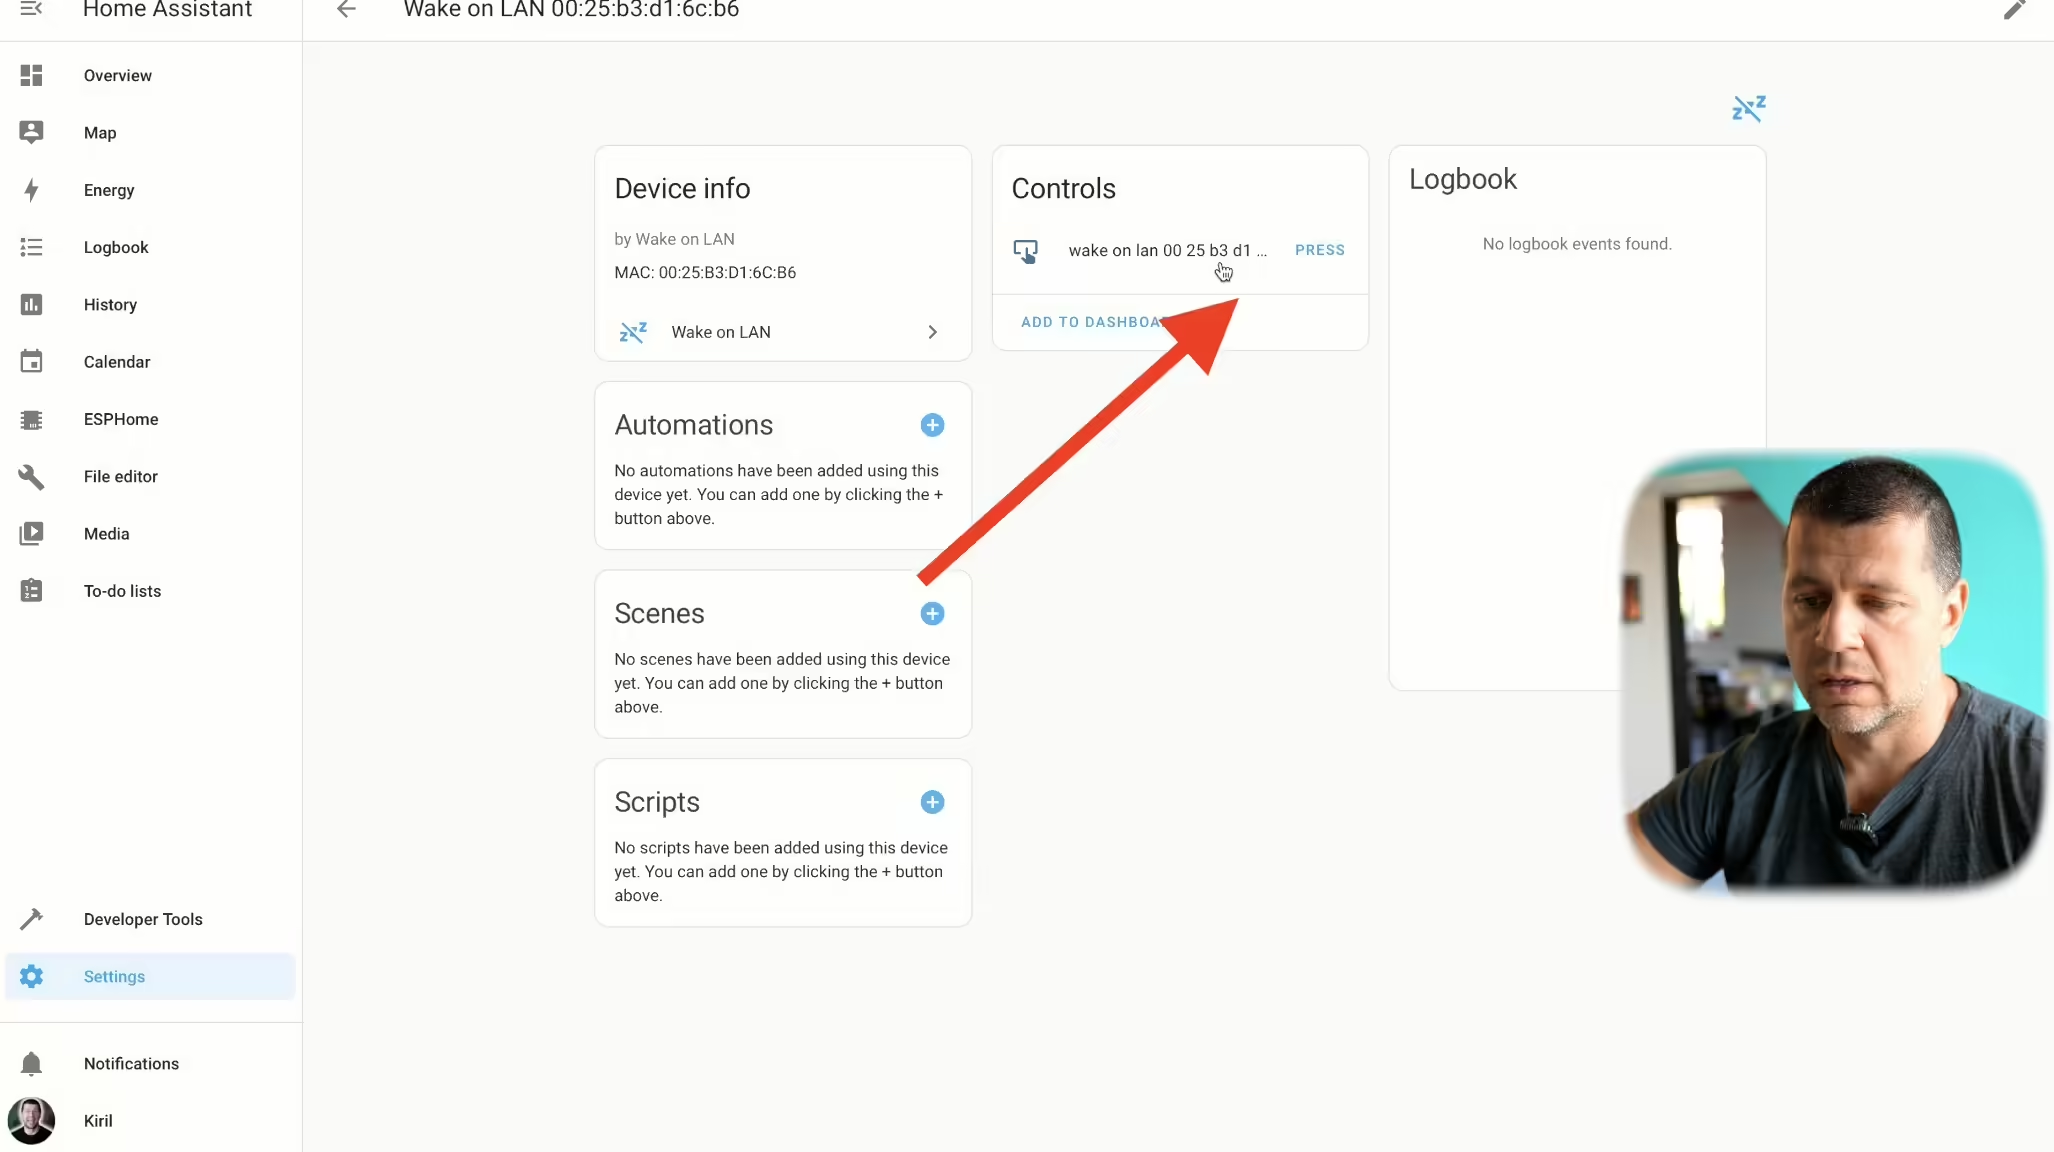
Once set up, you’ll see a new Wake On Lan integration in your Home Assistant. Click on it and you will see more info and a button. Press it, and your device will wake up!
Step 5: Test Your WOL Button
Now comes the moment of truth — testing the WOL button you’ve added to your Home Assistant dashboard.
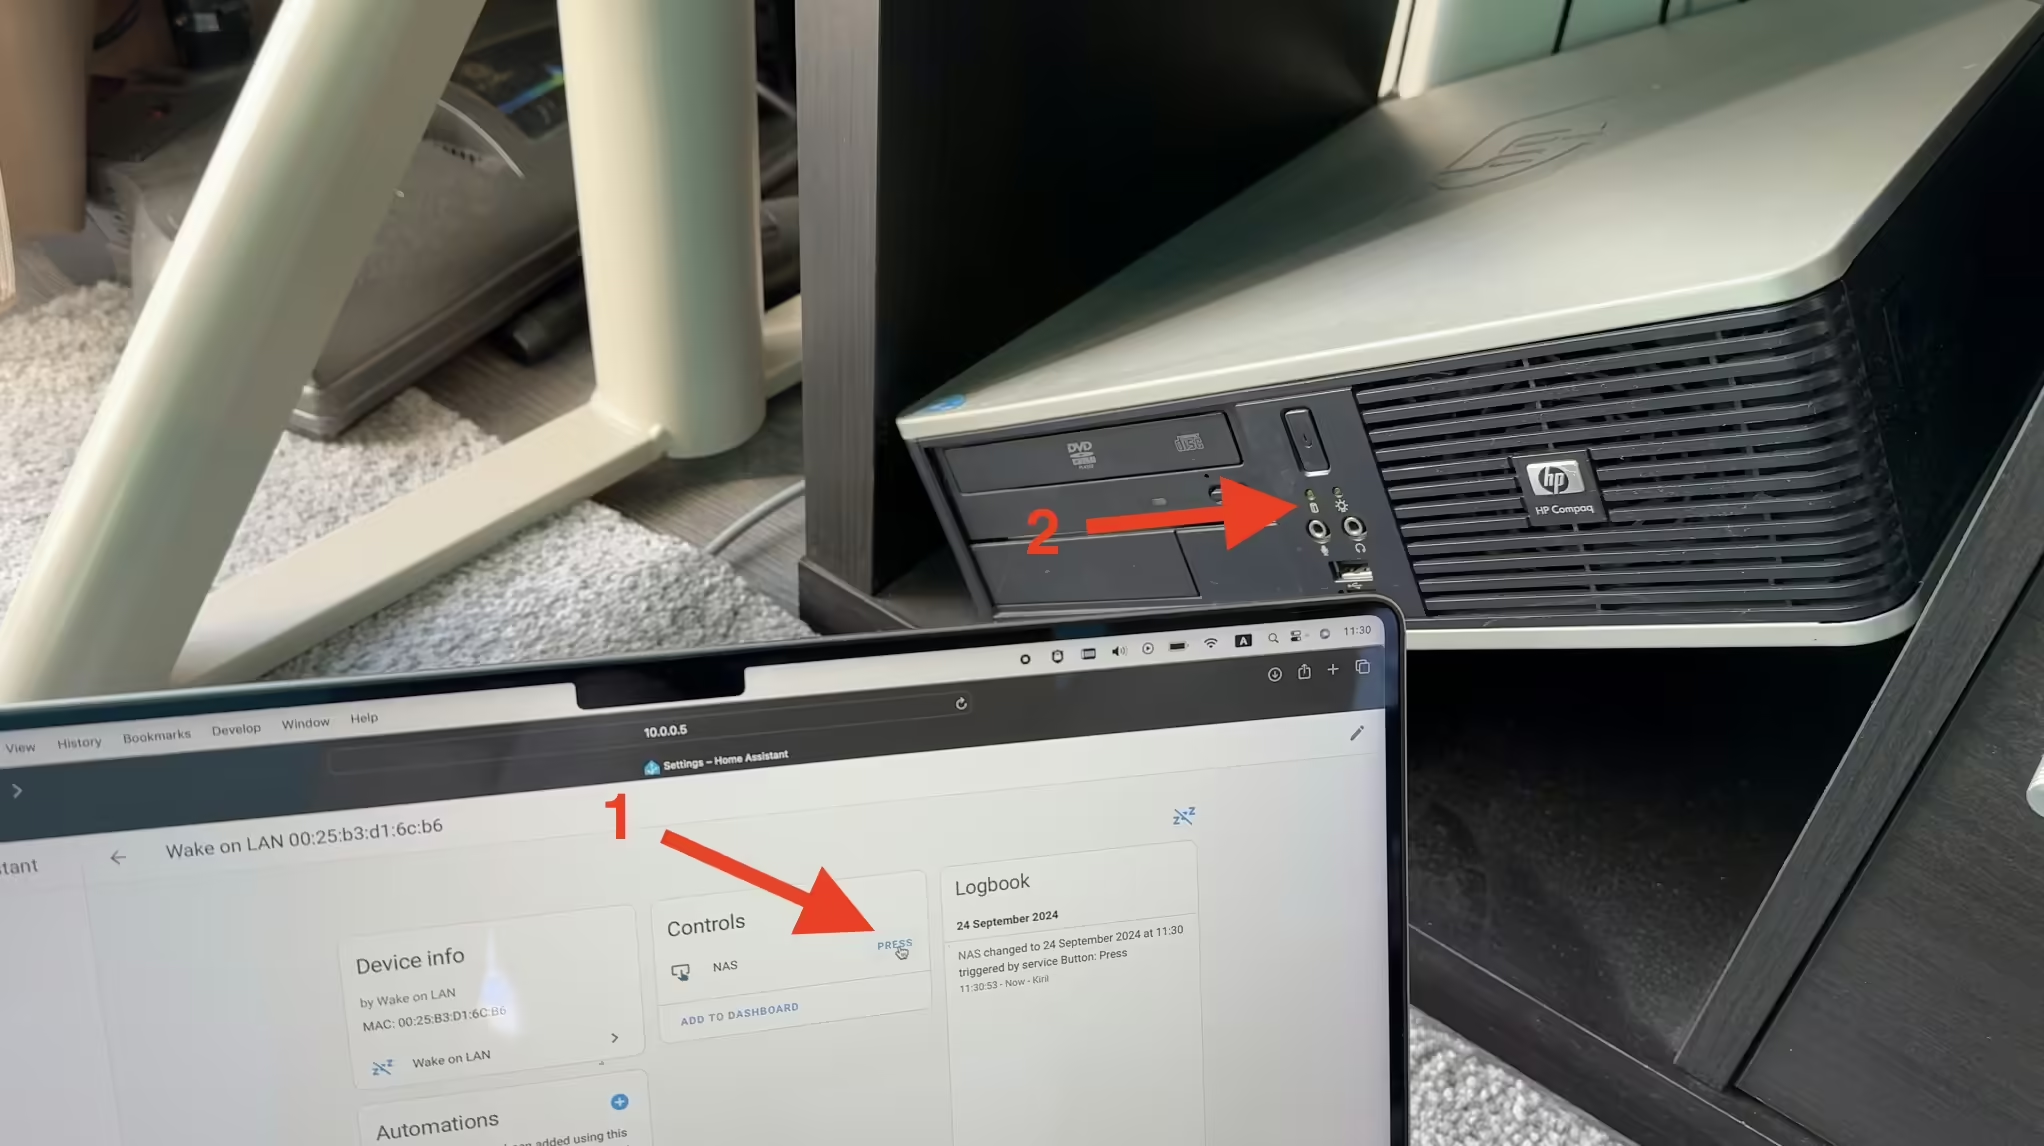
Here’s how I tested it with my Network Attached Storage (NAS) device:
- First, I made sure my NAS was turned off.
- Then, I pressed the WOL button in Home Assistant, and within seconds, the NAS powered on!
You can add more devices by repeating the same process, assigning each device its own MAC address, and adding them to your dashboard for easy access.
Bonus: Control Shutdown for Windows Devices
If you’re working with a Windows PC, you may want to not only wake it up but also shut it down remotely. Luckily, I’ve made an article showing how to set up remote shutdown for Windows devices using Home Assistant. Check it out if you’re interested in that functionality!
Home Assistant Wake On Lan & Home Assistant RPC Shutdown (HOW-TO)
Conclusion: Waking Up Devices Has Never Been Easier
Wake On LAN is a powerful feature that can greatly enhance the convenience of controlling your devices. Whether you want to save energy or simply avoid getting up to power on your computer, WOL makes it easy to wake up your devices remotely.
By integrating this functionality into Home Assistant, you get even more power and flexibility, as you can wake devices with a tap of a button or as part of larger home automation routines.
Did you manage to set up Wake On LAN for your devices? Let me know in the comments below. A simple “yes” or “no” works fine — I’ll know what you’re talking about!
Thank you for waking up some devices with me, see you in the next one!