
I will show you how to create Home Assistant Wake on Lan (WoL) switch to turn on your desktop computer. As well as how to use Home Assistant RPC shutdown add-on to turn off a Windows PC with a click of button.
Using Home Assistant you can control many things and probably you already doing this, but after you read this you will add your computer to the list. Let start this!
Table of Contents
What is Wake on LAN (WoL)?
Wake on Lan is a standard that allows a computer to be awakened by a network message called magic packet. To use the Wake On LAN, your computer should support this feature and it have to be always connected to your network. You can use Wake on LAN regardless of the installed Operating System as this feature is usually controlled by the motherboard of your device.
After you finish reading this you will be able to create a Home Assistant Wake on LAN Switch, Script or Automation that will awaken any device that supports WoL.
What is RPC Shutdown?
On the opposite side to turn off a Windows PC from Home Assistant you will need the Home Assistant RPC Shutdown add-on. The RPC Shutdown add on is available in the Add-On store in Home Assistant and you can install it with 1 click.
If you don’t have Home Assistant yet, or your Home Assistant is without the Supervisor menu (Add-on store) check these two tutorials of mine and you will have everything that is needed in no time:
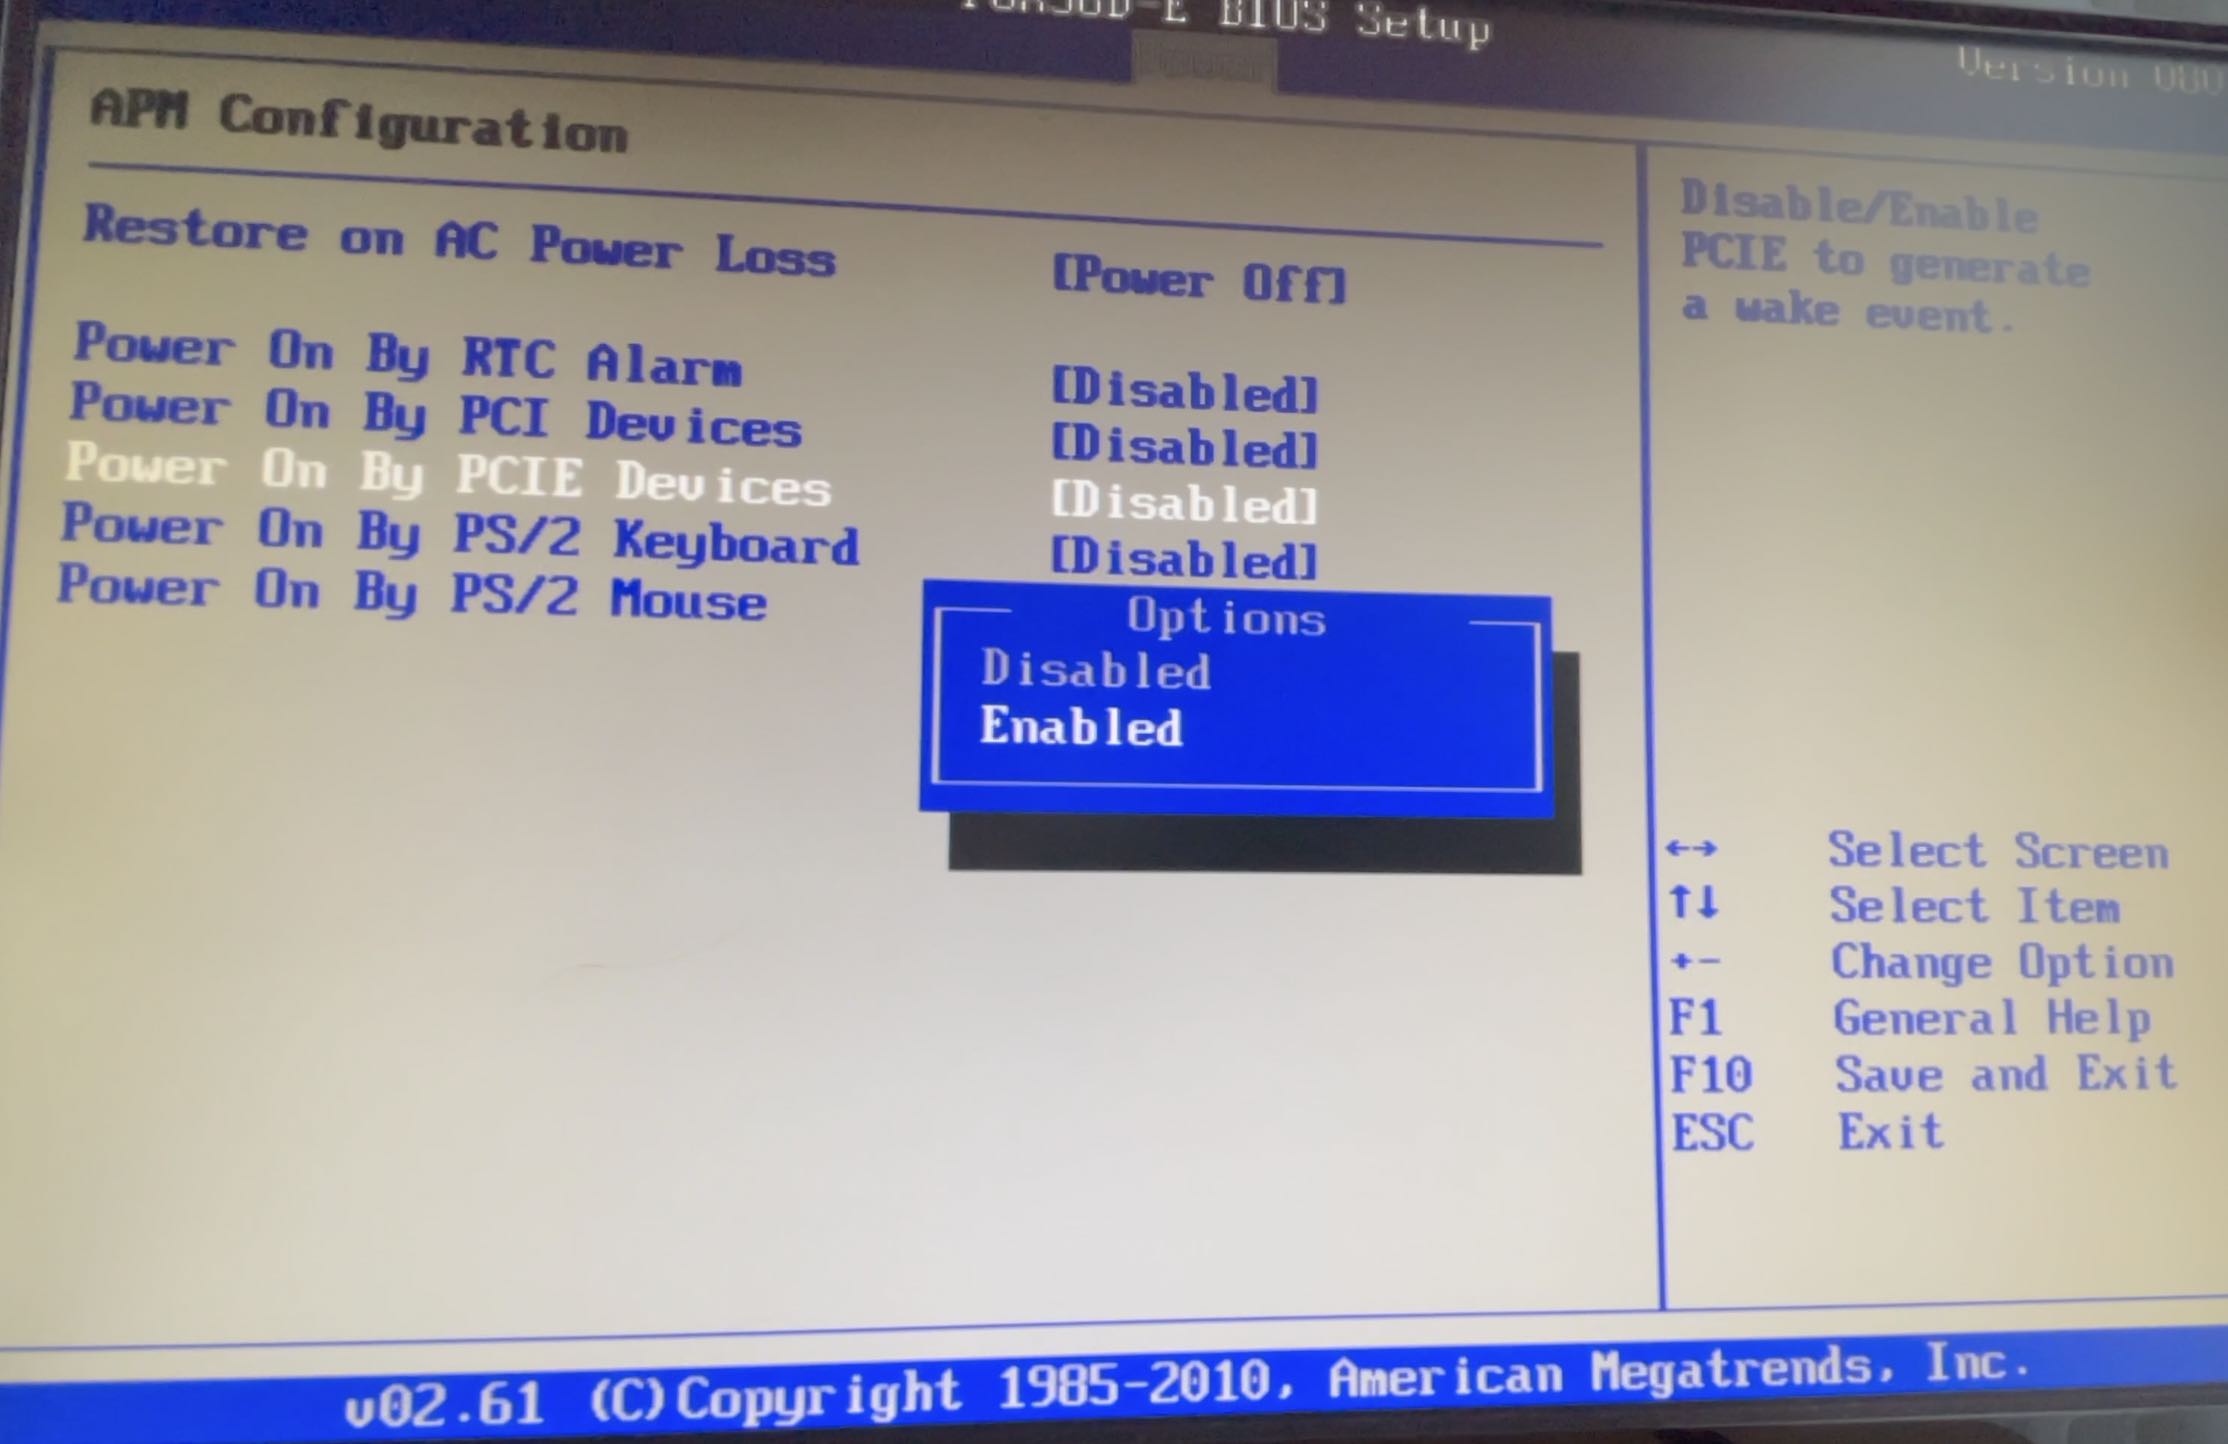
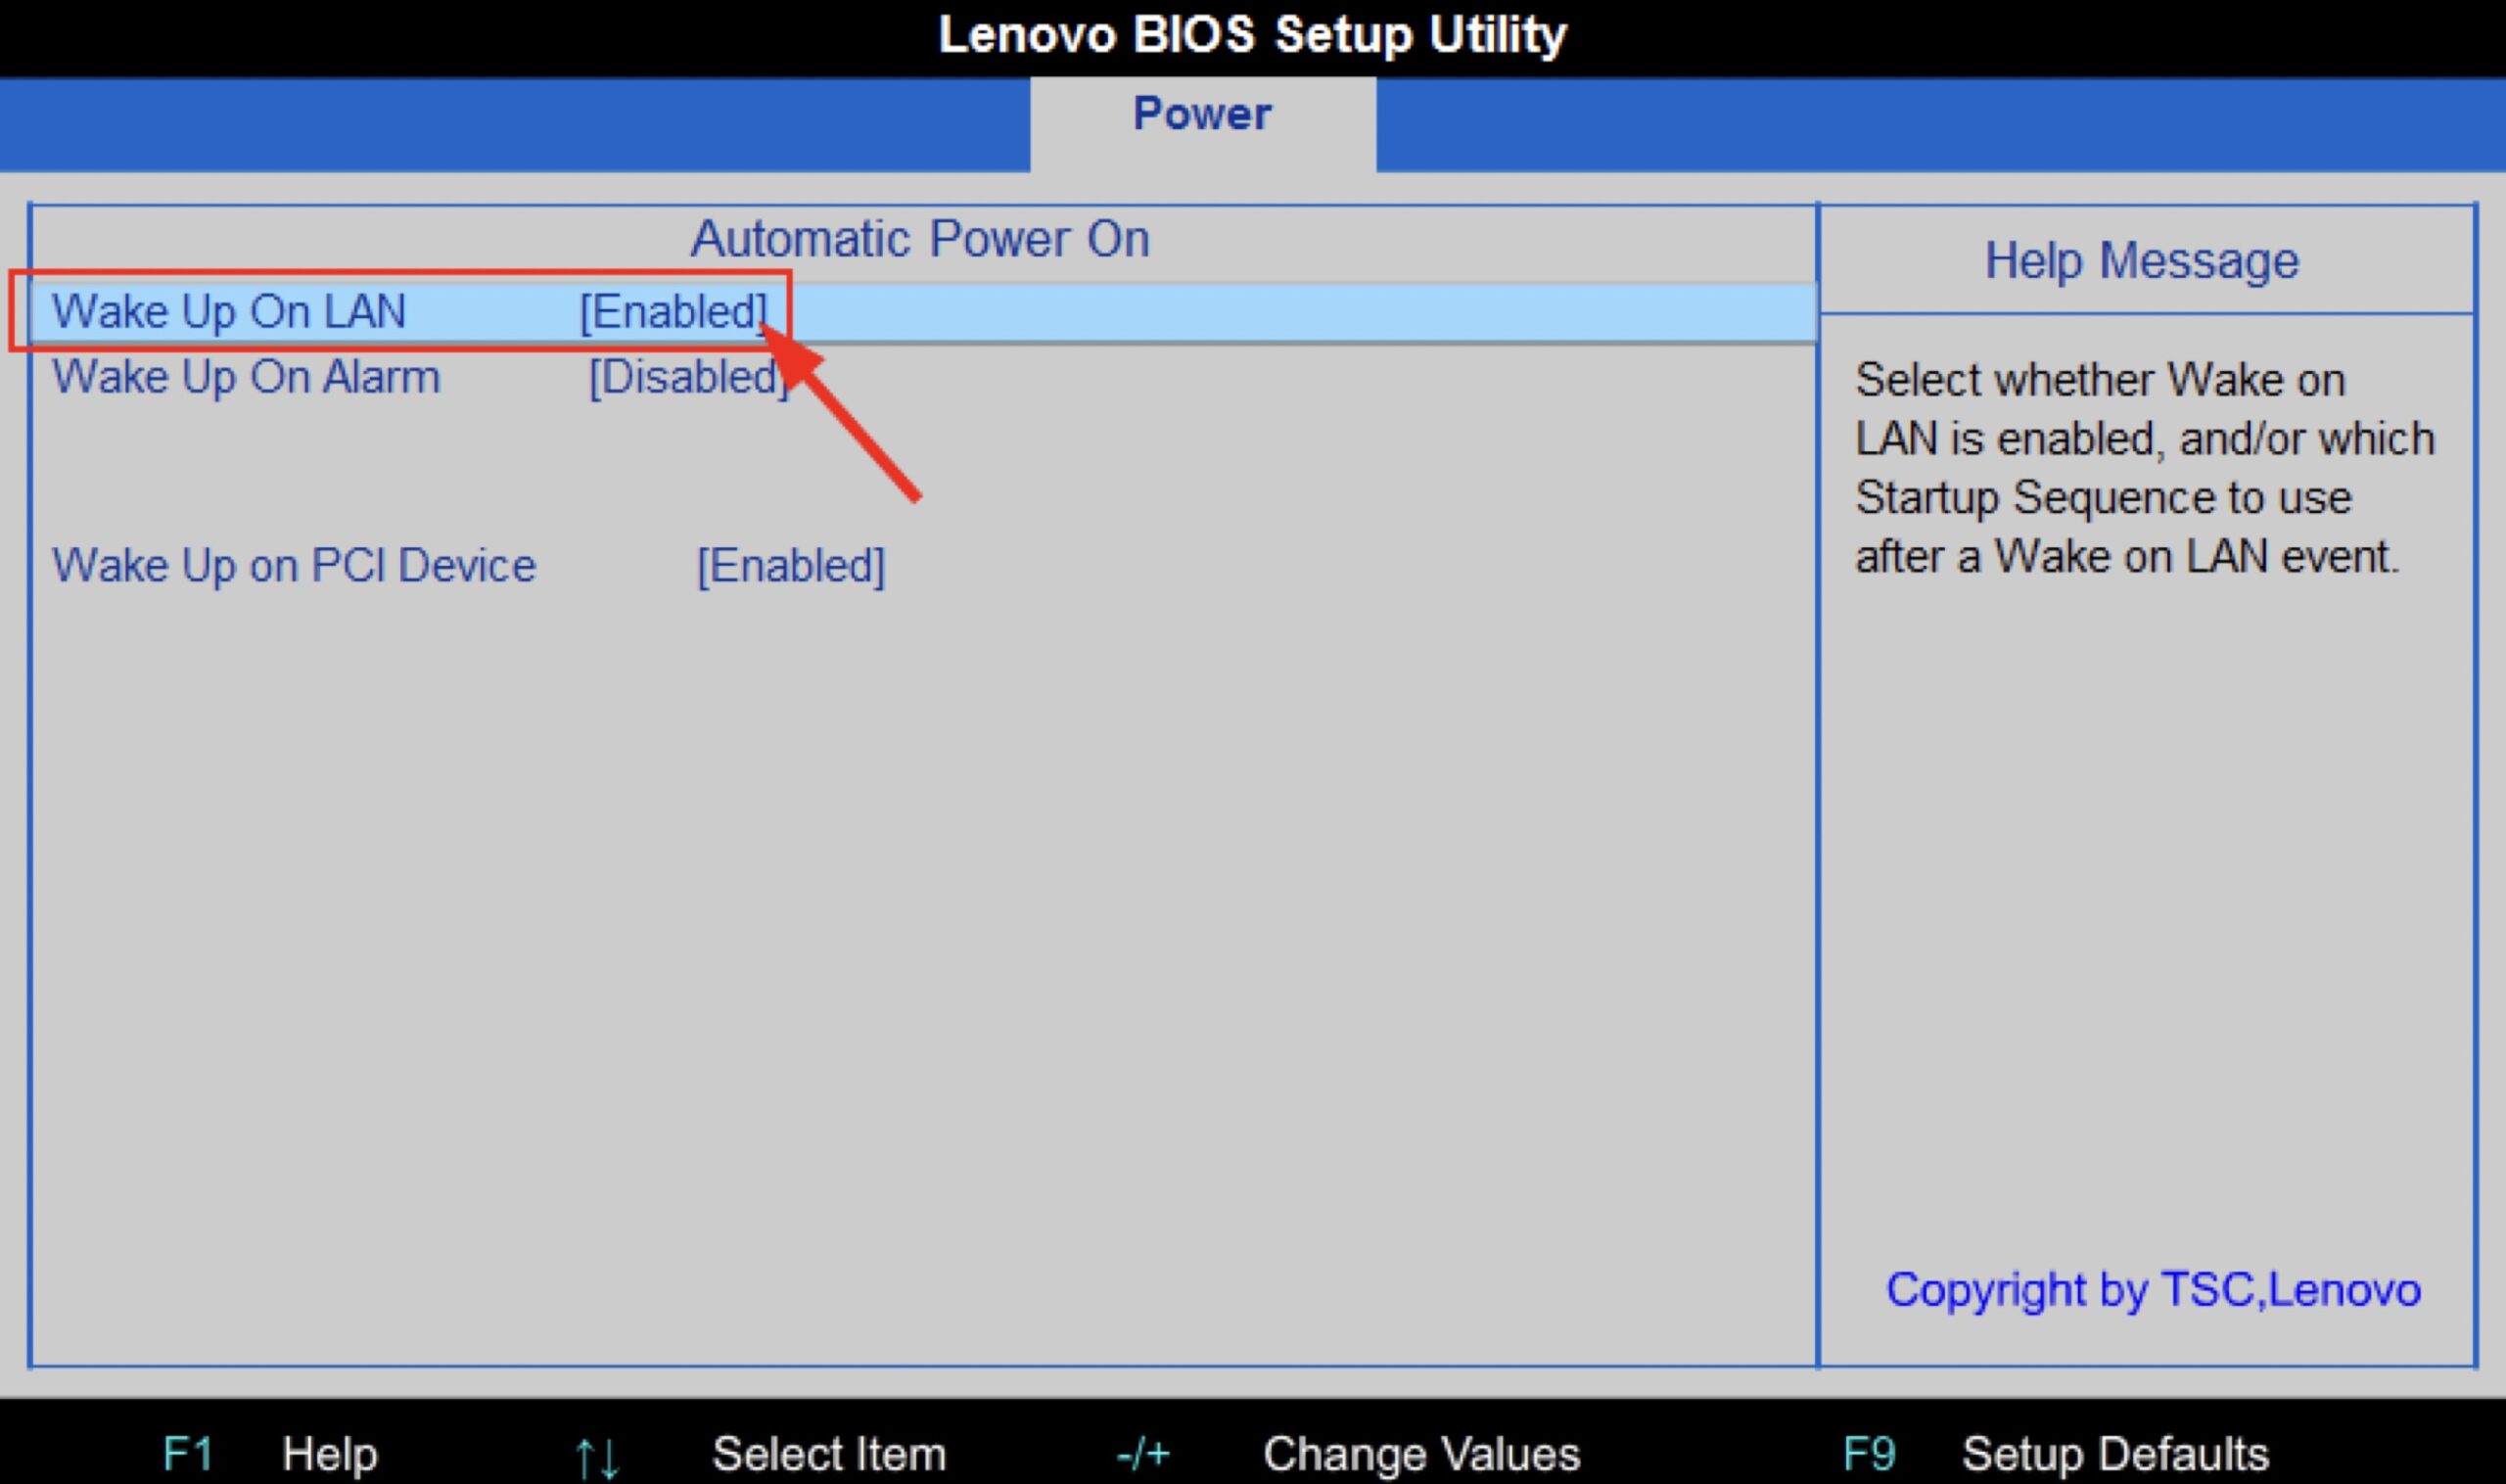
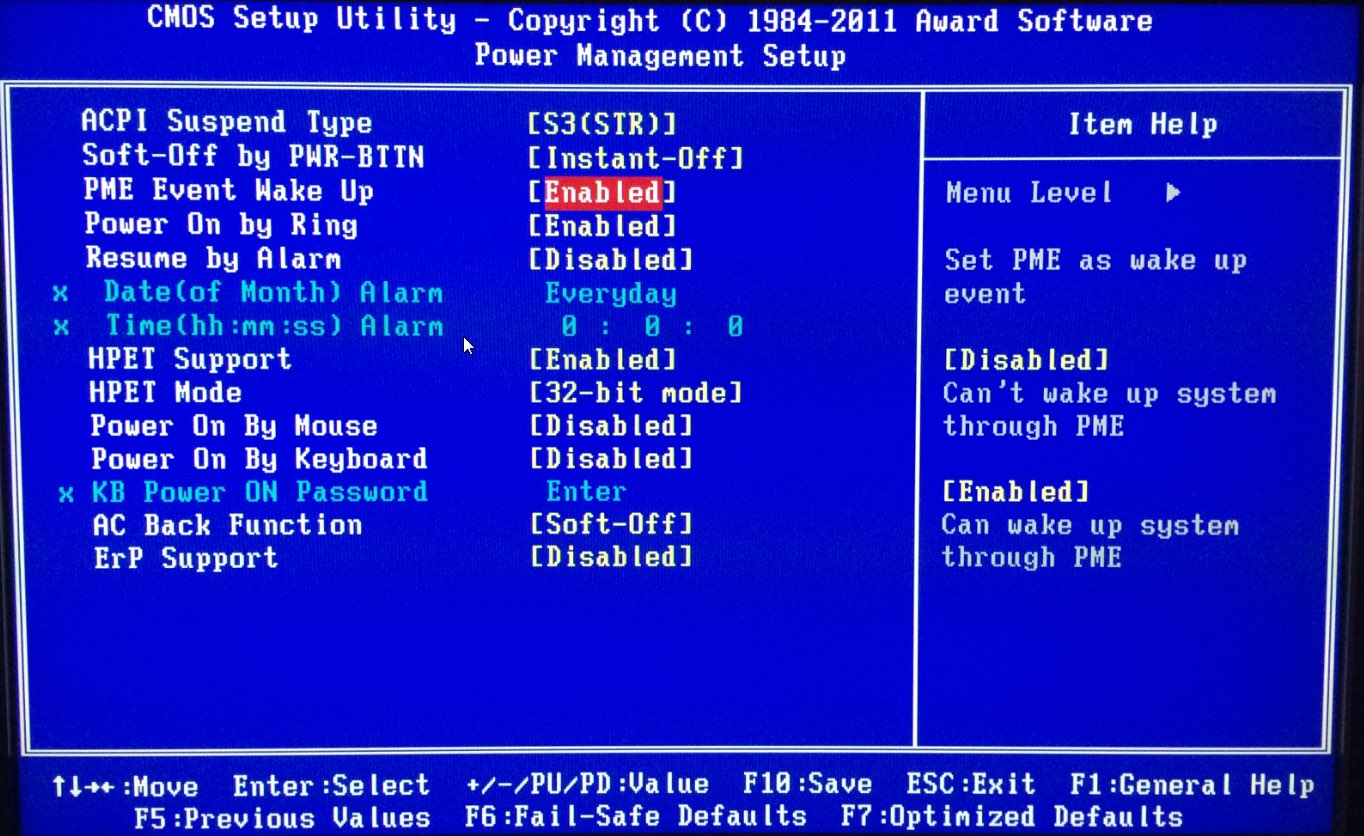
How to Enable Wake On Lan in BIOS?
First of all you have to check that the device that you want to turn on remotely support the Wake On Lan functionality. Check your motherboard manual or enter in the BIOS (usually by hitting the Del, button or a specific functions keys during the startup of your system).
Every motherboard vendor is having different place and even different wording for the Wake On Lan feature, so you’ll have to search for it a bit in the BIOS menus or in the manuals.
Enable Wake on Magic Packet in Windows 10
Sometimes it is necessary to enable wake on magic packet option on your network adapter in Windows and this is how I did it in Windows 10.
Right click on the Start menu > Device Manager > Network Adapters > right click on your network adapter and select Properties > Advanced > Wake on magic packet > Enabled.

Home Assistant Wake on LAN
It is time to add and configure the Home Assistant Wake on Lan integration.
Add the following text in configuration.yaml file and you will have the Wake on LAN platform enabled in your Home Assistant.
# configuration.yaml entry
wake_on_lan:
You will need to restart your Home Assistant before start using the Wake on LAN integration, but don’t do that yet. We will add the Home Assistant Wake On LAN switch in the next section and we will restart afterwards.
Add Home Assistant Wake on LAN switch
Only adding the things described in the above section in Home Assistant configuration is not enough. You may want to have a switch, script or automation in Home Assistant that will wake a specific PC or multiple PCs. This is what you can do for a Home Assistant Wake on LAN switch:
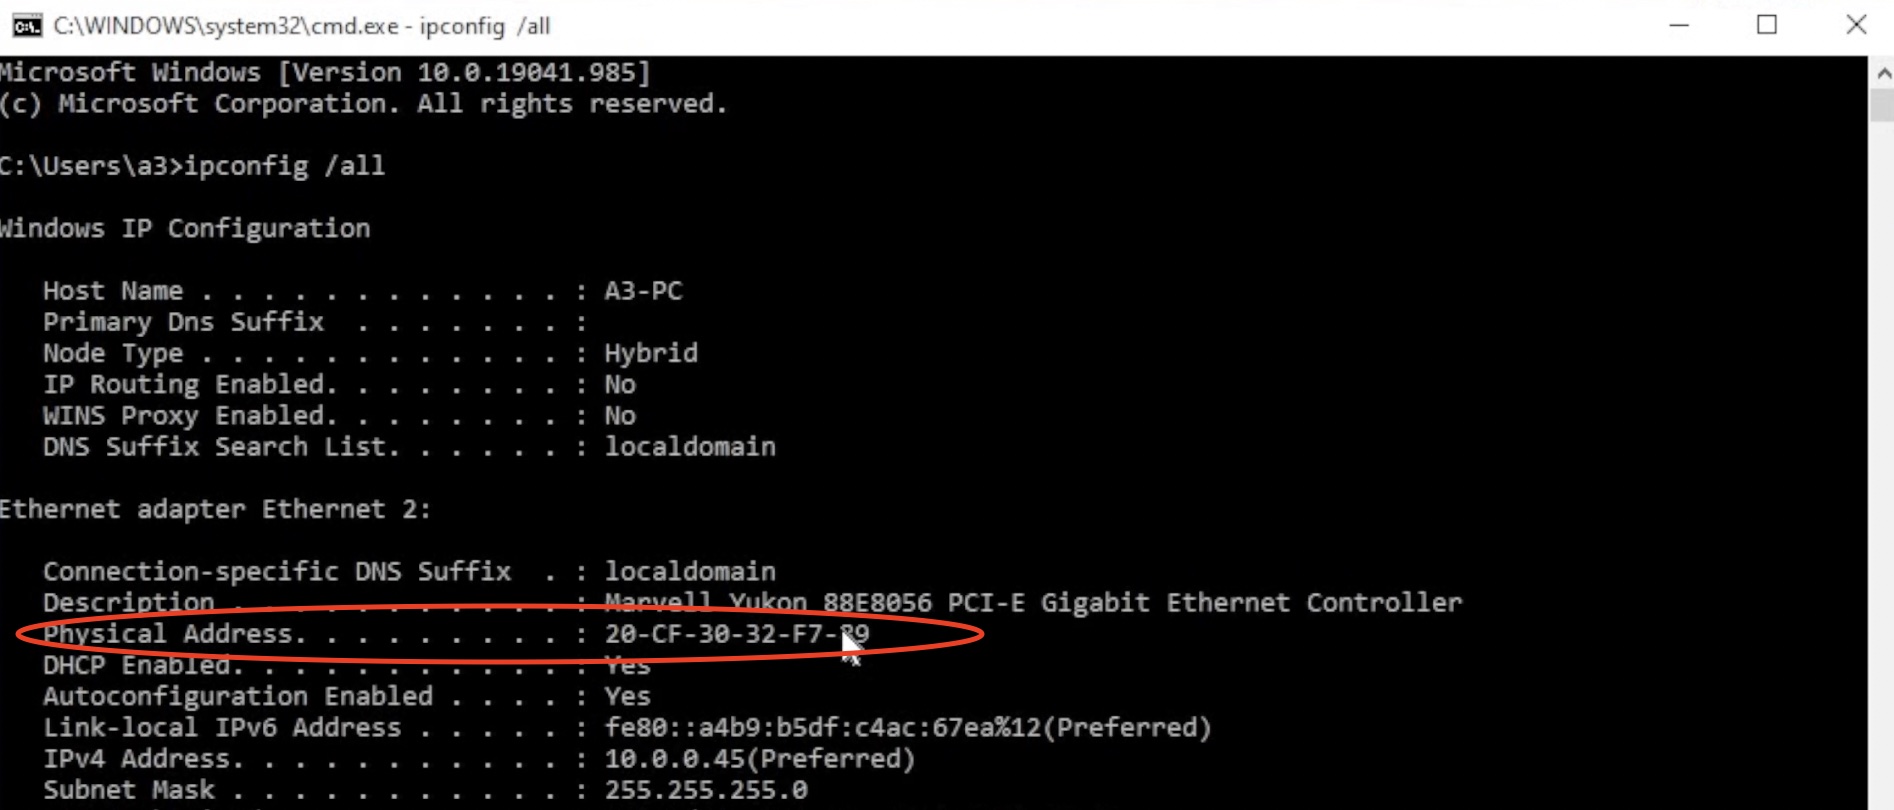
First, you will need the MAC address of the PC of your interest. You can get the MAC address either from your router interface or from the Windows command prompt using the ipconfig /all command.
Second, you have to add the following YAML in the configuration.yaml file using text editor or add-on like File Editor.
# configuration.yaml entry
switch:
  - platform: wake_on_lan
    mac: 20:cf:30:32:f7:89
    name: “a3-pc”
Make sure that you do the following things:
- If you already have switch: section in your configuration.yaml file add only the last 3 lines under your existing section.
- Change the mac: value with your MAC address.
- Change the name: to something meaningful for you (e.g. hostname of the device)
- Save the changes and restart Home Assistant.
Test the Home Assistant WoL switch
Let’s quickly test if the Home Assistant Wake on LAN switch can actually wake our PC.
You can add a button to the Home Assistant Lovelace UI by click on the three dot menu in the upper right corner > Edit Dashboard > Add Card > Button Card > as entity select your newly created switch (i.e. switch.a3_pc) > Save

Before the actual test you have to put your computer to sleep. If you shut it down the Wake on LAN may or may not work.
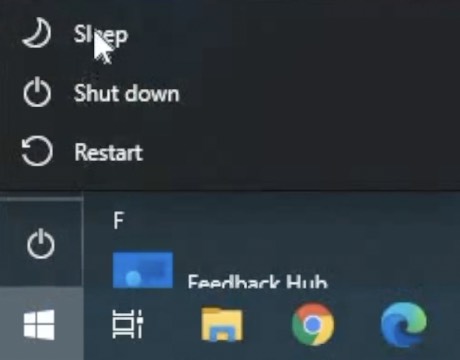
And now when your PC fell asleep 💤 and you have a Button card with your WoL switch in Home Assistant – you can just press it and your PC will rise from the dead. 🎉
Home Assistant RPC Shutdown add-on
Okay Wake on LAN Is working, but what if you want to turn off a Windows PC from Home Assistant? The Home Assistant RPC shutdown add-on available in the Home Assistant store will save the day. Let’s install it
Open your Home Assistant and press, the “c” button to invoke the search bar, type add-on and choose Navigate Add-On store. Then search for RPC Shutdown or save the hassle and click on the link below, which will lead you to the same place.

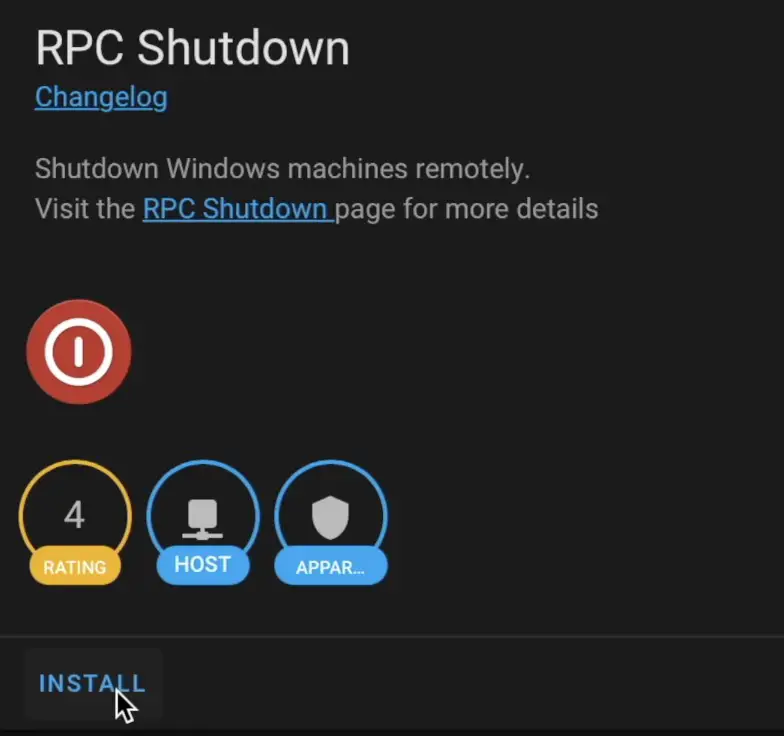
Click on the Install button to have your RPC Shutdown add-on.
After the installation we will need the IP, username and password of the windows machine to configure properly the RPC shutdown add-on. This is an example configuration for my Windows PC, of course you can add multiple computers as well (just add more aliases).
computers:
  - alias: a3-pc
    address: 10.0.0.45
    credentials: smash%thelike
    delay: 0
    message: >-
      Home Assistant is shutting down this PC. This cannot be canceled. Please
      save your work!
Make sure that you do the following changes under the Configuration tab in RPC shutdown add-on:
- Change the alias: with something meaningful for you (e.g. hostname of the device)
- Change the address: value with the IP address of the computer that you want to wake (Get it from your router interface or use again the ipconfig /all command from Windows command prompt)
- Change the credentials: values with your Windows user & pass (i.e. user%pass)
- Save the changes and start the RPC shutdown add-on from the Info tab.
Add Home Assistant RPC Shutdown switch
To test if the shutdown of a Windows PC from Home Assistant is working – we will edit our switch that we created in the Add Home Assistant Wake on LAN switch section above.
Go back to your configuration.yaml file and add another 6 lines under the existing WoL switch, so your code at the end should look similar to the one below.
# Example configuration.yaml entry
switch:
  - platform: wake_on_lan
    mac: 20:cf:30:32:f7:89
    name: “a3-pc”
    host: 10.0.0.45
    turn_off:
      service: hassio.addon_stdin
      data:
        addon: core_rpc_shutdown
        input: a3-pc
The things that you have to change here are the following:
- The value of the host: parameter with the IP of the machine that you want to shutdown.
- The value of the input: parameter, where the value should be exactly the same as the alias in the RPC shutdown configuration. In my case the value everywhere is my windows pc hostname (a3-pc).
- Save the changes and restart Home Assistant.
After Home Assistant has started – you can try to shutdown the Windows PC (a.k.a the victim) by pressing the same button that wake our PC earlier in the Home Assistant UI.
If your computer shut down correctly – you are done with this guide and you don’t have to do anything else, except you can show off in the comments section below.
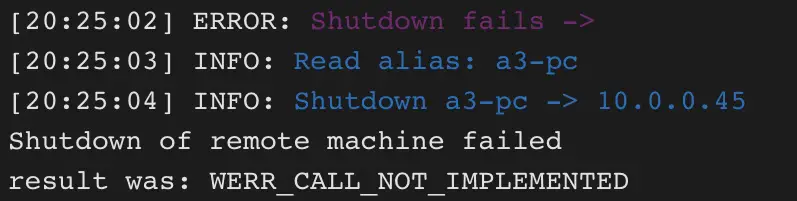
If your computer doesn’t want to shutdown, check the RPC Shutdown Logs section and continue reading.
What If RPC shutdown is not working?
If you see any of the errors below in the RPC shutdown log section:
Could not initialise pipe winreg. Error was NT_STATUS_OBJECT_NAME_NOT_FOUND
Shutdown of remote machine failed result was: WERR_CALL_NOT_IMPLEMENTED

Also the Home Assistant RPC shutdown is not working – you have to do several extra steps. Namely to start a Remote Registry service, to create a WMI firewall rule and to add a local policy in your Windows registry.
Don’t worry it is easy, not that easy as subscribing to my newsletter, but I will show you all of the steps.
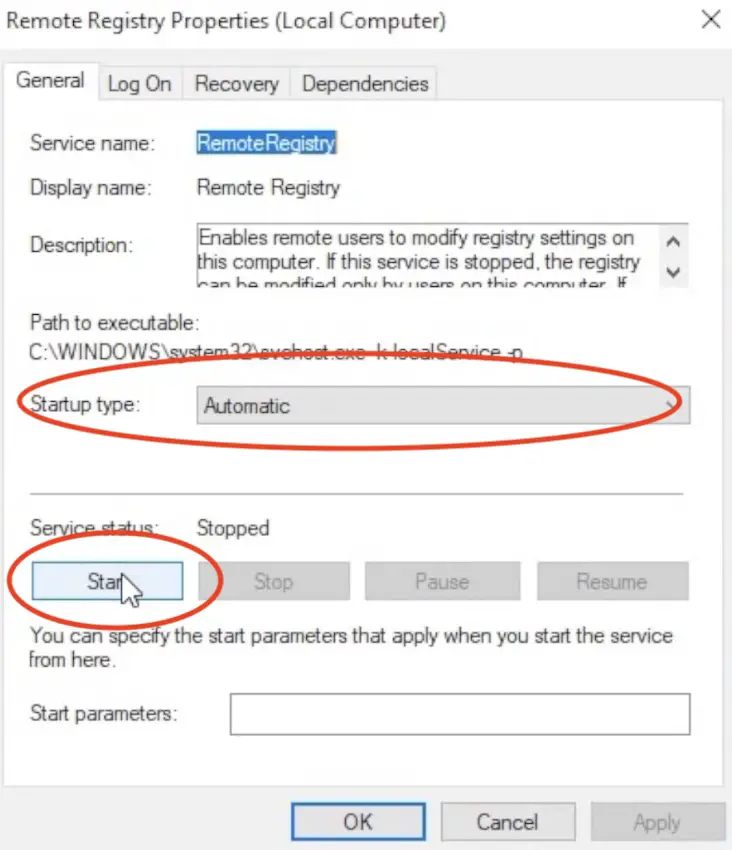
Start Remote Registry Service in Windows
Click on Start menu > select Run > Type services.msc and click OK > In the Services window search for Remote Registry service > Double click on it and set the Startup type: to Automatic > Click Apply > Finally start the service by click on Start button.
You can try again to shutdown your PC from Home Assistant after you start the Remote Registry service, but most probably you will fail, so keep reading.
Allow WMI in Windows Firewall
We have to create a simple Firewall Rule. Here is how:
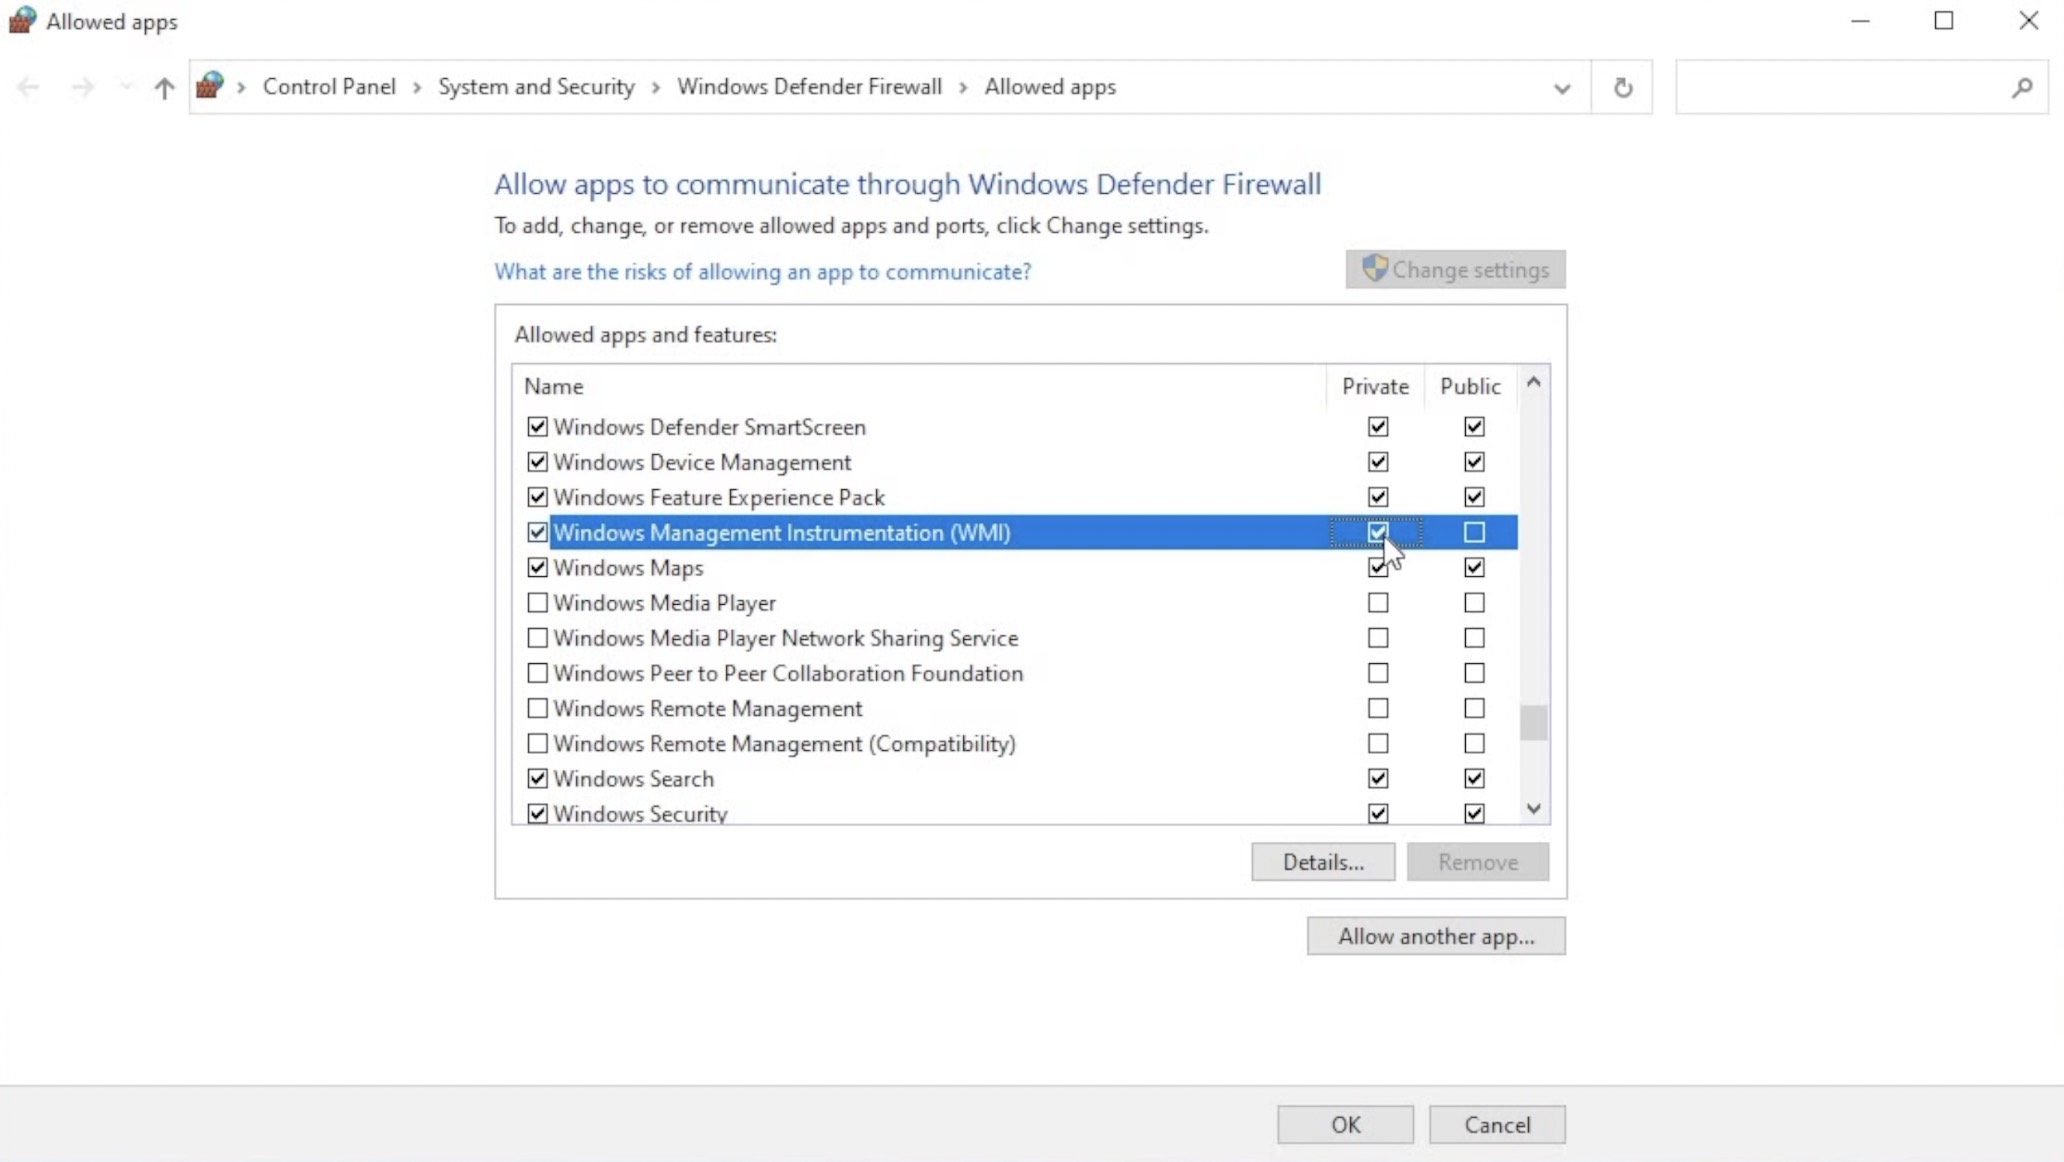
Click on the Start button and type “allow” > Click on the Allow an app through Windows Firewall result > in the opened window scroll down until you see Windows Management Instrumentation (WMI) > Click on Change settings button and tick the checkbox under the Private column > finally click OK button.
You can try again to shutdown your PC from Home Assistant after you allow the Windows Management Instrumentation (WMI) in the Windows Firewall, but most probably you will fail, so keep reading.
Adding Local Policy in Windows Registry
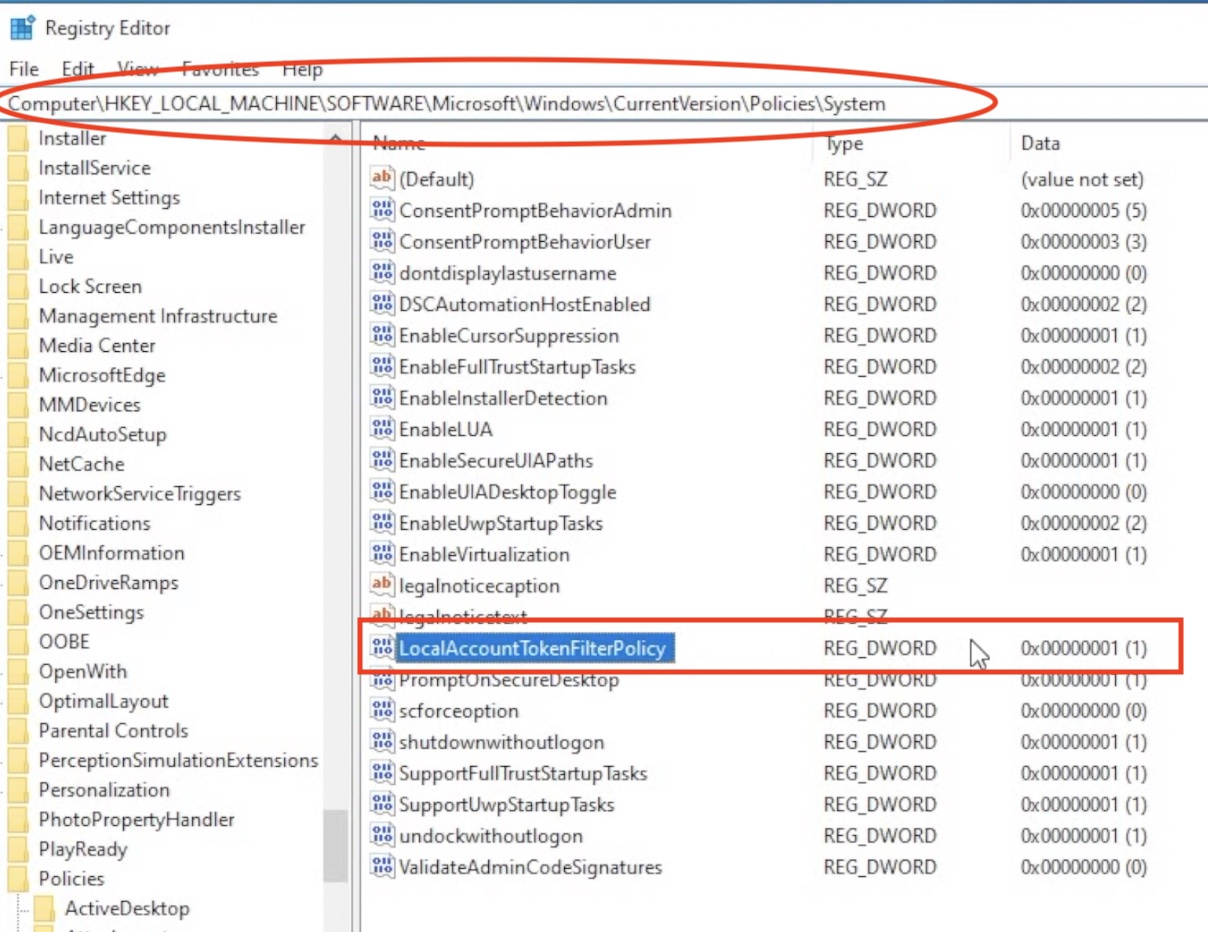
It is Time to edit the Windows registry just a little bit :
Add a 32-bit DWORD named “LocalAccountTokenFilterPolicy” with a value of “1” (without quotes) under the following path in the windows registry: HKEY_LOCAL_MACHINE/SOFTWARE/Microsoft/Windows/CurrentVersion/Policies/System
Or download and start the following LATFP.reg file that I made, which is doing the exact same thing 👉 LINK
After this last step you can try again the Home Assistant RPC Shutdown and this time it should work. Congratulations 🥂
Support My Work
If you want to secure this site existence you can become one of my Patreons where you will receive early access to my content, exclusive content and depending of the tier – free access to my paid Smart Home Guide.
Of course there are other support options available and you can check them here 👉 LINK
With that being said, stay safe and don’t forget – Home Smart, but not hard!
Thank you for watching and I will see you in my next article.
Can you access the switch on/off controls from homekit? That way I can turn my PC on/off with Siri commands.
Yes, you can but you need to add the HomeKit integration in Home Assistant and then to expose your switches. It is not hard I’m using this and it is working fine. Unfortunately I still don’t have article/video on this topic to re-direct you there for more details.
Thanks, finally solved how to shutdown and start my PC. Would it be possible to choose hibernate or sleep?
I’m not sure here. Probably there is a way, but some research is needed.
Hello,
Did you manage to go to sleep?
Thanks for your tutorial.
The WOL works fine but the RPC Shutdown doesn’t. As soon as I add the RPC parameters to the configuration.yaml the WOL switch shows “off”. When I remove this part of the config the switch shows the acutal state of the computer “on”…
Also the RPC shutdown doesn’t work at all.
Do you have any idea what I am doing wrong? I followed and double checked every step of your tutorial.
Regards,
Daniel
Thank you for this tutorial!! I’m on windows 11, the wake up is working but i can’t use shutdown. When I look the log, I have the error
“The username or password was not correct.
Connection failed: NT_STATUS_LOGON_FAILURE”
For my loggin, I looked in C://Users to see exactly my name and my password is the password I use to login. Can you help me? Thank’s a lot
Hi. I have the same problem. Maybe you are logging with your microsoft email account? in some Addons I’ve read that it’s not possible and that you should use a local account to log in to the PC. I don’t remember what it was but I had to add a local account on my minipc with hassio to do something explicit. so maybe that’s the problem?
Great! Made it work!! amazing work
great, enjoy it!
Hi there,
Thanks for the excellent tutorial. I have it all working great, except I would like separate buttons for WOL & Shutdown. Is that possible?
yes, try wit a home assistant script and link it to a button on your home assistant dashboard for example