
If you have any version of the UniFi Security Gateway or UniFi Dream Machine this article is for you – we will configuring UniFi Internet Security Settings.
To understand if they are truly working we will set and then we will test them whenever that’s possible.
Configuring Internet Security Settings in the UniFi Controllers and their ease of use are one of the features that differentiate UniFi from the other brands on the market. Terms like Deep Packet Inspection, Threat Management, Intrusion Detection System and Intrusion Prevention System as well Honeypot and some others will be explained and put to a test in this article.
Starting right now.
Table of Contents
What is UniFi Controller?
The UniFi Controller is a management software from Ubiquiti Networks that can be run on dedicated hardware devices (like UniFi Cloud Key or UniFi Dream Machine) or it can be installed on any major Operating System or Virtual Machines including Docker. UniFi Controller allows you to manage multiple networks and UniFi devices using a web browser.
Backup UniFi Controller Settings
Before we continue further, let’s fist backup the UniFi controller configuration. The settings that we are going to try are not dangerous or harmful, but it is always a good idea to backup. That way if something is messed up we can always restore our settings safely.
To Backup the UniFi Controller Settings do the following:
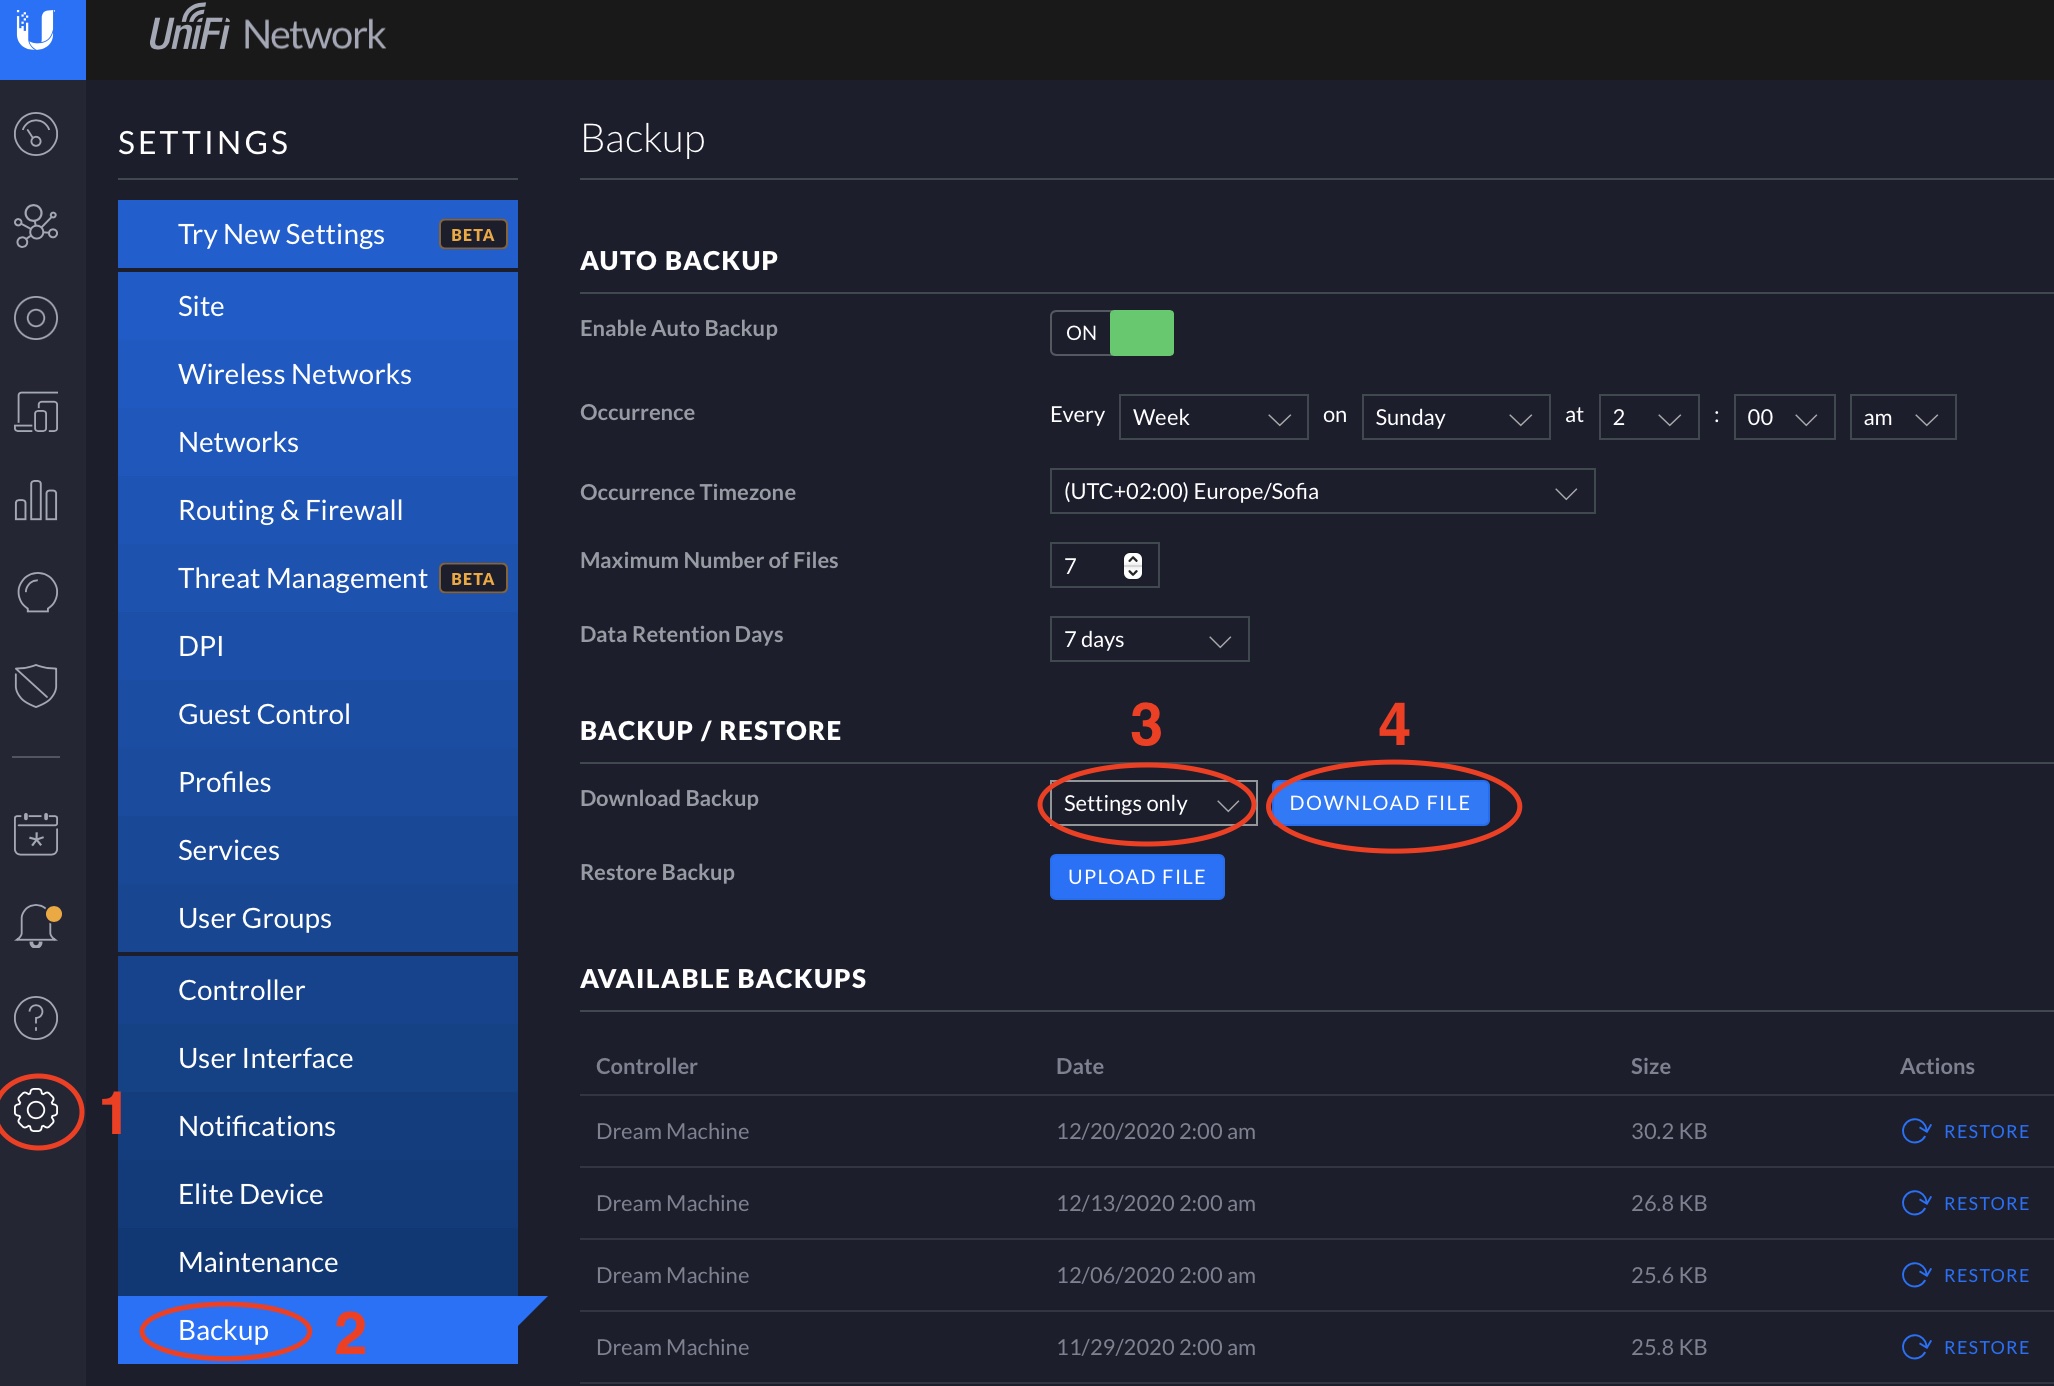
In the Classic Settings go to Settings > Backup > Under Backup/Restore section choose Settings Only and then click on Download File.
The UniFi Controller New Settings
At the moment there are two different views / interfaces in the UniFi controller – the classic settings and the so called new settings.
UniFi Classic settings have been around for a while and almost everything there is polished and working, but it looks a little old school and not so modern.
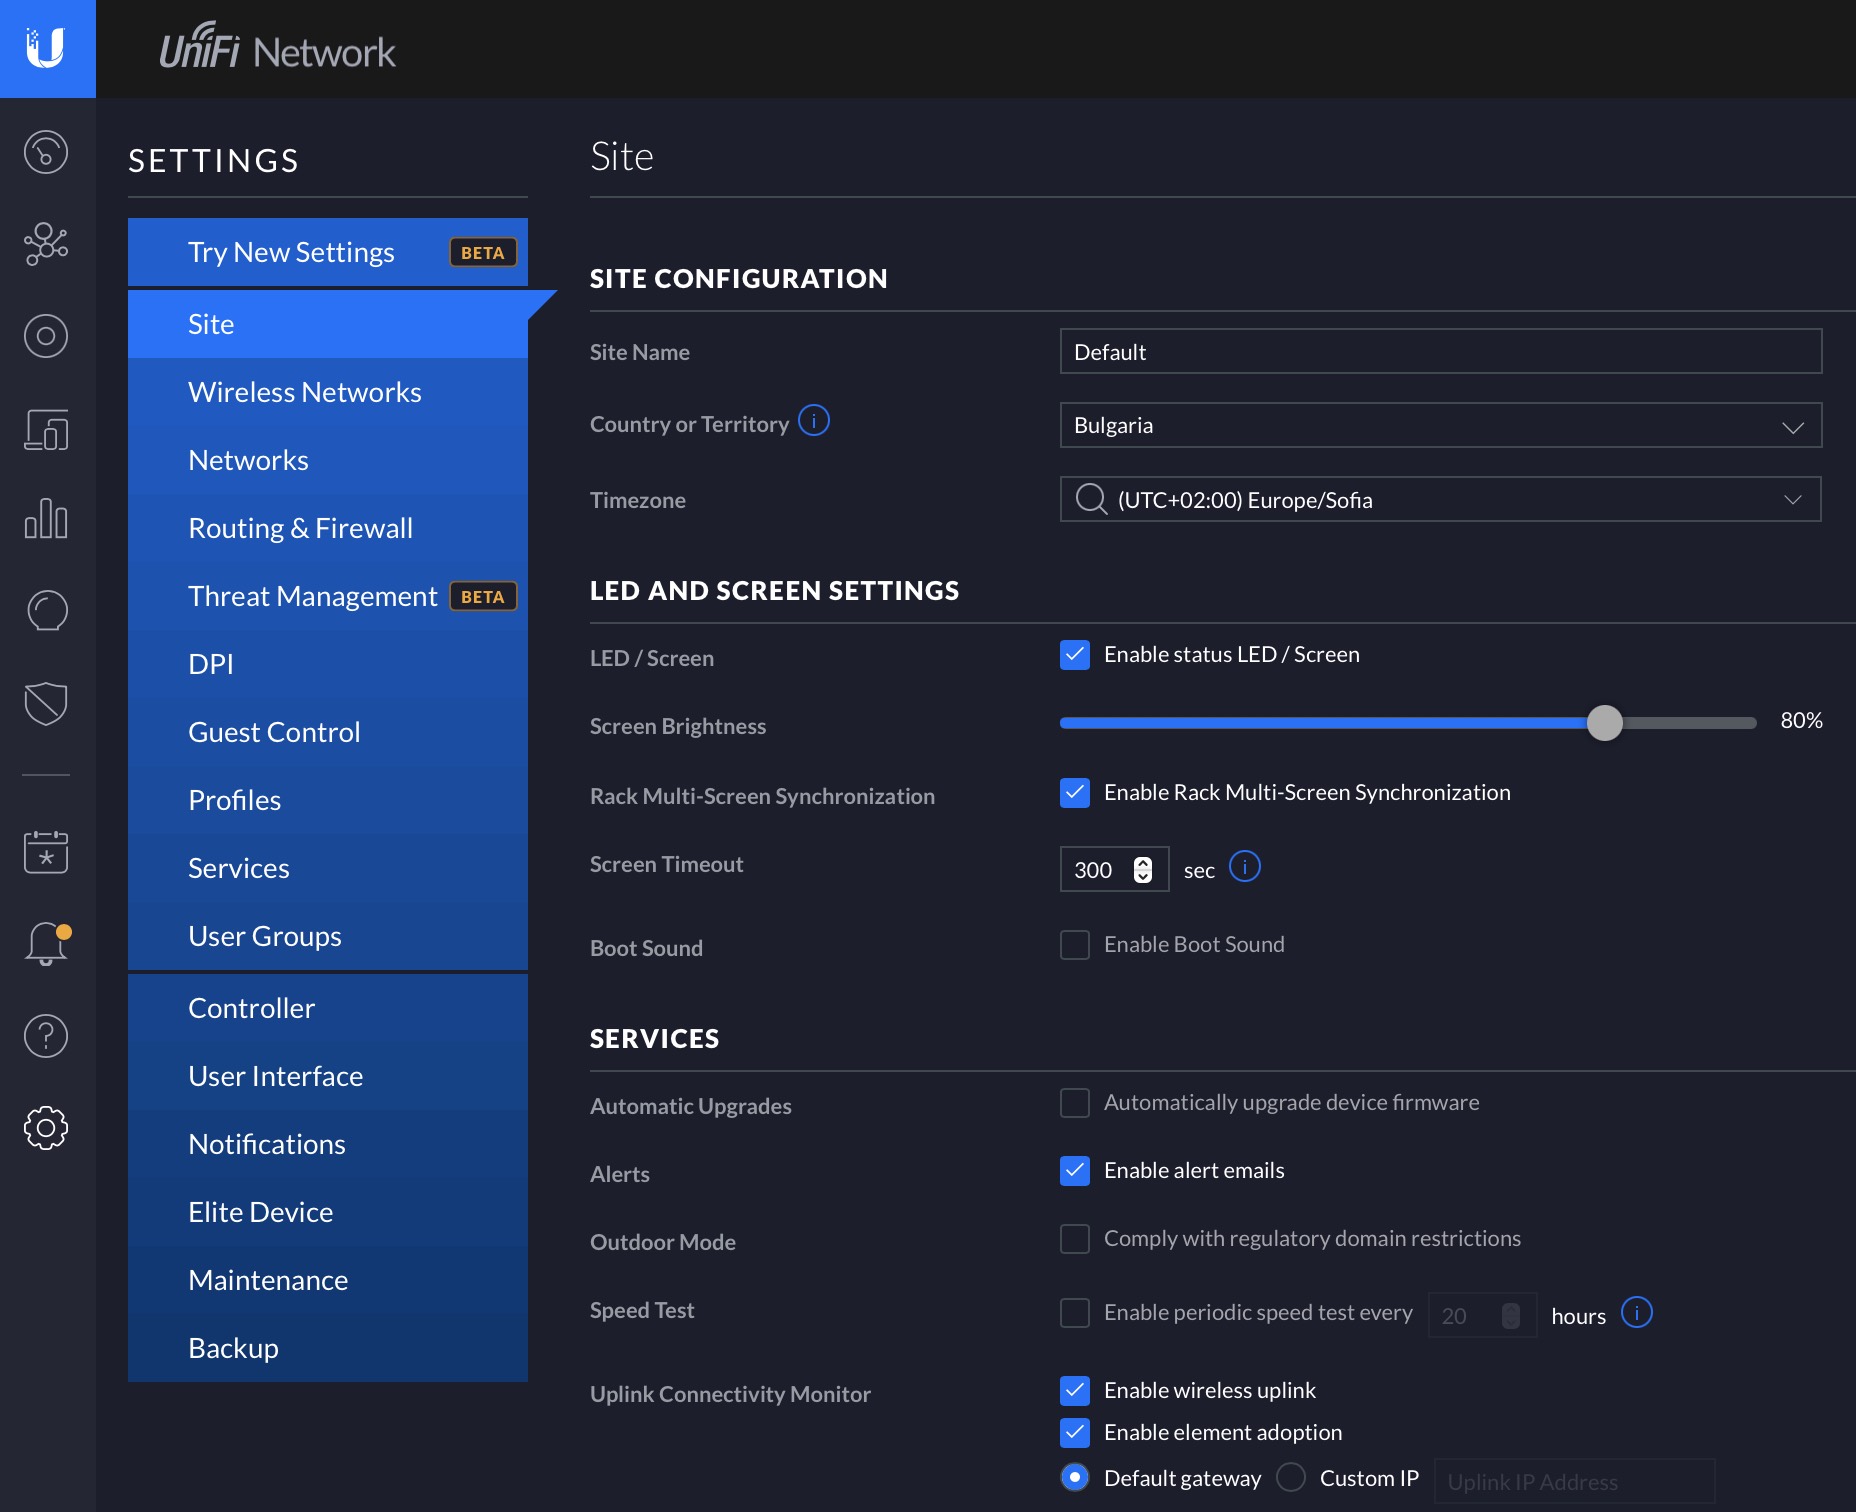
Old, but gold UniFi classical settings
Also there are too many options there to tweak and change and at the end you could easily break something if you don’t know what are you doing.
Don’t get me wrong here, I love the classic settings. If you ask me I don’t want to switch, but I guess that the classic settings will be gone sooner than later as Ubiquiti is pushing the new settings more and more lately.
That is why we are going to use the UniFi new settings in this article. To enable the new UniFi controller settings go to:
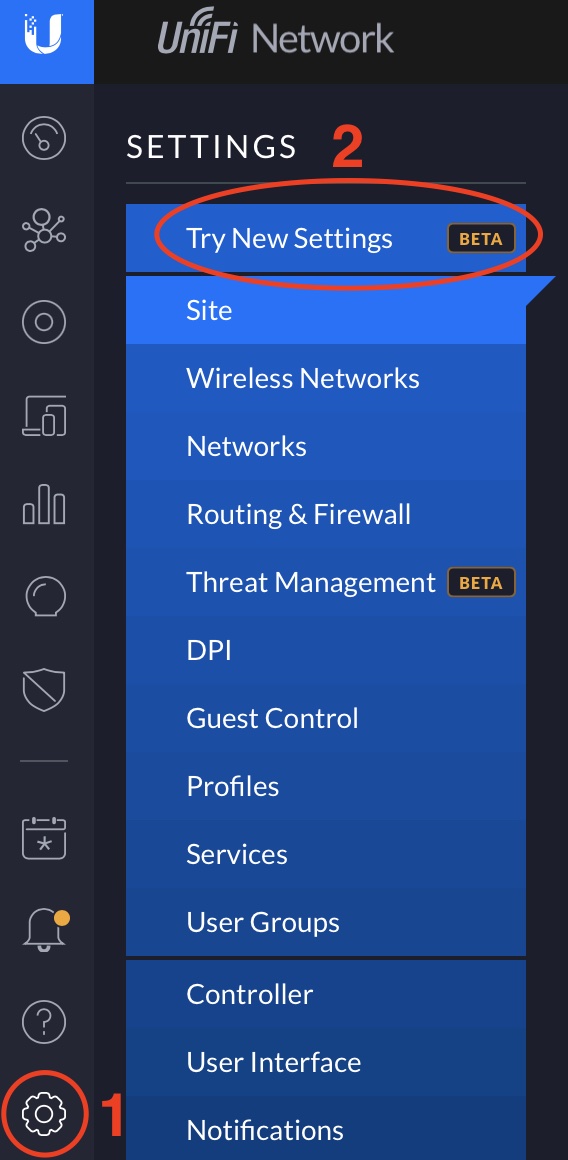
Settings > Try New Settings
And with a click of button you will instantly feel a lot more modern and fresh.
You can switch back anytime at least for now by going to the New Settings menu and clicking on the banner on the top saying – Not seeing everything? Go to Classic Settings.

UniFi Internet Security Settings
Now let’s finally start configuring the UniFi Internet Security Settings and the first stop will be Threat Management modes. These settings can protect your network from attacks and malicious activities.
Navigate to the New Settings > Internet Security > Internet Threat Management section of the UniFi Network controller and enable the Internet Threat Management option.
Have in mind that enabling Internet Threat Management and IDS or IPS that is Intrusion Detection System and Intrusion Prevention System will limit your maximum connectivity throughput. These below are the maximum values.
| DEVICE | MAX THROUGHPUT |
| UniFi Security Gateway (USG) | 85 Mbps |
| UniFi Security Gateway Pro (USG-Pro) | 250 Mbps |
| UniFi Dream Machine (UDM) | 850 Mbps |
| UniFi Dream Machine Pro (UDM-Pro) | 3.5 Gbps |
What is Intrusion Detection System (IDS)?
When you enable Intrusion Detection System (IDS) you will receive an alert when threats or malicious activities are detected on your network, but this activities or threats will not be blocked in any way.
What is Intrusion Prevention System (IPS)?
When you enable Intrusion Prevention System (IPS) the UniFi controller will automatically block threats and malicious activity on your network.
Internet Threat Management System Sensitivity
You can customize Sensitivity of both IDS and IPS by just moving the slider where 1 means Maximum Performance and Minimum Protection and 5 is just the opposite – Maximum Protection, Lowest Performance.
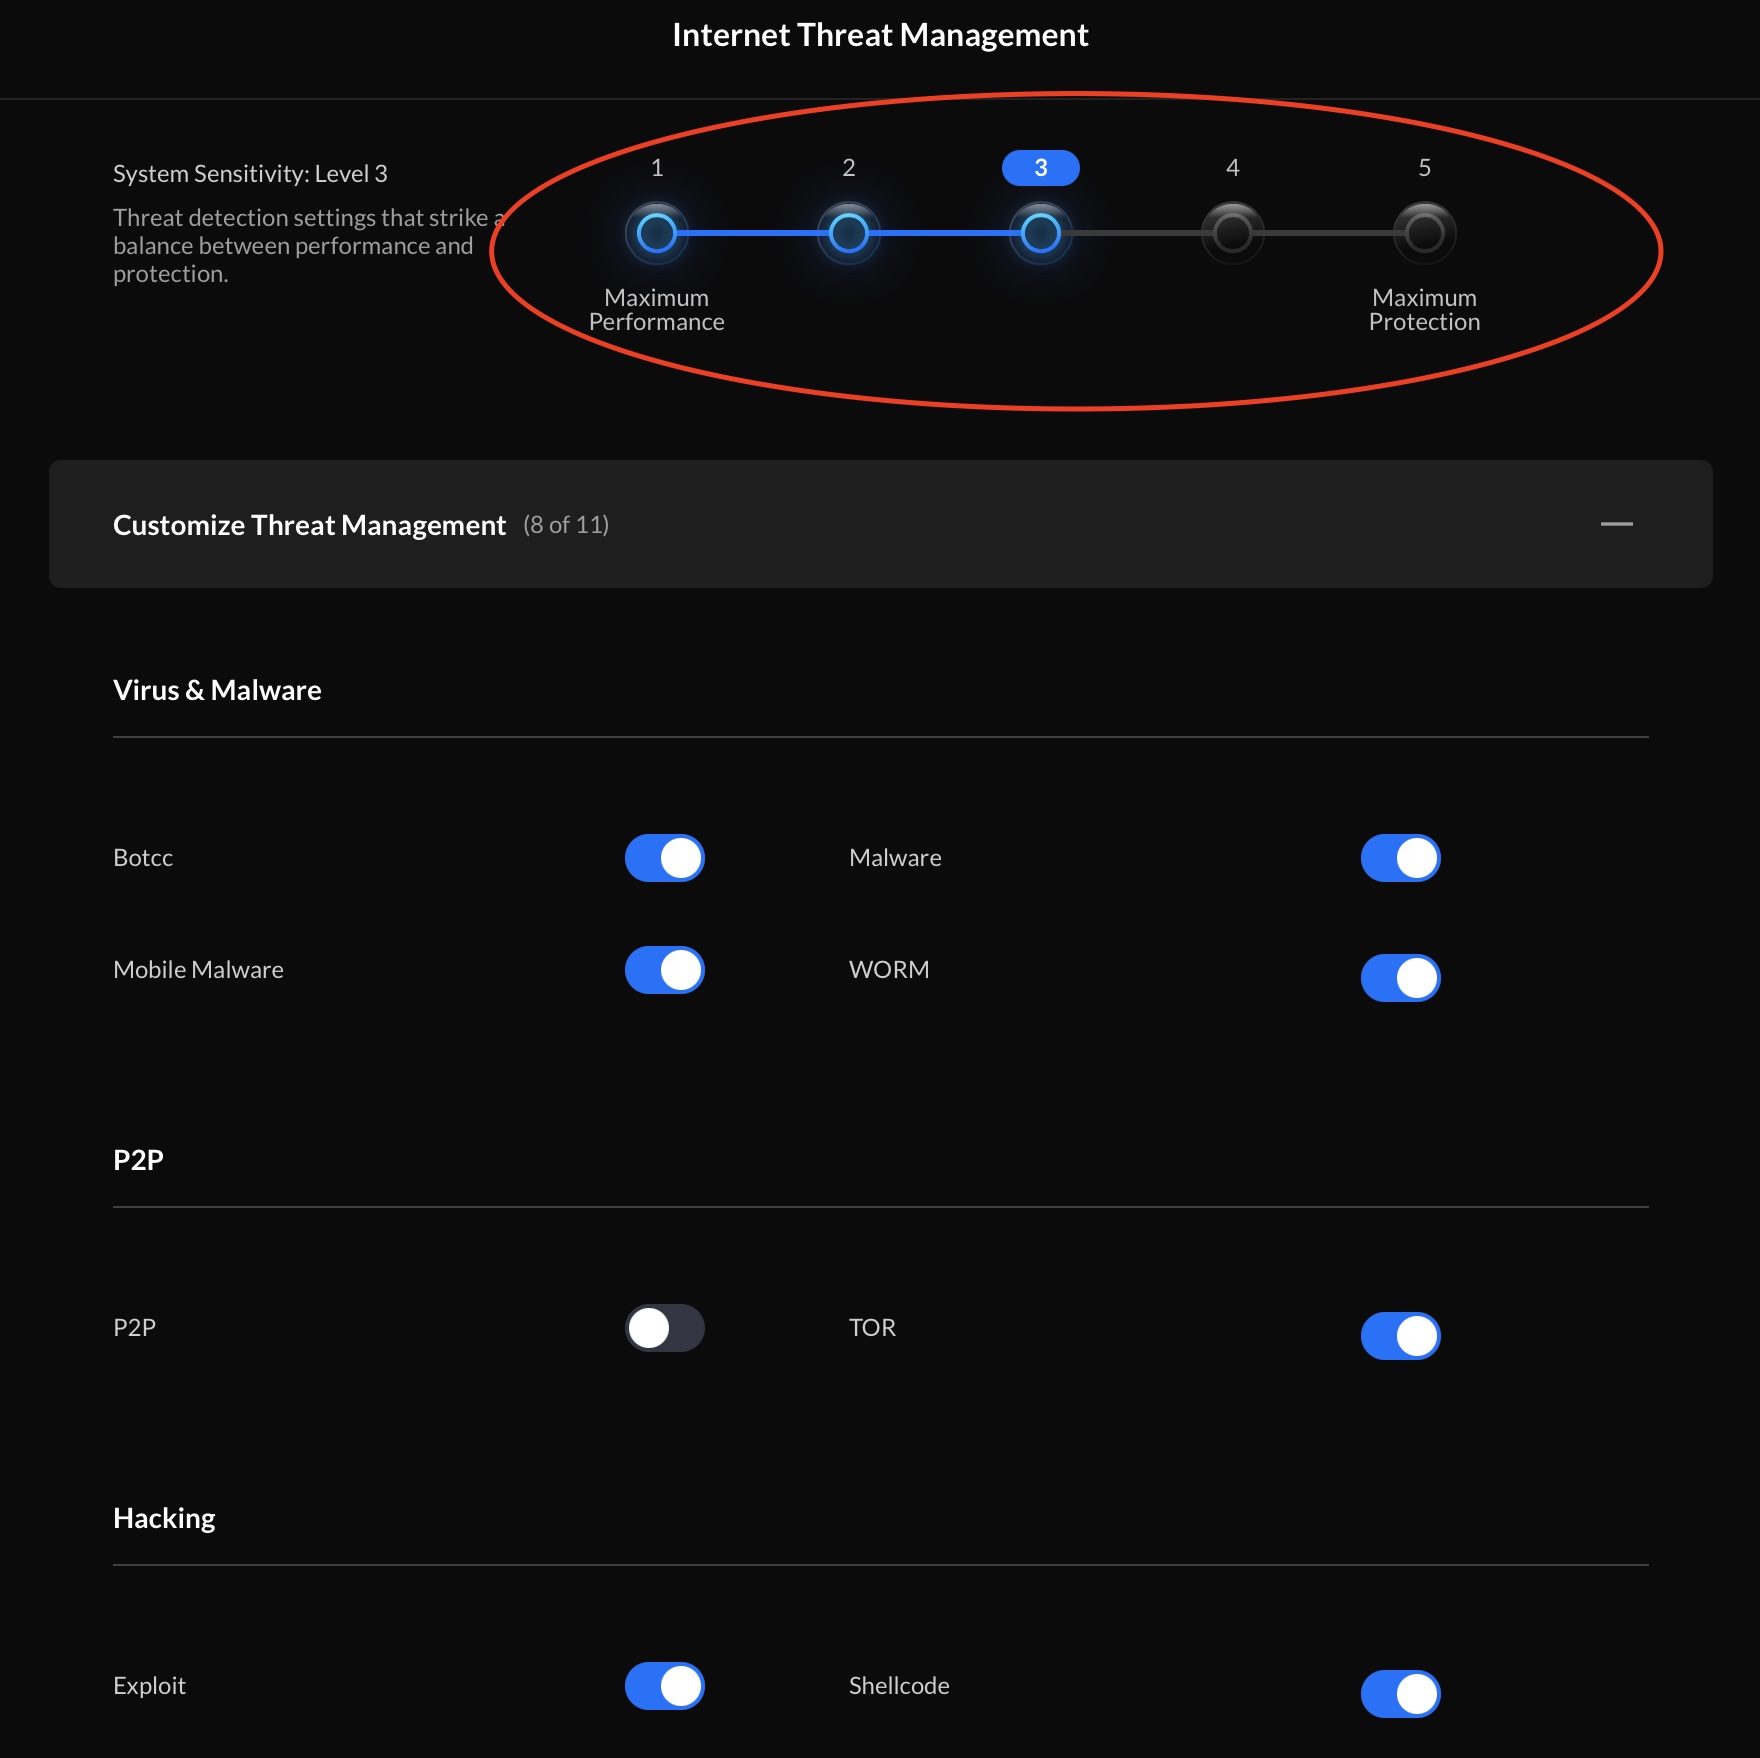
When you move the slider you enable or disable the options like Botcc, Malware, P2P etc. under the Customize Threat Management section.
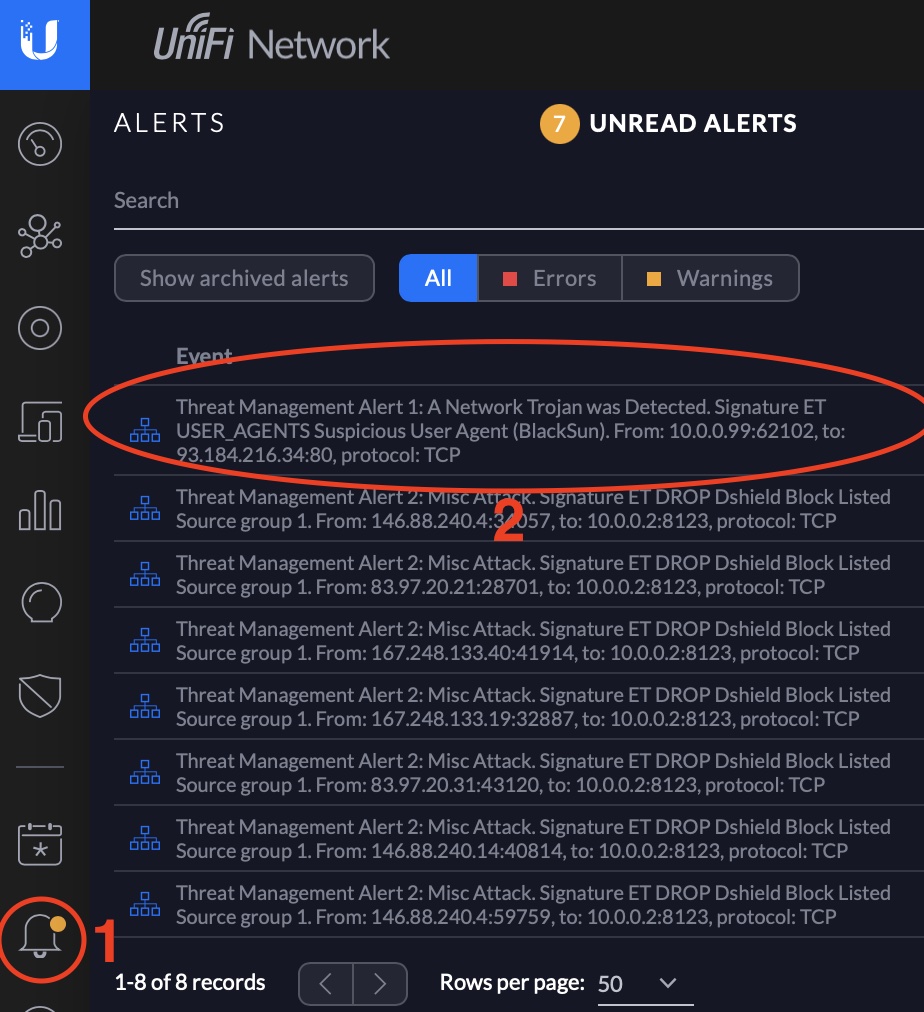
How to test if IDS/IPS is working?
To test the IDS/IPS, you can open a new Terminal if you are using Linux/macOS and type the following:
curl -A "BlackSun" www.example.comYou can then check the Alerts section in the UniFi controller and you will see there your activity detected and/or blocked. Depending of what are you using Intrusion Detection System (IDS) or Intrusion Prevention System (IPS).
Biggest Threat?
One of the biggest Internet threads these days is called – “Not smashing the subscribe button for my Newsletter.”
[sibwp_form id=2]
To protect against it just hit the subscribe button gently and don’t forget to confirm your subscription from the confirmation mail that you will receive (if you don’t see it check your spam folder).
UniFi Network Scanners
Next section in the UniFi Internet Security Settings is called Network Scanners. You can find Threat scanner and Internal Honeypot.
Threat scanner
Threat scanner is a feature that will automatically scan connected clients to your network and it will try to identify any vulnerabilities on them.
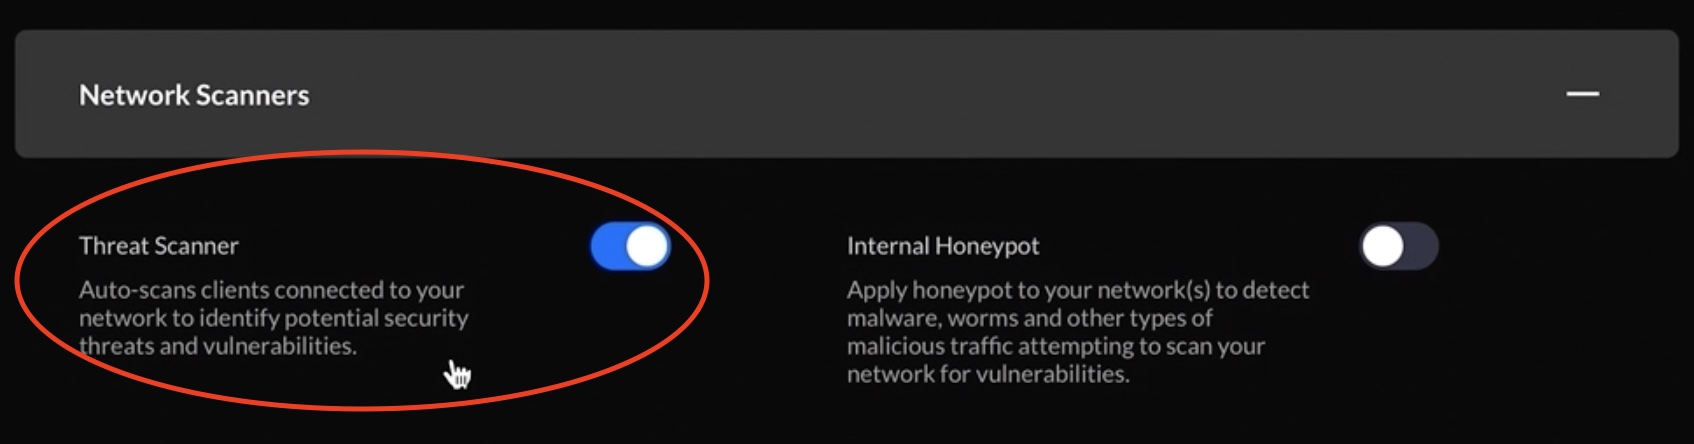
You know that they say – One systems is as strong as it’s weakest element. In other words if you have good overall security, but you have connected clients that are wide open and not protected at all – your security can be compromised.
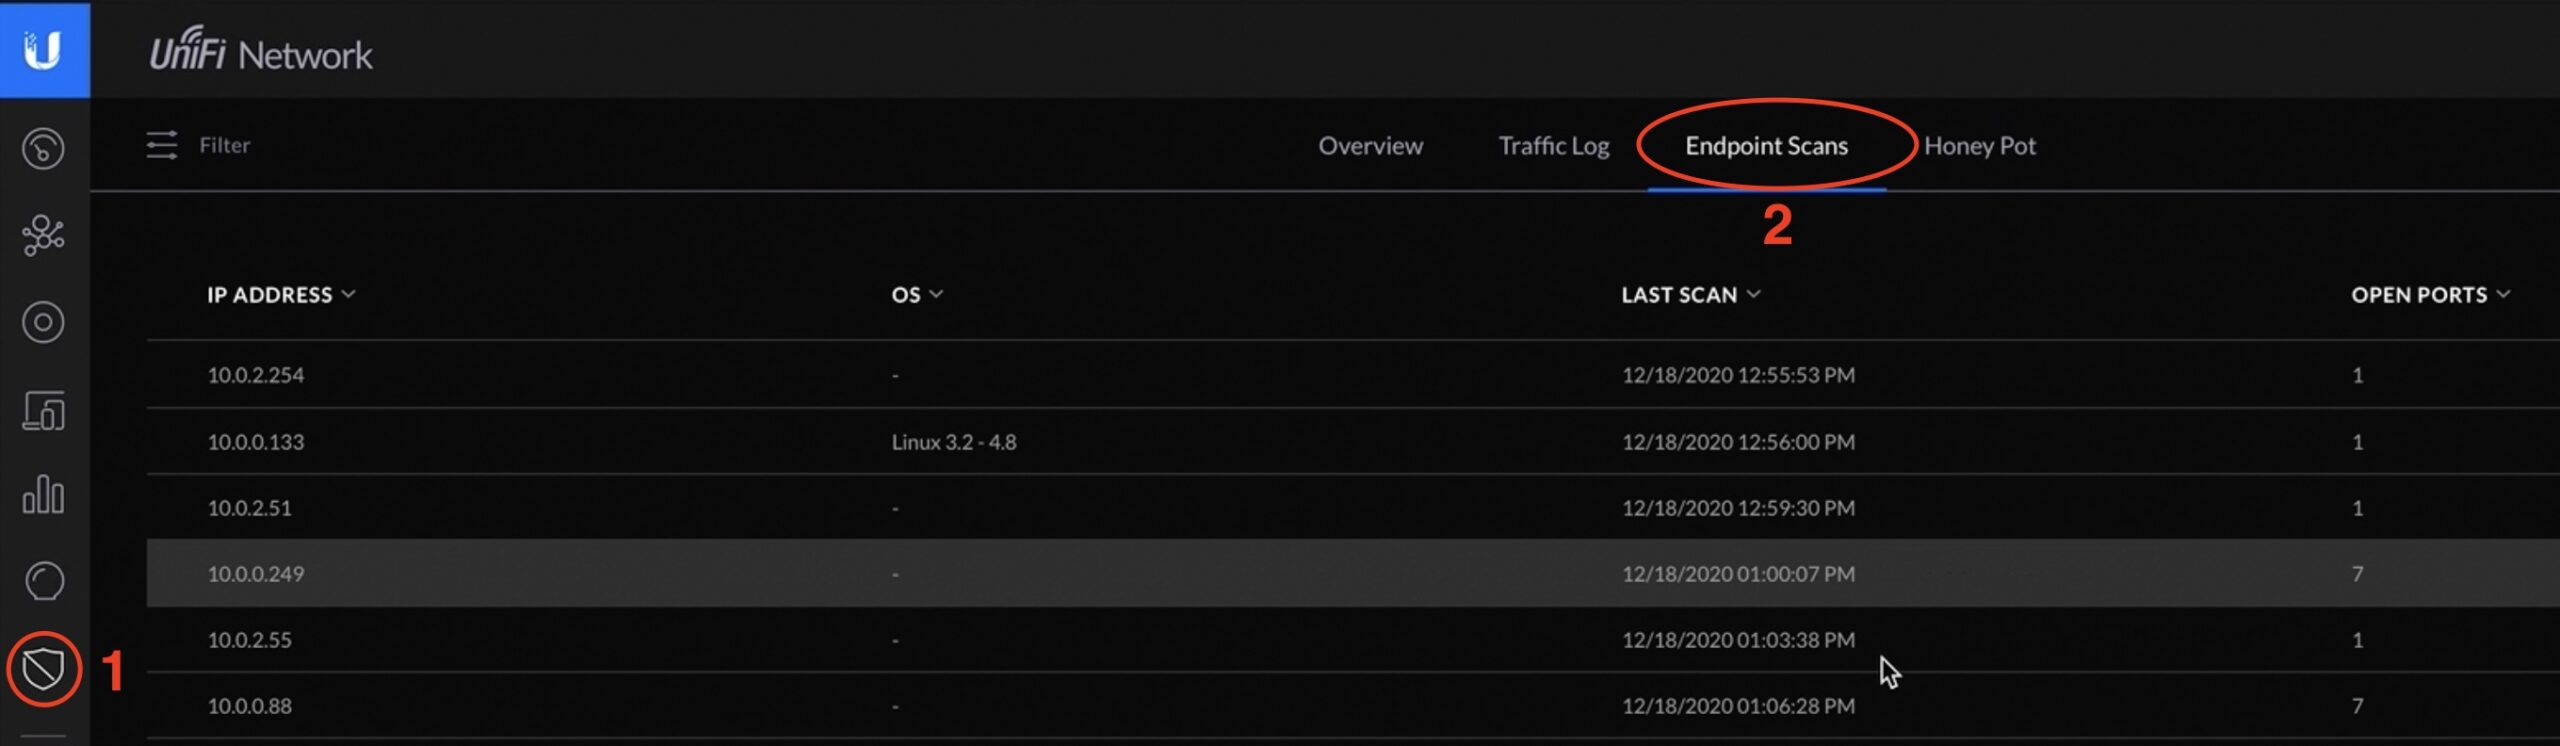
To see the result from the Threat scanner just go to Threat Management > Endpoint Scans in the UniFi controller.
Internal Honeypot
Internal Honeypot feature is a passive detection system that listens for LAN clients attempting to gain access to unauthorized services.
To create a Honeypot go to New Settings > Security > Internet Threat Management > Network Scanners > enable Internal Honeypot > Create Honeypot
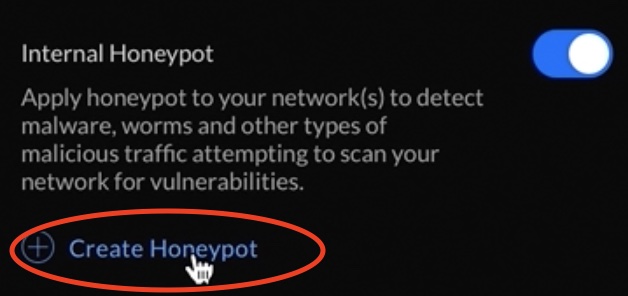
Click on this link to create a Honeypot.
Then you only have to select one of the available networks from the dropdown menu and to choose a virtual IP that will be your actual Honeypot.
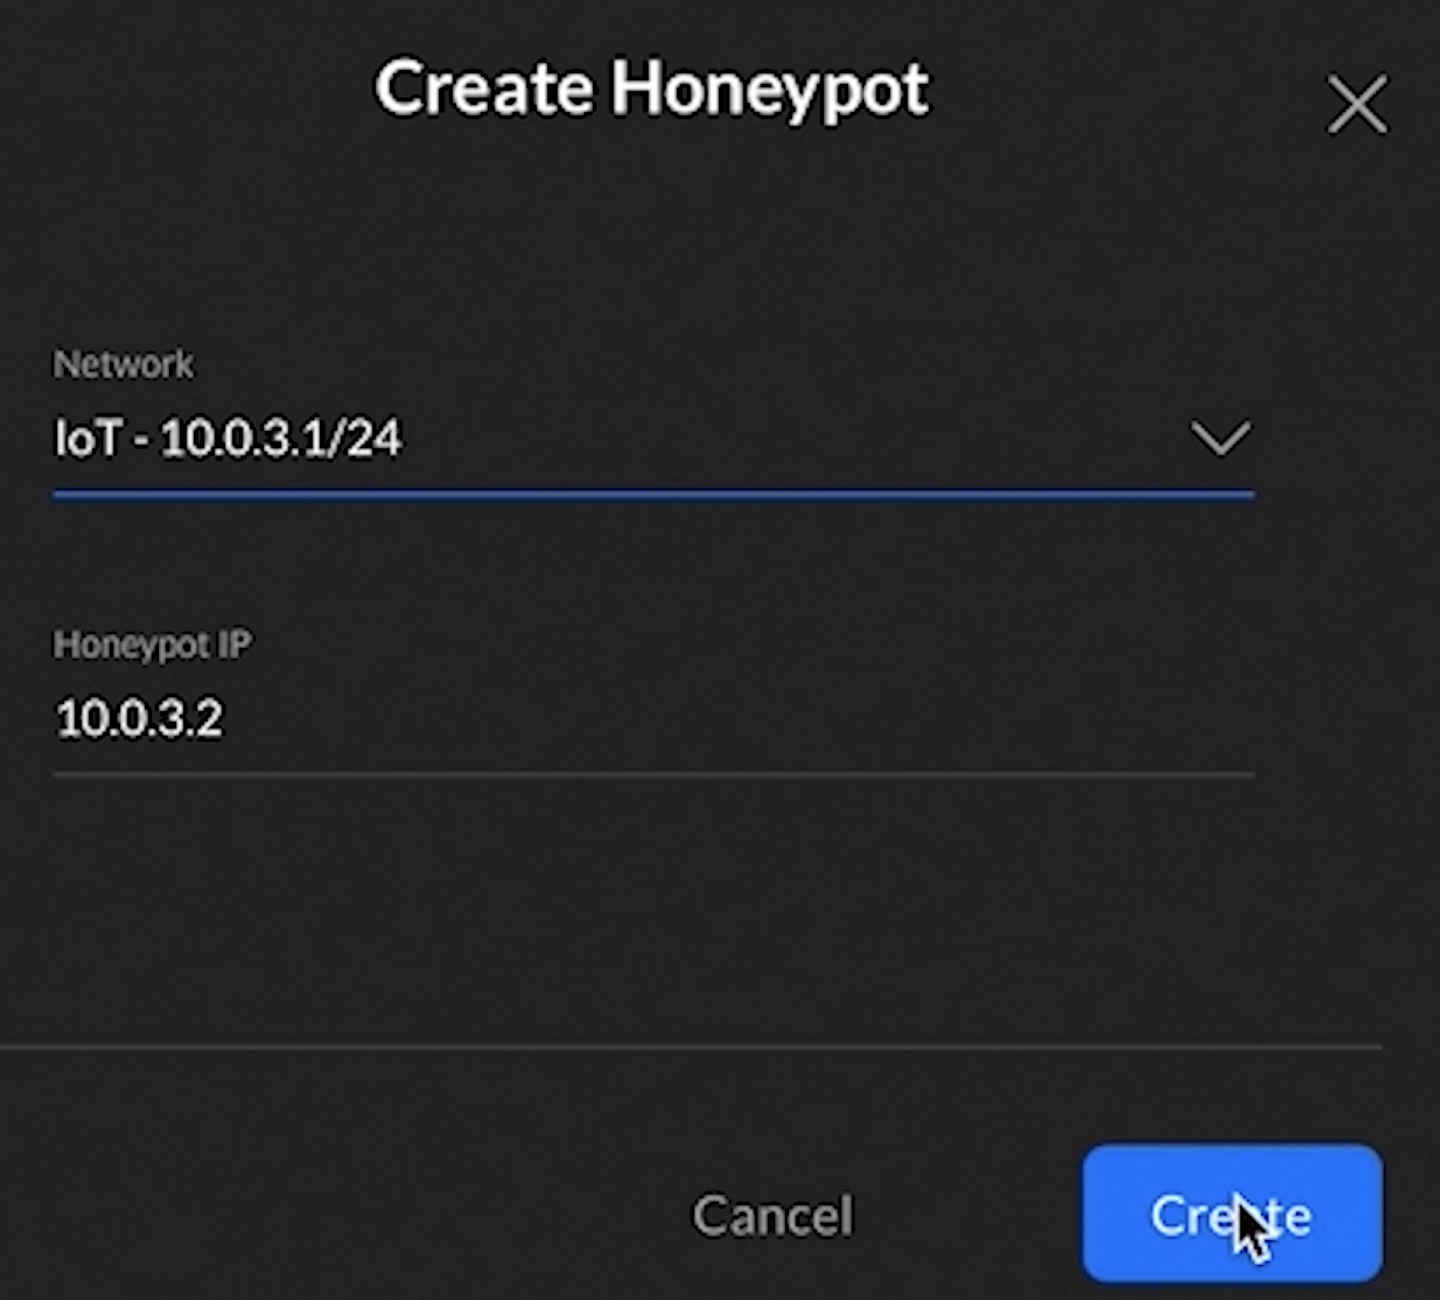
The Honeypot IP will be open for attacks on purpose.
When you finally create your UniFi Internal Honeypot you will be able to test if it is really working.
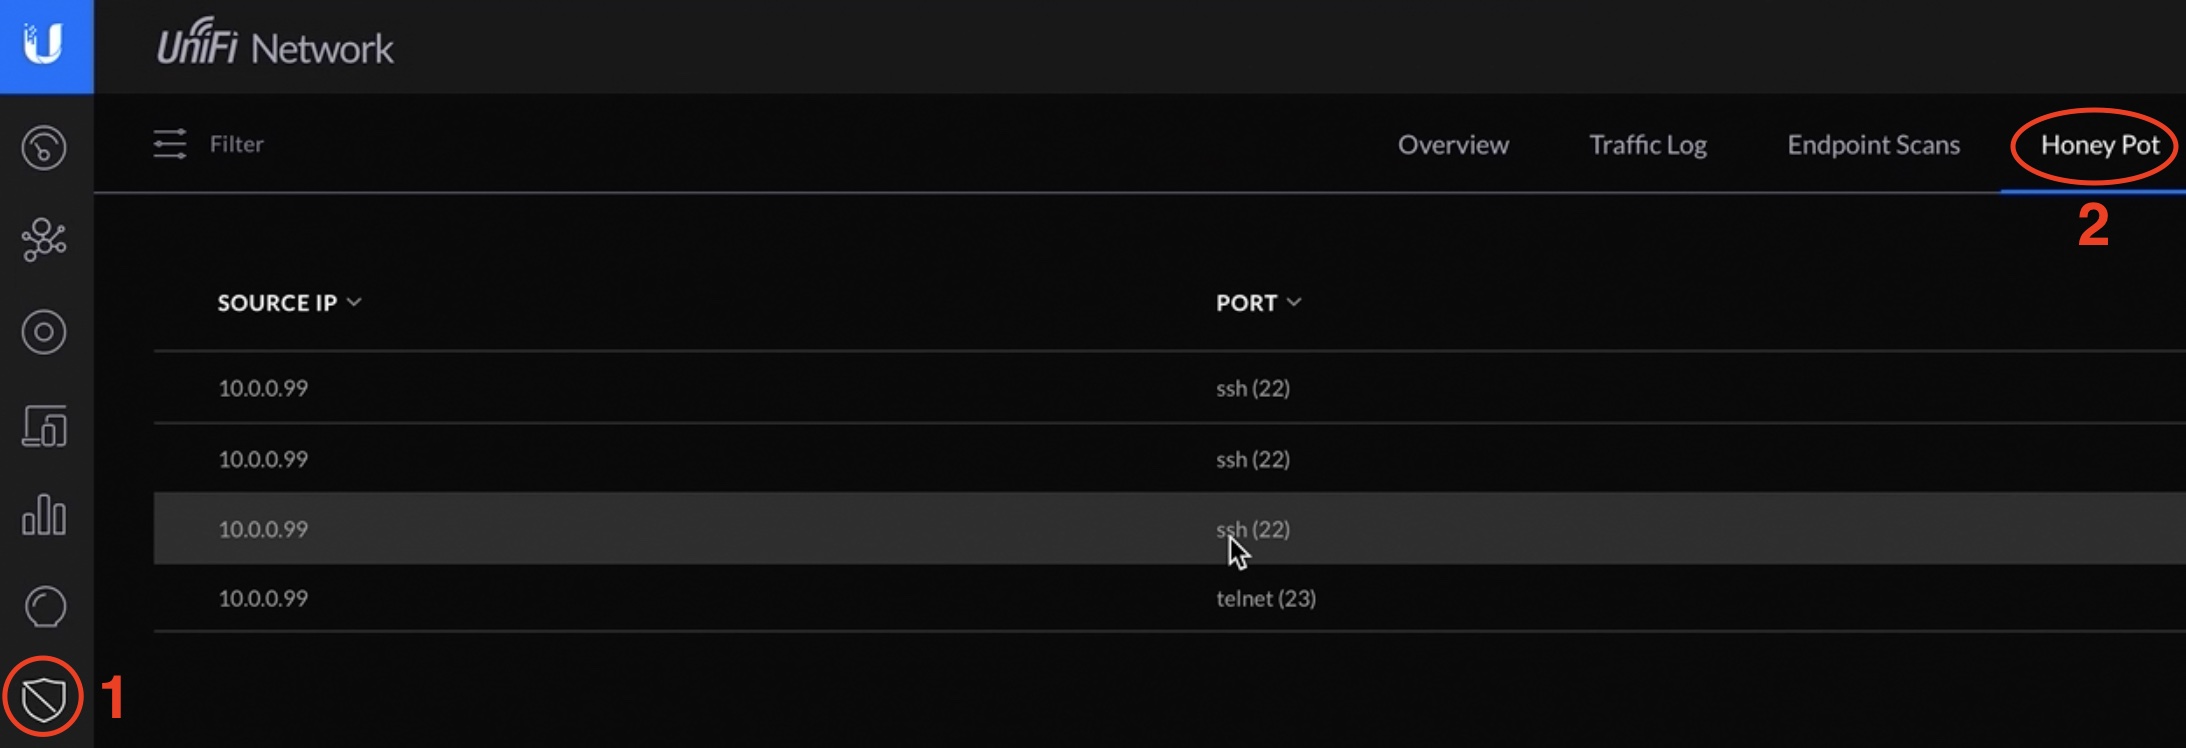
Open a Terminal if you are Linux/macOS user or open an SSH client like putty if you are on Windows and try to connect to the Honeypot IP using SSH and/or Telnet.
ssh root@YOUR_HONEYPOT_IPThe result should be a successful connection and new detailed record in Thread Management > Honey Pot menu in the UniFi controller. If you click on the record you can add the Source IP to the deny list.
Threat Management Allow List
Threat Management Allow List is simply a white list of IPs, networks or subnets that will not be affected by the above Internet Threat Management settings.
Threat Management Allow List is located in New Settings > Security > Internet Threat Management > Advanced
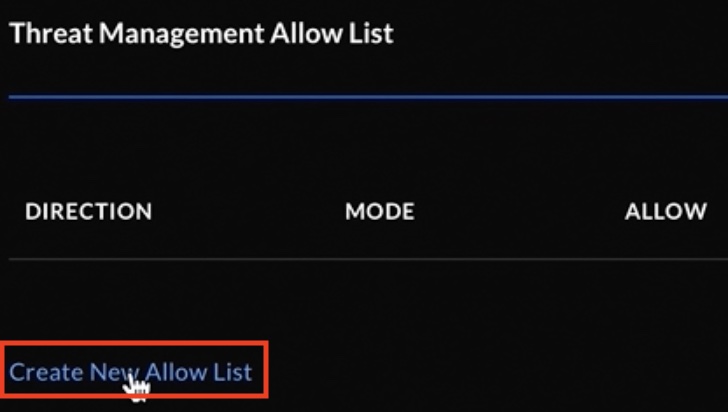
If you have a list of device(s) that you are sure that they are trusted and secured you can whitelist them from here.
What is Deep Packet Inspection (DPI)?
Next on the list is the UniFi Deep Packet Inspection which will allow your USG or UDM to analyze the traffic on your network. Thanks to DPI or Deep Packet Inspection you can go to the Statistics section in UniFi controller.
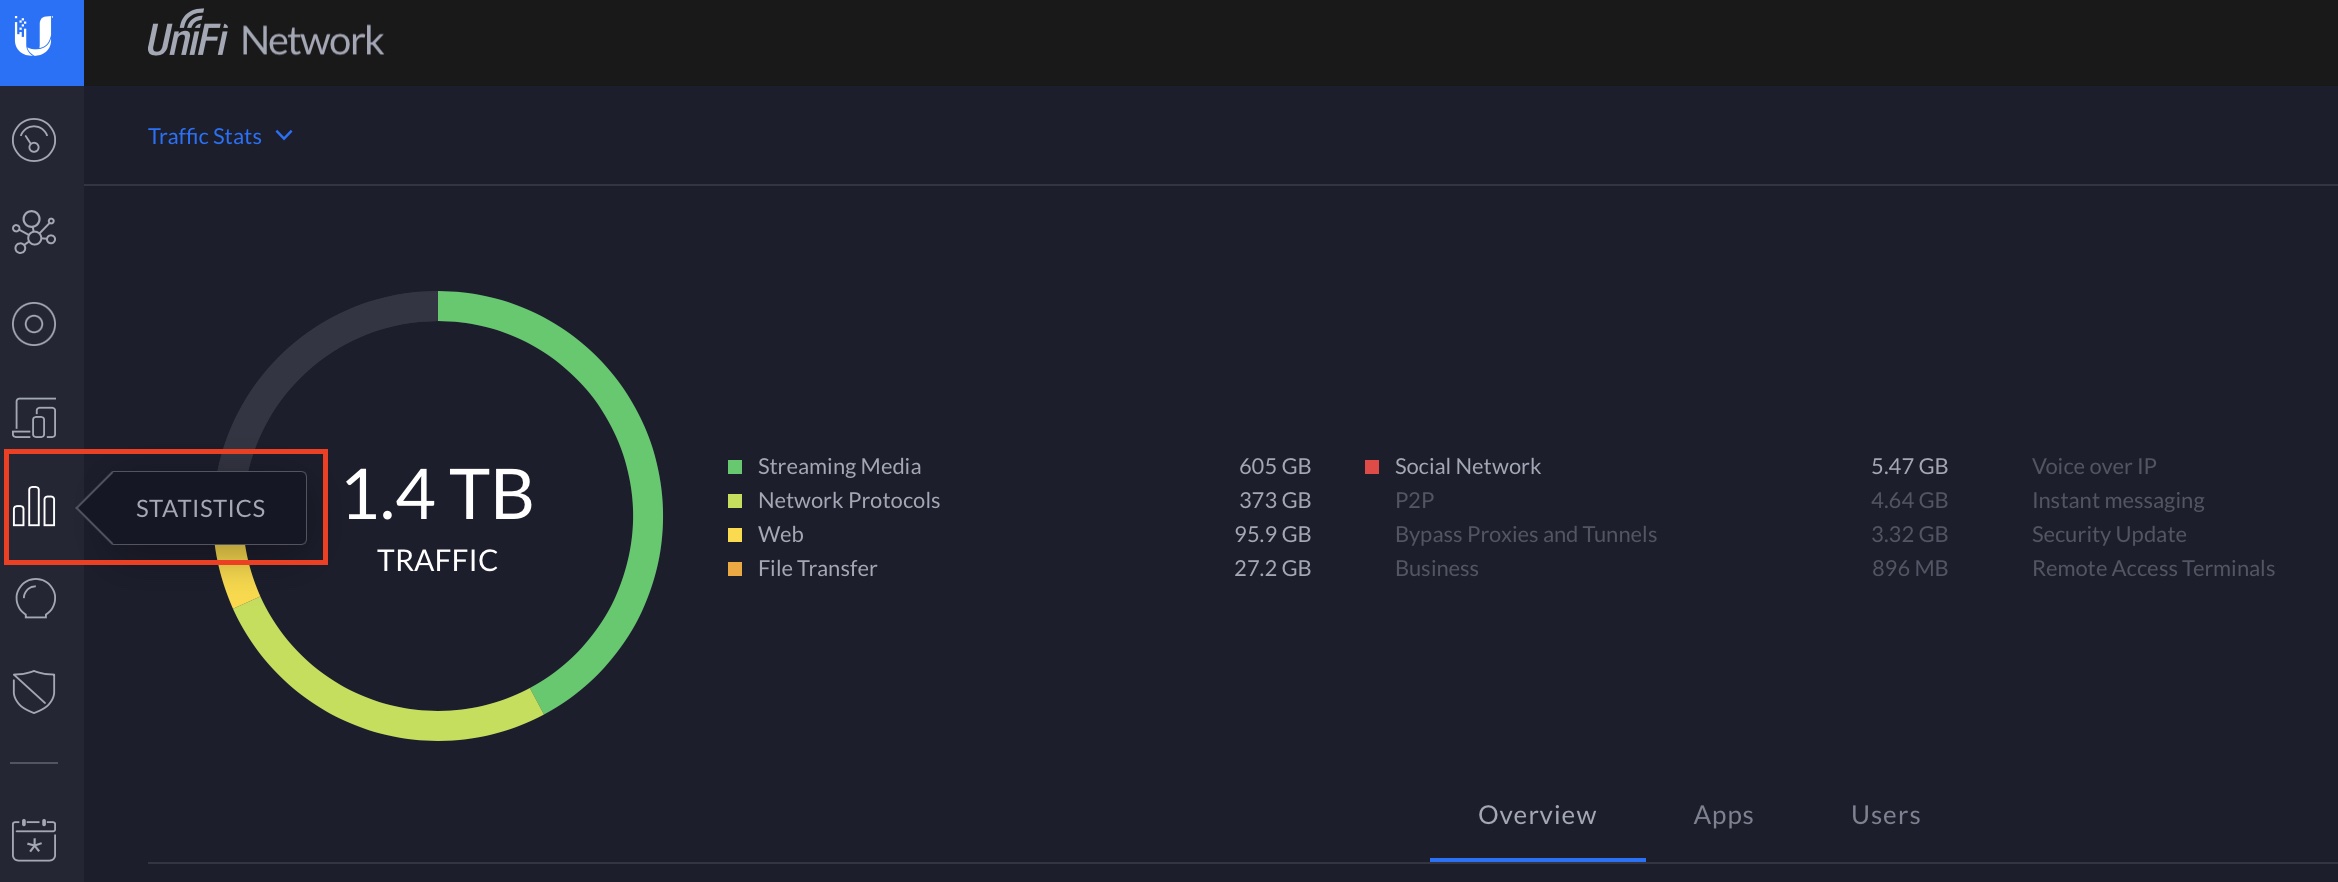
In Statistics section you will see very interesting data for your clients and your general network usage separated by categories and pie charts.
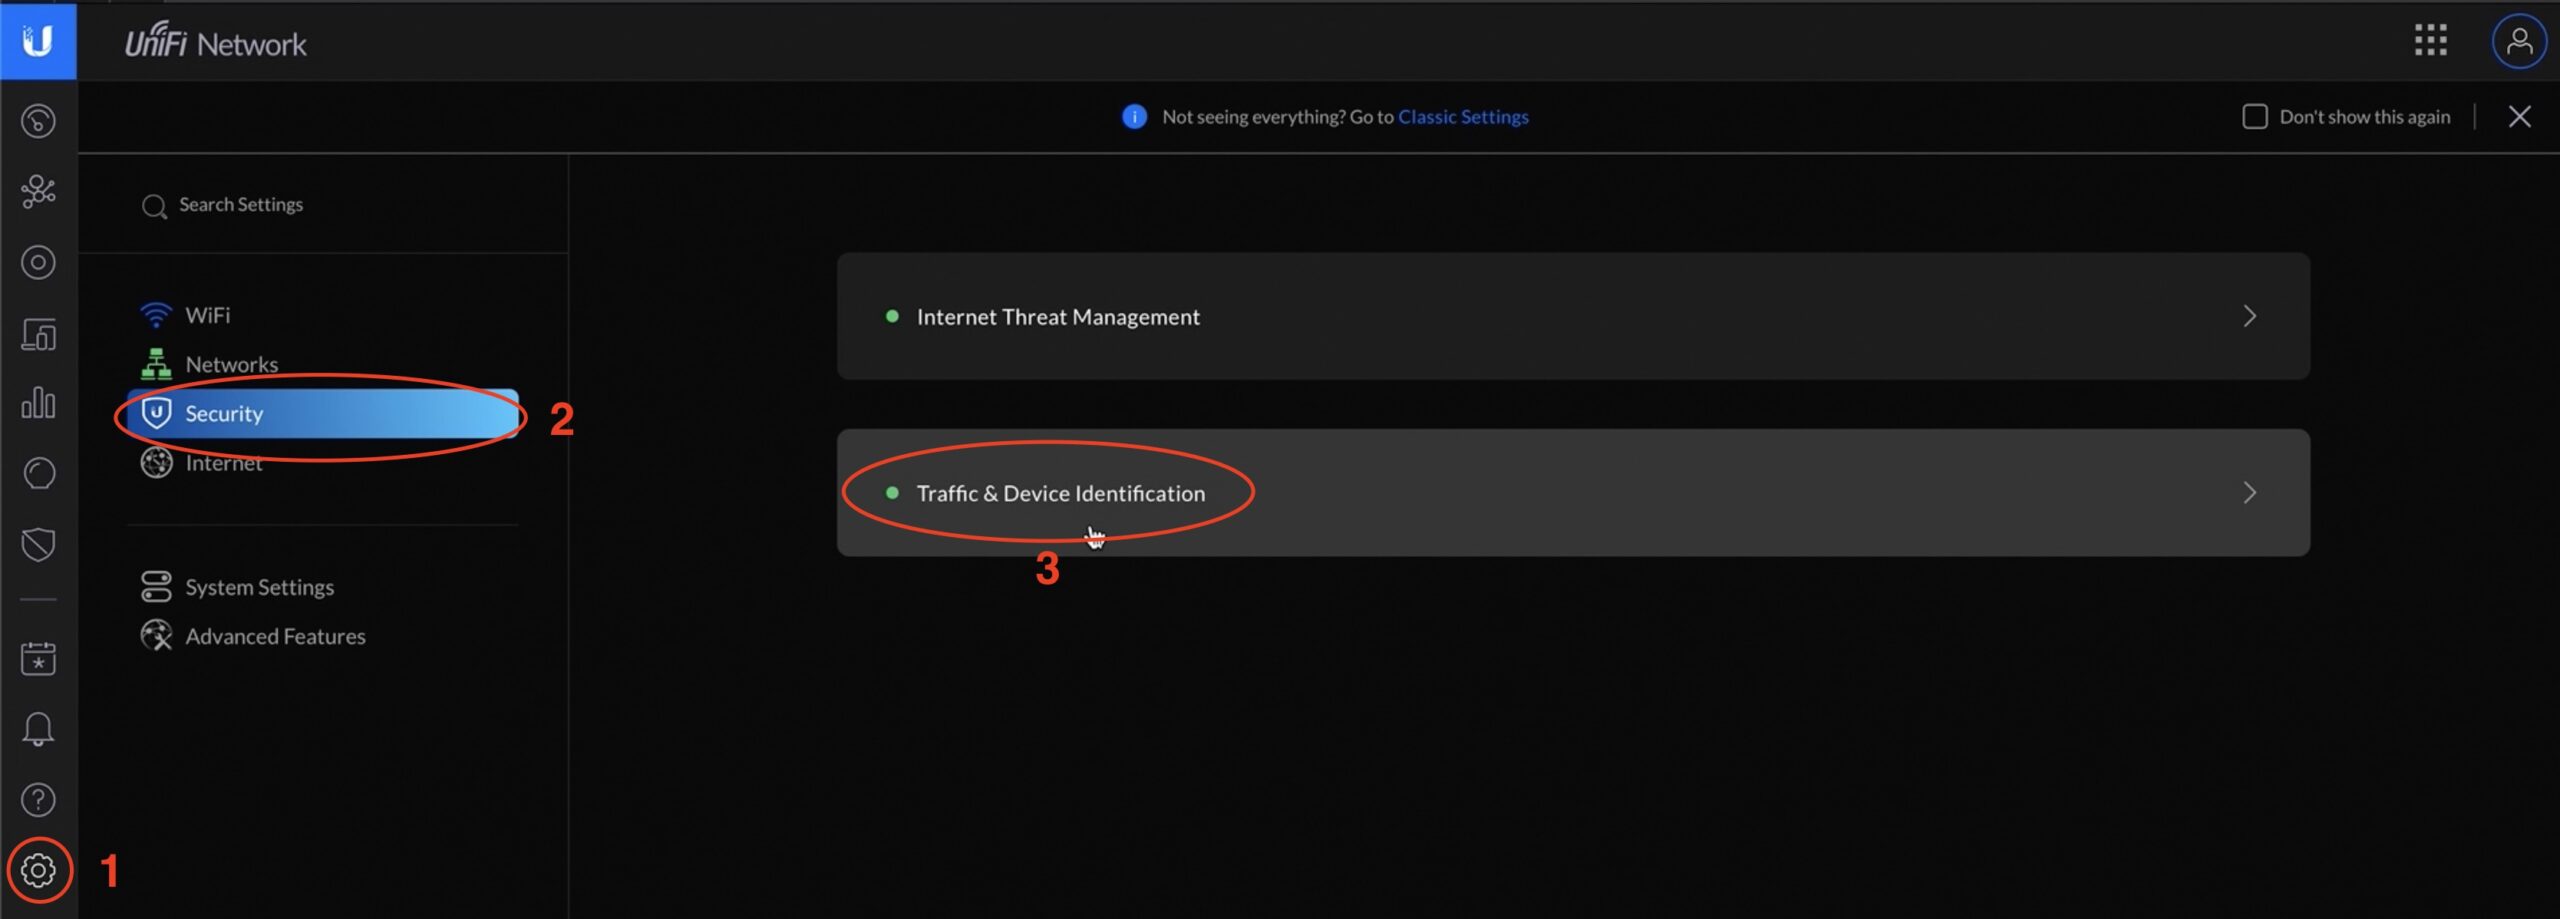
To activate Deep Packet Inspection (DPI) go to New Settings > Security > Traffic & Device Identification
To check your individual clients data gathered by the Deep Packet Inspection go to Clients > click on a client of your choice and select Traffic tab from the opened window.
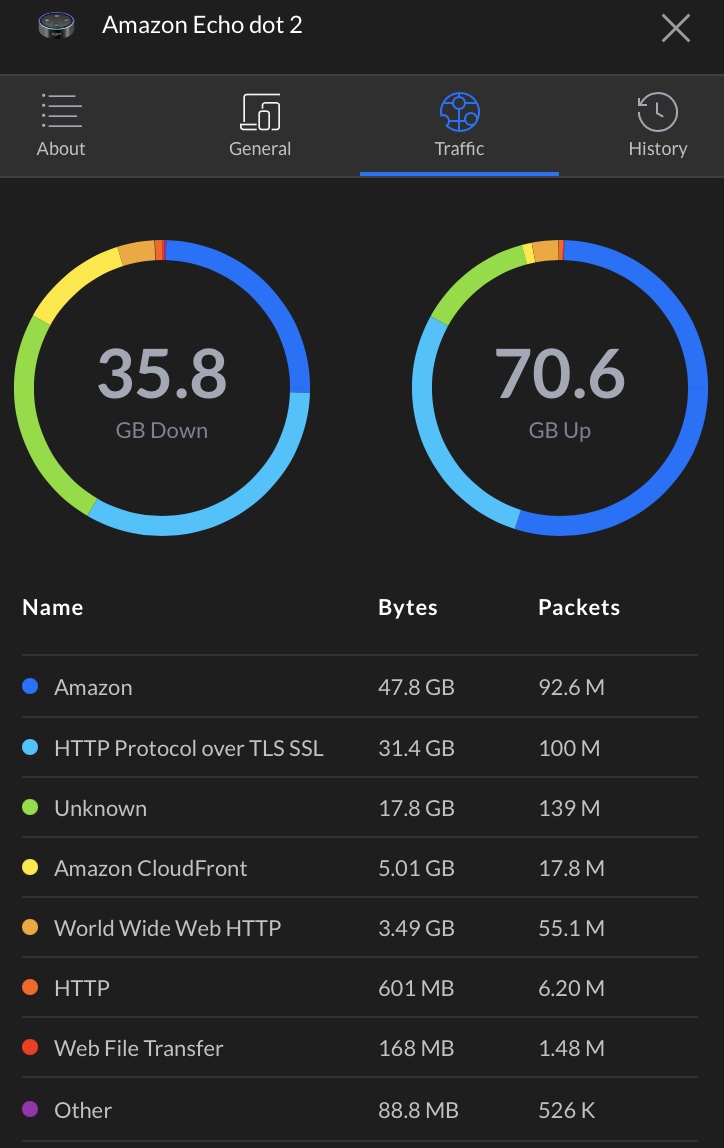
Detailed data for my Amazon Echo Dot gathered from Deep Packet Inspection.
You can also clear the Deep Packet Inspection data from the same menu by just clicking on the Clear DPI Data button.
Restriction Definitions and Restriction Assignments
Use these features to define restrictions based on different categories, services or applications. You can then assign these restrictions to the connected clients by either choose your WiFi or Wired network.
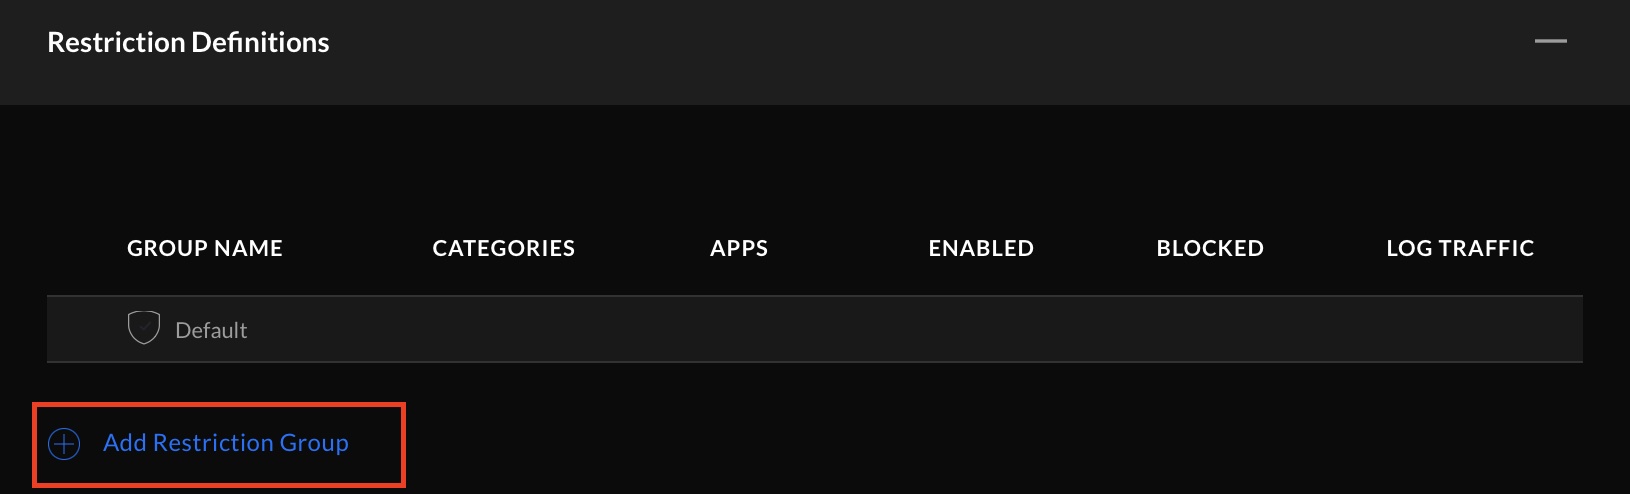
To define a restriction go to New Settings > Security > Traffic & Device Identification > Restriction Assignment > Add Restriction Group > add a name for your restriction group and click on Add Restriction button.
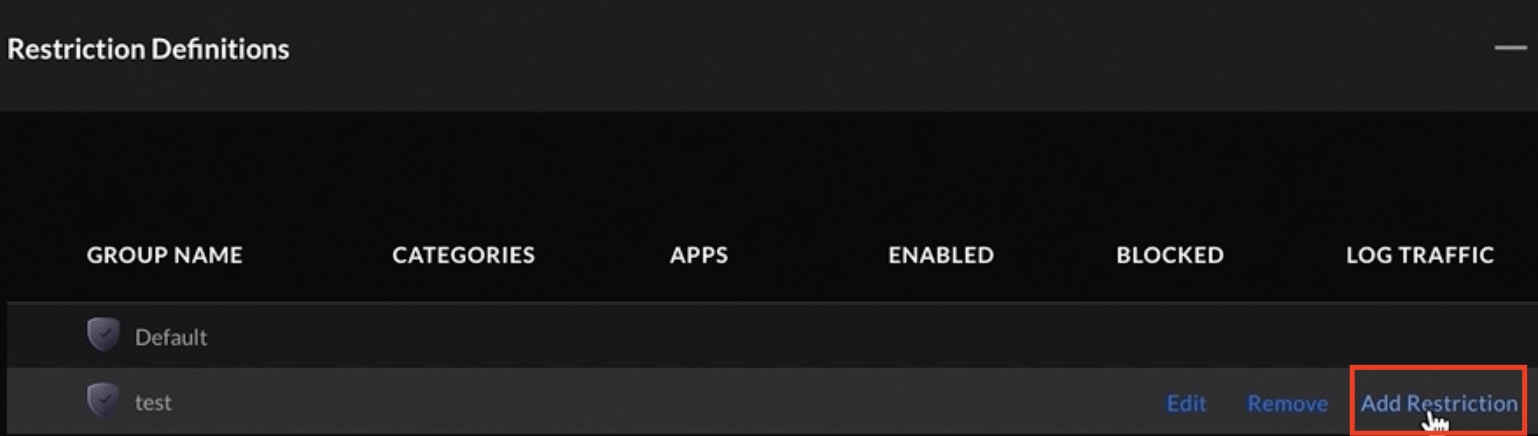
After you create a restriction group you can add restrictions to it by clicking on the Add restriction button.
From the dialog that will be shown you can select from multiple categories and applications what exactly to restrict.
You can switch on or off Block Traffic, Log Events, and Enable This Restriction toggle buttons.
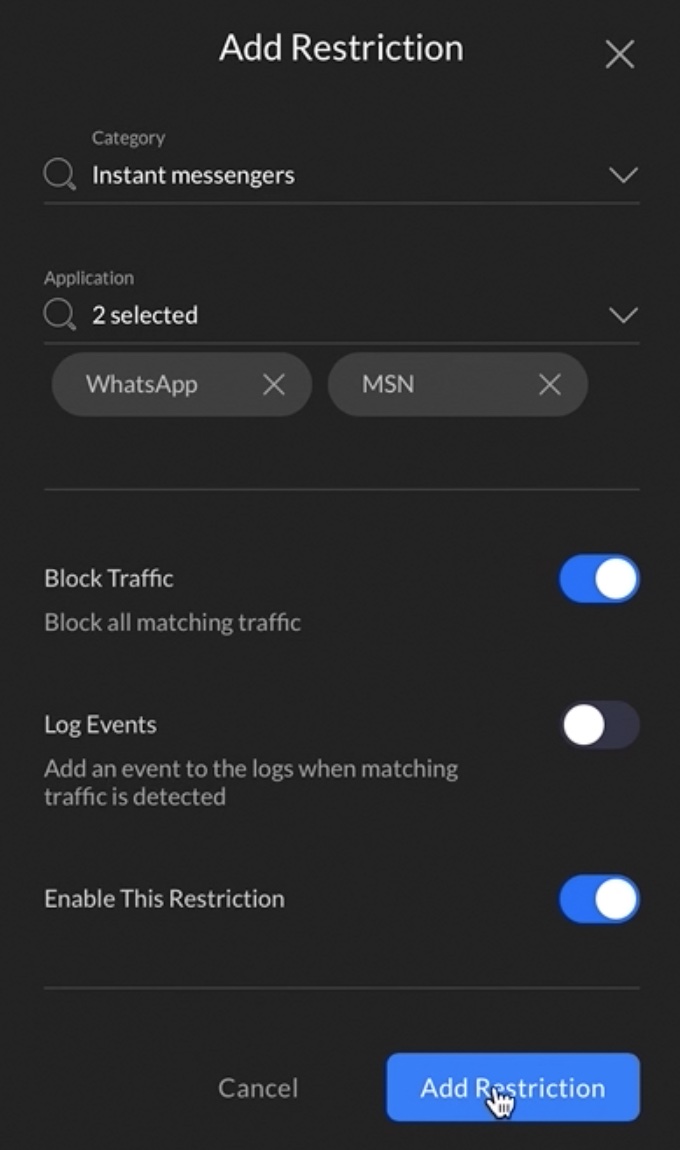
When you are ready click on Add Restriction button.
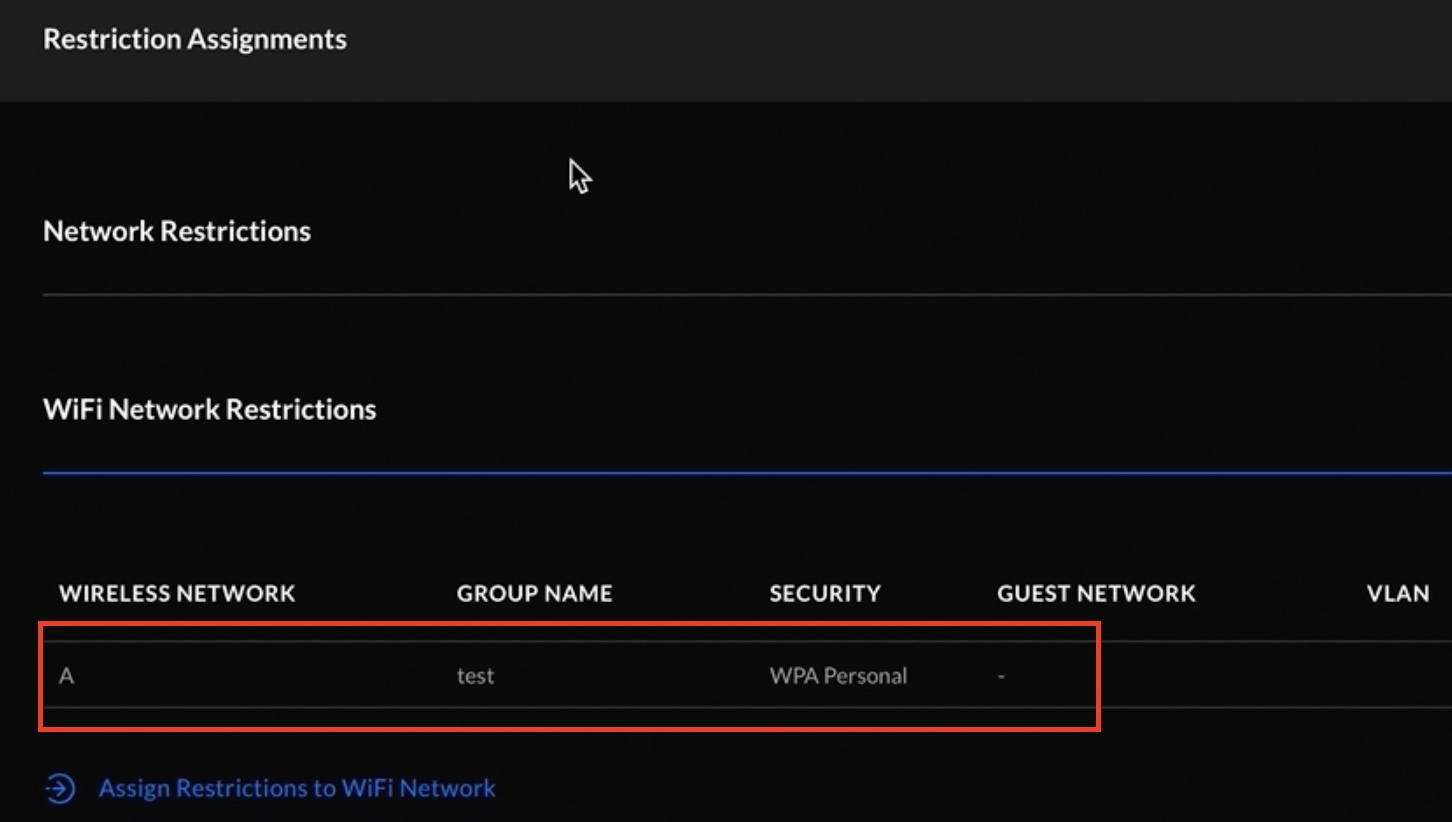
Then go to Restriction Assignments section and select either Network Restriction or WiFi Network Restriction and click on the button underneath to assign the created restriction group that we created earlier.
UniFi GeoIP Filtering
And last but not least is the UniFi GeoIP Filtering from where you can block individual countries.
To access the GeoIP Filtering go to Threat Management > Overview.

Blocking is as easy as navigating to the map, clicking on a country, and confirming by clicking “Block”.
You can also choose GeoIP Filtering traffic direction from the upper right corner.
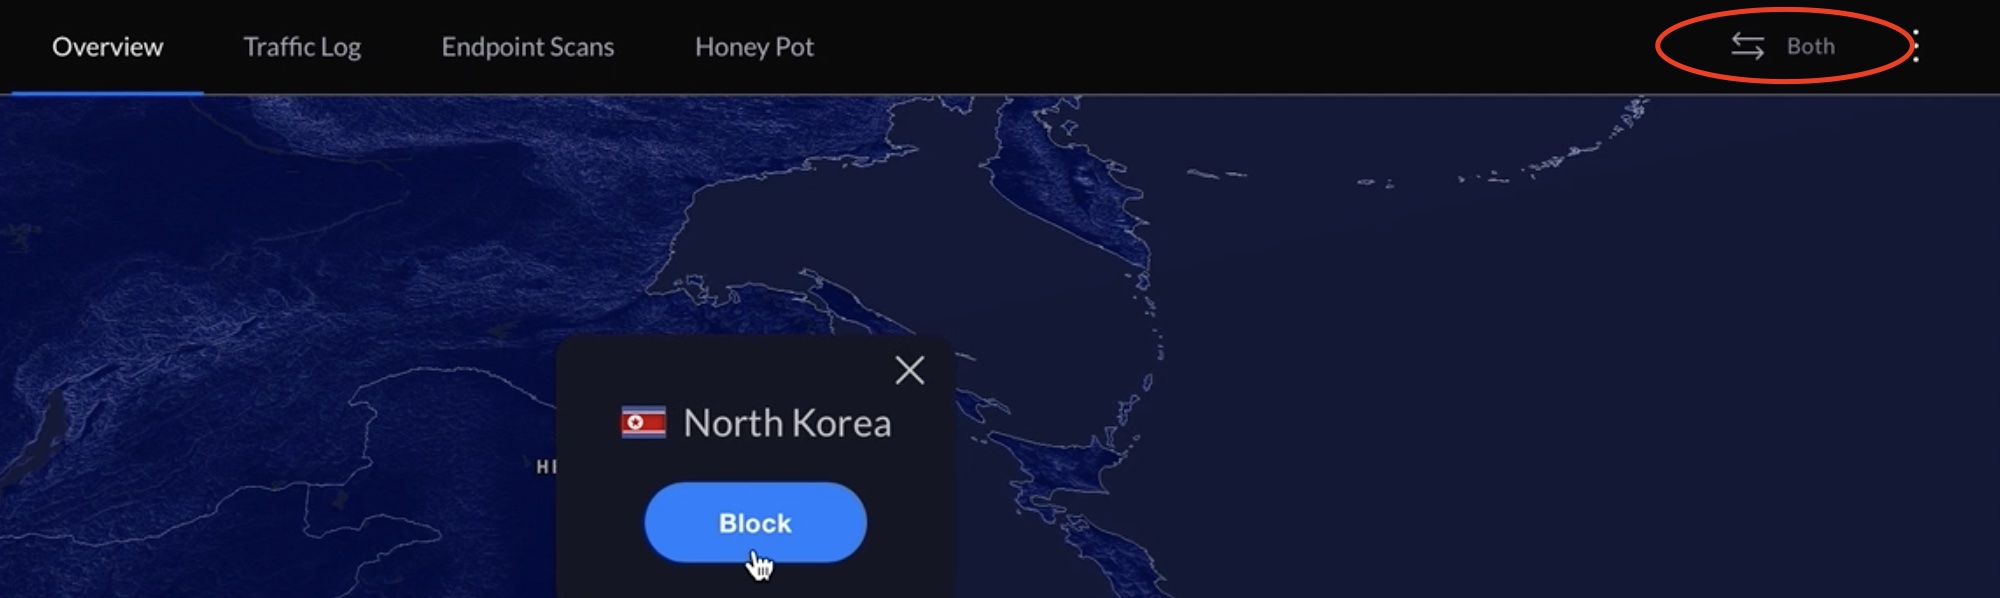
The available options are: Both, Incoming and Outgoing. That means you can block only the Incoming traffic from a country or countries, which makes the most sense for me.
Question for You!
Quick question for you what is your favorite security feature in UniFi controller? Let me know in the comments below. I promise to respond you back so we can chit chat a bit 😜
Summary
I really hope that you find this information useful and you now know more about the UniFi Internet Security Settings available in USG and UDM devices. As well as terms like Deep Packet Inspection, Threat Management, Intrusion Detection and Prevention Systems, Honeypot and so on and so on.
If you want to secure this blog existence you can become one of my supporters. You can see exactly how in this section of my site.
I can’t thank enough to all wonderful guys that are supporting my work already – you are amazing!
Any other sort of engagement on this site and my YouTube channel does really help out a lot with the Google & YouTube algorithms, so make sure you hit the subscribe, as well as the Like and Bell buttons.
If you are just entering the Smart Home world you could also buy my digital product called: Smart Home – Getting Started Actionable Guide 👉 LINK
Also feel free to add me on Twitter by searching for @KPeyanski. You can find me on my Discord server as well.
Stay safe and don’t forget – Home Smart, But Not Hard!
Hi, thank you for the nice Site.
How can I whitelist one single web server in a geo blocked country? Is this possible?
best wishes
Sascha