
What contactless liquid sensor is? Can you make such sensor smart by your own? Proudly present you another DIY smart sensor named XKC Y25 that is working with Home Assistant. This time I will show you how to easily create an Intelligent non-contact level sensor that can detect whether a liquid is present in a plastic, glass or ceramics container up to 20mm thick.
Table of Contents
What is the main idea?
The idea is the following the sensor have to be glued to a tank wall or a pipe and when there is liquid inside that tank at the level of the sensor or above it, the sensor will have state ON. Respectively, when the liquid inside the tank drops below the sensor level – the state of the sensor will become OFF.
That is called a binary sensor in Home Assistant terms as you will see later.
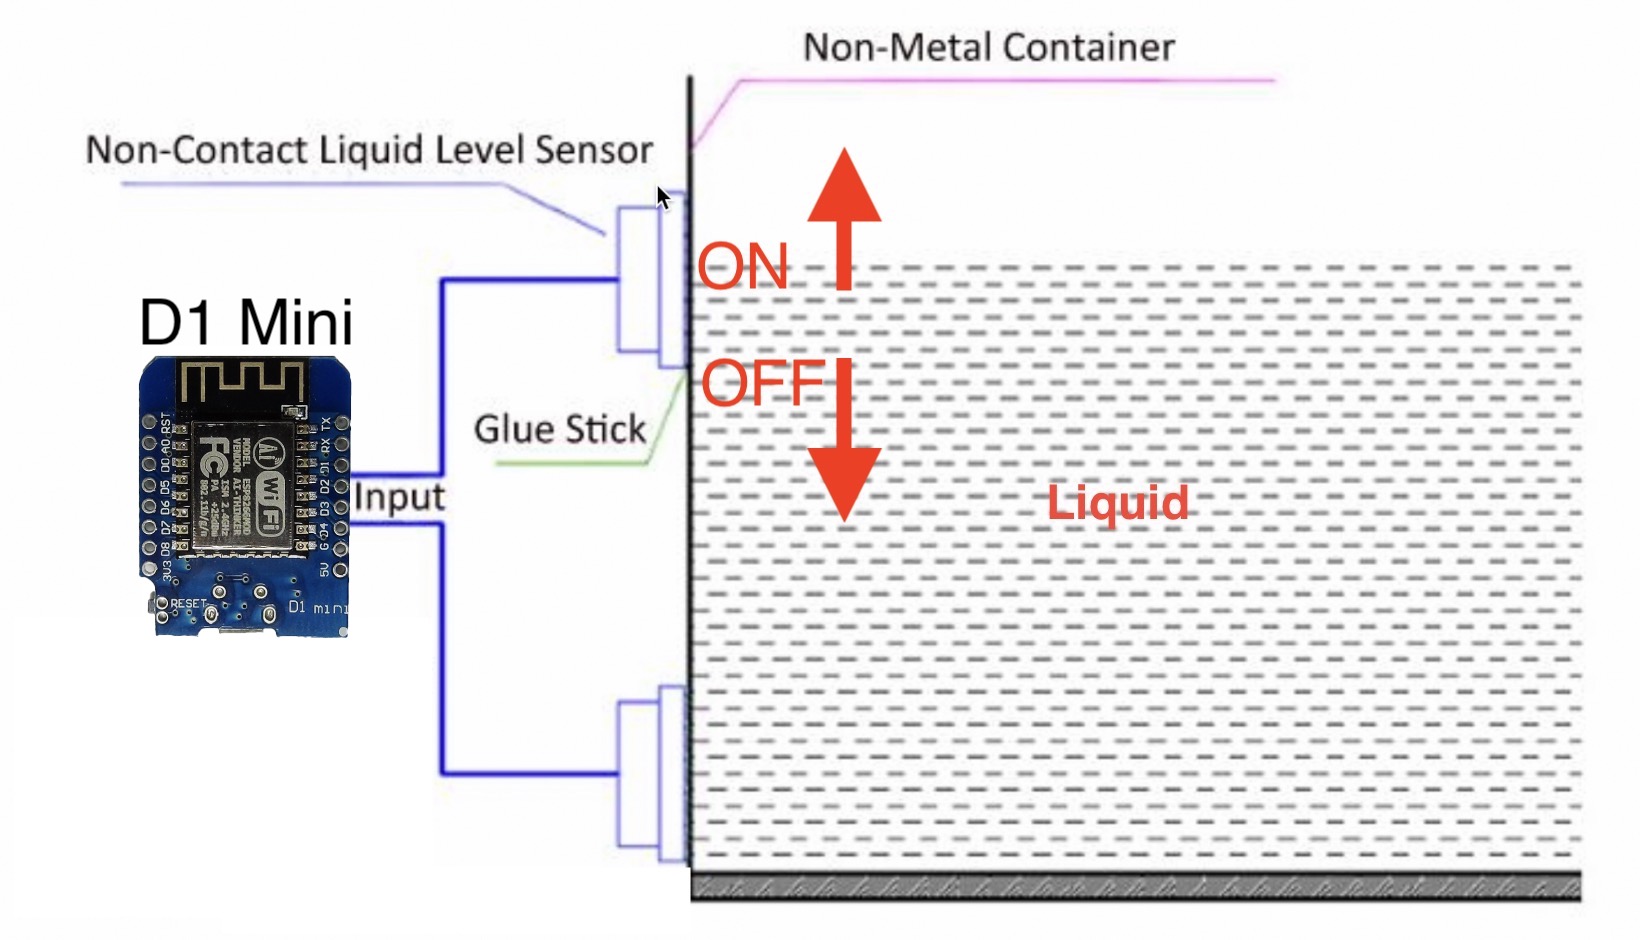
And because there is no contact with the liquid, the sensor is suitable for hazardous applications such as detecting toxic substances and all kinds of liquids in containers under high pressure.
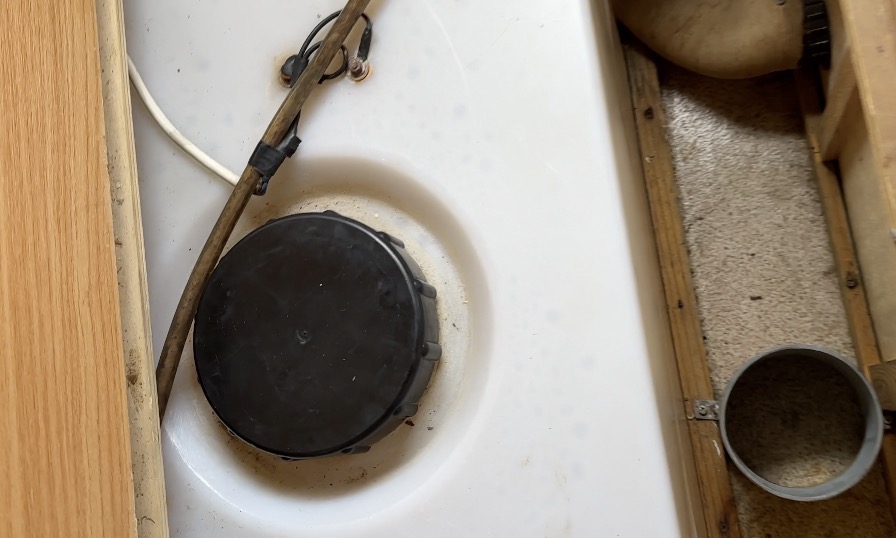
One great use case of this sensor is measuring the level of clean, grey and brown water in Campers or Caravans. My idea is to use this smart non-contact liquid level sensor for exactly that purpose.
XKC Y25 Contactless Liquid Sensor Cost & Specs
I got my sensor from AliExpress where there are 3 different modifications. Mine is the PNP model.
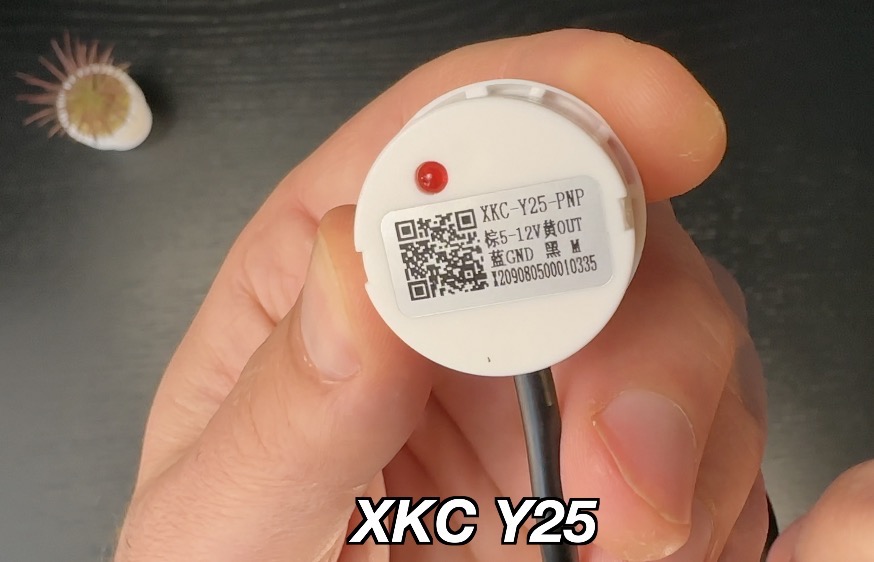
This version cost me around $5 US dollars with the shipping , it is waterproof with an IP67 rating, can work in a humidity range from 5% to 100%, and has an operating temperature range from 0 to 100 Celsius, which makes it quite versatile.
- XKC Y25 PNP contactless liquid sensor (AliExpress) – https://s.click.aliexpress.com/e/_Dm5HfPj
- XKC Y25 PNP contactless liquid sensor (Amazon) – https://amzn.to/40U5Qqj or https://amzn.to/3Z65DPl
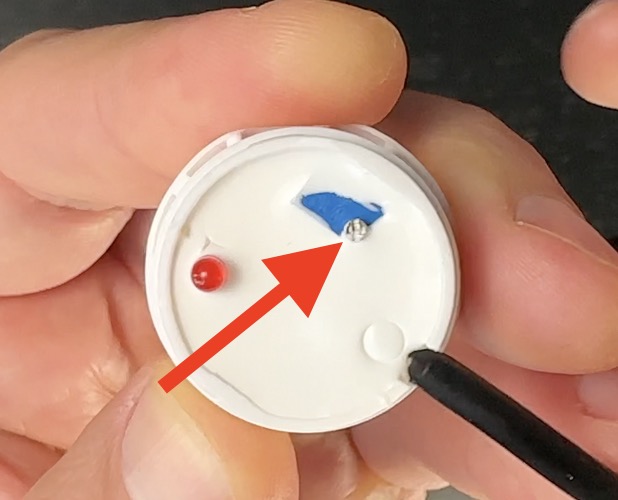
Adjusting the Sensitivity of the XKC Y25 sensor
By removing the cover, you can adjust the sensor sensitivity. Counterclockwise rotation of the knob will increase the sensitivity and respectively, clockwise rotation will decrease it.
What is needed to make the Liquid Sensor Smart?
Apart from the XKC Y25 sensor, several other things are needed and I’m going to list them all in the next few sections.
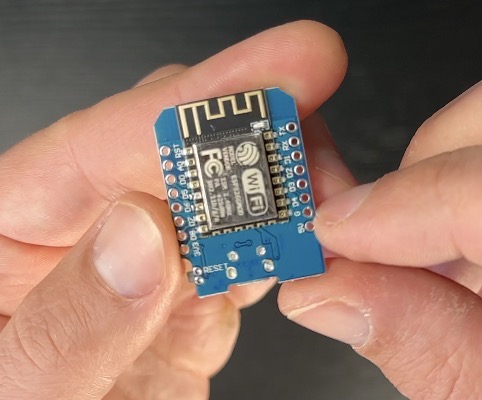
D1 Mini
Next thing that is needed for todays DIY project is an ESP board. I will use a D1 mini for that purpose and I will connect the liquid sensor to that D1 Mini and then I will upload the ESPHome firmware on it, so I can read the sensor data wirelessly.
- D1 Mini (AliExpress) – https://s.click.aliexpress.com/e/_AFgAIp
- D1 Mini (Amazon) – https://amzn.to/3A5jNoc
Do not worry I will show you the wiring and firmware uploading procedure in just a moment. It is peace of cake.
Working Home Assistant
Third thing that is required is a working Home Assistant. If you don’t have such yet go and register for my Home Assistant Webinar where I’ll talk about the all 4 official methods of Home Assistant installation + 1 secret and stupid easy way to get started on a PC in under 5 minutes.
Link to the free webinar registration page -> https://automatelike.pro/webinar
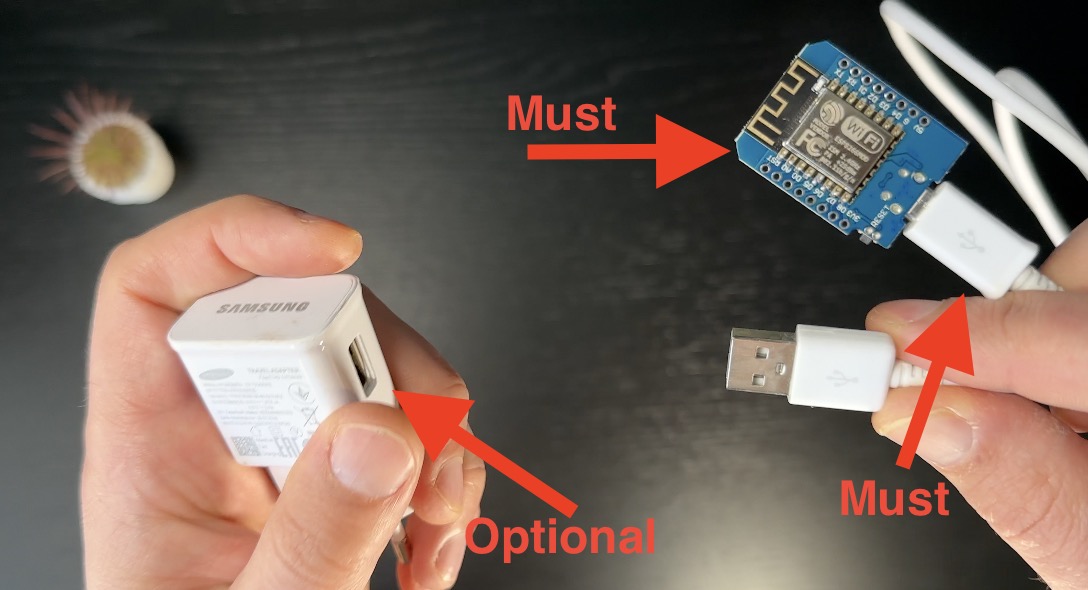
Micro USB cable and optional adapter
Final things that are needed, are a Micro USB cable and optionally an USB power adapter that will be used to power up the D1 Mini as well as the contactless liquid sensor.
Where to buy the needed parts?
I bought all of the things above from the AliExpress website. The parts are also available in Amazon, but they are slightly more expensive there. Both AliExpress and Amazon links for all of the needed parts for this project can be found below:
- XKC Y25 PNP contactless liquid sensor (AliExpress) – https://s.click.aliexpress.com/e/_Dm5HfPj
- XKC Y25 PNP contactless liquid sensor (Amazon) – https://amzn.to/40U5Qqj or https://amzn.to/3Z65DPl
- D1 Mini (AliExpress) – https://s.click.aliexpress.com/e/_AFgAIp
- D1 Mini (Amazon) – https://amzn.to/3A5jNoc
- Micro USB Cable (AliExpress) – https://s.click.aliexpress.com/e/_DmMNO6L
- Micro USB cable (Amazon) – https://amzn.to/32tdxdF
- (Optional) USB adapter EU US UK (AliExpress) – https://s.click.aliexpress.com/e/_DCIgyvF
- (Optional) USB adapter (Amazon) – https://amzn.to/3u2Tdvj https://amzn.to/3qXkJYS
How to wire the XKC Y25 PNP and D1 Mini?
Now it is time to wire the future smart contactless liquid detector to the D1 mini board and then to upload the ESPHome. Here is how I did it.
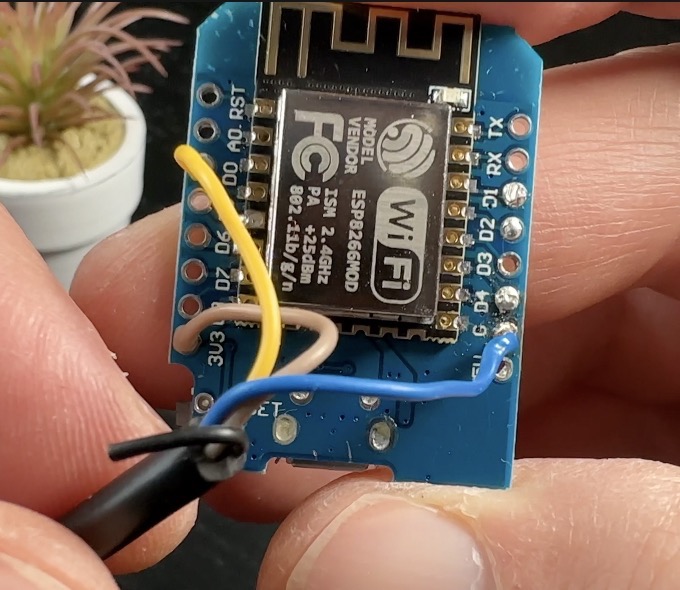
First, I cut the plastic connector at the end of the XKC Y25 PNP cable and I connected the wires directly to the D1 mini board as follows:
| XKC Y25 Sensor | D1 Mini |
|---|---|
| Blue wire (Ground) | GND |
| Brown Wire (VCC) | 3v3 |
| Yellow Wire (Signal Output) | D0 (GPIO16) |
| Black Wire | Not connected |
I solder the wires and below is the end result. Have in mind that the black wire is not connected anywhere and can be insulated somewhere, so it doesn’t get in the way.
Connecting several sensors to one D1 Mini Board
It is possible to add several XKC Y25 contactless liquid sensors to one ESP board. Using this approach you can mount several contactless sensor to one water tank for more precise monitoring. I didn’t made that yet, but I plan to do it in the future.
As general guideline, an external power supply should be used and different Data Pin for every contactless sensor have to be chosen.
UPDATE: Robert, shared in the comments below that he managed to connect second sensor using the following:
He connected the blue and brown wires from both sensors together, and the yellow wire from the second sensor I connected to D8 (GPIO15). Below is the code for both sensors:
binary_sensor:
– platform: gpio
pin:
number: GPIO16
mode:
input: true
pulldown: true
device_class: moisture
name: “Liquid sensor – upper ”

– platform: gpio
pin:
number: GPIO15
mode: INPUT_PULLUP
device_class: moisture
name: “Liquid sensor – lower”
If you have some other experience with connecting multiple sensors to one ESP board – please, share it in the comments bellow.
Question for You
I’m planing to use this contactless liquid detector in my Camper, so that I will know when the water tank is running out of water.
But I’m wondering what is your use case for this DIY project? Can you share what is your idea in the comments below?
Installing ESPHome on the D1 Mini
ESPHome Dashboard installed as Home Assistant add-on is probably the easiest way to manage ESPHome devices. This method + several other are well described in this article of mine – Complete ESPHome Installation Guide: 4 different ways to install ESPHome. If there is such need go read it and then come back right here.
This is how I will upload ESPHome firmware on the D1 Mini:
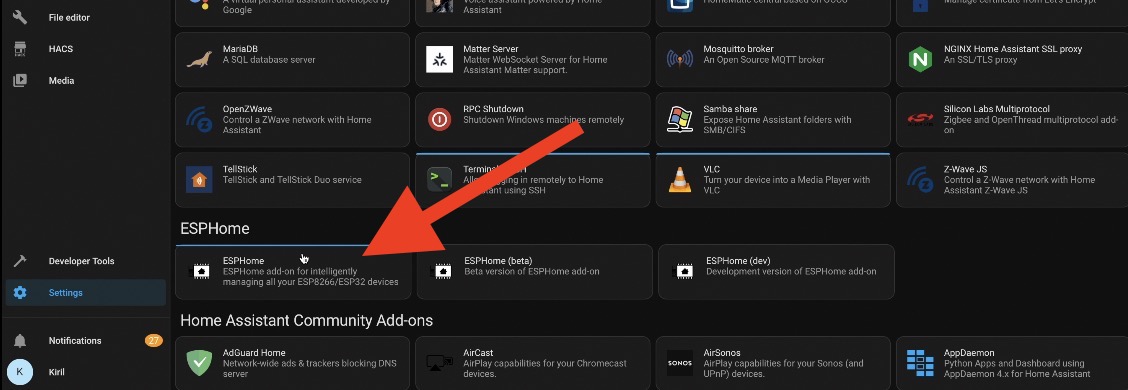
- While I’m Inside Home Assistant I pressed the “c” button to invoke the search command bar and I typed – ESPHome
- Then I selected Navigate ESPHome, to open the ESPHome Dashboard
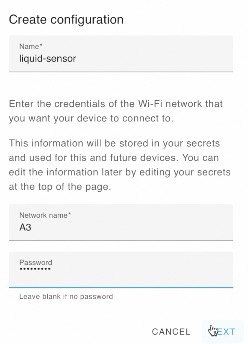
- Inside the ESPHome Dashboard I clicked on the New Device button then on Continue
- Then I enter a device name (ex. Liquid Sensor) and I typed my WiFi name and Password.
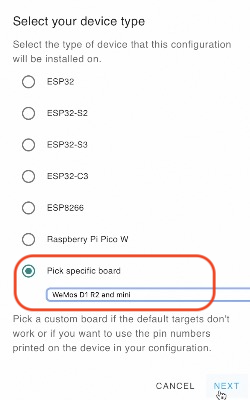
- Then I choose Pick a specific board option and I selected the D1 Mini from the dropdown list
- I leaved the auto generated Encryption Key and I pressed on the Skip button, as I want to add few more lines to the ESPHome Configuration.
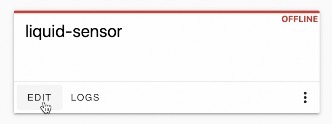
- To edit the configuration I pressed the Edit button under the newly created Liquid Sensor.
- I added the following lines at the bottom of the existing ESPHome configuration:
# Example configuration entry
web_server:
  port: 80

binary_sensor:
  - platform: gpio
    pin:
      number: GPIO16
      mode:
        input: true
        pulldown: true
    device_class: moisture
name: "Liquid Sensor"- The web_server line will open a Web Server on the default port 80, so you will be able to see the status of the sensor from any web browser. This web_server part is optional and you can remove/comment it if you don’t need it.
- In binary_sensor section I suggest to not change anything unless you know what you are doing. Just for information – GPIO16 is equal to D0 pin on the D1 mini according to the D1 Mini board pinout.
- Finally I saved the changes.
- I connected the D1 Mini with the Micro USB cable to the device where Home Assistant/ESPHome dashboard are running and I clicked on the Install button.
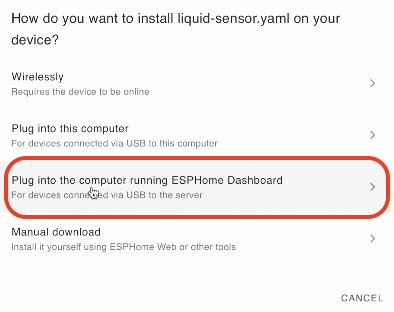
- I selected the Plug into the computer running ESPHome Dashboard option.
- After several minutes (3-5min) the Smart Contacless Liquid Sensor should be ready for use.
Testing the Liquid Sensor using the Web Interface
After the installation of ESPHome is ready I wanted to quickly test if the sensor is working as expected. Here is what I did:
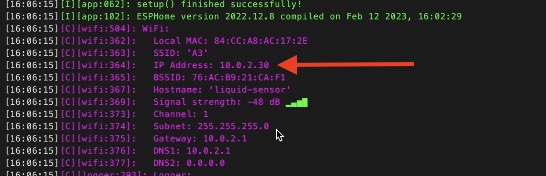
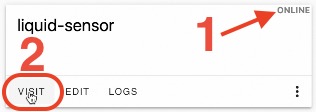
- I opened the ESPHome Dashboard and I saw that the Liquid Sensor is online.
- I pressed on the Visit button and the Web Page of the device was opened for me.
- I used a glass of water and when I glued the sensor to the glass it state immediately goes to ON.
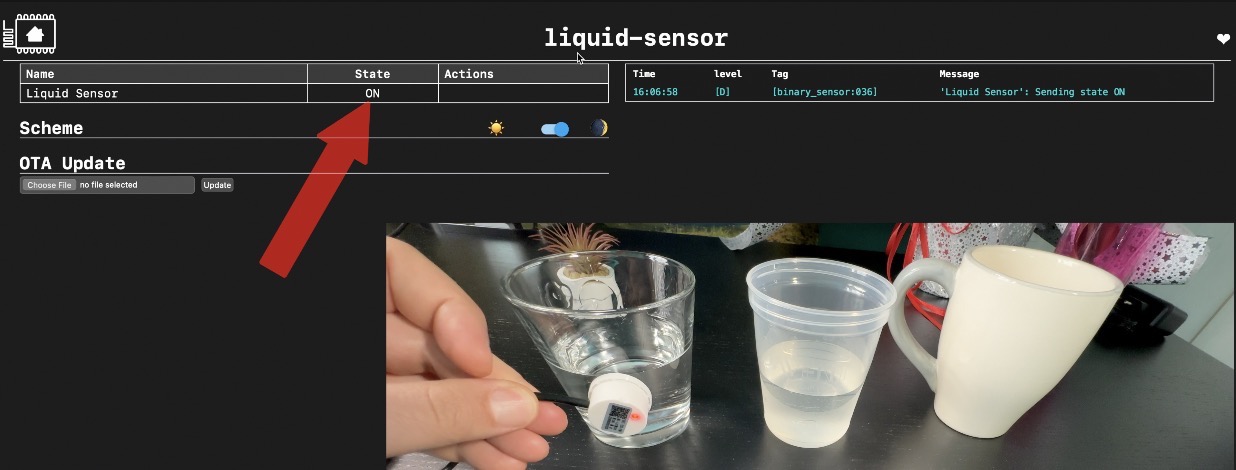
- If I moved the sensor up to the empty part of the glass – the sensor state becomes OFF immediately.
This quick test described above showed me that the sensor is working perfectly and I can freely continue forward to the more interesting part.
Smart Home Glossary?
Before I continue to the actual adding of the DIY smart liquid sensor in Home Assistant I want to give you my free Smart Home Glossary that will help you find the meaning of the 60+ of the most popular Smart Home words and abbreviations.
Download that Smart Home Glossary right now free of charge from my other website https://automatelike.pro/glossary
With glossary or not here is how I added the sensor in Home Assistant
Adding the XKC Y25 in Home Assistant
Adding the ready to be used Contactless Liquid Sensor that is running ESPHome in Home Assistant is extremely easy. Let me explain how I added mine:
- While I was inside Home Assistant I pressed the “c” button to invoke the search command bar.
- I typed Integrations and I selected Navigate Integrations.
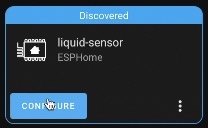
- Inside the Home Assistant Integrations list I found the Liquid Sensor auto discovered and I pressed Configure button under it.
Quick Tip: If the sensor is not auto discovered it should be manually added. By adding a new ESPHome integration and providing the IP of the sensor during the configuration process.
- After I successfully added the Contactless Liquid Sensor in Home Assistant I can see a new device under the ESPHome Integrations. And now, I can start using this Device/Sensor in Home Assistant automations & scripts.
How to create a Home Assistant demo automation?
One of the biggest flex of Home Assistant are the automations. You can easily create an automation that will notify you when the liquid in the tank that you are monitoring is below certain level.
Here is one quick example that will send a persistent notification when Liquid Sensor becomes Dry (Not moist)
alias: Dry Liquid Sensor
description: ""
trigger:
  - type: not_moist
    platform: device
    device_id: 421168f108dc14423f7f34dc7c6d499d
    entity_id: binary_sensor.liquid_sensor
    domain: binary_sensor
condition: []
action:
  - service: persistent_notification.create
    data:
      message: liquid sensor is dry
mode: single
To use the above automation in your Home Assistant setup, you have to change the device_id & entity_id with yours.
Challenge for You
I’m pretty happy with the end result of this DIY smart contactless liquid sensor. If you manage to create such sensor for yourself, share that in the comments below, by typing #LiquidSensorOwned
If you want to see more DIY Smart Sensors that are working with Home Assistant check this category of mine – https://peyanski.com/category/smart-home/smart-sensors/
I promise to congratulate you personally for the efforts.
Thanks for reading. I’m Kiril, see you next week. Bye!
Hi,
I was able to connect the second sensor. I connected the blue and brown wires from both sensors together, and the yellow wire from the second sensor I connected to D8 (GPIO15). Below is the code for both sensors:
binary_sensor:
– platform: gpio
pin:
number: GPIO16
mode:
input: true
pulldown: true
device_class: moisture
name: “Liquid sensor – upper ”
– platform: gpio
pin:
number: GPIO15
mode: INPUT_PULLUP
device_class: moisture
name: “Liquid sensor – lower”
Great work Robert, and many, many thanks that you are sharing your solution. I will put it in the article 😉
Thank you for the amazing tutorial!
I put one together, however, the state of the sensor never changes from OFF to ON. The sensor itself has a red light that turns on when its near water. I also measured about 2.2mv on the yellow wire when water is present. Any ideas on what could be wrong?