
In this article we will see what are the up to date options to install ESPHome on an ESP device. This is a complete ESPHome installation guide as we will go through the ESPHome prerequisites, ESP board preparation and several different methods to install ESPHome. Namely using: Home Assistant, using Docker, using Python and using a ESPTools in a web browser.
Table of Contents
What is ESPHome?
If you are wondering what actually is ESPHome here is quick explanation:
ESPHome is an alternative open source firmware that allows you to locally control ESP8266 or ESP32 based devices by simple yet powerful configuration files, so you can then add these devices in many different Home Automation systems like Home Assistant or Node-RED for example.
For what ESPHome can be used?
The whole idea with ESPHome is the following: Imagine that you buy an IoT device (which usually is ESP based, that means the main chip inside is either ESP8266 or the newer one ESP32).
- Scenario 1: This IoT device can be either without any software on it, as example: D1 mini, NodeMCU and many others.
- Scenario 2: The IoT device can be pre installed with software from the vendor that is selling it. For example: Sonoff, Shelly, Tuya and many, many more.
In both of the above mentioned scenarios you can upload the ESPHome firmware and replace what was on that device before, gaining full local control over the device.
You can then add this new ESPHome device to your favourite Smart Home Hub (e.g. Home Assistant, Node-RED, etc) and you can connect it to MQTT Broker if you wish. That way you can add one more trustworthy soldier to your Smart Home army that will serve you for the years to come.
What are the ESPHome Prerequisites?
There are some prerequisites that needs to be met to successfully install ESPHome on an ESP device, but do not worry as you are reading a complete ESPHome installation guide and everything is included here.
The most important requirement is that you have to connect the ESP device to your computer somehow. This usually can be done using one of the following ways:
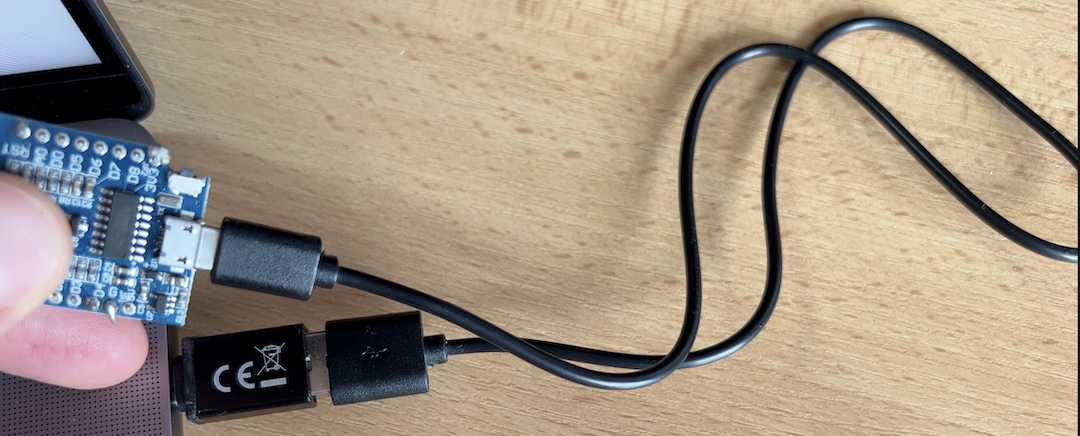
- Using a micro USB cable if the ESP device of interest have such port on it.
How to properly connect an ESP device for ESPHome install?
If your ESP device have a micro USB port you just have to connect it to your PC and you are ready to upload ESPHome.
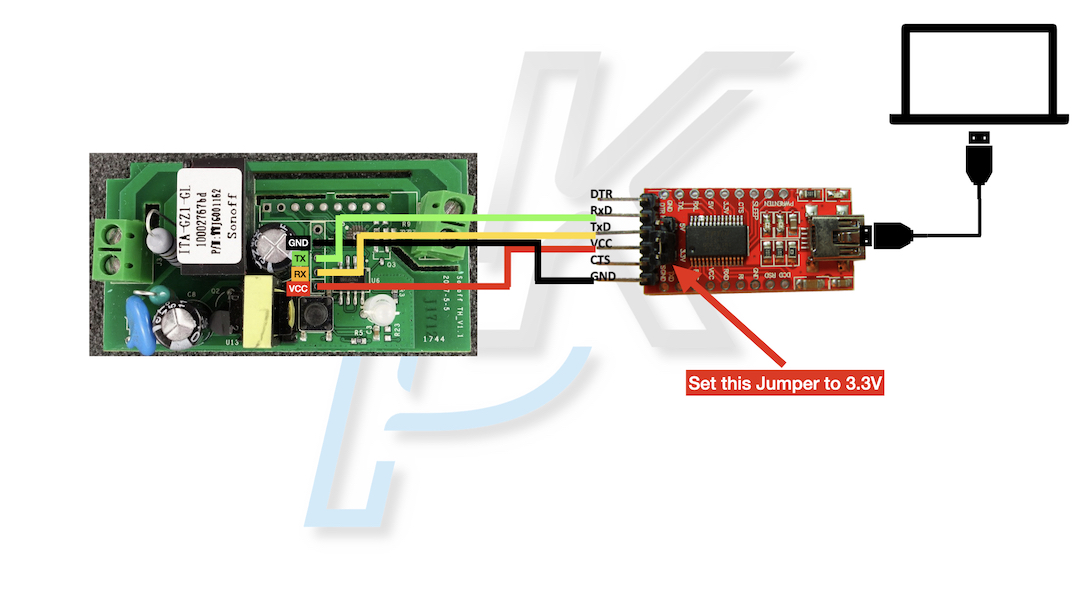
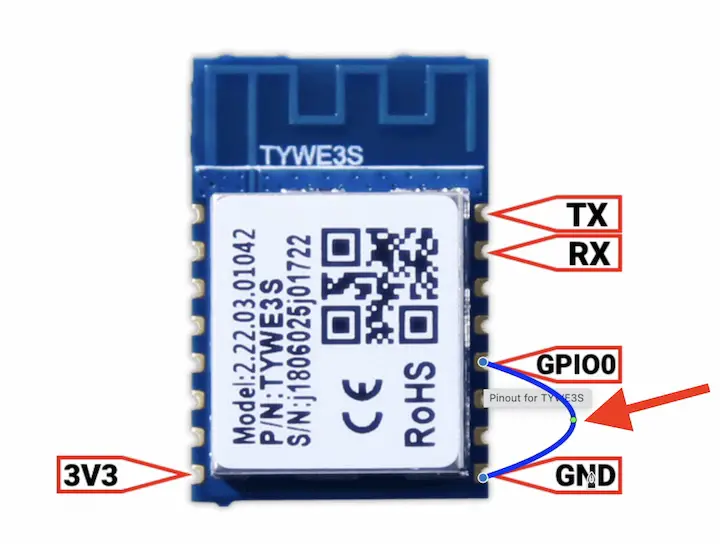
Otherwise, you have to connect a Serial-To-USB adapter to your computer and then you have to connect your Serial-To-USB adapter to the ESP device as follows:
- VCC on the Serial-to-USB adapter to VCC on the ESP device
- GND on the Serial-to-USB adapter to GND on the ESP device.
- RX on the Serial-to-USB adapter to TX on the ESP device
- TX on the Serial-to-USB adapter to RX on the ESP device
How to put an ESP device in Programming/Flashing mode?
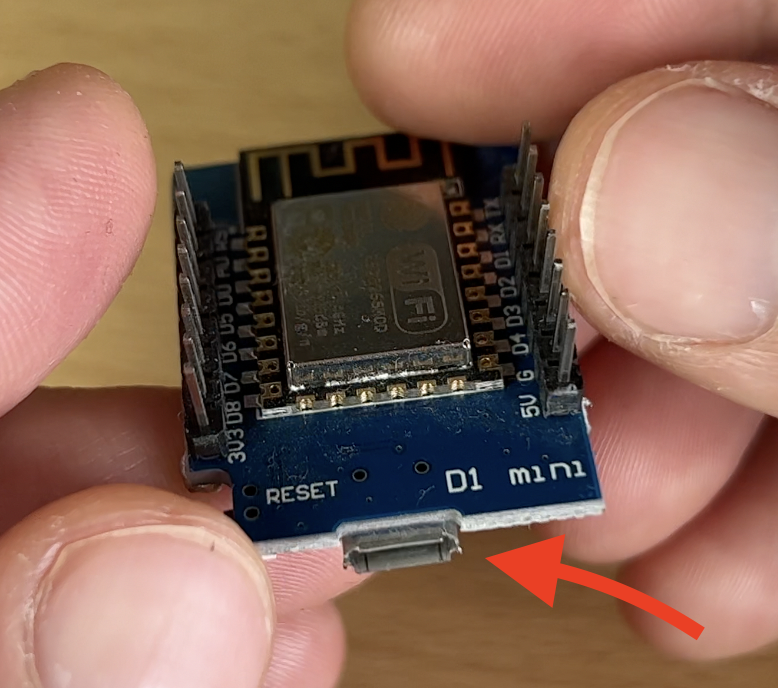
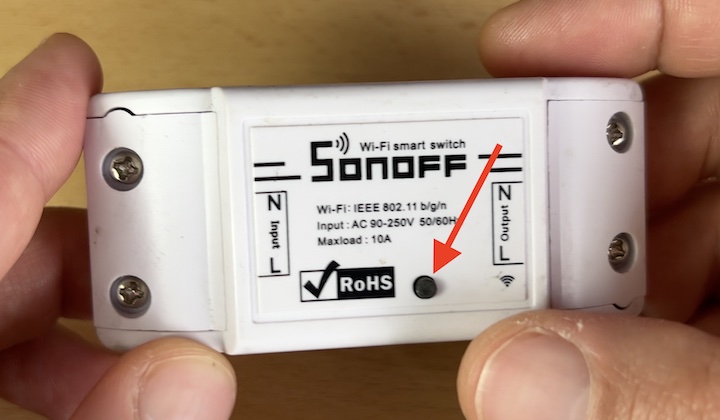
Depending of the ESP device that you have, you may have to hold down the board button or to connect GPIO0 to GND with a wire while the device is booting to put it in Programming or also known as Flash mode.
For some devices like the D1 Mini, NodeMCU, etc you don’t have to do anything special to put them in Programming mode as they are in constant mood for changes & updates (as they are also known as development boards)
What are the recommended software tools to install ESPHome?
After you put your device into the programming mode or flash mode, you have several ways to install ESPHome and as I said in the beginning the methods are:
- Using Home Assistant,
- Using Docker (command line),
- Using command line and Python,
- And using ESPTools in a web browser.
I will show them all as this is a complete ESPHome installation guide
How to Install ESPHome using Home Assistant?
I will start with Home Assistant method. To use this method you need either Home Assistant OS or Home Assistant Supervised installation.
TIP!: If you want to know more about the different Home Assistant Installation methods check my Webinar which is exactly on this topic and it is available on my other website – https://automatelike.pro/webinar absolutely for FREE.
If you don’t want to use Home Assistant to install ESPHome for some reason or you simply don’t have Home Assistant, you can skip this section and go to the next ones where I’m showing the other ESPHome installation methods.
Otherwise, this is what you need to do to install ESPHome using Home Assistant.
In Home Assistant go to:
- Press the “c” button to invoke the Home Assistant command search bar > start to type: Add-on Store > Select Navigate Add-on Store, or click on the My Home Assistant Link below:

- Next, search for ESPHome, click on the result and then click on the Install button.
- When the installation is finished, the Install button will be replaced with Start button – click on it to start the ESPHome add-on.
- Wait few seconds for the ESPHome to start and then click on the Open Web UI button.

- You should see similar screen as above. And you should click on the New Device button.
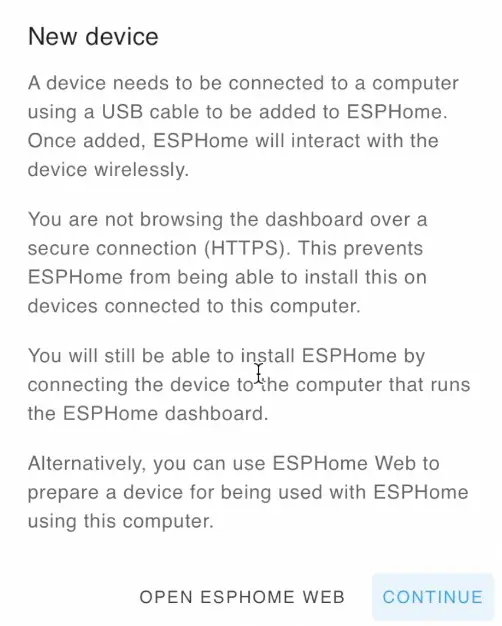
New dialog like this one will appear. Read it if you wish and then click on the continue button.
Next, you should enter a device name of your choice as well as you WiFi name and password. I named my device: smoke-sensor-d1mini.
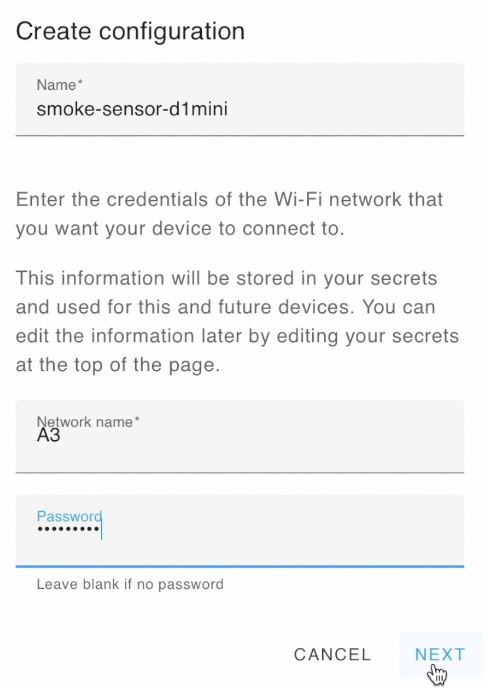
When you are ready click on Next button.
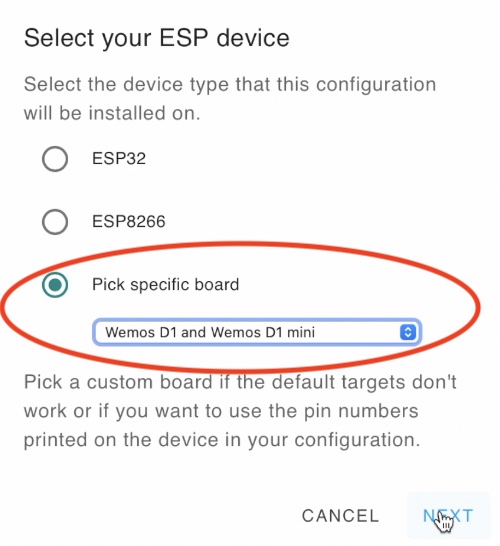
- From the next dialog, click on Pick specific Board radio button and select the Wemos D1 and Wemos D1 mini. Of course, if your ESP board is different – either find it from the list or select the more generic ESP32 or ESP8266 options depending of your board type. Finally, click Next button.
You should see a Configuration Created window with Skip and Install buttons.
- Click Install button and you will have ESPHome installed on your ESP device in no time or…
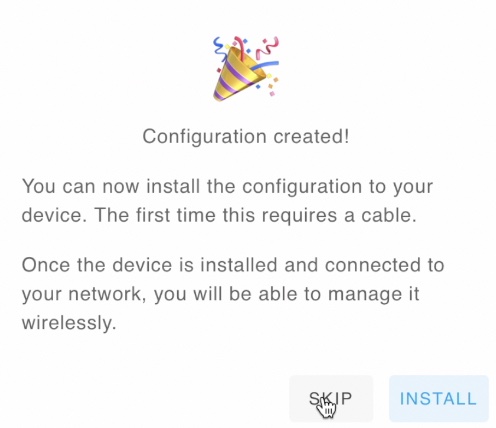
- Click on SKIP button and then on the Edit button under your device name in the ESPHome dashboard if you wish to add some additional configuration as YAML code. That is only needed if for example you are adding some additional sensors or relays to your ESP device like temperature sensor or smoke sensor for example. More info can be found in my articles about that:
- Plug the D1 Mini or whatever ESP device you have in one of the USB ports on the device where Home Assistant and ESPHome are installed and select “Plug into the computer running ESPHome Dashboard” option from the list.
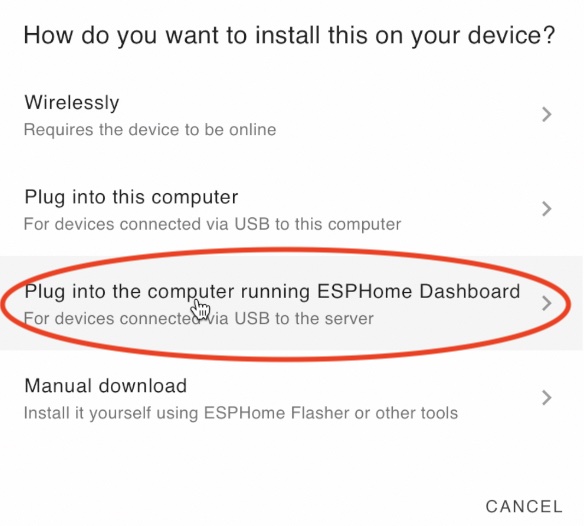
- The USB port where your device is connected will be auto detected and you should only click on it, example: USB2.0-Serial /dev/ttyUSB0.
- If everything is fine, a terminal will appear with a lot of text and multiple text based progress bars. When the ESP installation is finished, your new ESPHome device will be automatically added in the ESPHome Dashboard.
How to Install ESPHome using Docker?
The next method to install ESPHome is using Docker, and this is a command line method which means some Docker commands in the Terminal or Command prompt have to be executed.
If you are looking for the easiest method to get ESPHome maybe you have to wait for the last one, which is using the ESP Web Tools from a Browser, but until then let’s focus on the Docker. For that of course, you need up & running Docker and Internet connection. If you already have that, here are the exact steps that you need to execute to install ESPHome using Docker:
- First thing is to pull the ESPHome Docker image from Docker Hub (Internet):
docker pull esphome/esphome- Then, start the ESPHome wizard! This wizard will ask you about your device type, your device name, your WiFi credentials and finally will generate a yaml file containing all of the configurations for you. In the case below the generated file will be
stl.yamland it will be stored in the folder that you are currently in.
docker run --rm -v "${PWD}":/config -it esphome/esphome wizard stl.yaml- Now, connect your ESP device to the device where Docker is running (either using an USB cable or Serial-To-USB adapter) and if you are on Linux type the following command :
dmesg | grep ttyUSB- The above command will show you the diagnostic messages from the buffer of the Linux kernel. As a result you will able to see which /dev/ttyUSB device is assigned for your connected ESP device (e.g. /dev/ttyUSB0, /dev/ttyUSB1, etc.)
- Put your device in programming mode (if that is needed) and execute the next command to install the ESPHome on the device connected to the /dev/ttyUSB1 using the configuration stored in stl.yaml file (if your /dev/ttyUSB is different, for example /dev/ttyUSB0, /dev/ttyUSB2, etc change it the command below before executing it)
docker run --rm -v "${PWD}":/config --device=/dev/ttyUSB1 -it esphome/esphome run stl.yamlAfter the above command finish, you should have up & running, brand new ESPHome device that can be added in your favourite smart home hub and controlled from there locally.
How to Install ESPHome Dashboard using Docker?
Additionally, you can also start the ESPHome dashboard using Docker. This will help you manage your ESPHome devices from one place. To do that simply execute the following command:
docker run --rm --net=host -v "${PWD}":/config -it esphome/esphomeAfter that, open a new browser or tab and type the IP on the device where Docker is installed and use port – 6052. For example: http://192.168.0.2:6052 and you should see the ESPHome Dashboard.
How to Install ESPHome using Python?
Next method that I want to show you is also command line based, but this time to install ESPHome I will use Python. This method is very similar to the Docker method with few minor differences, so let’s see this:
- If you are on macOS or Linux check if Python is installed by executing the command below. You should receive the version of your installed Python (versions above 3.7.X are required):
python3 --version- If you are on macOS, you need to install
wheelandesphomepackages by using the following command:
pip3 install wheel esphome- If you are on Linux, you have to install
esphomepackage by using the following command:
pip3 install --user esphome- If you are on macOS or Linux you can start the ESPHome wizard using the following command:
esphome wizard stl-python.yaml- Finally, connect your ESP device to your Computer (using USB cable or Serial-To-usb adapter) and put it in programming mode (if needed). Then, Install ESPHome using the configuration in the stl-python.yaml file:
esphome run stl-python.yamlAnd that Is it, you should now have your ESPHome ready to be used.
How to Install ESPHome Dashboard using Python?
If you wish to install the ESPHome dashboard using Python that will be accessible on http://YOUR_IP:6052 type the following command:
pip install tornado esptool esphome dashboard config/How to Install ESPHome using browser and ESP Web Tools?
The last method to install ESPHome is using ESP Web tools. ESP Web Tools, as the name suggest is a tool that can be started from a web browser. This is probably the easiest method to install ESPHome, although there is one small drawback. Using this method you will receive only the core, the basic ESPHome without any configurations for your device.
That means if you have some relays or sensors attached to your ESP device you probably have to upload once again the configuration for these relays and sensors afterwards, probably using any of the above described methods. The good thing is that can be done wirelessly (OTA) as you will already have ESPHome software installed.
So, let’s see how to install ESPHome using ESP Web Tools from a browser.
- Start a Google Chrome or Microsoft Edge browser (only these two browsers are supported at the moment) and open the ESP Web Tools page – https://esphome.github.io/esp-web-tools/
- Connect your ESP device to your computer, either with a USB cable or with Serial-To-USB adapter (as shown in the sections above).
- Put your device in Programming / Flash Mode if that is necessary (as shown in the sections above).
- Click on the Connect button and from the shown dialog select the port on which your ESP device is connected and click on Connect again.
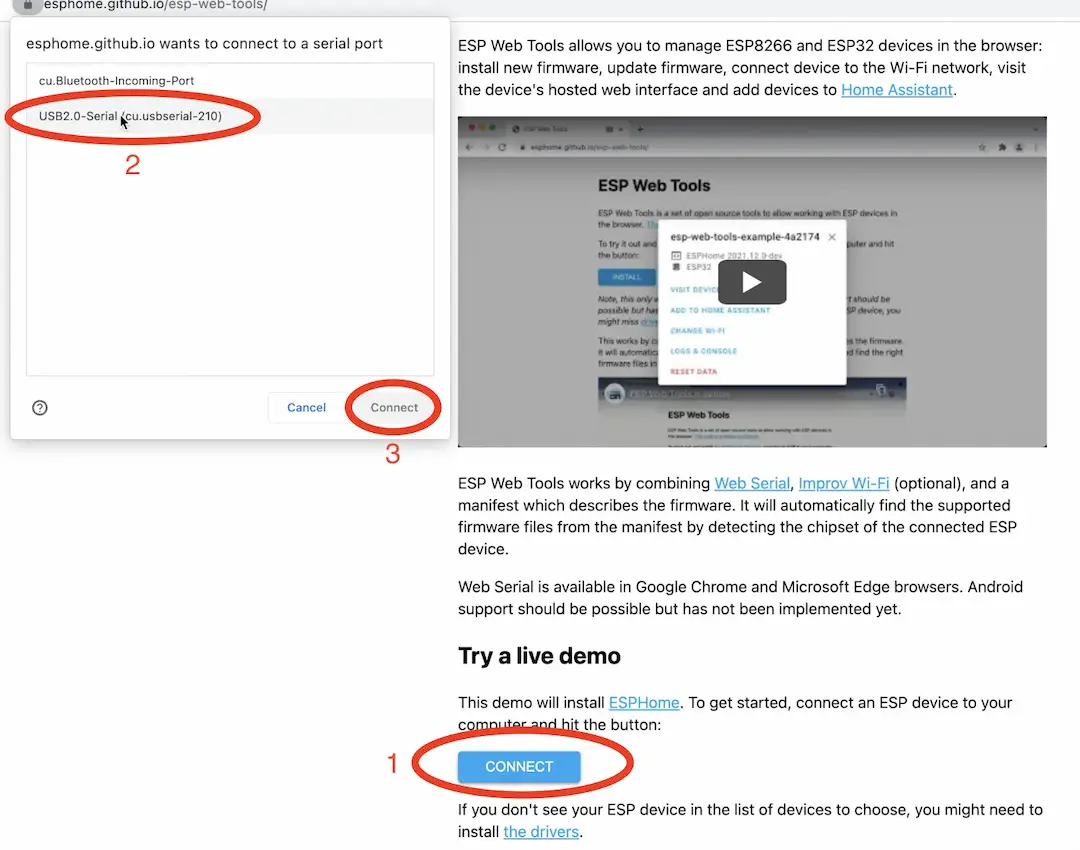
- If you don’t see your device listed in the shown dialog, try to change the USB ports of your device or to install drivers listed on the ESP Web Tools page.
- Finally, click on Install ESPHome and then Install buttons. The installation process will start and it is highly recommended to keep the installation page visible (on focus) all the time to prevent slow downs or even errors.
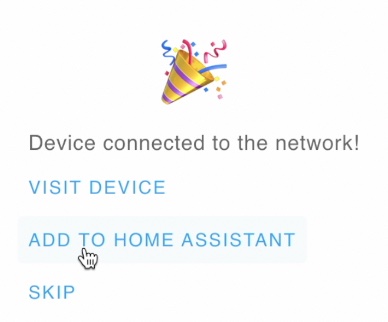
- When you see the Installation Complete window, click Next button and enter your WiFI credentials and hit Connect button.
- That is it! Now, you can visit your new ESPHome device, add it to Home Assistant or skip any of these.
I don’t want to flash, but I want an ESPHome device!
If the ESPHome installation process is not for you, but you want to Use ESPHome software anyways – you can buy pre flashed with ESPHome and ready to use devices that are available in AliExpress from a vendor called Athom.
- Official Athom page in AliExpress (affiliate link) – https://s.click.aliexpress.com/e/_A2LbTv
Smart Home Glossary for you!
In case you are a bit lost with the words and abbreviations that I used during this article go to https://peyanski.com/glossary and download my Smart Home PDF glossary which is absolutely FREE.
I’m Kiril and I’m done writing. Bye!
Hi thanks for the guide. I managed to run as a container esphome, and even to start the dashboard via the command yousuggested “docker run –rm –net=host -v “${PWD}”:/config -it esphome/esphome
”
my problem is that every time i reboot my rp4 (running OMV6 , after which HA and docker/portainer are installed) thedashboard is no longer avaiable, and I need to run again the command above to make it star, and then it works. Also my portainer says that ESPhome container image is present but not running… Is there a way to autostart the docker at every rebooth (as the other containers seems to do)? Thank you very much, keep rocking!!!
Try without -rm and also setting container restart policy as unless-stopped
I cannot get HOME ASSISTANT to work on my Linux laptop… Is the problem Linux?
The laptop seems to have Home Assistant on it but it never recognizes the DNS of the system or the board connected??
I am completely lost … Could you help.
Hi Joe, please take a look at my online video trainings at https://automatelike.pro and send me an e-mail there I will try to give you a discount coupon. We can fix that fast…