
It is time for another DIY project and today I will show you how to create Smart Smoke Sensor for Home Assistant with D1 Mini, MQ-2 smoke & gas sensor & ESPHome.
Do it yourself or DIY Smoke Sensor for Home Assistant is quite easy and I will guide you through all of the steps.
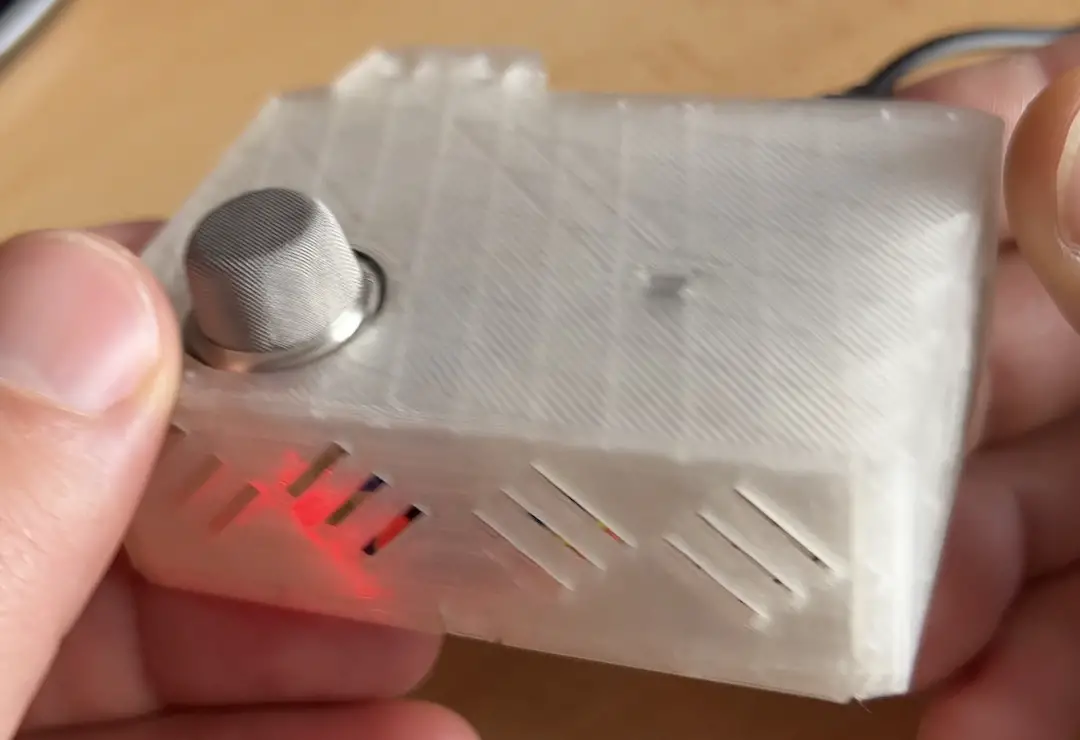
At the end you can put everything in a 3D printed enclosure like this one and to leave your new smoke sensor somewhere at your home were you have WIFi coverage.
But that is the end, when everything is ready! Let’s walk this way together in order to reach this point and I will start with the needed sensors & devices for this DIY project.
Table of Contents
Needed parts for the DIY Smoke Sensor for Home Assistant
Wemos D1 Mini
I love the D1 mini devices as they are so cheap & versatile and I honestly can’t stop buying them, just in case and usually this case always comes.
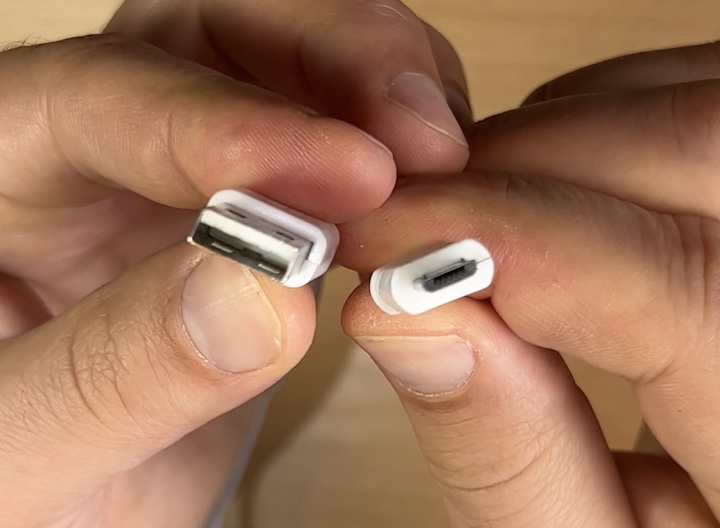
One of the things that I like the most is that the D1 Mini is equipped with a Micro USB port and new firmware can be installed by only connecting the D1 Mini to a computer with a Micro USB cable.
The price of one D1 mini is around $2.50 in AliExpress, but you can go even lower than that if you buy 3, 5, 10 or more pieces at once.

Have in mind that there are two types of these devices:
- D1 Mini based on ESP8266 chip – this is the cheaper without Bluetooth model, with less memory and a bit slower, but it is just perfect for such projects and I’m using exactly this type here.
- D1 Mini (AliExpress affiliate) – https://s.click.aliexpress.com/e/_AFgAIp
- D1 Mini (Amazon affiliate) – https://amzn.to/3A5jNoc
- D1 Mini based on ESP32 chip (D1 Mini ESP32) – this is the newest model, slightly more expensive, with bluetooth and more powerful. This model can also be used for this project exactly the same way.
- D1 Mini ESP32 (AliExpress affiliate) – https://s.click.aliexpress.com/e/_9ufvuG
- D1 Mini ESP32 (Amazon affiliate) – https://amzn.to/33oCUOx
Let’s continue with the MQ-2 Smoke & Gas sensor that I will attach to the D1 mini.
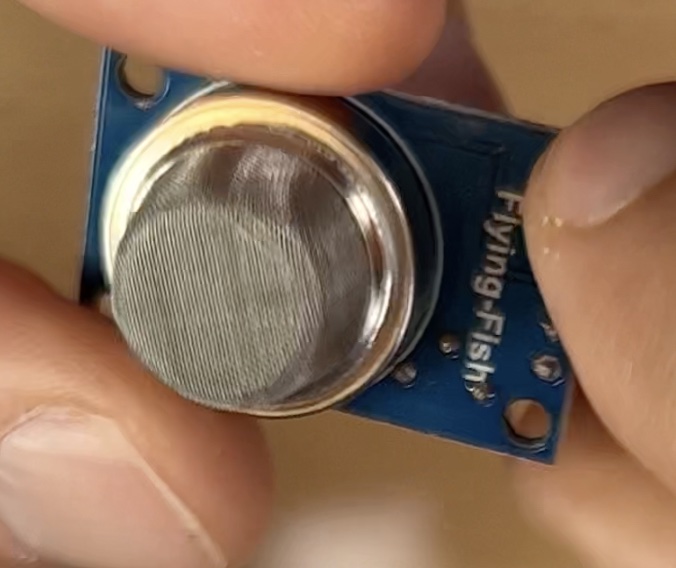
MQ-2 Smoke & Gas Sensor
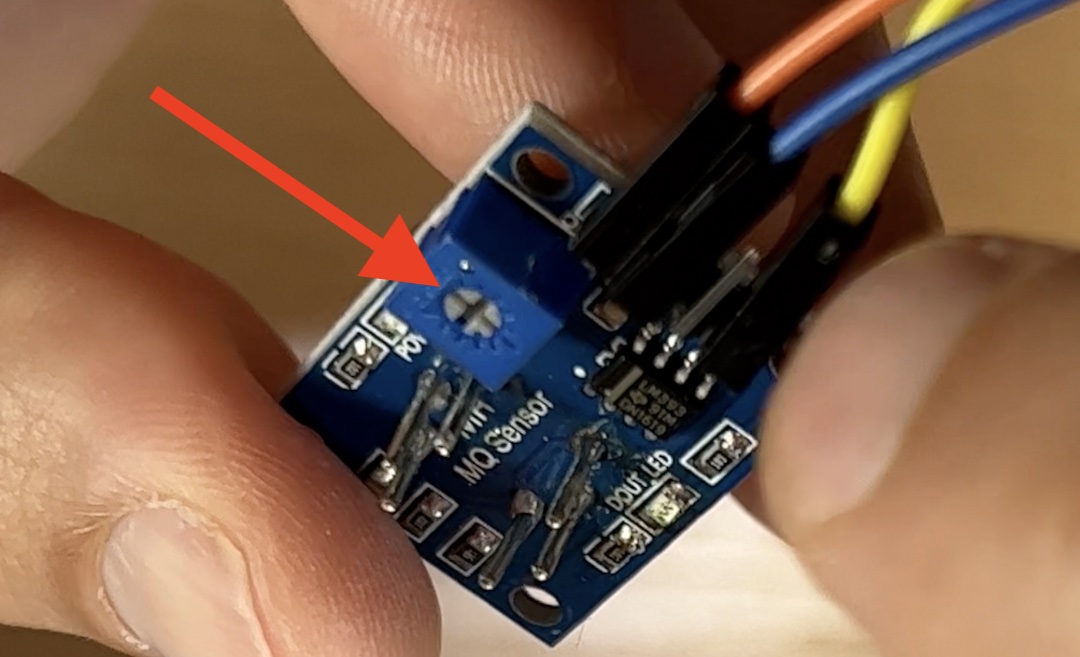
The MQ-2 Smoke & Gas sensor will increase its voltage when Smoke, Methane, Butane or LPG is detected, making it perfect for home appliance. The MQ-2 sensor have an adjustment knob that can be used to adjust the sensitivity of the sensor. I have to admit that I did’t played with that adjustment knob so far and I’m using the default settings.
The Increased voltage of the sensor can be used in Home Assistant automations as you are going to see later in the article.
Needed Wires & Cables
Of course, you will need some wires. I recommend to use jumper wires or so called Dupont wires. You will only need 3 female-to-female jumper wires, but they are usually packaged in 20 or 40 pieces.
The last thing that you will need is a Micro USB cable to power on the D1 Mini. Optionally, you will need a USB adapter if you are planning to plug the DIY Smoke Sensor for Home Assistant in a power socket. Otherwise, any other free USB port that you have will be able to power the device.
Links to all of the needed parts
All of the above means that for around $5 and this article instructions you can DIY Smoke Sensor for Home Assistant! How cool is that?
Below you can find some AliExpress & Amazon affiliate links to the needed parts. Amazon prices are higher, but the items usually arrive way faster compared to AliExpress.
- D1 Mini (AliExpress) – https://s.click.aliexpress.com/e/_AFgAIp
- D1 Mini (Amazon) – https://amzn.to/3A5jNoc
- MQ-2 Gas & Smoke sensor (AliExpress) – https://s.click.aliexpress.com/e/_Dnmkm4R
- MQ-2 Gas & Smoke sensor (Amazon) – https://amzn.to/3rMzxJg
- Jumper Wires (AliExpress) – https://s.click.aliexpress.com/e/_Aluq3z https://s.click.aliexpress.com/e/_A3YiR3
- Jumper Wires (Amazon) – https://amzn.to/3fRlXyK
- Micro USB cable (AliExpress) – https://s.click.aliexpress.com/e/_AnrsGw
- Micro USB cable (Amazon) – https://amzn.to/32tdxdF
- (Optional) USB adapter EU US UK (AliExpress) – https://s.click.aliexpress.com/e/_Ataxcq
- (Optional) USB adapter (Amazon) – https://amzn.to/3u2Tdvj https://amzn.to/3qXkJYS
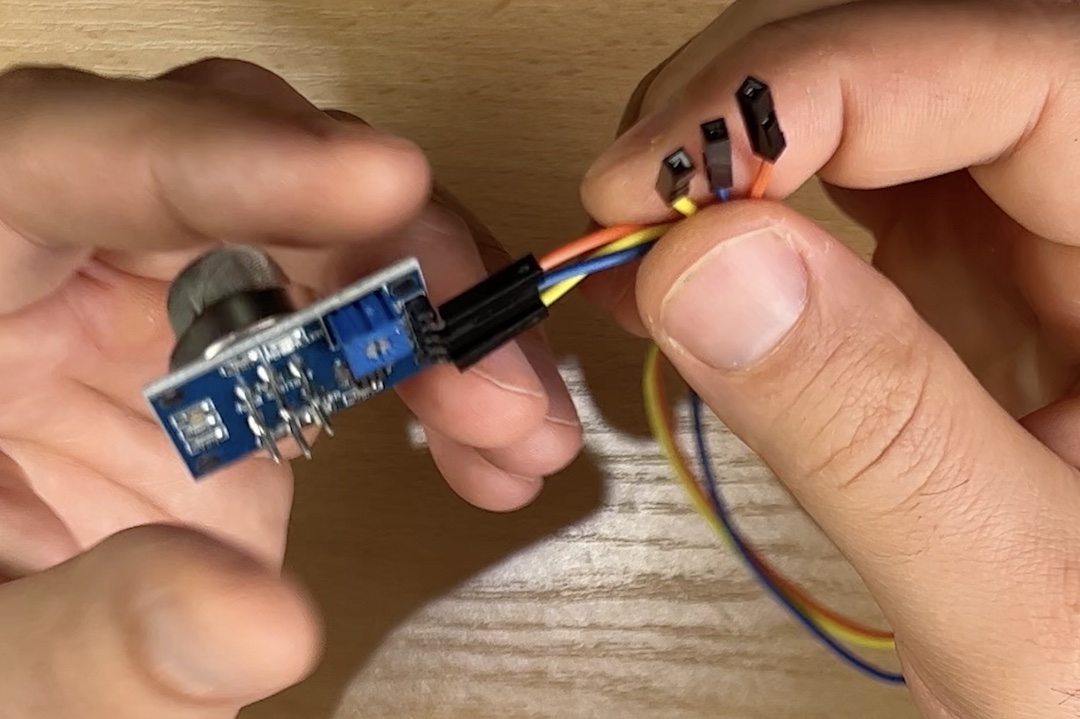
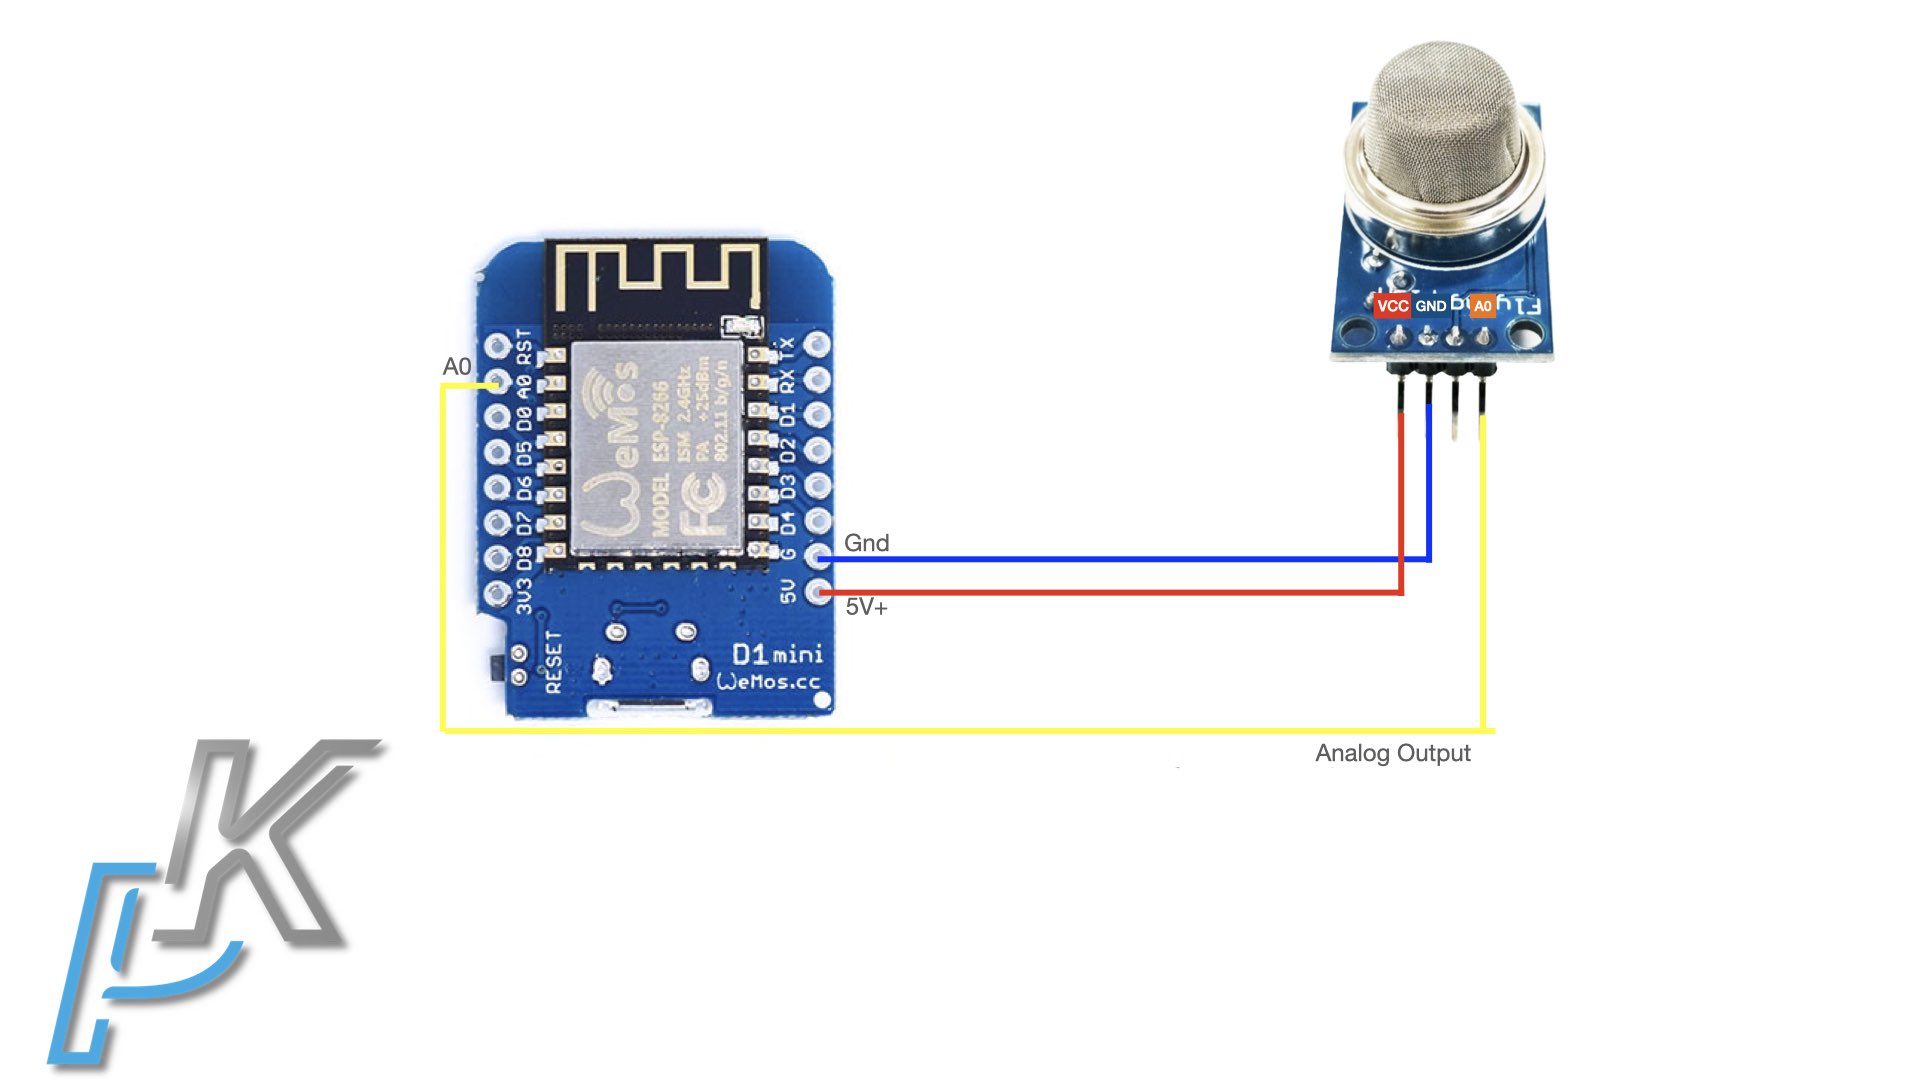
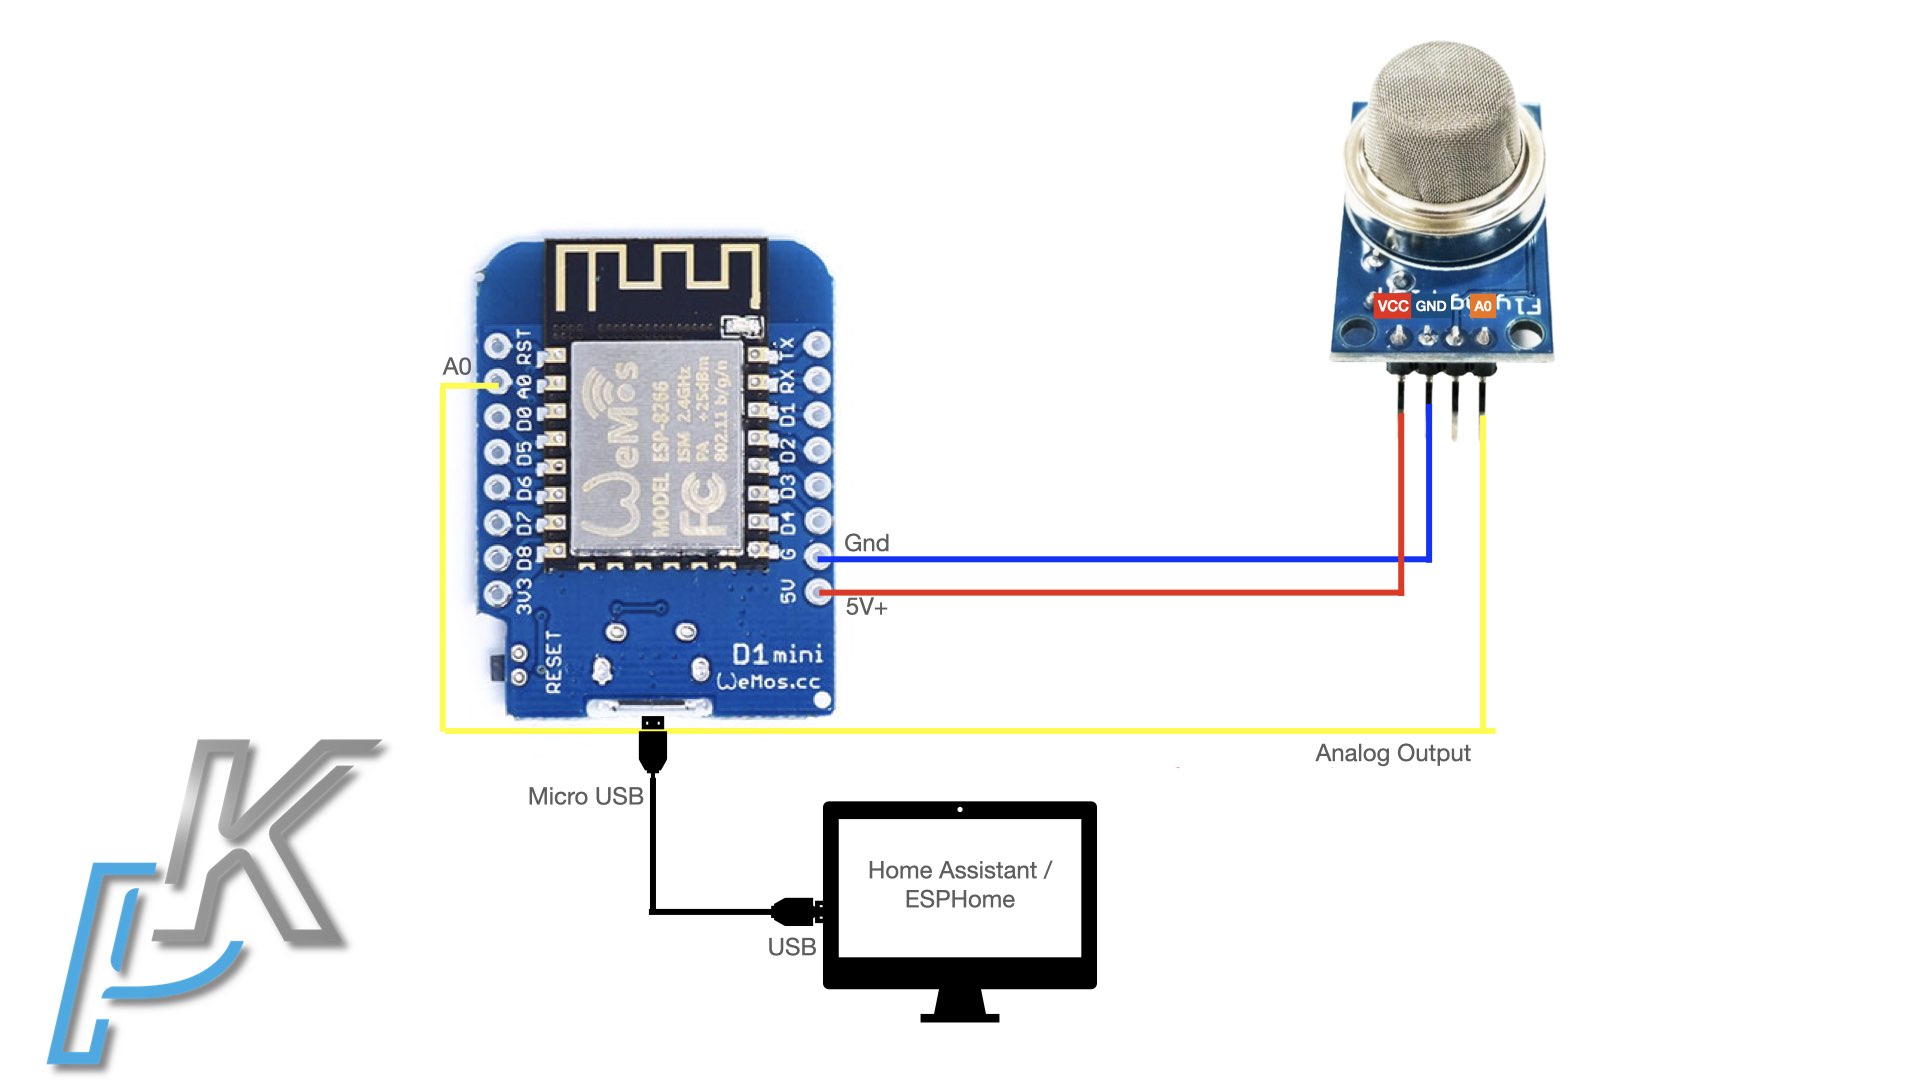
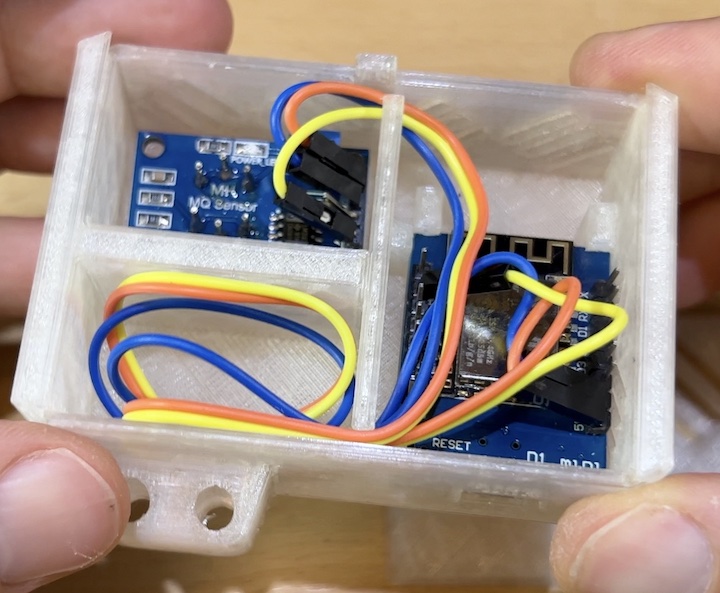
How to connect D1 Mini and MQ-2 Sensor?
It is time to connect the D1 Mini and the MQ-2 Sensor together.
Using Jumper wires (or other suitable cables) connect both devices as follows:
- VCC on the MQ-2 sensor to 5V on the D1 Mini device
- GND on the MQ-2 sensor to GND on the D1 Mini device.
- A0 on the MQ-2 sensor to A0 on the D1 Mini device.
Are you going to try this?
Let me know in the comments what do you think, are you going to try this DIY Smoke Sensor for Home Assistant in your home?
Type simple Yes or No in the comments and I will know for what are you talking about. I will even reply most probably with something very wise and profound like: Okay
How to install ESPHome add-on in Home Assistant?
Jokingly and with not a lot of efforts we reach the point where the hardware part of our DIY Smoke Sensor for Home Assistant is ready. Let’s continue with the software part where I will install ESPHome add-on inside my Home Assistant.
BTW, if you do not have Home Assistant yet, check these articles of mine where I’m showing exactly that:
- Home Assistant Supervised on Debian based linux – LINK
- Home Assistant on Windows using VirtualBox – LINK
Now, let’s start with the ESPHome add-on installation.
In Home Assistant go to:
- Configuration > Add-ons, Backups & Supervisor > Add-on Store (button in the lower right corner) or click on the My Home Assistant Link below:

- Next, search for ESPHome, click on the result and then click on the Install button.
- When the installation is finished the Install button will be replaced with Start button – click on it to start the ESPHome add-on.
- Wait few seconds for the ESPHome to start and then click on the Open Web UI button.
How to configure the MQ-2 Smoke Sensor and to install ESPHome on D1 mini?
I will use the ESPHome Dashboard to add the DIY Smoke & Gas Sensor as new device and then I will configure & install the ESPHome firmware on the D1 Mini. Don’t worry it is very, very easy.
- Open the ESPHome dashboard.

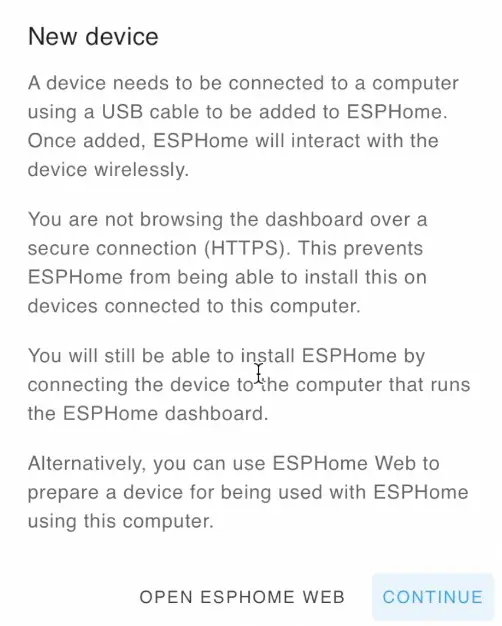
- You should see similar screen as above. And you should click on the New Device button.
New dialog like this one will appear. Read it if you wish and then click on the continue button.
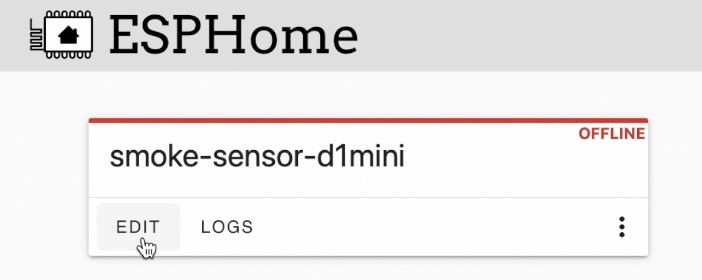
Next, you should enter a device name of your choice as well as you WiFi name and password. I named my device: smoke-sensor-d1mini.
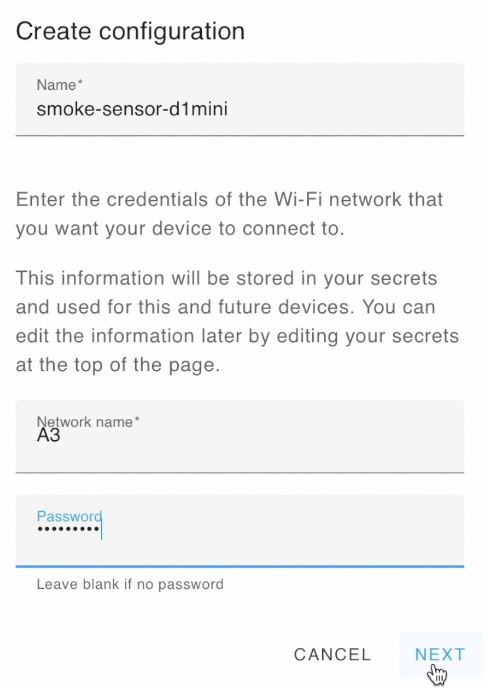
When you are ready click on Next button.
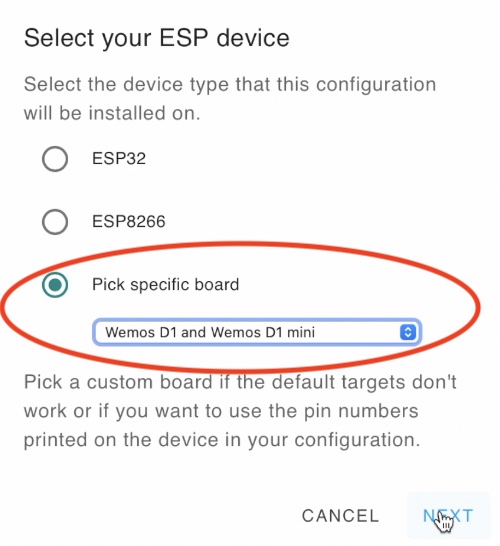
- From the next dialog, click on Pick specific Board radio button and select the Wemos D1 and Wemos D1 mini. Of course, if your ESP board is different – either find it from the list or select the more generic ESP32 or ESP8266 options depending of your board type. Finally, click Next button.
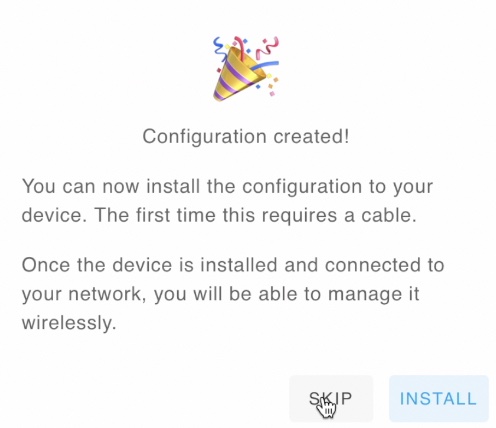
You should see a Configuration Created window with Skip and Install buttons. As we are not ready to install ESPHome yet – click on the Skip button.
- Click on the Edit button under your device name (the future Smoke & Gas sensor) in the ESPHome dashboard.
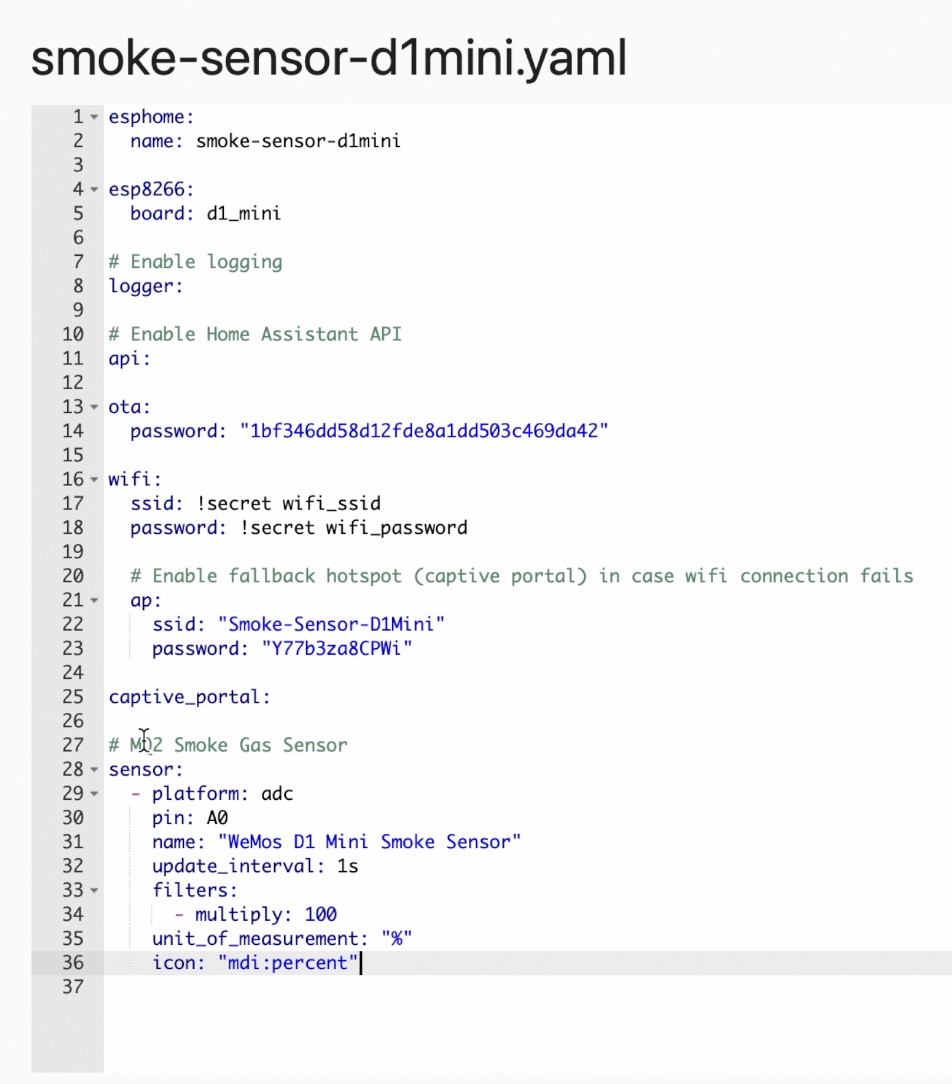
- Paste the following lines at the very bottom of the configuration:
# DIY MQ-2 Smoke & Gas Sensor for Home Assistant
sensor:
  - platform: adc
    pin: A0
    name: "WeMos D1 Mini Smoke Sensor" # You can change that
    update_interval: 1s                # You can change that
    filters:
      - multiply: 100
    unit_of_measurement: "%"
    icon: "mdi:percent"                # You can change that
Here is how my whole D1 Mini and MQ-2 configuration looks like at the end:
- When you are ready with the above part. Click on the Save and then Install buttons located in the lower right corner of the ESPHome configuration editor.
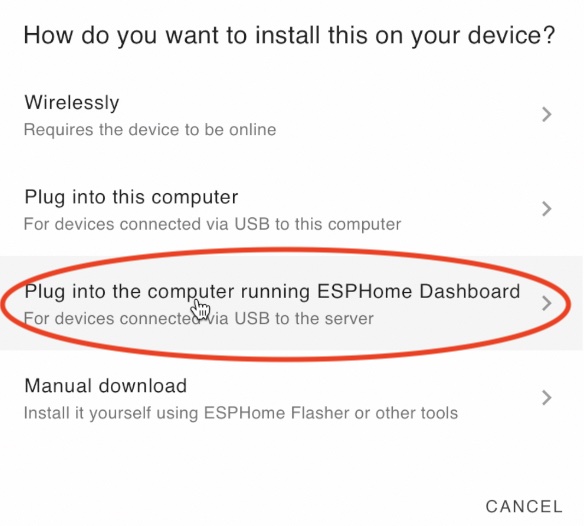
- Now is the best time to connect the future DIY Smoke Sensor for Home Assistant to the computer/device where Home Assistant/ESPHome is installed. This is the whole diagram if that way is easier for you:
- So, Plug the D1 Mini in one of the USB ports on the device where Home Assistant and ESPHome are installed and select “Plug into the computer running ESPHome Dashboard” option from the list.
- The USB port where your device is connected will be auto detected and you should only click on it, example: USB2.0-Serial /dev/ttyUSB0.
- If everything is fine, a terminal will appear with a lot of text and multiple text based progress bars. Wait until you see some MQ-2 sensor readings, something like this below:

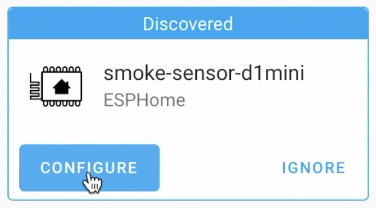
How to add the Smoke & Gas Sensor in Home Assistant
Time to add our DIY Smoke & Gas Sensor in Home Assistant which is a piece of cake.
In Home Assistant go to:
- Configuration > Devices & Services > Your new DIY Smoke Sensor for Home Assistant device should be listed there.
- Click on the Configure button under it and then on Submit.
- Optionally, you can select an area to which the DIY Smoke Sensor for Home Assistant will be added or you can skip this part and just click on the Finish button.
- Click on the 1 device link under the newly added smoke sensor in Home Assistant

- Select your sensor again and then under Sensor section select Add to Lovelace button and Add to Lovelace UI.
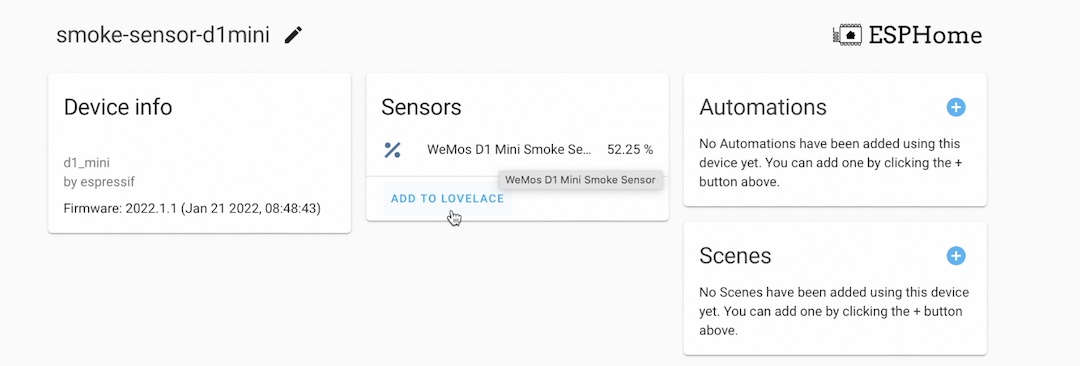
- If everything is fine you should have the DIY Smoke & Gas sensor added as card to your Home Assistant Dashboard. Congratulations!
Creating a Home Assistant automation for our DIY Smoke Sensor
It is time to create a Home Assistant automation that will automatically trigger when smoke is detected.
As action of this automation I will use a simple notification inside Home Assistant. As I’m showing in these articles of mine this action can be easily replaced with Mobile Push notifications or even Automatic Voice Calls with Text to Speech messages, but that is optional.
- Ultimate Home Assistant Notifications – LINK
- Home Assistant Telegram Notifications – LINK
- Home Assistant Twilio Integration – LINK
I can highly suggest to check my video where I’m showing how to use the Automation Editor to create the automation, but if you are YAML guy here is the code that you can import in your automations.yaml file.
alias: Smoke is detected by my DIY Smoke sensor
description: ''
trigger:
  - type: voltage
    platform: device
    device_id: 7d06ce9165563b4d14bb48dc96fe3d8b #change this to your device_id
    entity_id: sensor.wemos_d1_mini_smoke_sensor #change this to your entity_id
    domain: sensor
    above: 50
    for:
      hours: 0
      minutes: 0
      seconds: 0
condition: []
action:
  - service: persistent_notification.create
    data:
      message: Smoke is detected by my DIY Smoke sensor
mode: single
Challenge for you
I have a a quick challenge! If everything until now is working for you, then share your success it in the comments section by typing #SmokeSensorOwned.
You can even tag me in Twitter (@KPeyanski) with the same hashtag. I will be very happy to see such comments or tweets. Now, back to action.
3D Printed enclosure for the DIY Smoke Sensor for Home Assistant
I managed to find and print on my Ender3 v2 3D Printer this enclosure for the DIY Smoke sensor.
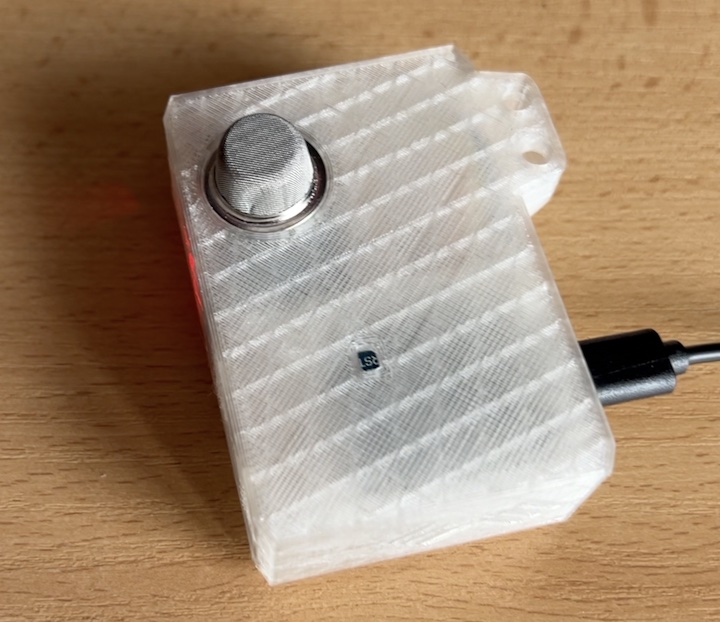
The 3D model turns out to be pretty good and I will leave a link if you want to print the same. If you find something even better, don’t hold it only for yourself and share it here.
DIY Smoke Sensor for Home Assistant 3D printed enclosure – https://www.thingiverse.com/thing:4718579
DIY Smoke Sensor for Home Assistant Summary
I’m not yet sure how reliable this DIY Smoke Sensor for Home Assistant will be in the years to come, but I plan to leave several of these sensors around my home and I will test them with matches & lighters from time to time.
As with any other DIY sensor, do not relay entirely on these sensor for your home safety and use them at your own risk. I’m about to do the same and If I sense something wrong with the sensors I will update this article and my video description in YouTube.
It will be very beneficial if you also share your experience with these sensors. That way we can help each other as usual!
If you want to secure this website existence, check the available methods of support in the support section. Follow me on Twitter & join my Discord server.
I’m Kiril & I’m done writing. Bye!
very nice, im in the process of putting together some esp32 based sensor boxs for various rooms in my house, this is one sensor i didnt add, you convinced me to retro fit them to my boxs
Great to hear! Wish you success and don’t forget to comment here again when you are ready 🙂
Thank you for this useful article and video.
I have something to share-back with you.
To all of my ESPHome sensors, I add a “heartbeat”. I turn on and off the led of the ESP device every 10 seconds. This is a visual check. But more important, in home assistant, I trigger an alarm if I have not received a heartbeat for the last 15 seconds. Then I know that my ESP device either lost power or has crashed.
For something like a smoke detector that may be useful.
Next step is using battery backup for my RPI and modem. This if for the case when a faulty electrical circuit first kills the power before it actually starts a fire 😉
/c
Pure gold! Thanks ChrisV as these are some very, very good tips!
A good usecase for a homemade smoke sensor would be enforcing no smoking rules on tenants in a rental property. Add an anti tamper switch that is triggered when the device is removed from the ceiling, a proximity sensor to detect when the is device is covered (making it unable to detect smoke) and a heartbeat signal to detect any problem including with wireless connection.
Yes, that can save you a lot of troubles. Thanks for that comment 🙂
Hello there
Thanks for the guide.
But i would like to hear from you on the subject that this sensor is powered by the D1 and when heating it pulls about 800ma; also it outputs 5v and the D1 A0 is 3,3v.
Are these reasons to worry?
#SmokeSensorOwned
Thanks for the tutorial. I have tried multiple brand-name commercially available LP gas sensors to alert me of a gas stove or fireplace leak and none of them have worked when I test them by letting the gas leak right next to them.
This DIY version does work. Just note that the MQ2 sensor needs 24-48 hours to “warm up” once it is turned on before it can be considered reliable.
I would also be interested in how to make the notification only happen once per incident, as the MQ2 seems to oscilate in its voltage output and can lead to repeated notifications as its value declines after the gas dissipates.