
Are you ready to convert your existing lights into smart lights in under 10 minutes? You can do that using Shelly 1L – one of the latest product from Shelly. For those of you who already know me you guessed it right I will also connect the Shelly 1L to Home Assistant.
Table of Contents
What is Shelly 1L?
Shelly 1L is a single wire Wi-Fi operated relay, that have embedded WEB server, supports SSL connectivity and it is open source. It can handle up to 4.1A max load, AC 110-230V.
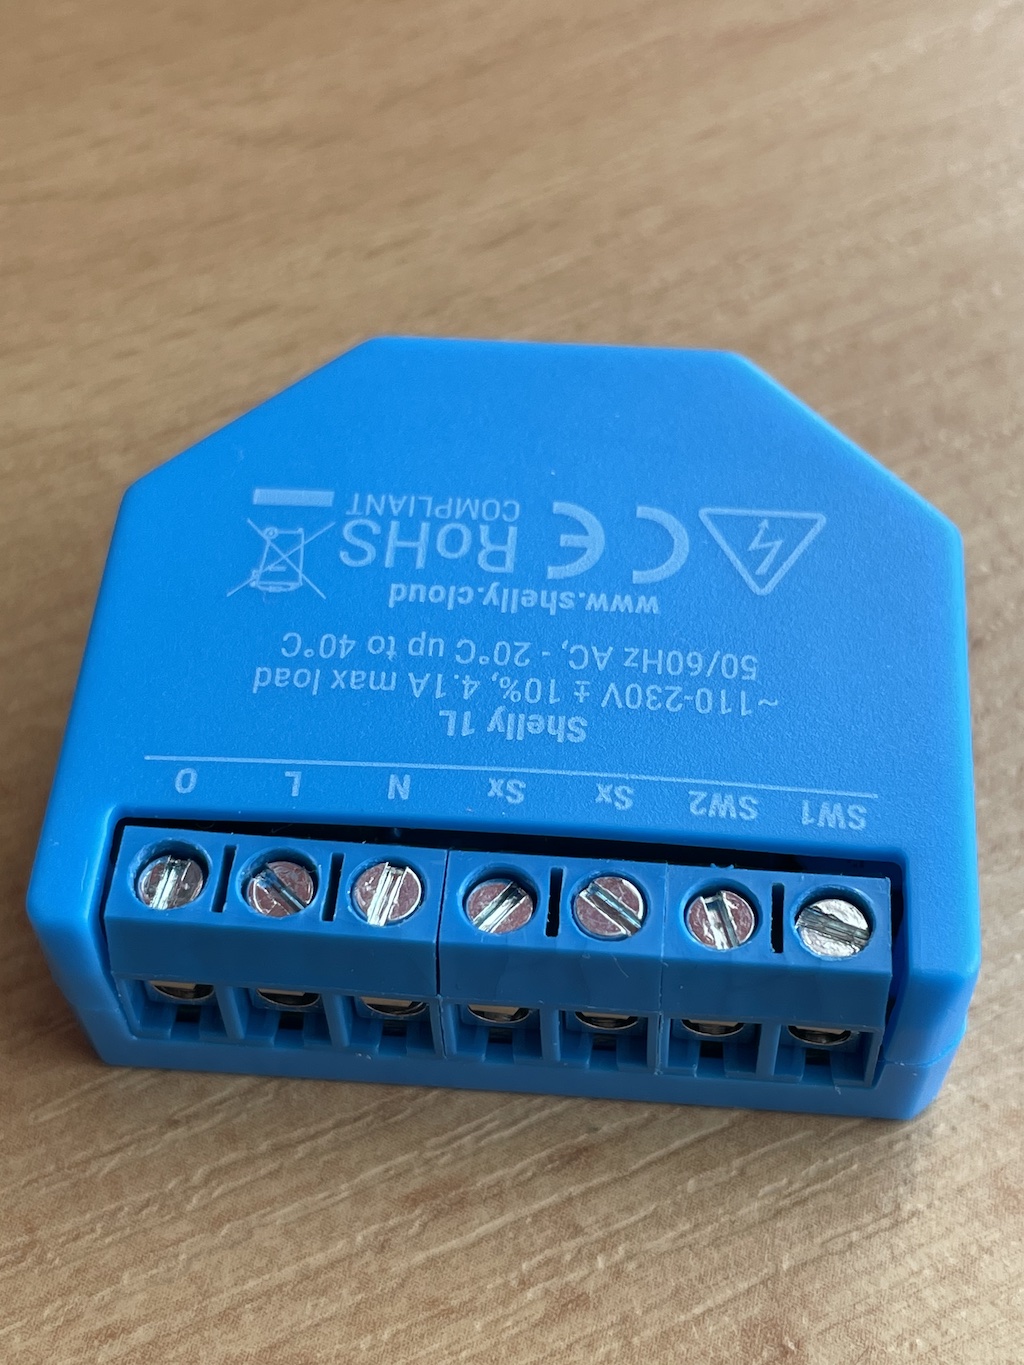
One of the best features of the Shelly 1L is that the neutral wire in your lights wiring is optional. That means the Shelly 1L will work just fine with or without neutral wire. That also means that you don’t have to change the wiring or to run new cables. You just have to put the Shelly 1L behind an existing wall switch.
The other cool feature is the overheating protection. This is very important at least for me if you want to know why – check this article/video of mine and you will understand the reason behind that.
Let’s now see how the Shelly 1L looks like, then we will do the wiring and finally we will integrate it with Home Assistant.
Shelly 1L size
The idea of this relay is to put it behind your existing light switch without much/any modifications, so the device should be as small as possible. The Shelly 1L dimensions are 42mm x 36mm x 14 mm.
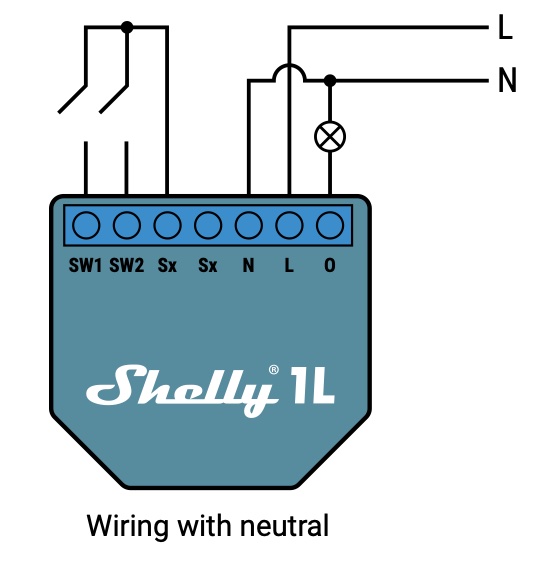
We now know how the Shelly 1L looks like and what size it is. It’s time to start wiring the Shelly 1L with neutral method. Let’s see this.
Shelly 1L with neutral
This is how you can wire the Shelly 1L with neutral.
The first picture is the official electrical diagram coming from Shelly.
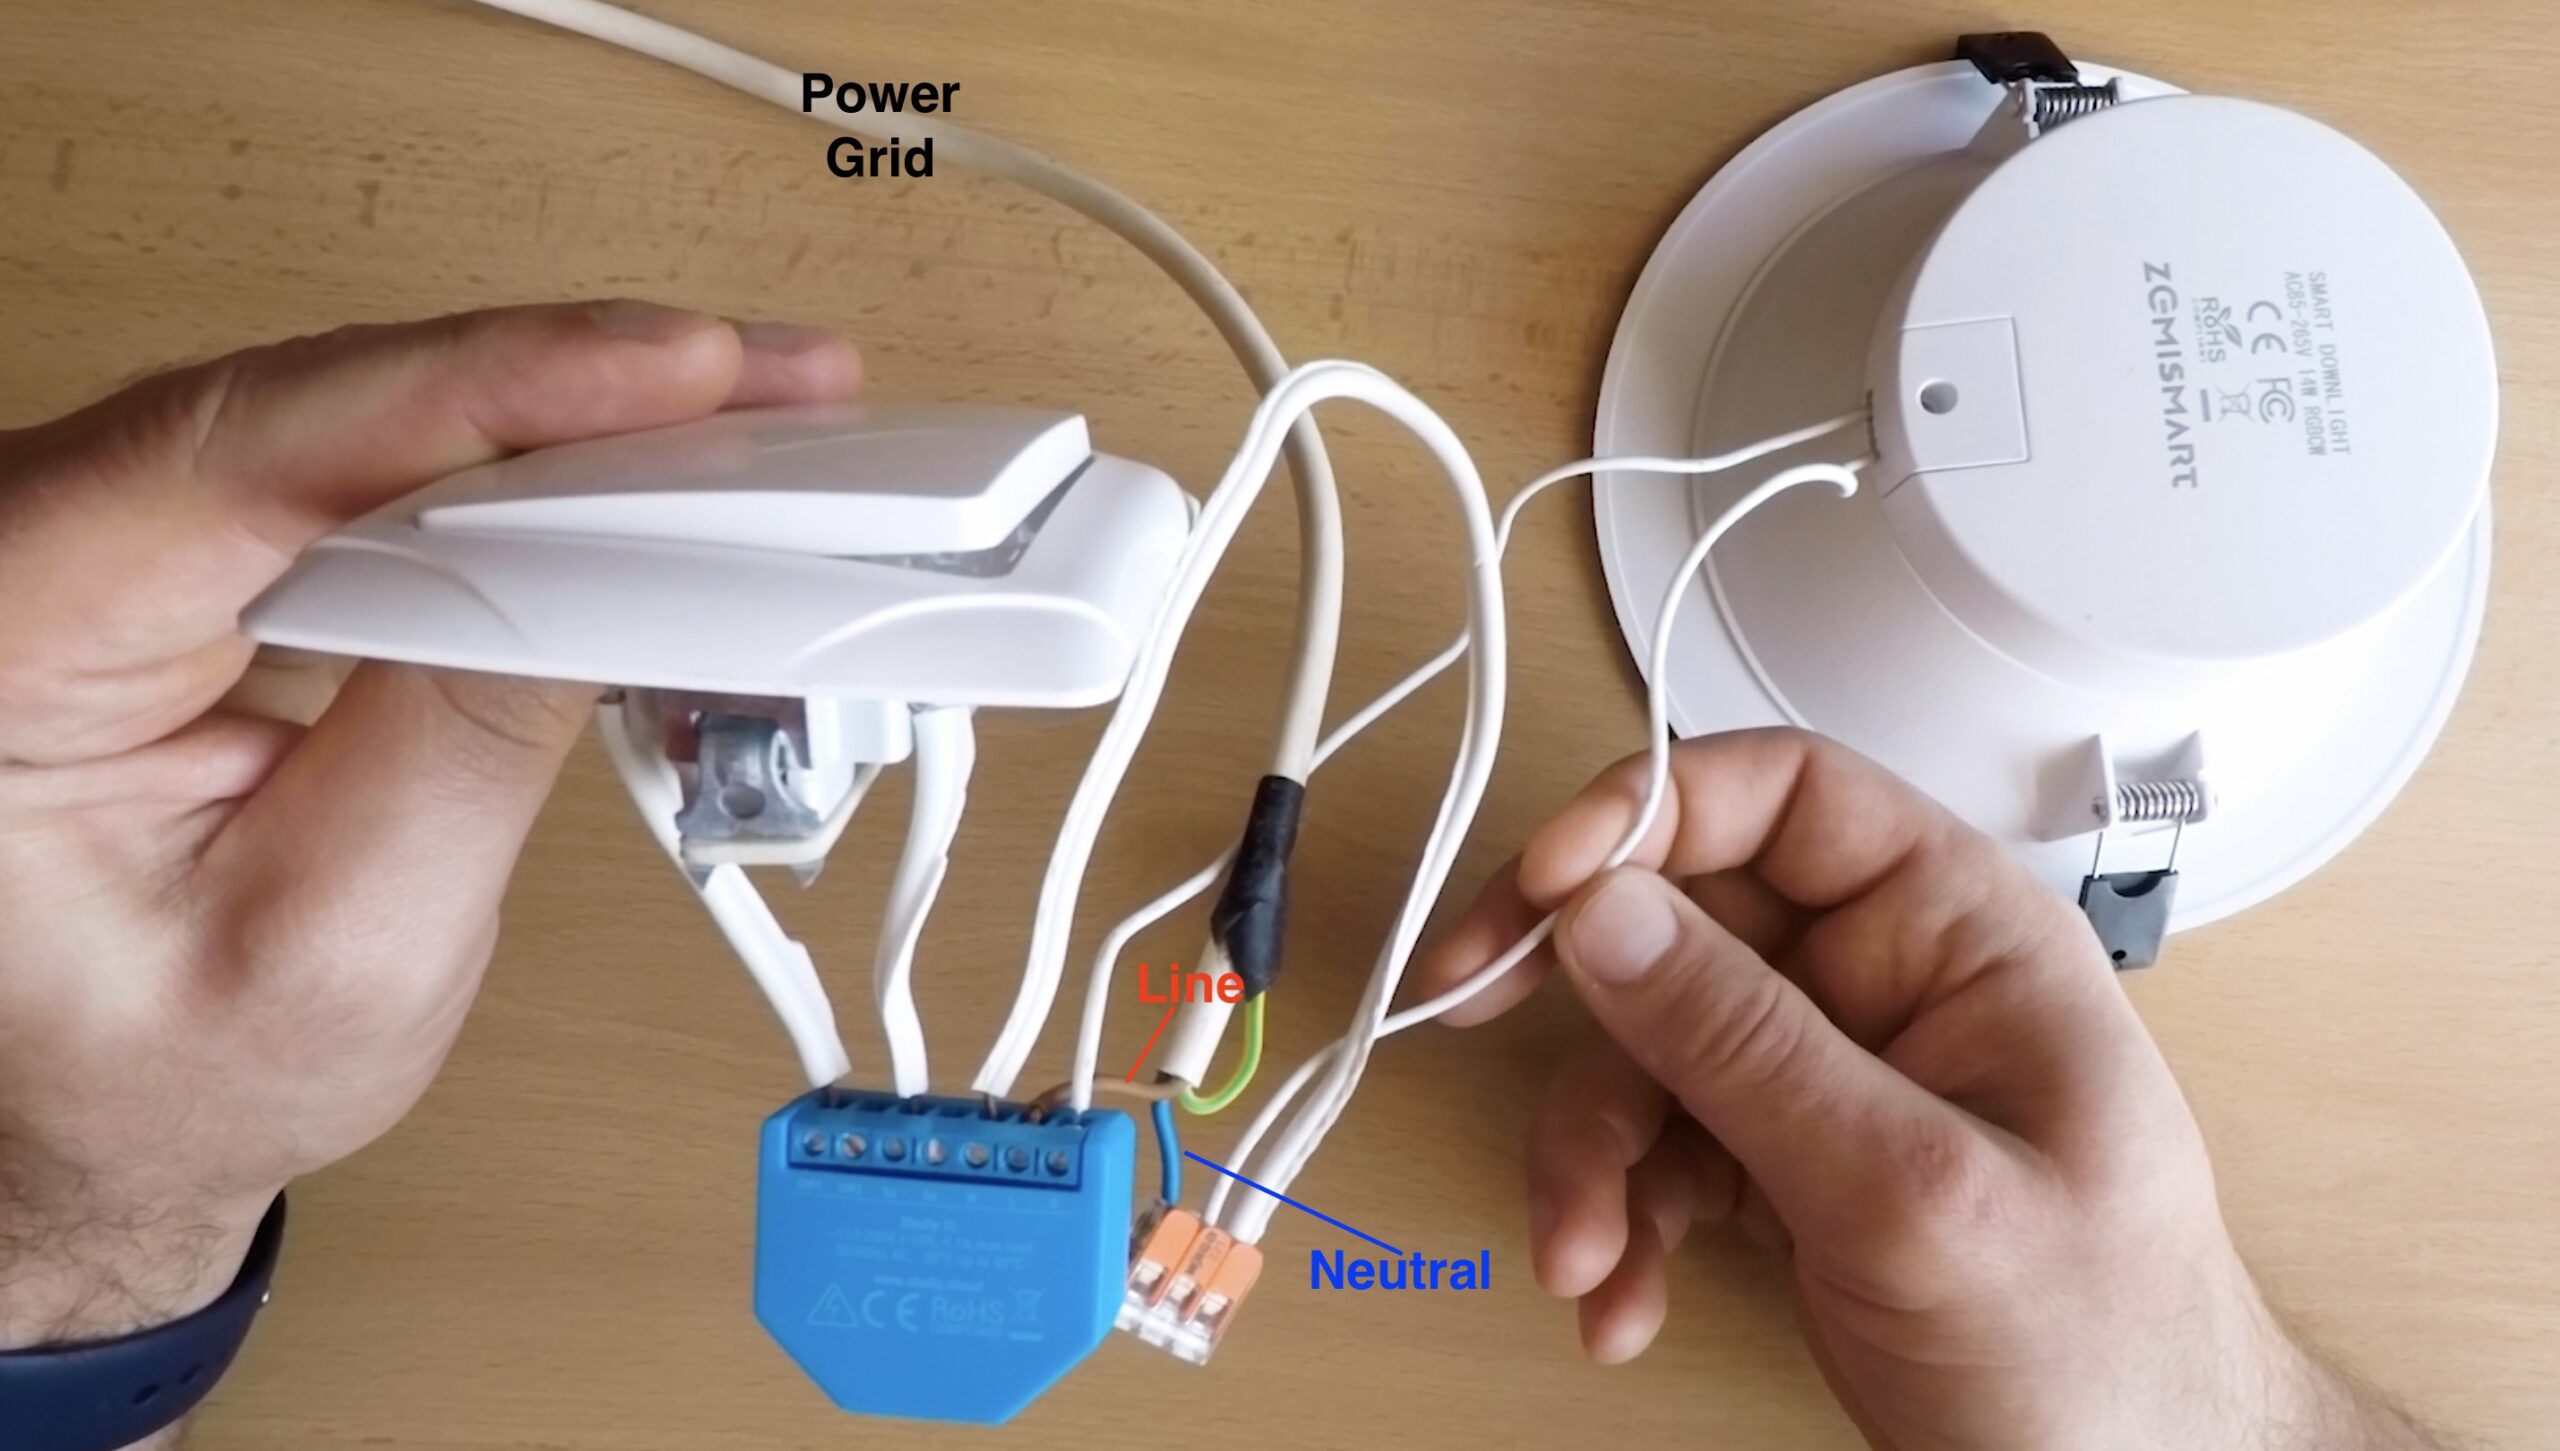
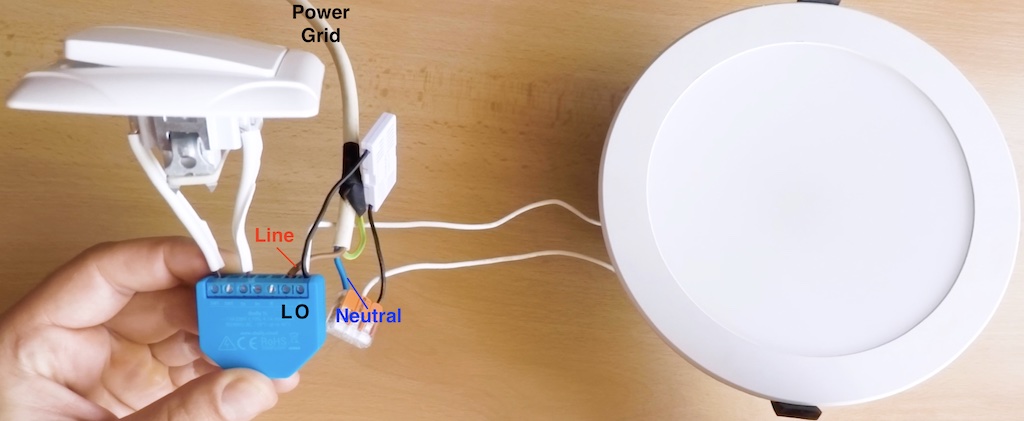
And below is a picture of my wiring of the Shelly 1L with neutral. I used one single European standard light switch and a LED downlight to test the wiring.
When you wire the Shelly 1L you can continue to the control Shelly 1L section.
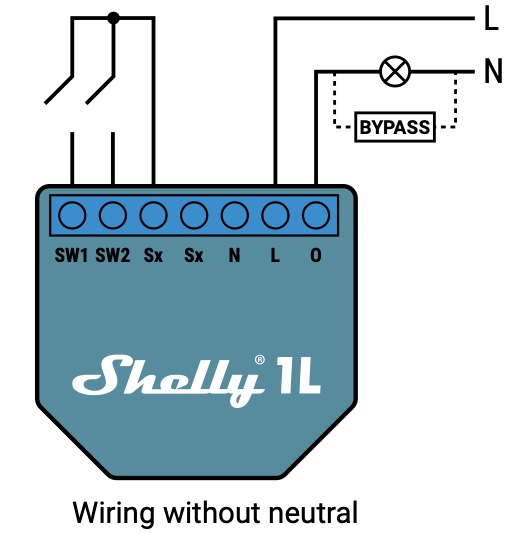
Shelly 1L without neutral
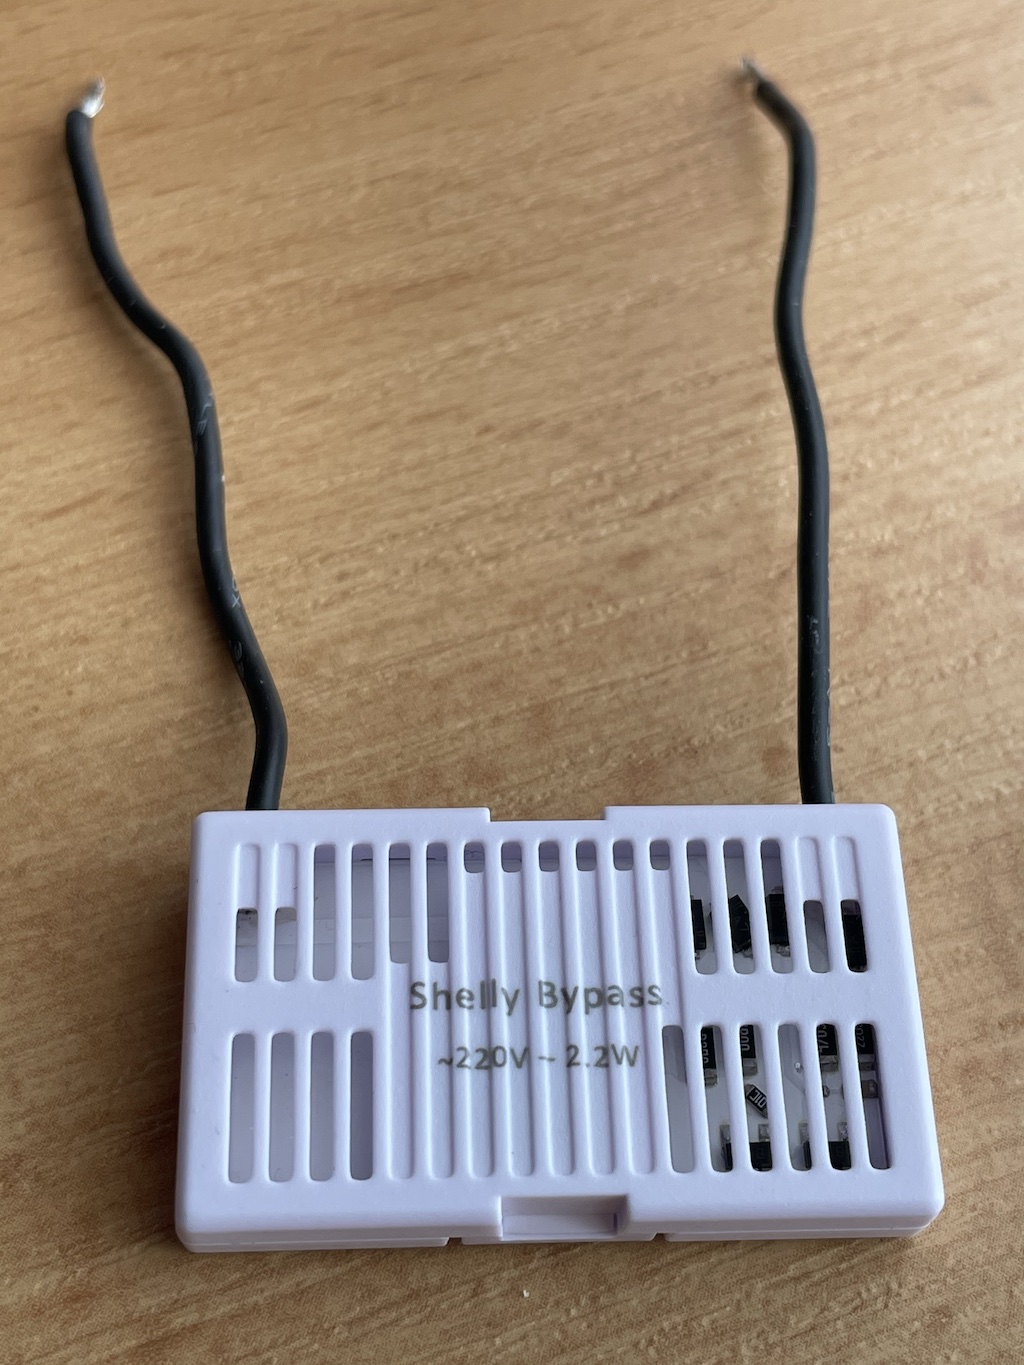
Many light switches are wired with no neutral wire, which makes them difficult to automate. Shelly 1L handle this problem beautifully, because it can only use the Live line when this is needed. To do that you will need a bypassing device called Shelly Bypass that you could buy along with the Shelly 1L. The Shelly Bypass device is looking like this:
Let’s see how we can wire Shelly 1L without neutral wire.
The first picture is the official electrical diagram for Shelly 1L without neutral coming from Shelly.
And you can find below my interpretation of the diagram above, my test setup which actually works.
When you wire the Shelly 1L you can continue to the control Shelly 1L section.
Shelly 1L two-way installation without neutral
Shelly 1L supports two switches and this is the electrical diagram that you have to use if this is what you need.
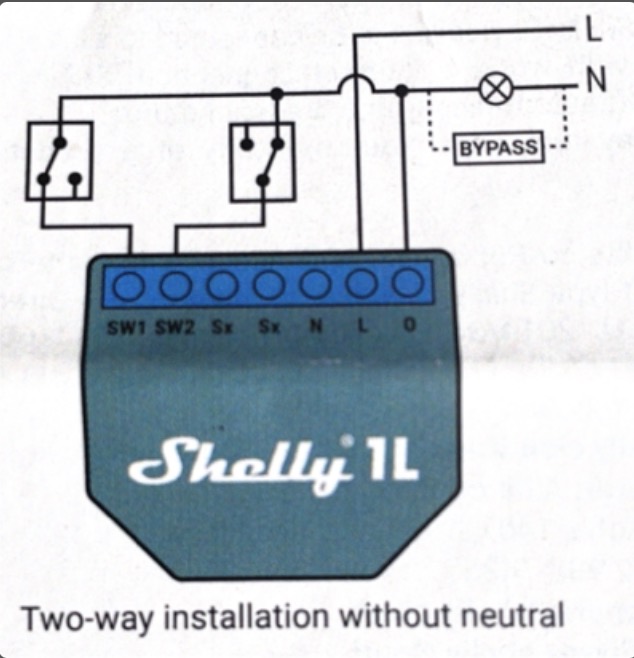
Strangely enough you can find the above Two-way installation without neutral diagram only in the paper manual located in the Shelly box. I didn’t find it anywhere else on the Internet. Now you can find it on my website as well, but it’s kind of a secret.
When you wire the Shelly 1L you can continue to the control Shelly 1L section.
Control Shelly 1L
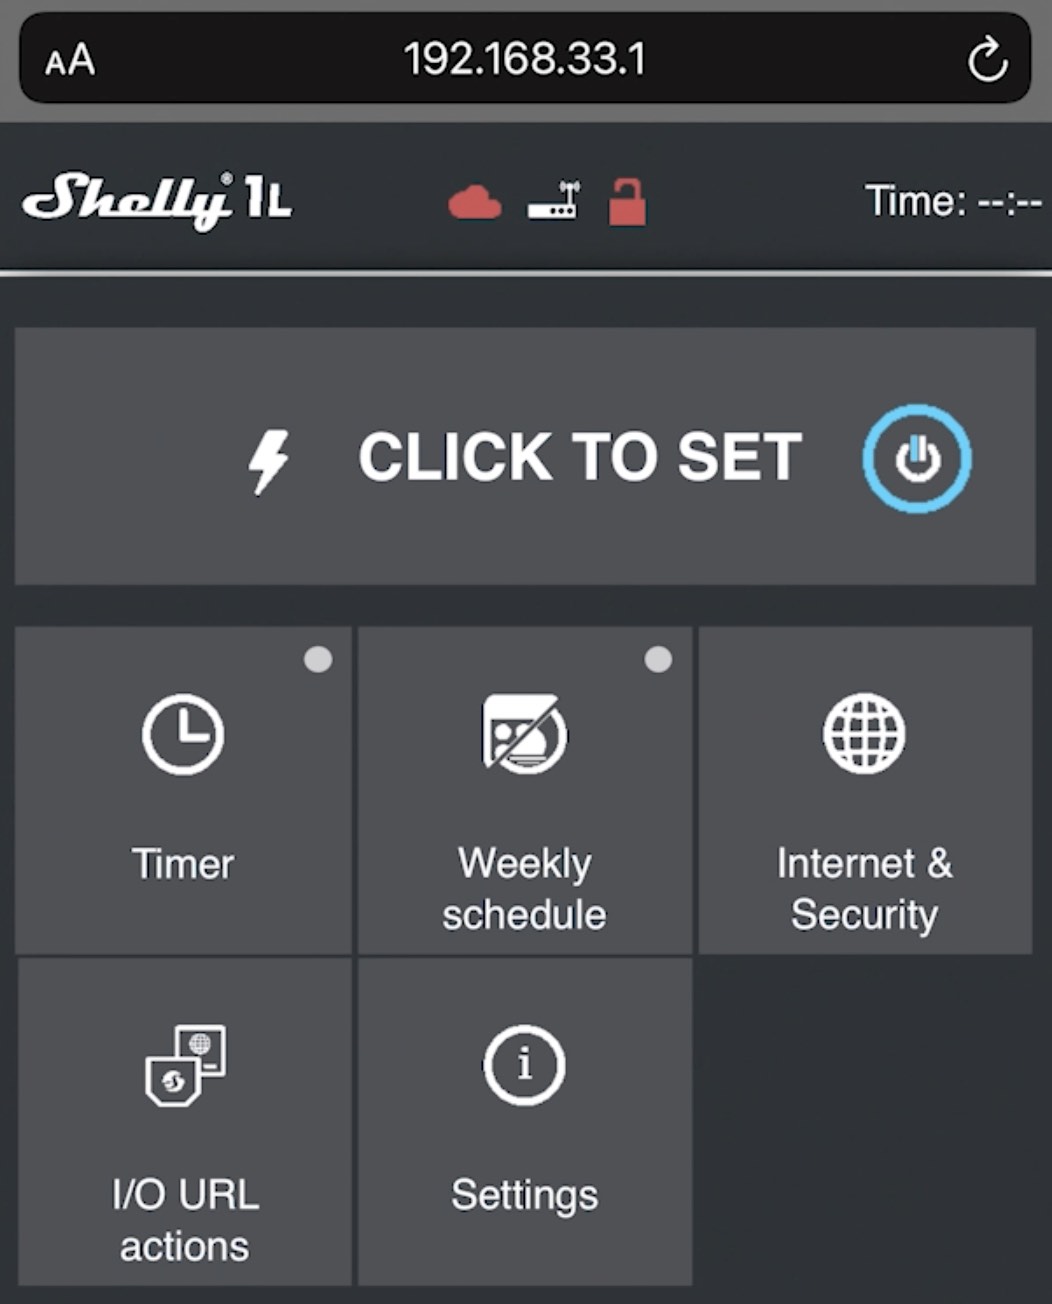
When you successfully wire your Shelly 1L and turn the power on the Shelly will create its own WiFi network similar to that one – Shelly1l-XXXXXXXXX. Connect to that network and then type 192.168.33.1 in a new browser or tab to open the Shelly1L web interface. You can control the device like that or you can join it to your existing WI-FI using the Wi-Fi settings in the web server.
You can also use the Shelly mobile app for the initial setup and control of the device afterwards. The Shelly mobile app Is available for iOS and Android devices in the respective stores for free.

Retrofit your lights?
Do you have any lights in your home that you wish to retrofit and make them smart? You can Say simple yes or no in the comments bellow and I will know for what are you talking about. I personally want to retrofit the lights in my bedroom.
Also if you’re new here consider subscribing now let’s continue.
Home Assistant Shelly 1L integration
It is time for Shelly 1L Home Assistant integration! Are you ready? Let’s go.
Go to Home Assistant > Configuration > Integrations and search for Shelly.
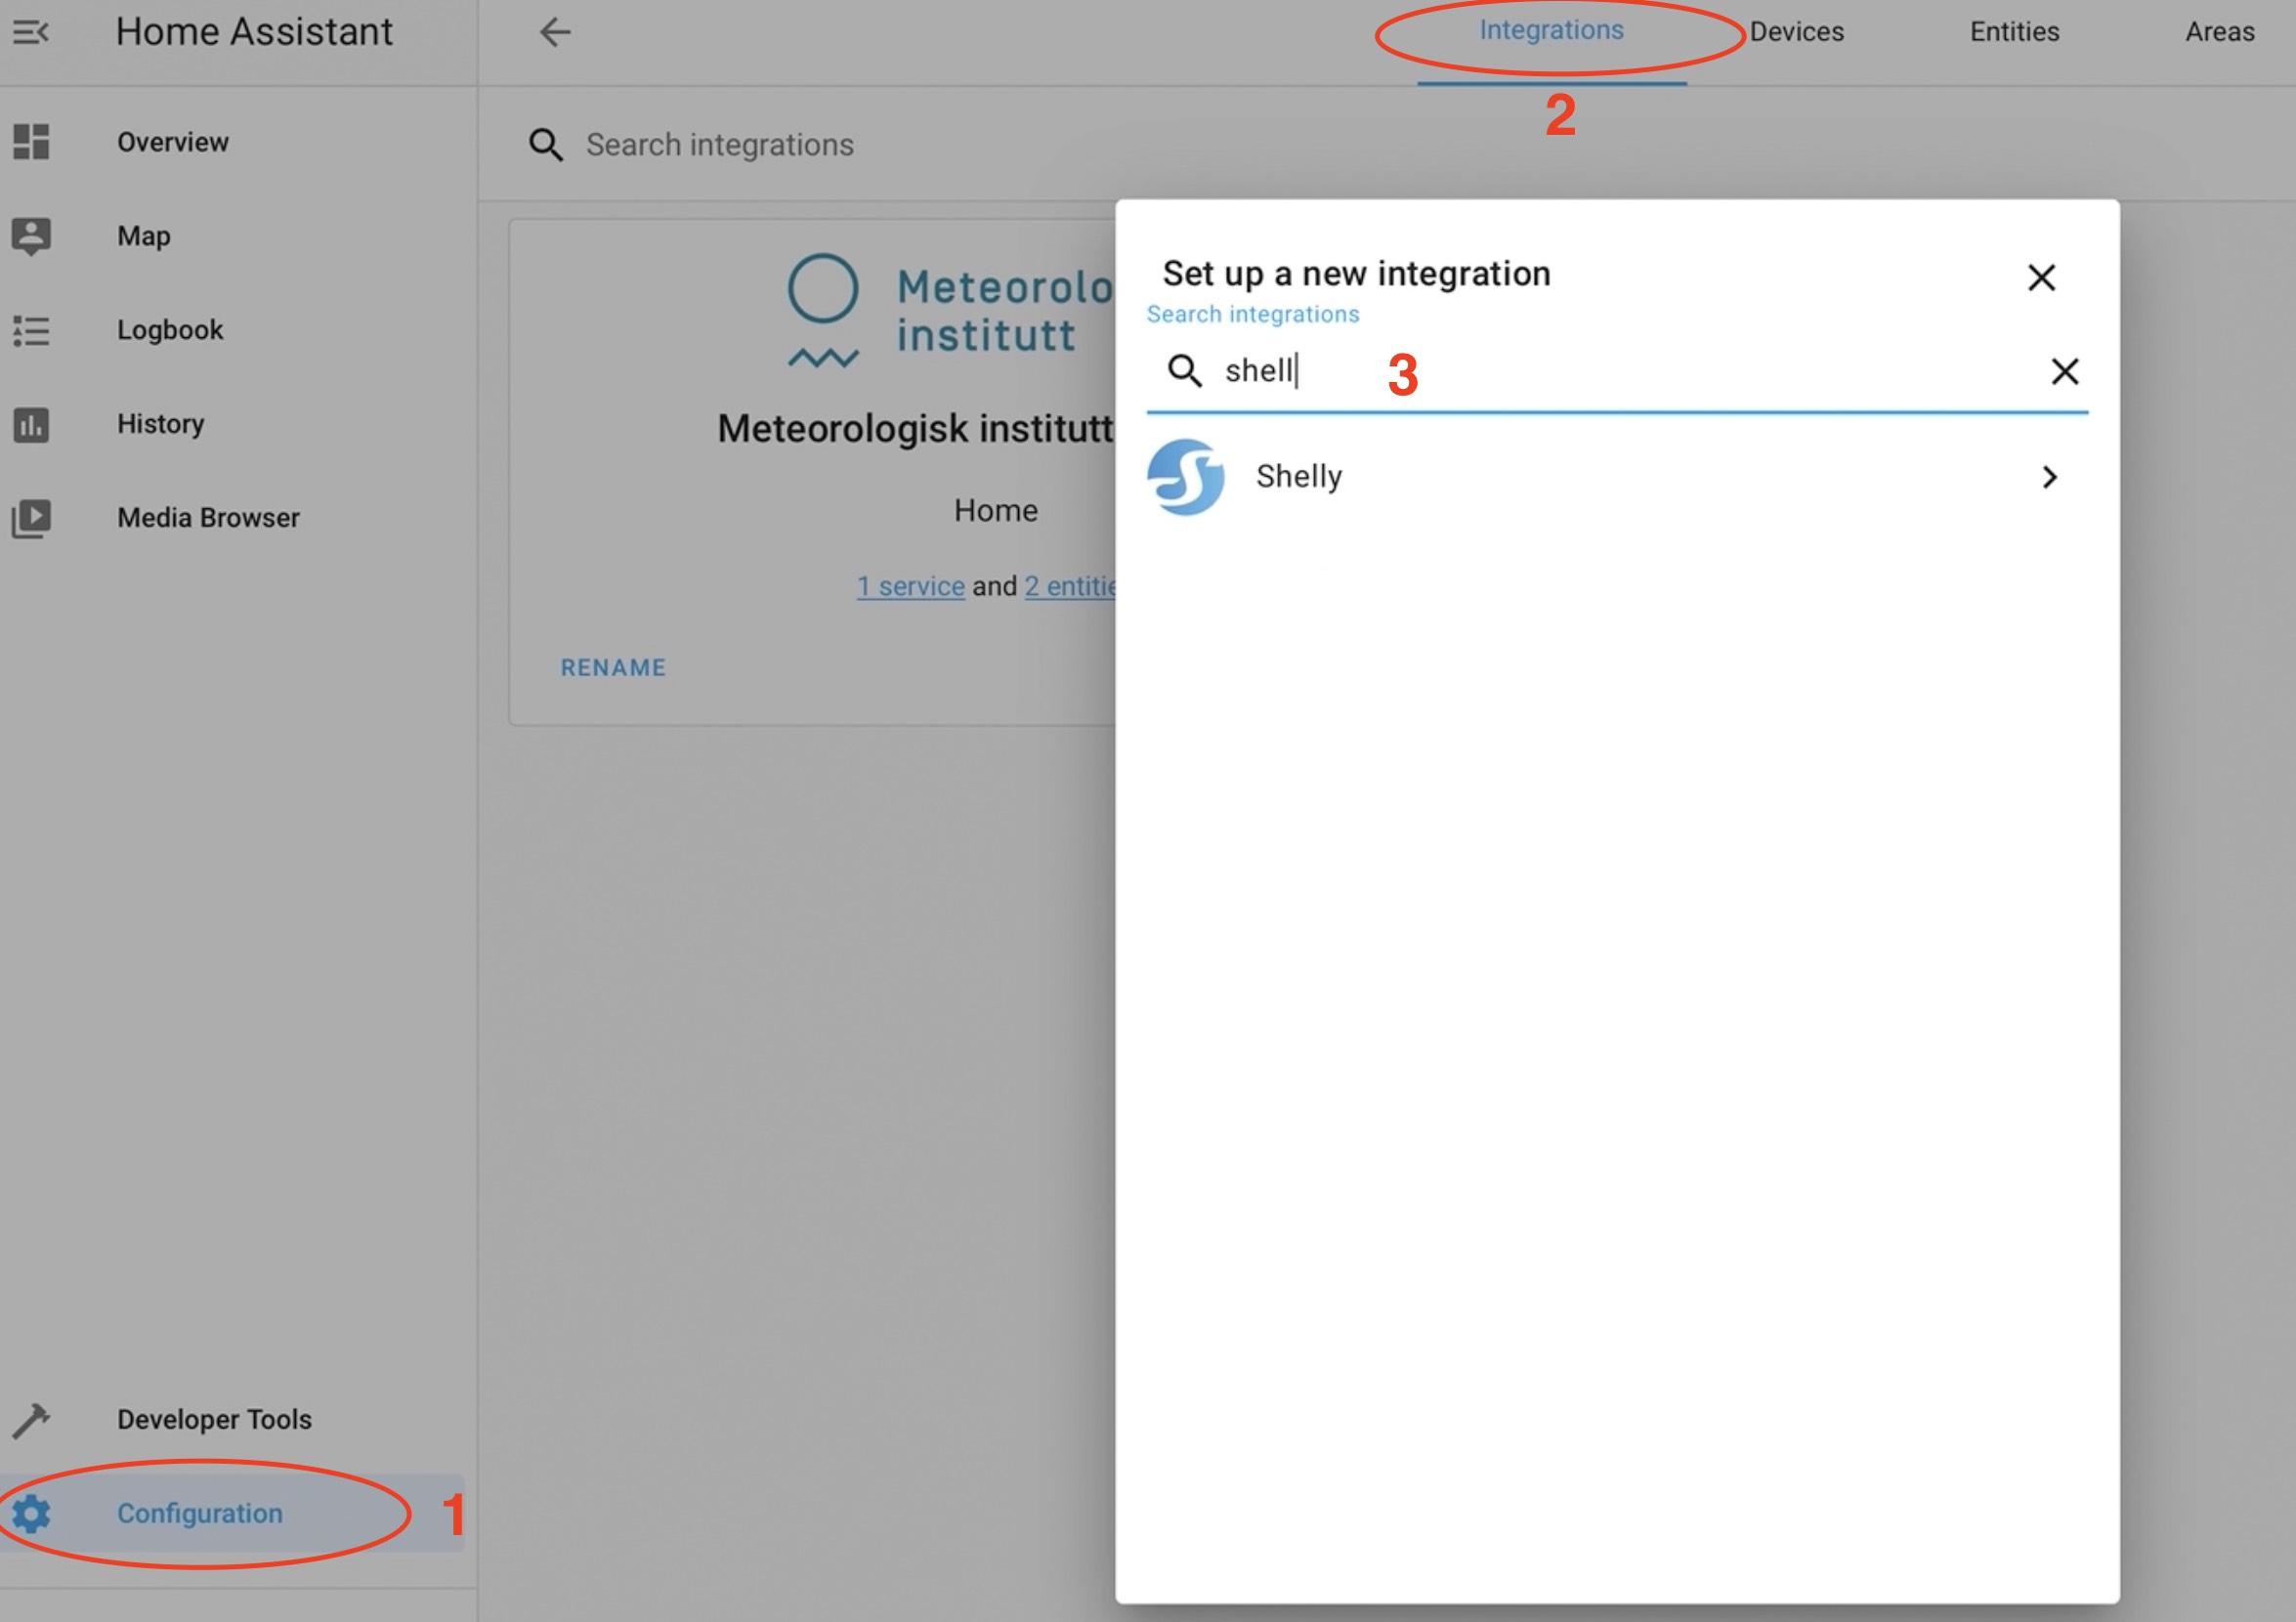
Then click on the Shelly result and enter the IP of your shelly device. Click on the Submit button and finally on Finish button.
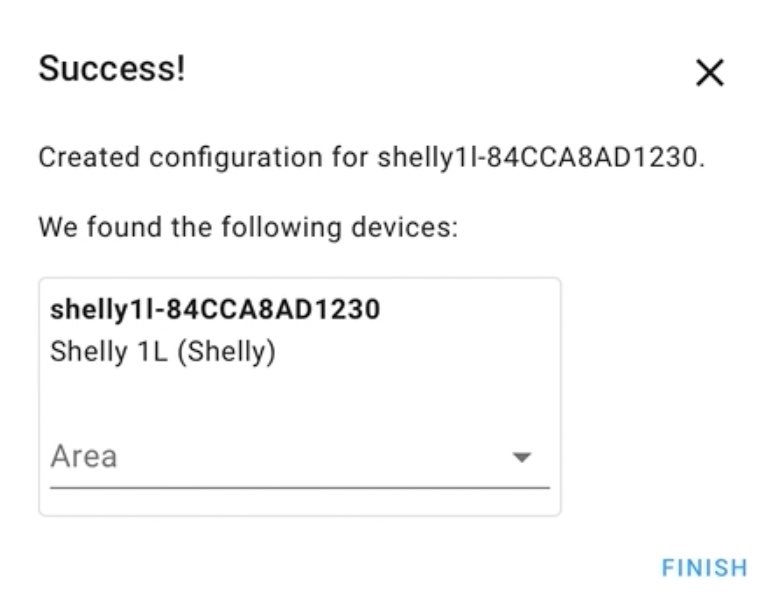
When the integration between Home Assistant and Shelly 1L is finished you will have a couple of new entities. You can use them in Home Assistant scripts and automations as usual or you could just add them to your Home Assistant Dashboard.

Where to buy Shelly 1L?
If you want to buy Shelly 1L, you can use the Shelly official store and my affiliate link below, doing so I will earn some small commission from your purchases with no additional cost for you:
- Shelly Amazon Store – https://amzn.to/34d88VR
Support my Work!
If you want to secure this blog existence you can become one of my supporters. You can see exactly how in this section of my site.
Any other sort of engagement on this site and my YouTube channel does really help out a lot with the Google & YouTube algorithms, so make sure you hit the subscribe, as well as the Like and Bell buttons.
Also feel free to add me on Twitter by searching for @KPeyanski. You can find me on my Discord server as well.
I really hope that you find this information useful and you now know more about the Shelly 1L. How to wire it with or without neural wire and how to integrate Home Assistant and Shelly 1L.
Stay safe and don’t forget – Home Smart, But Not Hard!
Thank you for reading, I will see you in the next article.
Hi
Great write up thanks – but I think I am missing something to wire this in the UK with a 2 wire (no neutral) light switch? Does ‘O’ with bypass go to the light? on the uk light switch I have COM (which I now would be L) and S1 – so I guess the bypass goes to this? Thanks!
Hi
Great Write up thanks but do you know how this would in UK wiring as I only have a Live and a Switch wire – does ‘O’ with bypass connect the switch wire?
Thanks
Hey Jason, I don’t want to answer you something wrong as I’m not familiar with the UK wiring. You better check the diagrams in the manual or ask the shelly support.
Thanks for your post. I was almost giving up. The new manual doesn’t include this diagram and all the other examples I found on the web are based on UK wiring (would need three wires between switches instead of two) or simply don’t work. I followed your diagram for connecting two switches and it worked like a charm at first try.