Why to DIY pH Sensor for Home Assistant? There are a several important water characteristics that have to be monitored and controlled all the time so the water in your pool, fish tank, or for gardening can stay usable and healthy. One of the most important water characteristics is the PH. What if you can have the PH readings in Home Assistant in real time, so you can have a safe and clean water during the whole season?
In this article I will show you how you can DIY a Smart PH sensor that can work with Home Assistant and that can help you monitor your pool or your fish tank or whatever actually you wish.
Table of Contents
What is PH?
PH stays for Potential or Power of Hydrogen and it is represented in a form of a scale that can be used to specify the acidity or basicity of any water based liquid. But enough chemistry talks, let’s see the requirements.
Is Home Assistant needed for the DIY Smart pH Sensor?
For this exact project having a Home Assistant is kind of optional, as the Smart DIY PH sensor that we are going to build will have a display that will show the pH readings.
If that is enough for you, you can skip the Home Assistant part entirely. But if you want to make automations based on the pH readings. For example: if the pH become acidic, send a notification to a phone – then Home Assistant is a must.
Also, install Home Assistant now and thank me later as this software can be used for so many things and it is all free. I’m two hands recommending it.
Webinar Alert! 4 Official + 1 Secret way to get Home Assistant
If you want to know more about the different official methods to get the Home Assistant – please, check my webinar, where I will talk exactly about that.
I will also talk about one kind of hidden way to start Home Assistant in under 5 minutes so you can begin experimenting almost immediately.
Go to my other website and register for the Webinar. It is free – https://automatelike.pro/webinar
Needed Parts for the Smart DIY pH Sensor
I’m going to list the needed parts for the Smart DIY pH Sensor for Home Assistant. I bought them all from AliExpress website and I will paste the exact links, so you can get the same if you want to build the Smart DIY pH sensor. The links below are affiliate links, so if you buy something I will get a small cut from your purchase with no additional cost for you.
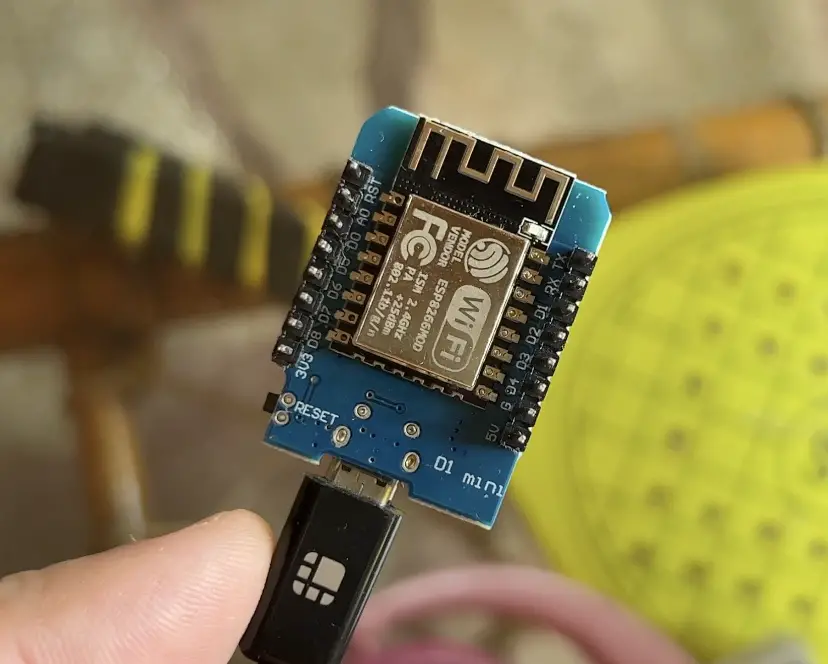
D1 Mini (the brain)
First one is the D1 Mini, which is the brain of our operation. It is an ESP8266 based board that can be connected to a computer using a Micro USB cable and a software can be installed on it. Exactly what we are going to do later in this article.

PH Value Detection Sensor
Next, is the actual PH value detection sensor that is a board and a stick with a cap that can hold a liquid that is going to be measured. Of course, you can remove the cap and put the sensor constantly in your pool or other tank to measure the pH readings in real time.

PH Value Detection Sensor
After that, we will need a LCD display + I2C module that is going to display the PH reading of our Smart DIY PH Sensor.

5K Ohm Potentiometer
Also 5K Ohm Potentiometer is needed.

Jumper Wires
Some jumper wires to connect everything plus connectors or soldering iron with some basic soldering skills if you don’t use a connectors.


Hot Glue Gun
Optionally, you will also need a hot glue gun to glue everything in place inside the box.

A Project Box
And finally, a project box that will collect everything in one place. Of course, you can print such box if you have a 3D Printer or you can buy a ready to use one and that is the Style number 7 (100x60x30mm) box from the link below.

How much is the total cost of the Smart DIY pH Sensor for Home Assistant?
The needed parts are not so expensive, they cost me around $25 US dollars in total, but you can check the current prices in the links above. Have in mind that I’m not including the soldering iron and the hot glue gun in the total price, as I already had them.
What is next?
Now, when we saw all of the needed things, I will try to give you as clear instructions as possible about how to connect the parts. Then how to upload the ESPHome software on the pH sensor brain that is the D1 mini. Then I will show you how to calibrate the pH Sensor and finally, how to add everything in Home Assistant.
Let’s start.
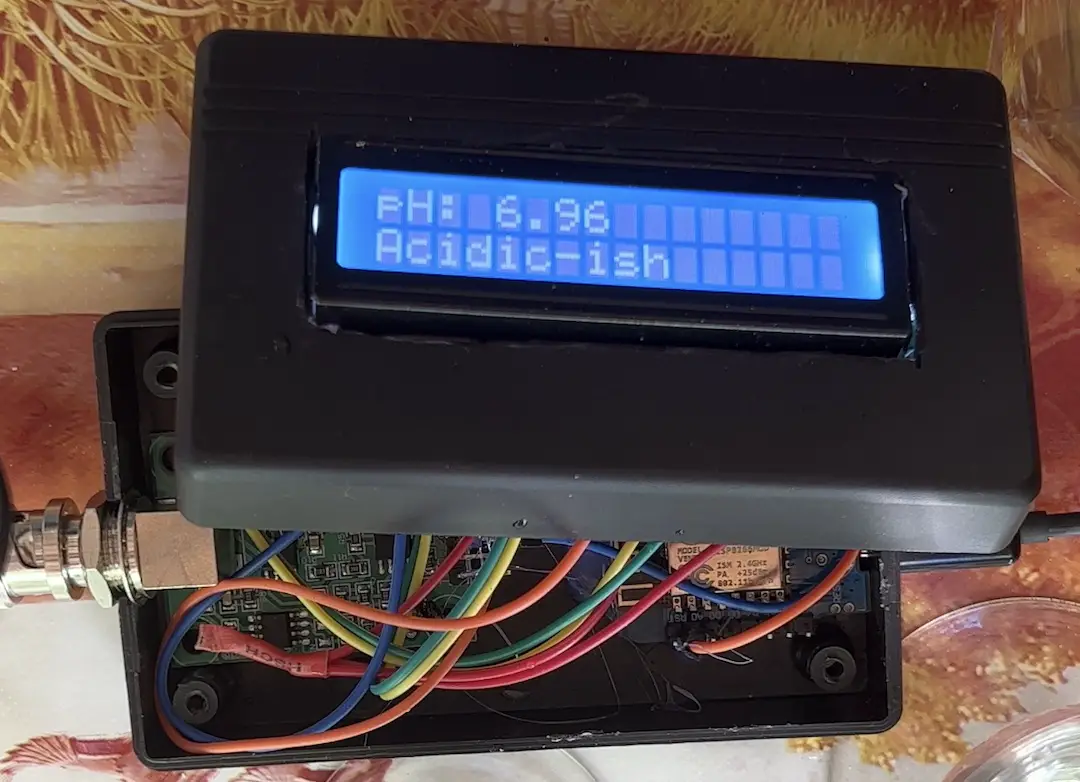
Cutting the Box & Preparation
The first thing that I did was to cut the box a little bit, so I can fit the display, the PH Sensor connector and the Micro USB cable.
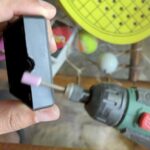
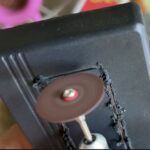
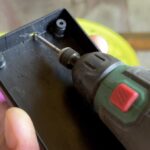
I used a “Dremel” tool for that that I bought form the LIDL stores. This tool helped me to do the job good enough, but probably there are some better and more precise ways to accomplish this task.
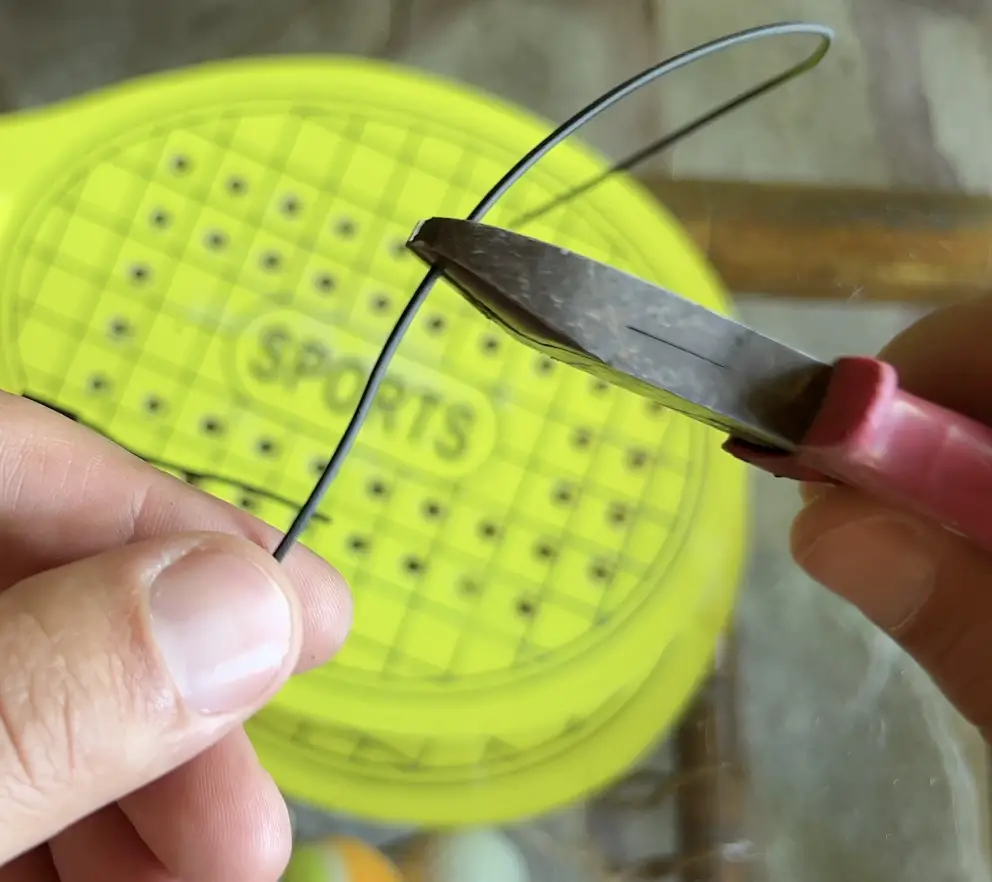
After that, I cut one black and one red female-to-female jumper wires that I used as the Ground and 5V power cables.
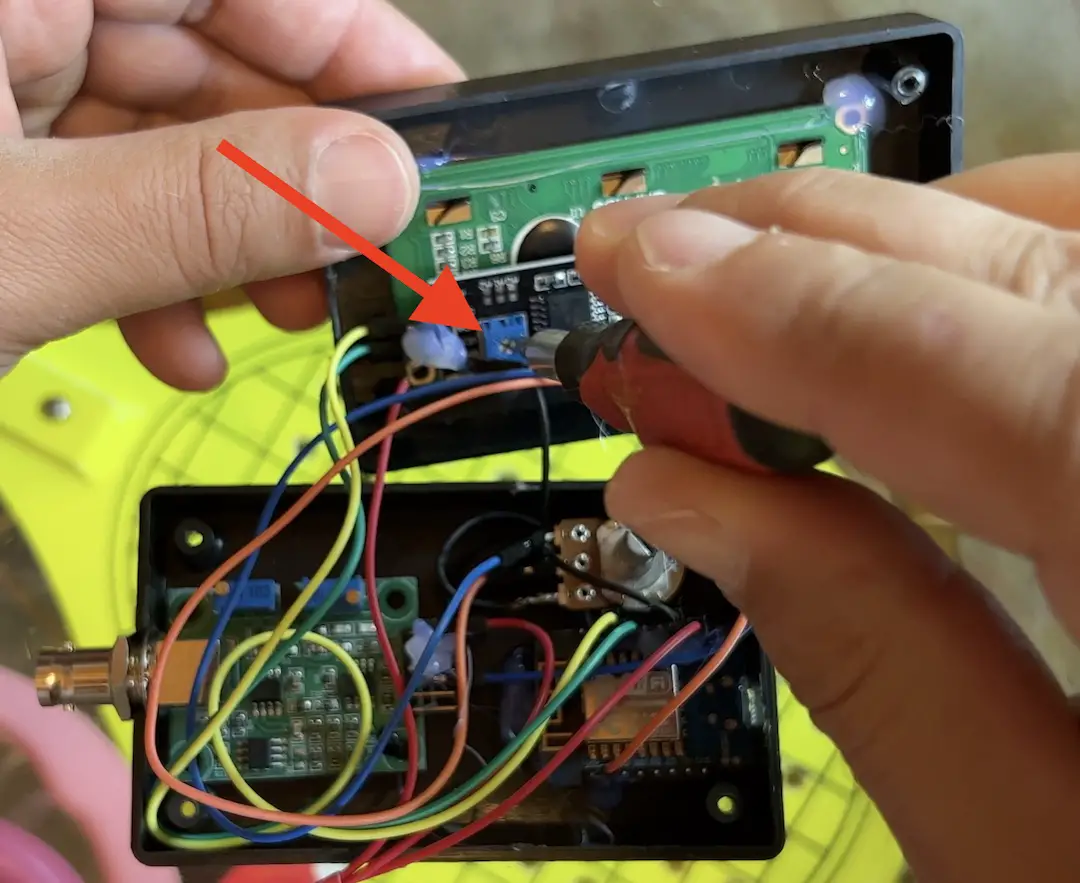
How to connect the Smart DIY pH Sensor parts?
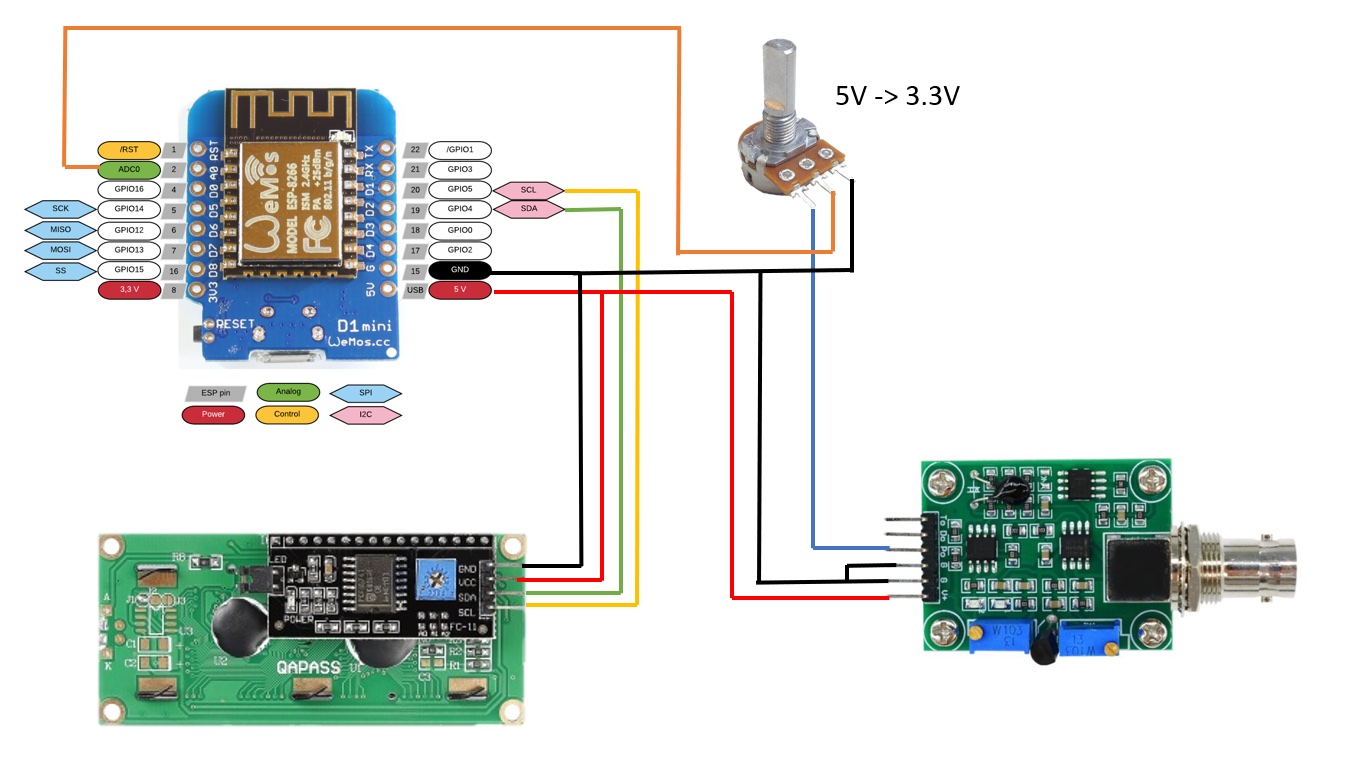
Then I used 4 more female-to-female jumper wires to connect everything using this diagram.
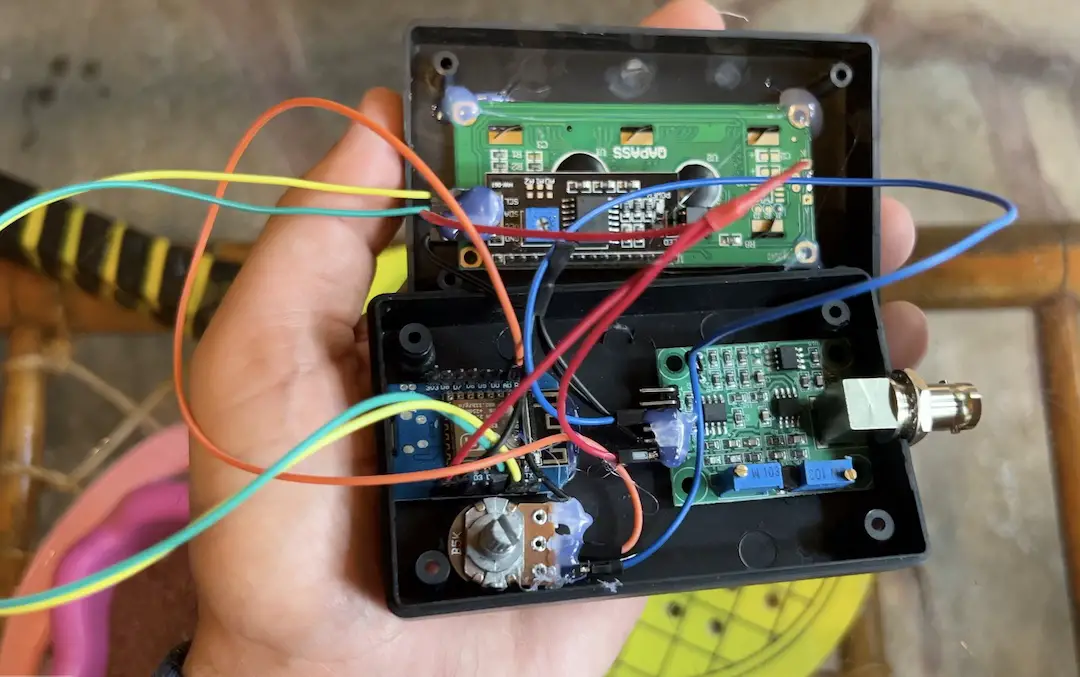
I soldered some of the black and red wires that didn’t have connectors, due to my cuts directly to the boards. And this is the end result
Then I powered everything by using a Micro USB cable that I plugged into the D1 Mini and it seems that it all worked, but there was no software installed on the D1 Mini to control the hardware yet. Something that I was about to change.
Installing ESPHome on the D1 Mini
There are several ways to install ESPHome and I I covered most of them in this article of mine, so go check It out if you wish to know more.
For this DIY PH Sensor, I used the EPSHome add-on inside Home Assistant to upload the software.
The key moments here are:
- First, I had to connect the D1 Mini to the device where Home Assistant and ESPhome are installed in order the device to be detected. In my case it was one Raspberry Pi 400.
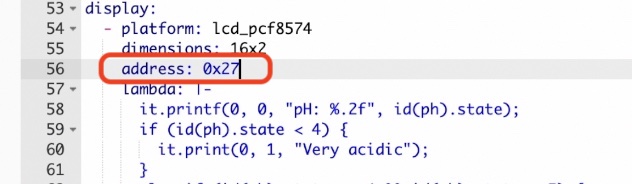
- Second, I had to copy and paste the code from this GitHub project into my ESPHome device. The only additional thing that I did was to add the display address, because I saw some errors in the logs and the display didn’t want to work without this address.
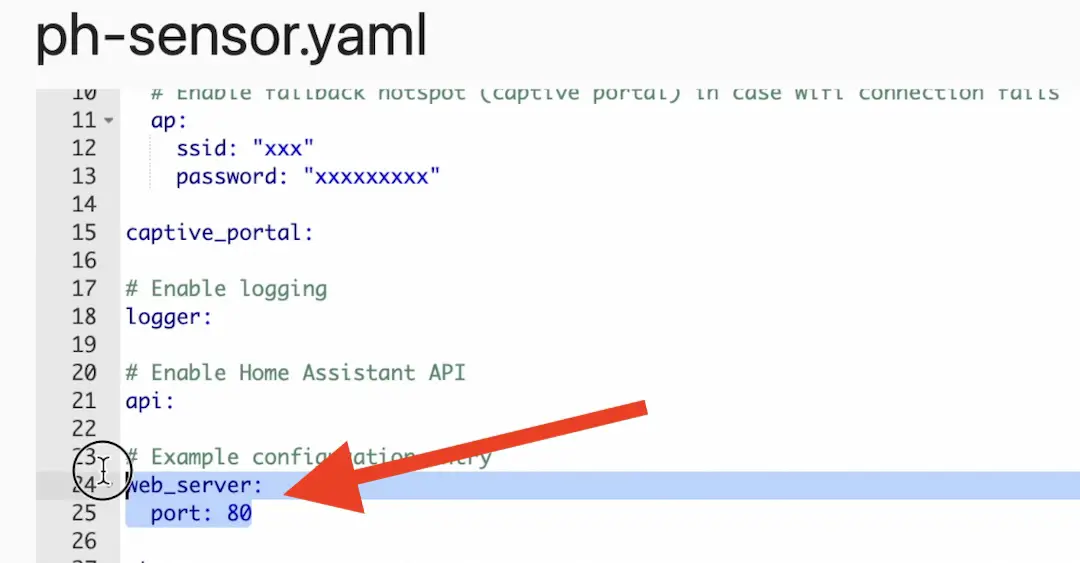
- I also added a Web server, so I can connect directly to the device IP and to see the readings.
I put the whole code that I used in this link right here ⬇️ https://gist.github.com/peyanski/902953d31a1419dc3579671396c20a57
Credits to the author of the ESPHome-PHSensor
Big shout out to the author of the code above, all the credits for this Smart DIY pH Sensor is going to Mikko Lauhaluoma! As well as to the @Intro_Verti from my Discord server who showed me that project.
Adjusting the display brightness
I uploaded the ESPHome on the D1 Mini and I powered everything once again, but although I could see the pH readings in the ESPHome logs, the display was not showing anything.
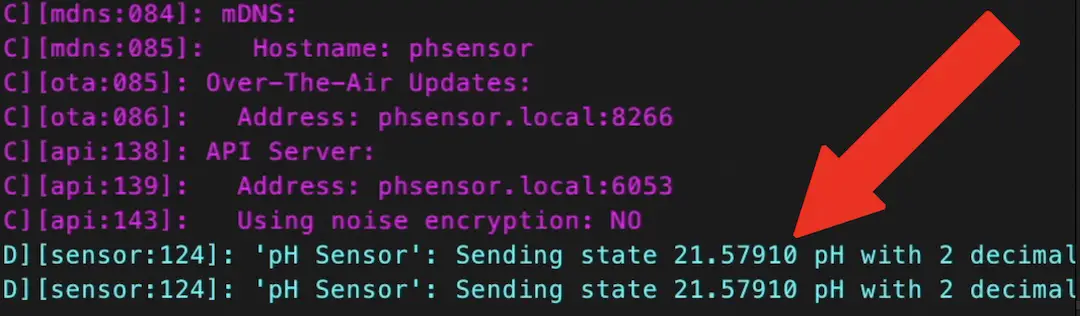
One more tip here about the LED display. If it doesn’t show anything just like as in my case and there are no errors in the ESPHome log about the display. Try to adjust the brightness using the potentiometer on the back of the display. I calibrated the display brightness and out of the blue I saw the pH readings on the display.
Don’t forget to use some hot glue to fix the parts in place and also the cables. So you can freely cary the smart pH sensor everywhere you wish and everything inside the box will not to rattle like a candy box.
Calibrating the Smart DIY pH Sensor
After the successful display brightness calibration, another problem appeared. The pH readings were too high and they didn’t change no matter what I did.
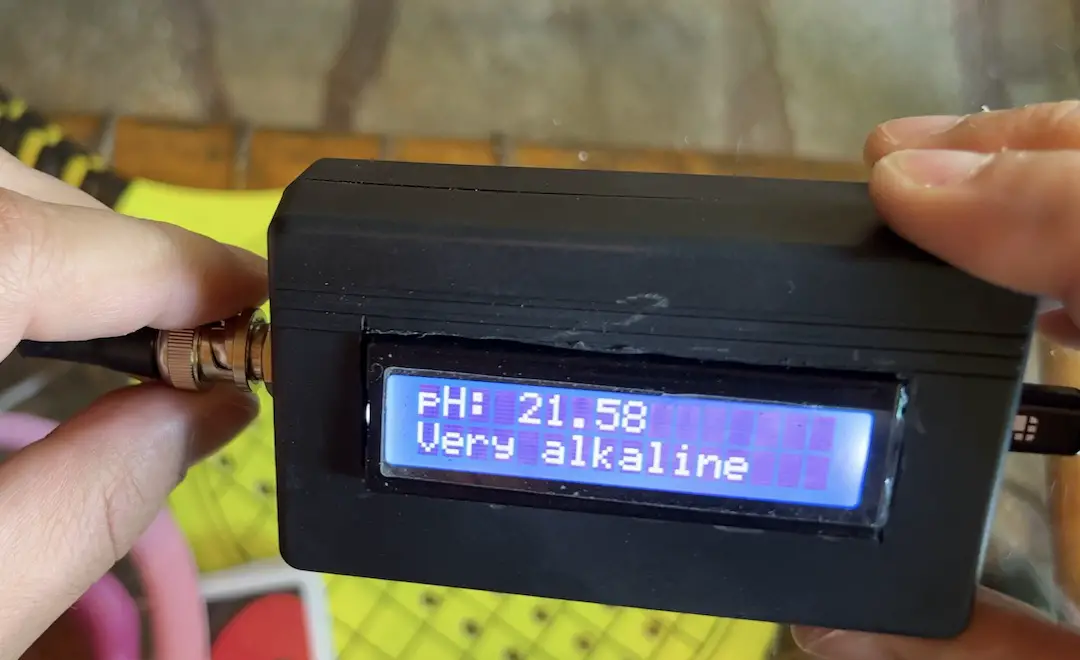
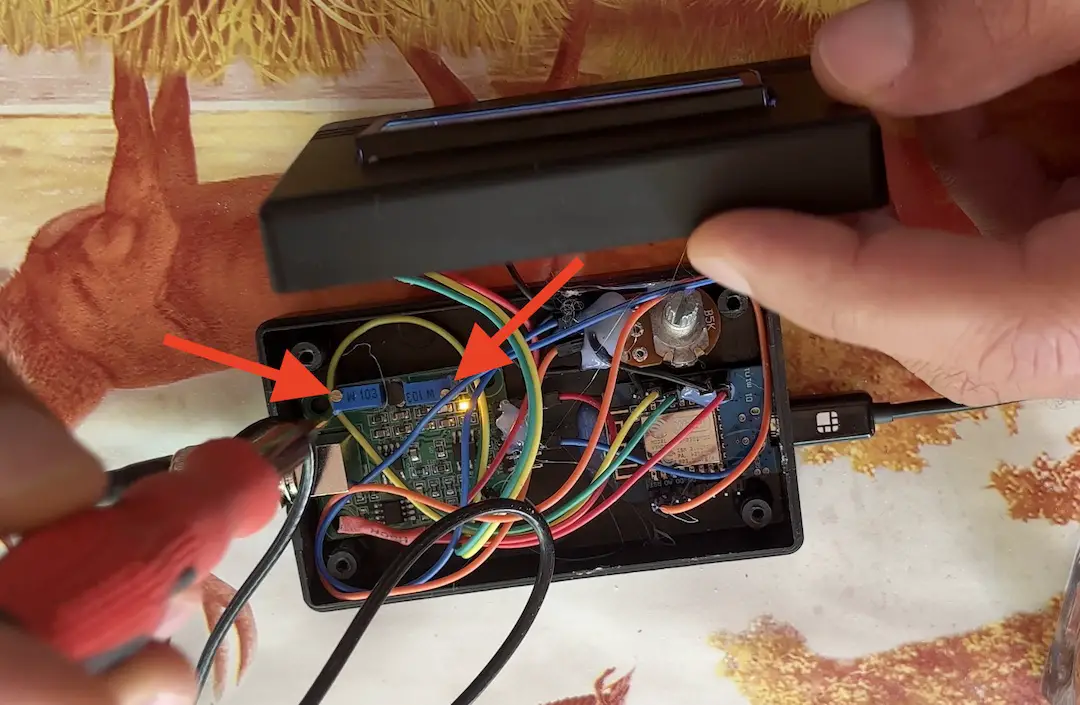
Thankfully, it is also possible to calibrate the pH Sensor by using the 5K Ohm potentiometer and the screws on the pH Sensor board.
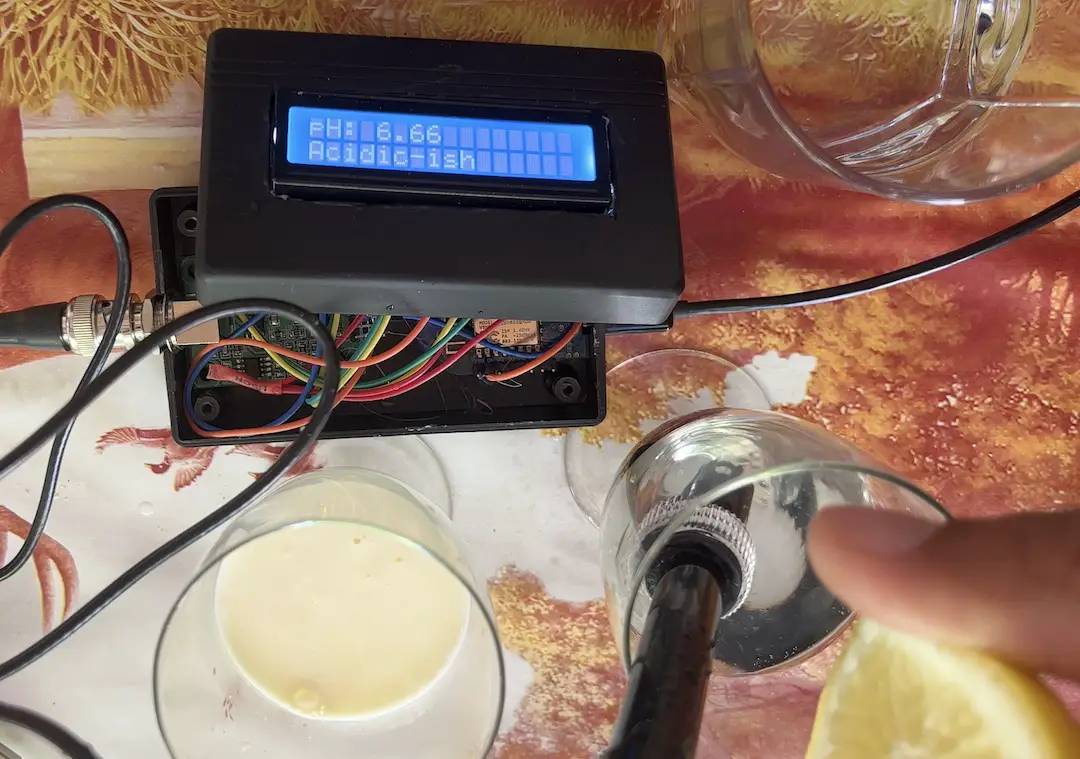
I used a normal mineral water that have a PH 7.7 as a starting point. After I managed to calibrate the smart pH Sensor I tested it with milk and a water with lemons and all seems great.
Challenge for You!
Exactly as in my other DIY sensor articles I have a challenge for you here as well.
If you reach this point and your DIY Smart PH Sensor is working. Share that in the comments by just type: #phowned and I will know that you managed to do it.
That way me and everybody else who reading this can congratulate you for the efforts.
Smart Home Glossary for FREE?
If some of the words and abbreviation are kind of foggy for you, I can try to help.
Just go to my other website and download the Smart Home Glossary that I prepared for you.
https://automatelike.pro/glossary
This Glossary is absolutely free and it is full of simple, but yet useful explanations of the Smart Home words that are used everywhere.
Adding the Smart pH Sensor in Home Assistant
That until now was the hardest part of the whole project. Now, let’s continue with the Home Assistant and smart DIY PH sensor integration part which is like a walk in the park after all these cables and sensors.
- Open your Home Assistant and press the “c” button on your keyboard to invoke the Home Assistant search bar.
- Start typing “integrations” and select Navigate Integrations.
- There is a big chance that your Smart DIY PH Sensor to be auto discovered by Home Assistant and to be shown within the Integrations with a big CONFIGURE button on it. If that is the case, just click on CONFIGURE and follow the instructions.
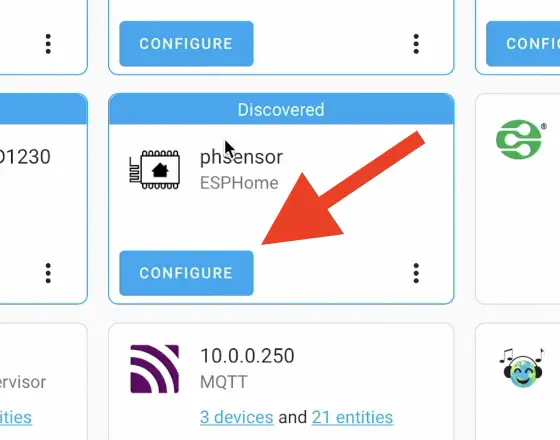
- If the sensor is not auto-discovered, click on the Add Integration button, search for ESPHome and select it. Or you can click the My Home Assistant link below

- No matter what of the options you chose, you should end up with added 1 new ESPHome device with 1 entity.
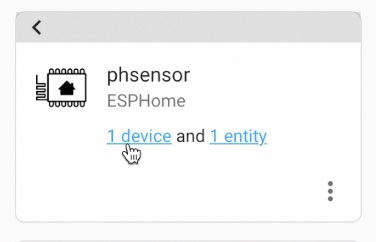
- Click on this 1 device link and you should see the pH readings inside Home Assistant.
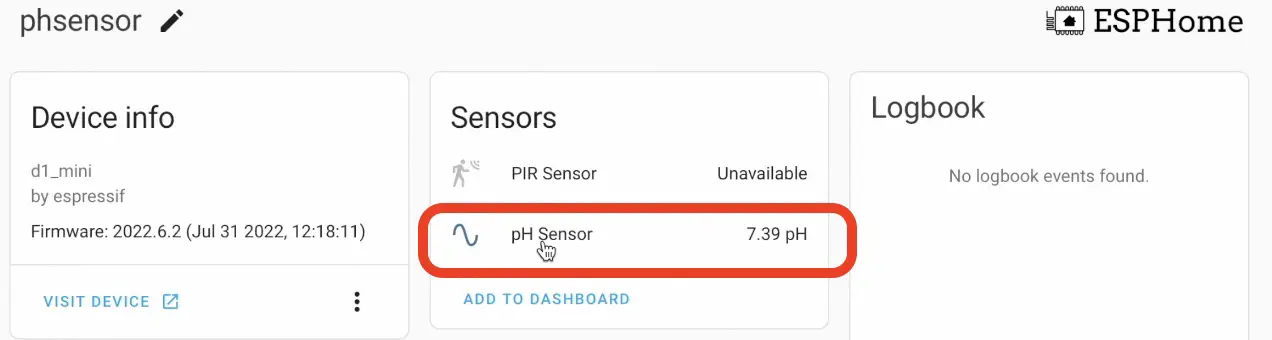
That is worth celebrating in my opinion, don’t you think?
Adding the DIY PH Sensor in Home Assistant Dashboard
You can add the ready to be used DIY PH Sensor for Home Assistant on your dashboard by just click on the Add To Dashboard link in the screen above and you will have it exactly as shown. Or you can make it a bit more beautiful by adding a new Gauge card and paste the following code inside:
type: gauge
entity: sensor.ph_sensor #CHANGE THIS TO YOURS
needle: true
min: 1
max: 14
segments:
  - from: 1
    color: '#db4437'
  - from: 6
    color: '#ffa600'
  - from: 7
    color: '#43a047'
  - from: 8
    color: '#ffa600'
  - from: 9
    color: '#db4437'
And the end result will be the following:
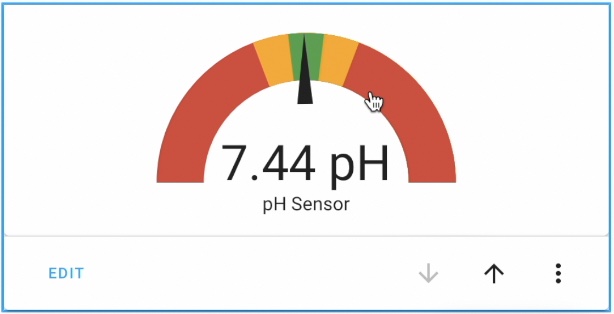
Tell me in the comments do you like the above Gauge Card or not. Maybe you got something better? Please, share it!
How to make PH Sensor automation in Home Assistant?
Time to make one simple, but yet useful Home Assistant pH Sensor automation.
- Paste the following YAML code in your
automations.yamlfile or use the YAML editor in the Home Assistant Automations editor.
alias: if pH goes above 8 or below 6.5
description: ''
trigger:
  - platform: numeric_state
    entity_id: sensor.ph_sensor #CHANGE THIS TO YOURS
    above: '8'
  - platform: numeric_state
    entity_id: sensor.ph_sensor #CHANGE THIS TO YOURS
    below: '6.5'
condition: []
action:
  - service: persistent_notification.create
    data:
      message: The pH value becomes {{ states('sensor.ph_sensor') }} #CHANGE THIS TO YOURS
mode: single- Don’t forget to replace the pH sensor name with yours. I marked the places with #CHANGE THIS TO YOURS comments, so you can find them more easily.
After you are ready with the Home Assistant automation above, you should start receiving Persistent Notifications (in lower left part of the HA screen) if the pH readings goes above 8 or below 6.5.

Thank you for reading, subscribe for my Newsletter, so you won’t miss an upload. See you next Wednesday.
I’m Kiril and I’m done writing. Bye!
I want to make these too, have yet to order the parts. It is not clear to me how to calibrate the sensor and where the potentiometer does. Searched the internet and read on various sites that the PH value is between 0 and 14 and how to calibrate it.
To calibrate you have to disconnect the sensor and connect the BNC connector, bridge between ground the middle. Also disconnect the PO connection to the 5K potentiometer. There you have to measure 2.5 volts on de PO and the ground, which is a PH value of 7. You have to adjust this with the potentiometer that is closest to the BNC connector. The sensor would now be calibrated?
The sensor PCB outputs between 0 volts (PH 0) and 5 volts (PH 14). The ESP can only operate up to a maximum of 3.3 volts. I think the 5K potentiometer is to compensate for this. I think if you first adjust the PCB to 2.5 volts then you have to adjust the 5K potentiometer until you see a PH value of 7 in the display?
Nice project , i’m going to make it!
how easy is it to add a temprature sensor??
it shouldn’t be difficult or any different than the usual…
It’s very easy. I just finished making a similar project, and added a temp sensor (dallas based) and an ultrasonic distance sensor. It is used for a Tower Garden (brynn1.towergarden.com) so that I can monitor how full the water reservoir is, as well as monitor the Ph and the temp. Works pretty well. In my case I used a HiLetgo ESP32 LCD WiFi Kit ESP-32 1.14 Inch LCD Display WiFi+Bluetooth CH9102 USB Type-C Internet Development Board for Arduino ESP8266 NodeMCU instead of the one mentioned in the post, but the principle is the same 🙂 (https://www.amazon.com/dp/B07X1W16QS?psc=1&ref=ppx_yo2ov_dt_b_product_details)
unfortunately I have an error concerning the lcd in the logs.
“Component lcd_base took a long time for an operation”
Eventually the error disappeared after several configuration attempts.
In i2c: I added
frequency: 200kHz
In display: I added
update_interval: 2s
However, while the logs show me data for the probe, nothing is displayed on the screen. It remains illuminated in blue without any inscription
Do you know where the problem would come from?
sorry for my previous message but I had not adjusted the brightness of the screen.
The display is operational.
On the other hand, my probe constantly displays 21.75 of Ph.
I tried to adjust the small screw on the card but it has no effect
Do I have to use the display? I dont really need a display as such – just to report the figure to HA and a dashboard. Is it just a case of removing the display: code?
Bonjour,
J’ai réalisé le montage et je ne parviens pas a l installer avec esphome, il me revoie le message suivant : esphome:
name: phsensor
platform: ESP8266
board: d1_mini
Please remove the `platform` key from the [esphome] block and use the correct platform component. This style of configuration has now been removed.
platform: ESP8266
je suis perdu , je ne sais pas comment mettre a jour le fichier yaml, home assistant a change son systeme de yaml,
Je voudrais realise ce capteur avant le printemps,
merci d avance
Charly