In this article, I will show you how to DIY a Smart sound sensor using an ESP board like D1 Mini, ESPHome and Home Assistant. The total bill of materials is less than $4 US dollars, which is cheaper than a good coffee or beer, so cheers.
Table of Contents
For what the DIY Smart Sound sensor can be used?
With this DIY smart sound sensor it will be possible to make home automations when sound is detected.
For example:
- You can extend your comfort zone and to use it to turn on some lights when you start talking or when you play some music in the evening.
- Or you can upgrade your security system and use it do detect sounds when someone try to break-in through crushing a window or a lock.
The possibilities are endless once you have it working.
What parts are needed for the DIY Smart Sound sensor?
To have the Smart Sound Sensor working you will need few things:
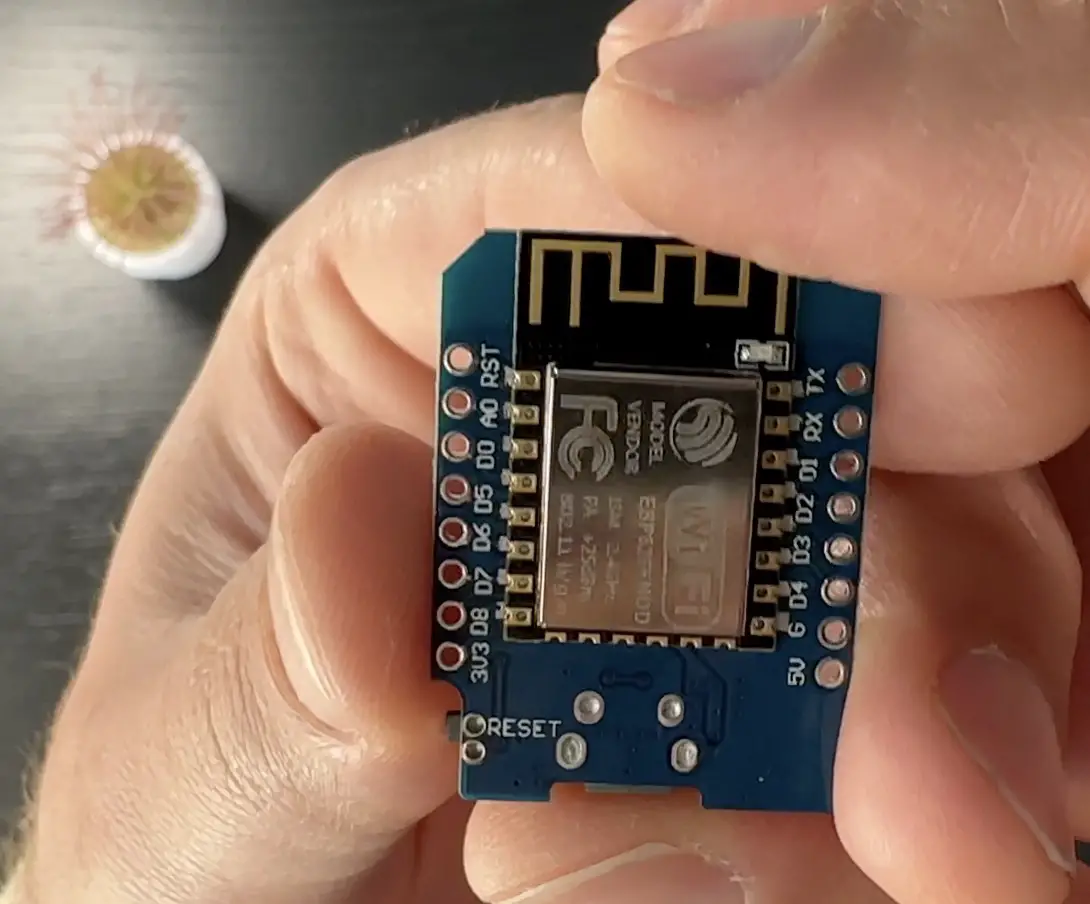
- Like D1 Mini ESP8266 board. This board cost $2 to $3 dollars and I will upload an ESPHome Software on it, which will allow communication with a Smart Home hub like Home Assistant.
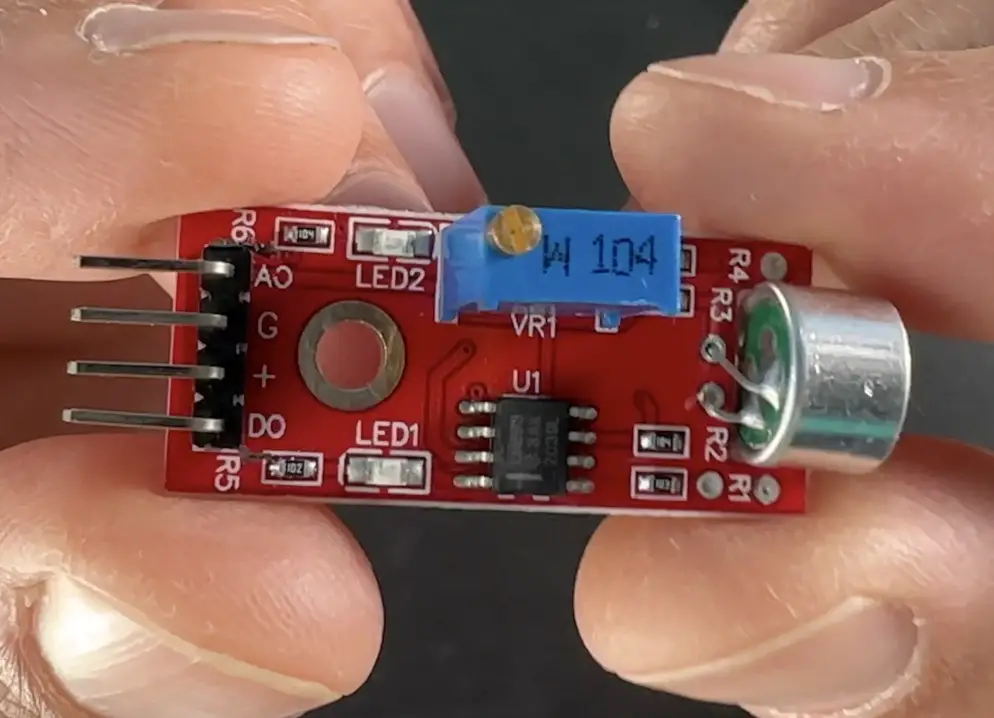
- Next thing that Is needed is the actual sound sensor. The exact model that I’m using is KY-037. There is also a KY-038 model that can be used as well with no modifications and the only difference is that KY-037 has a microphone with a higher sensitivity than KY-038. So, depending of what you want to achieve you can get one or the other.
The cost of this sensor is around $0.50 to $0.60 cents.

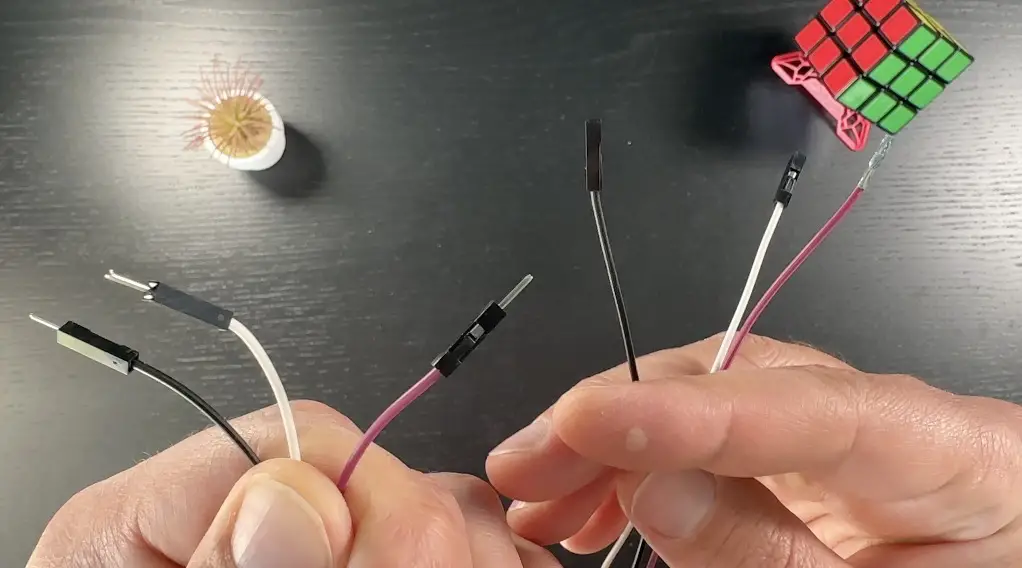
- 3 jumper wires will be also needed. I’m going to use female-to-male one and a Micro USB cable to power on the D1 Mini.
- Optionally, an USB power adapter may be needed if you don’t have a free USB slot to power up the sensor.
Where to buy the parts?
Amazon & AliExpress Affiliate Links to all of the needed parts can be found below.
- KY-037 Voice & Sound Detection Sensor (Amazon) – https://amzn.to/3L2wsj9
- 4pcs KY-037 Voice & Sound Detection Sensor (Amazon) – https://amzn.to/405Pv01
- KY-037 & KY-038 Voice & Sound Detection Sensor (AliExpress) – https://s.click.aliexpress.com/e/_DnoFI0d
- KY-037 Voice & Sound Detection Sensor (AliExpress) – https://s.click.aliexpress.com/e/_De034ah
- D1 Mini (AliExpress) – https://s.click.aliexpress.com/e/_AFgAIp
- D1 Mini (Amazon) – https://amzn.to/3A5jNoc
- Jumper Wires (AliExpress) – https://s.click.aliexpress.com/e/_Aluq3z https://s.click.aliexpress.com/e/_A3YiR3
- Jumper Wires (Amazon) – https://amzn.to/3fRlXyK
- Micro USB Cable (AliExpress) – https://s.click.aliexpress.com/e/_DmMNO6L
- Micro USB cable (Amazon) – https://amzn.to/32tdxdF
- (Optional) USB adapter EU US UK (AliExpress) – https://s.click.aliexpress.com/e/_DCIgyvF
- (Optional) USB adapter (Amazon) – https://amzn.to/3u2Tdvj https://amzn.to/3qXkJYS
If you get the parts from AliExpress they will be cheaper, but usually with way slower delivery times. In Amazon the parts are more expensive, but usually arrive much faster.
And that was the hardware needed, next is the software requirements.
What software is needed for the DIY Smart Sound sensor?
In general ESPHome Dashboard is needed to upload the ESPHome firmware on the D1 Mini. This ESPHome Dashboard is available as one-click install add-on inside Home Assistant. And Home Assistant is probably the best free Smart Home Hub that you can have lately.
If you don’t have Home Assistant yet or if you want to understand more about different installation types + 1 stupid easy way to get started, then register for my Home Assistant webinar on my other website.
The registration is free – https://automatelike.pro/webinar
As summary, for the software part the following things are needed:
- A Home Assistant preferably with Add-on store,
- ESPHome Dashboard.
If you need more help with ESPHome installation you can check this article of mine – Complete ESPHome Installation Guide: 4 different ways to install ESPHome
and if you need more help about Home Assistant go & register for my webinar (link is above).
Wiring of the DIY Smart Sound sensor
Next thing is the wiring you can use a breadboard to test the things up in advance or you can directly solder the wires. Of course, If you have more than two hands you can try to hold the wires during the ESPHome software upload.
Anyways, here is how I wire everything.
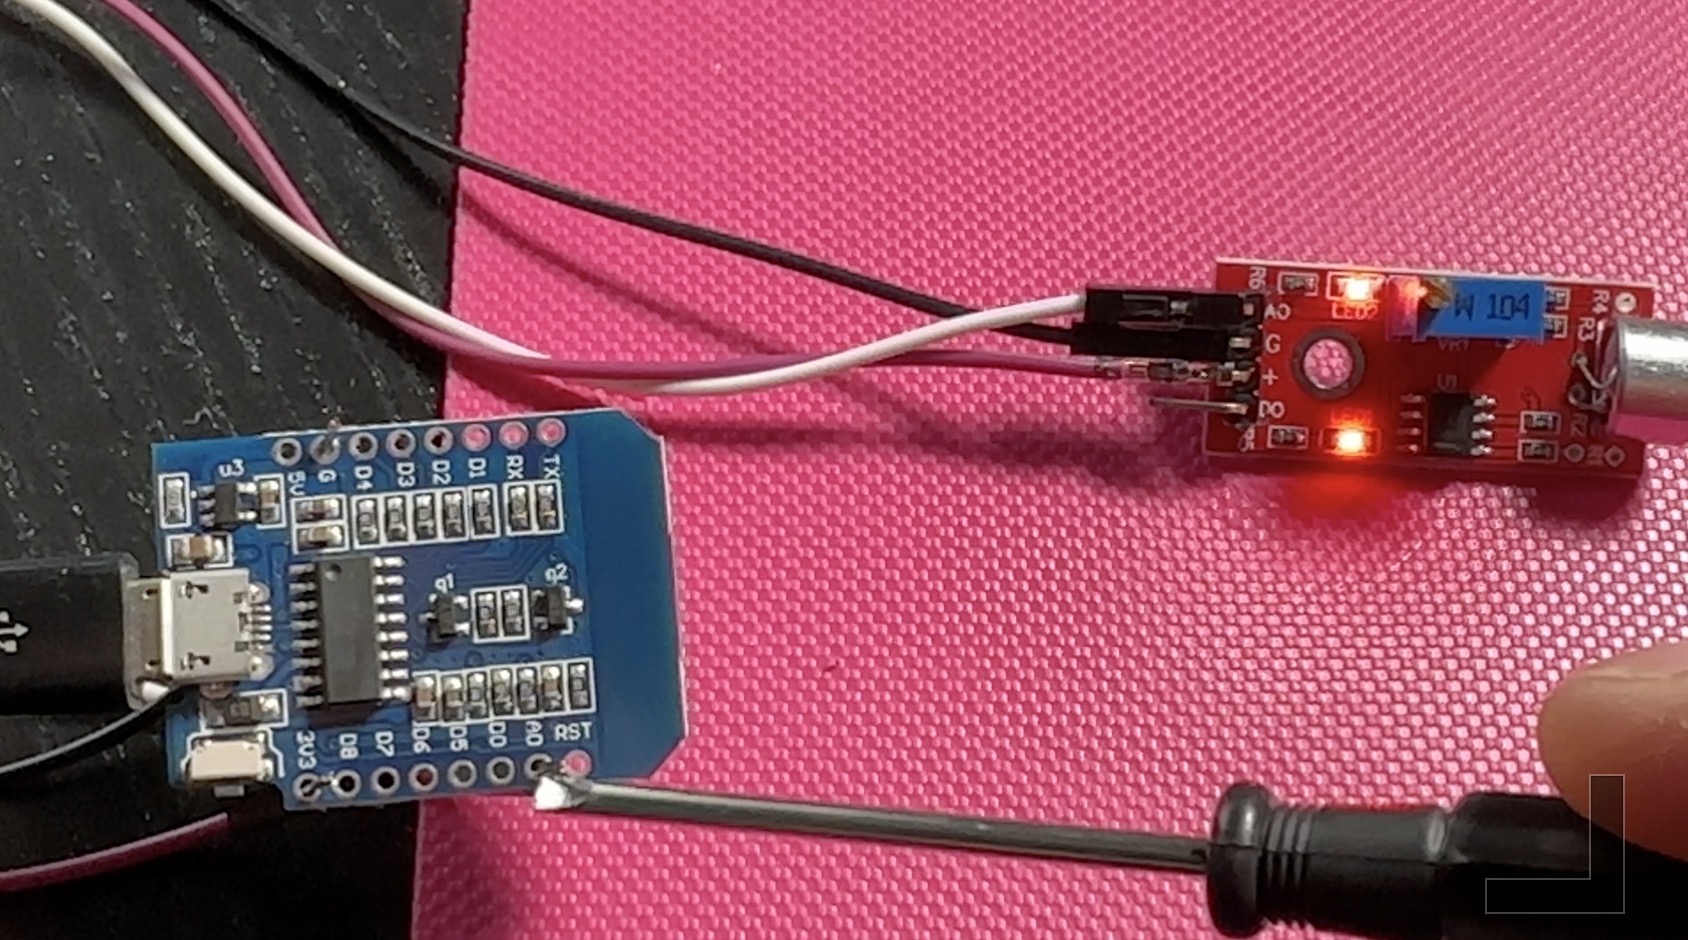
| KY-037 Sensor | D1 Mini |
|---|---|
| + Pin | 3v3 Pin |
| G Pin | GND Pin |
| A0 Pin | A0 Pin |
I connected the + Pin on the KY-037 sound sensor to the 3v3 Pin on the D1 mini, then I connected the G pin on the sound sensor to the GND pin on the D1 mini and finally I connected the A0 pin on the KY-037 sensor to the A0 pin on the D1 mini.
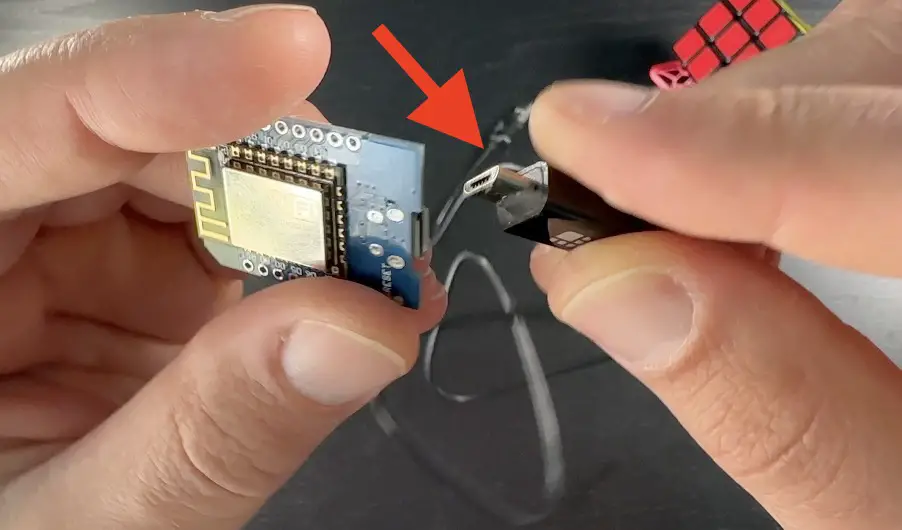
When everything is connected I just need one last connection and that is simply a USB connection. I have to connect the D1 mini board to the device where Home Assistant and ESPHome Dashboard are running. For that connection I will use a regular Micro USB cable.
Uploading the ESPHome code to the D1 mini
These are the steps that I executed:
Quick Tip: If you want the full, detailed instructions of all the steps below, please check the video tutorial linked on the top of this page..
- Inside ESPHome Dashboard I will add a new device and I will paste the following YAML code inside by overwriting everything already added by the ESPHome.
https://gist.github.com/peyanski/48691397d4cb1acfc4af56c0232342e2
- I saved the changes on the new device, by clicking on the Save button.
- I connected the D1 Mini with the attached KY-037 sensor on it to the device where Home Assistant and ESPHome are running.
- I clicked on the Install button.
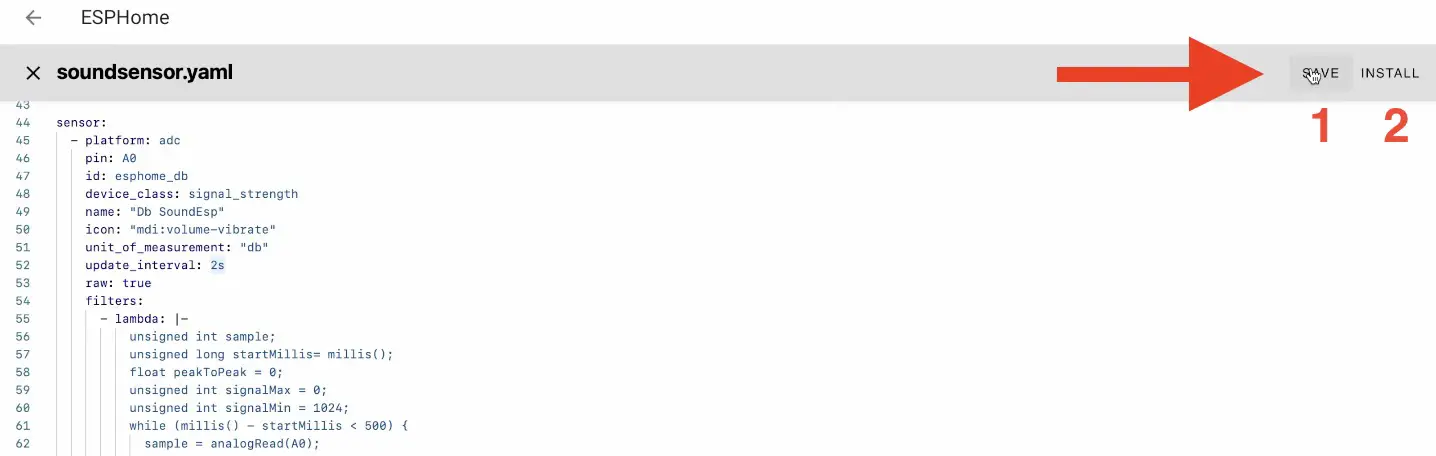
All the credits for the ESPHome code are going to the Brenner Reubertt from the Home Assistant Community. I’m not that smart to get out the DB Sound, RAW sound and Volume Sound sensor out of the KY-037 device as well digital sensitivity slider that can be used instead of the physical knob on the device.
Testing the DIY Smart Sound sensor from the embedded Web Interface
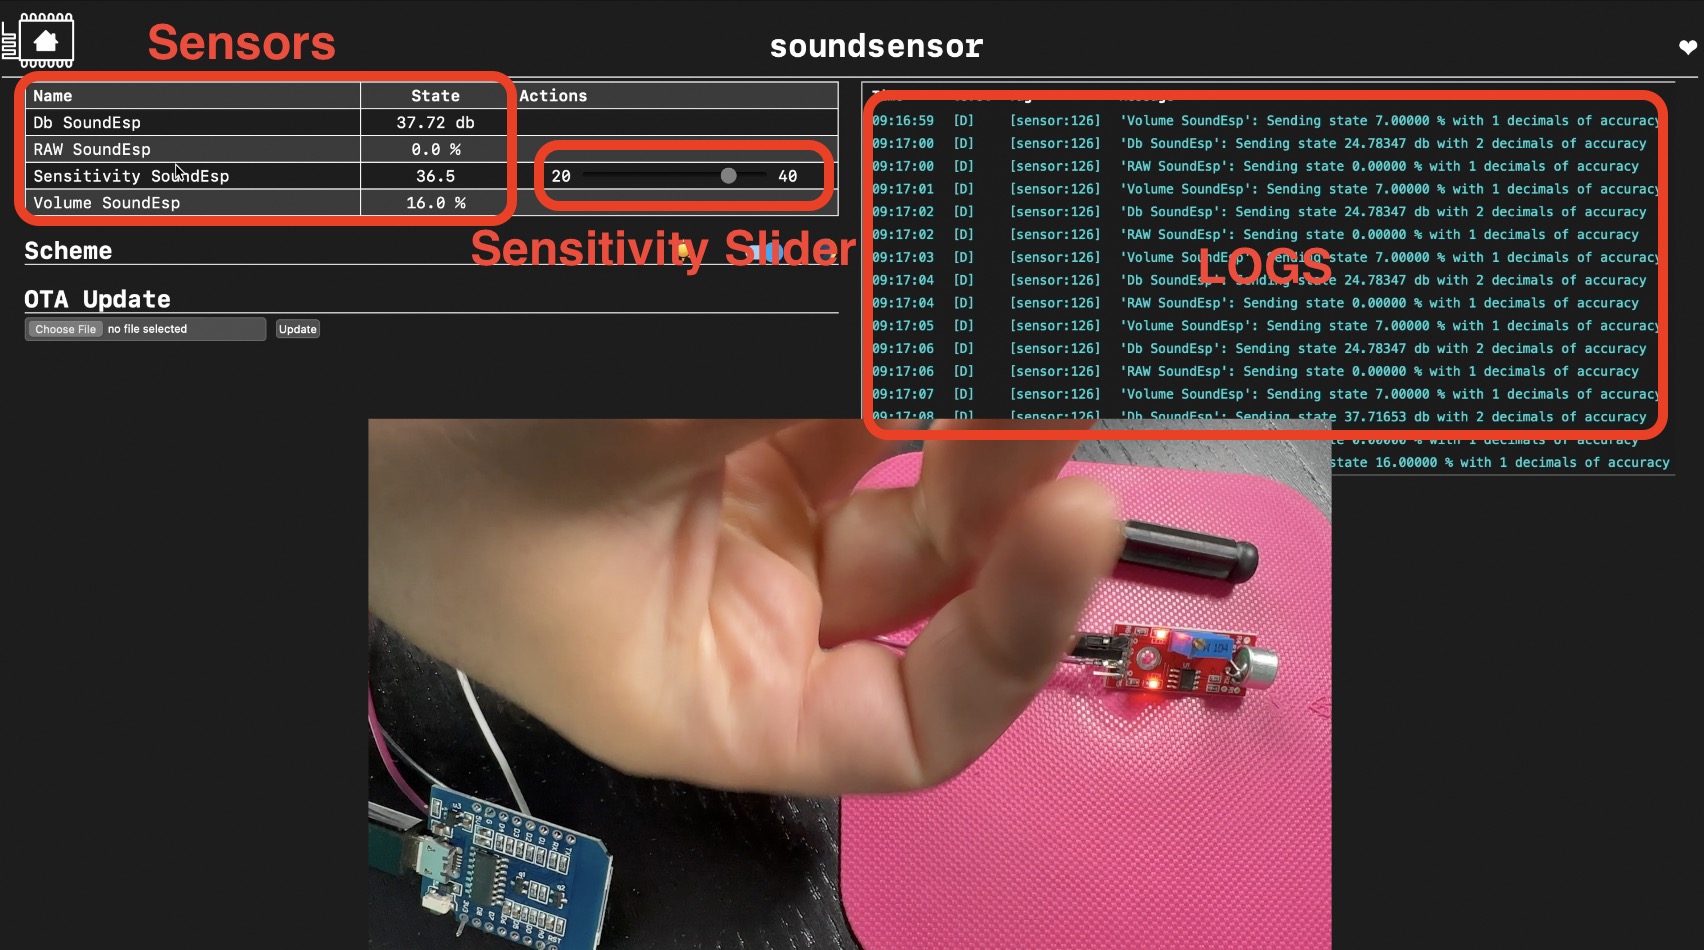
When the ESPHome software is uploaded on the D1 Mini it is a good idea for a quick test that will show if everything is working as expected. One of the ways is to open the Web interface of the device.
To open the Web interface you have to type the IP of the device or the name_of_the_device.local (ex. soundsensor.local) in a new browser window or tab or you can just click on the VISIT button in Home Assistant.

Once, Web interface is opened and If I snap my fingers next to the KY-037 sensor, the readings of the sensors are increased. Also, the Logs on the right side of the screen are showing no errors and the sensors readings in real-time, which means that everything is working great.
Adding the DIY Smart Sound sensor in Home Assistant
Now, here comes the good part, I will add the KY-037 sensor that is attached to the D1 Mini or in other words my DIY smart sound sensor in Home Assistant, so I can start making home automations.
But before I do that, let me know what is your potential use case for this DIY Smart Sound Sensor? For what exactly are you going to use it? Let me know in the comments bellow.
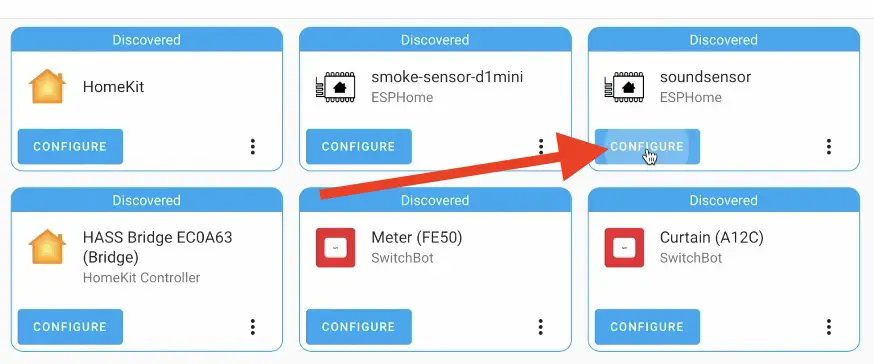
- I will go to the Integrations section of the Home Assistant by clicking on “c” button and typing Integrations and then selecting Navigate Integrations.
- Within the integrations my sound sensor will be auto discovered by Home Assistant and I will click on CONFIGURE button under it to add the sensor in Home Assistant
- After the sound sensor is added in Home Assistant I can find its detailed page under my ESPHome integrations section. And if I click on it I will see the same sensors that were available during the Web server test above.
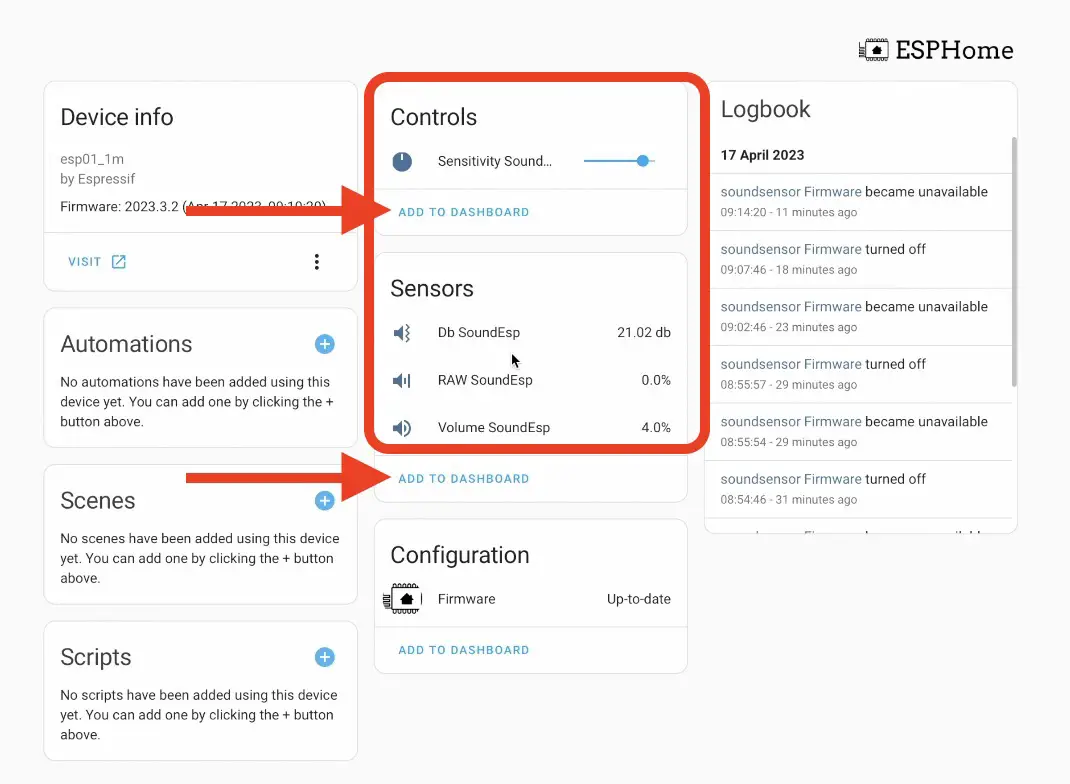
- Additionally, I can add these Sensors to my Home Assistant Dashboard, by just clicking on the ADD TO DASHBOARD buttons.
Creating a Home Assistant Automation using the DIY Smart Sound sensor
Time for a quick, but useful demo automation inside Home Assistant. The automation will do the following: when louder sound or voice is detected send a notification.
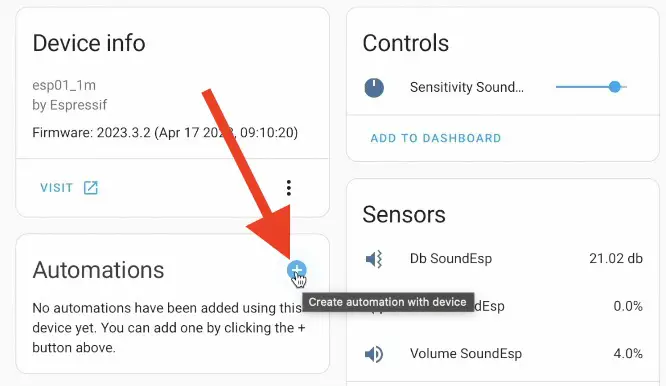
- On the same, more info display from above, I will click on the + button next to the Automations section. That is to create a new automation.
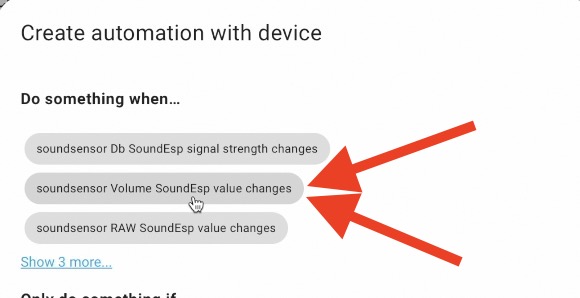
- Then I will select Do something when… soundsensor Volume SoundESP value changes. This will be my automation trigger.
- As Automation Action I will create a simple, but useful Persistent Notification by invoking the service
persistent_notification.create
Below is the full code of the automation that you can reuse with slight modifications
description: ""
trigger:
  - type: value
    platform: device
    device_id: 3510c689e3e26c820679a6e06beef678 #change this to yours
    entity_id: sensor.soundsensor_volume_soundesp
    domain: sensor
    above: 0
condition: []
action:
  - service: persistent_notification.create
    data:
      message: Loud sound is detected
mode: single
alias: Loud sound is detected
After I save the above Home Assistant automation and when I talk near the sensor or if I made other sounds I will receive persistent notifications.

Challenge for You!
Here is a challenge for you!
If you manage to make this sensor, share the news to the world by type #SoundSensorOwned in the comment section bellow.
I promise to congratulate you personally for the efforts!
Smart Home Glossary
If some of the terms or abbreviations that I’m using are not so clear for you, feel free to download my Smart Home Glossary which I made exactly for such cases. It is full of useful and simple, but useful explanations of the most common Smart Home & IoT words.
And it is totally free – https://automatelike.pro/glossary
Thank you for reading. I’m Kiril and I will see you next week.
Meanwhile, here is some more Smart Sensors articles from me
Bye.
Hi there,
Maybe a noobie question here but what is the connection type between D1 mini with my Raspberry Pi running Home Assistant?
Is it Bluetooth or is the ESP Home running in the D1 Mini having an IP Address?
Thanks