Today, I’m going to talk about one quick, simple, precise and cheap way to monitor the temperature in your home using a smart DIY Temperature sensor and Home Assistant.
It is going to be a Do It Yourself article in which I will show you the steps, the needed components, how to connect them and how to add everything in probably the best Smart Home hub available at the moment called – Home Assistant.
Table of Contents
What will be the end result?
As end result I will have a smart DIY sensor connected to my WIFI which will allow monitoring in real time the Temperature, the atmospheric pressure and eventually the humidity. Based on these readings I can create endless Home Automations like: turn on or off a heater, A/C or something else, but more on that later, because now I will list the components that I used and their incredibly “expensive” prices.
The needed components for the DIY Smart Temperature Sensor
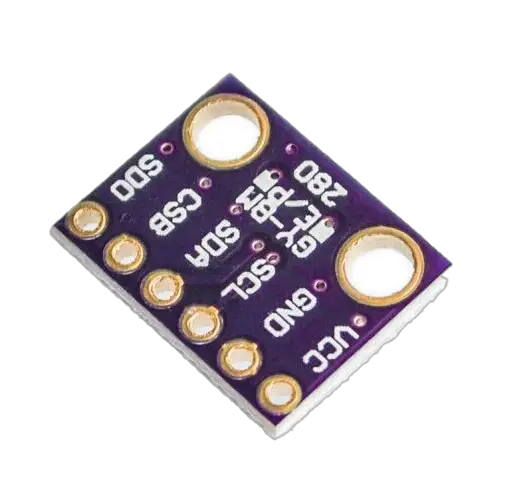
The first thing needed for the Smart Temperature sensor that will work perfectly with Home Assistant Is a D1 Mini.
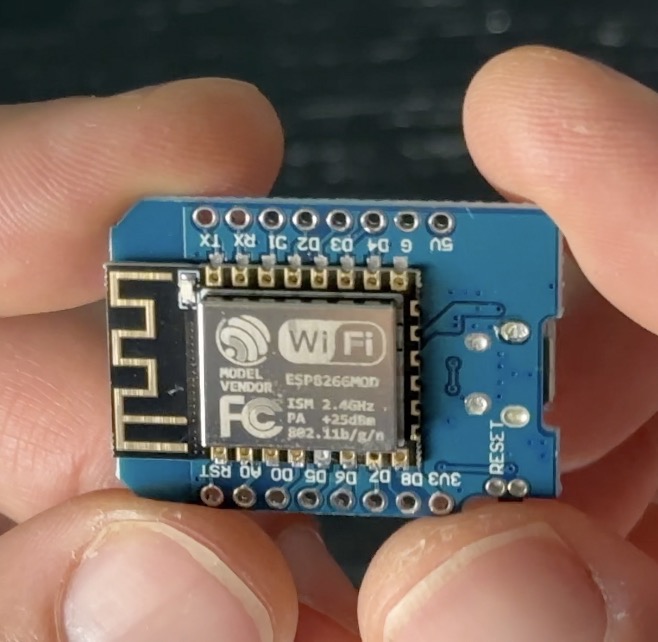
This IoT board will be connected to my WIFI and it will be powered by one micro USB cable. I will install ESPHome software on the D1 Mini, so I can control it and I will attach one high-precision, low-power digital pressure and temperature sensor called BMP280 on it.
What is the difference between BMP280 and BME280 sensors?
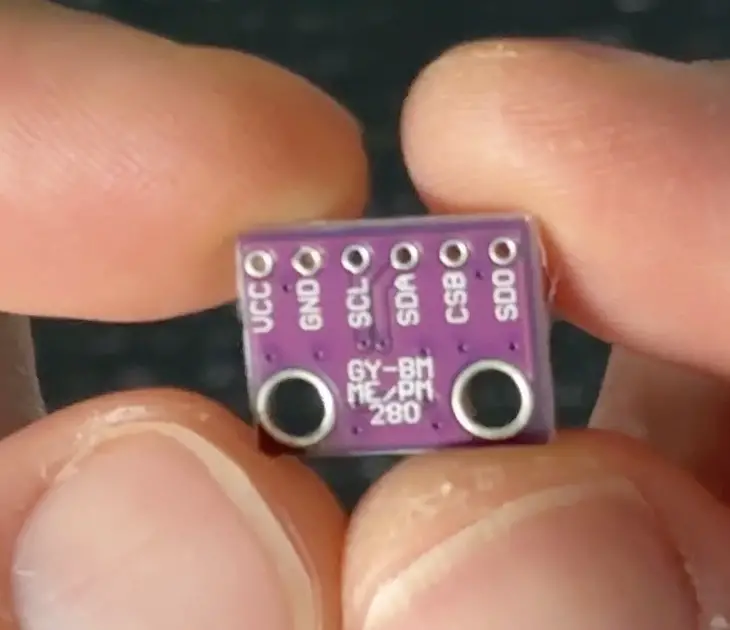
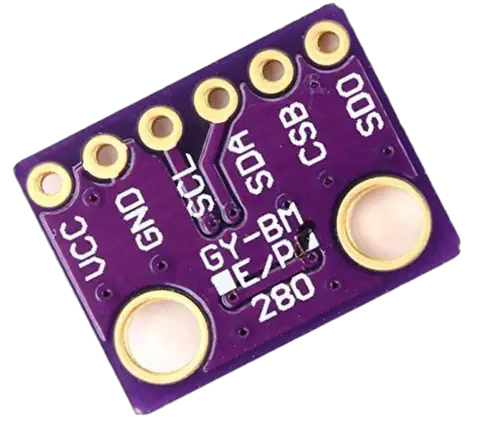
There are two types of temperature sensors that are pretty similar look and features and both can be used in this project with the same success. These sensors are called BMP280 and BME280. In the table below you can see the differences:
| BMP280 can measure: | BME280 can measure: |
|---|---|
| Temperature | Temperature |
| Atmospheric Pressure | Atmospheric Pressure |
| Humidity |
BME280 is slightly more expensive and it is a slightly better choice overall.
I’m saying all of that as I didn’t knew that there are two almost identical in terms of names and form factor sensors, so I bought some BMP280 instead of BME280 thinking that I found a great deal due to the lower price of the BMP280.
I got confused, but you can make an informed decision about what sensor you really need based on the information that I just shared. Nevertheless, I’m interested only in temperature readings for now and the BMP280 sensor is actually & unintentionally a better choice for me.
In anyways, I will link the ESPHome code for both sensors in the video description and in my website, so you can choose whatever sensor suits you best.
With that being said let’s see that code and upload it on the D1 Mini board, which is super easy.
The price of the needed components for the DIY Smart Temperature Sensor
Here is how much this project will cost approximately. If you buy something from the links below I will receive a small commission from your purchase with no additional cost for you, which is a great way to support this my work.
- The average price of the D1 Mini ESP8266 is around 3 US dollars or even less:
- D1 Mini in AliExpress – https://s.click.aliexpress.com/e/_DmseDwf
- D1 Mini in Amazon – https://amzn.to/3I6MR4V
- The price of the BMP280 is under a dollar:
- BMP280 in AliExpress – https://s.click.aliexpress.com/e/_Dmnt6Tl
- BMP280 in Amazon – https://amzn.to/3Wvi1an
- BME280 in AliExpress – https://s.click.aliexpress.com/e/_DBqUDAf
- BME280 in Amazon – https://amzn.to/3Vv20Aa
- The micro USB cable is around 2 US dollars:
- Micro USB cable in AliExpress – https://s.click.aliexpress.com/e/_DmMNO6L
- micro USB cable in Amazon – https://amzn.to/32tdxdF
- and the 3 thin wires are also needed where I recommend 3 male-to-male jumper wires
- Jumper wires in AliExpress – https://s.click.aliexpress.com/e/_DEoCGxH
- Jumper wires in Amazon –
Of course, if you already have a spare micro usb cable and some wires you can use them instead.
The total cost of everything that is needed for this DIY Smart Temperature Sensor for Home Assistant is around 6 US dollars.
How to get ESPHome Dashboard?
One of the easiest way to manage ESPHome devices is by using the ESPHome dashboard. And there is a nice chain here that can seem a bit complicated at first, but actually it is quite simple. So, one of the easiest way to get ESPHome dashboard is by installing it with two-clicks in Home Assistant. I even have a full tutorial about that and I will link it right here – Complete ESPHome Installation Guide: 4 different ways to install ESPHome
The next link in that chain is the actual Home Assistant installation type, which should be Home Assistant OS or Supervised because they allow installation of add-ons, including ESPHome Dashboard add-on.
Not to worry, I got you covered here as well. I’m excited to announce that I will be hosting a webinar exactly on this topic – the installation types of Home Assistant. The Webinar is all free and If you are interested in attending it, please type this URL in your browser or click on the link in the video description to register.
How to wire D1 Mini and BMP280 Sensor?
The uploading of ESPHome code on the D1 Mini is now complete and everything is almost ready, but the BMP280 temperature sensor is not yet attached. Here is how both components: D1 Mini and BMP280 should be wired. And by the way, the same wiring can be used for BME280 sensor.
I have connected the components like this:
| D1 Mini | BMP280/BME280 Sensor |
|---|---|
| G | GND |
| D1 | SCL |
| D2 | SDA |
| 3V3 | VCC |
And here is one GIF that can help you visualise better the wiring:

Uploading ESPHome code on the D1 Mini for the Smart Temperature sensor
Back to our chain. I have installed ESPHome Dashboard add-on on my Home Assistant OS and I created a new device with the following code inside:
Here is the code that I used for BMP280 sensor – https://gist.github.com/peyanski/5a0dd74ff1bca4df2367ad14f7c321b2
And below is the code that you can use if you have BME280 sensor –
https://gist.github.com/peyanski/cec1e7d1c08d52ffeceda792f2a72422
Calibrating the BMP280 DIY Smart Temperature Sensor from ESPHome
Although the DIY temperature sensor is now ready to be used and it can stay that way, I’m not finished yet. It is possible that you may want to calibrate the readings of the sensor. Let’s say you have one super, duper trusted temperature sensor in your home and the BMP280 sensor readings differentiate from the trusted sensor. If that is the case you have two options to calibrate it:
- You have to get at least two different measurements from the trusted sensor and the BMP280 sensor and then to use calibrate_linear filter in the ESPHome code like in the example below:
sensor:
  - platform: bmp280
    temperature:
      name: "BMP280 Temperature"
      oversampling: 16x
      filters:
      - calibrate_linear:
          # Map 0.0 (from sensor) to 0.0 (true value)
          - 19.5 -> 16.2
          - 20.8 -> 17.3
    pressure:
      name: "BMP280 Pressure"
    address: 0x76
update_interval: 60s- Or if you see that the difference between the two sensors is always the same. For example, I have a BMP280 temperature sensor that always marks two and a half degrees lower than the reference sensor and in this case I used filter offset: -2.5 like that:
# Example configuration entry
sensor:
  - platform: bmp280
    temperature:
      name: "Downstairs Temperature"
      filters:
      - offset: -2.5
    pressure:
      name: "Downstairs Pressure"
    address: 0x76
    update_interval: 60s
Smart Home Glossary
I know that Smart Home technology can be overwhelming, with all the different terms and technologies out there. That’s why I’ve created a Smart Home Glossary to help you better understand the terminology used in the smart home industry. This Glossary is absolutely free and you can instantly download it from my website. The link can be found below:
Download glossary – https://automatelike.pro/glossary
3D Printed case
The last optional thing is a 3D printed case for the newly created DIY smart temperature sensor. You can find some links to tested by me 3D models below:
- Wemos D1 Mini Enclosure – https://www.thingiverse.com/thing:1768820
- WeMos D1 mini case – https://www.thingiverse.com/thing:2567855
#Towned
If you manage to make your own Smart Temperature sensor thanks to D1 Mini and BMP280 or BME280 sensor and this article, please type #Towned in the comments, so that everyone will know that you made it and can congratulate you about the efforts.
Be sure to check my other Smart DIY Sensors Playlist and subscribe to my newsletter for more updates.
Thanks for reading I’m Kiril. Bye!
Hi,
Very good guide. Thanks for that.
One question:
Witch power plug do you use for this small insert?
Any USB-A power adapter should do
Great project! I would like to have the same for my greenhouse on battery bases and with deep sleep. Can you help me?
Thank you very much!!!
#Towned
I used a bme280, but I have to change the address from 0x77 into 0x76 in your script!
Cheers
Congrats and welcome to the club 🙂 Yes if the device is not working with one of the addresses you have to try with the other
Can you connect more than one temperature sensor to one ESP8266 board? for example, if I wanted to use one board to measure the ambient temperature, fridge temperature, and freezer temperature?