Today I will show you an officially supported way to customize your Home Assistant Dashboard by adding actionable pictures, buttons and graphs in the headers and/or footers of your Home Assistant cards. Using this, you will be able convert the standard and boring cards into something more beautiful and useful.
Table of Contents
Do I need anything special?
These customizations can be done without doing anything special like installing additional custom components, using HACS or other complicated stuff, as everything comes out of the box with Home Assistant and you just have to know how to use it.
What will I able to do with the Home Assistant Dashboards?
After you finish reading this article you will be able to add widgets with pictures, buttons and graphs in the header and/or footer of your Home Assistant cards. These widgets will not only look cool, but you will be able to define different actions for tap, double tab and hold on the pictures, you will be able to set MaterialDesignIcons for the buttons, and you can display detailed graphs.
Without further ado let’s start this.
How to add a picture in the header of a Home Assistant card?
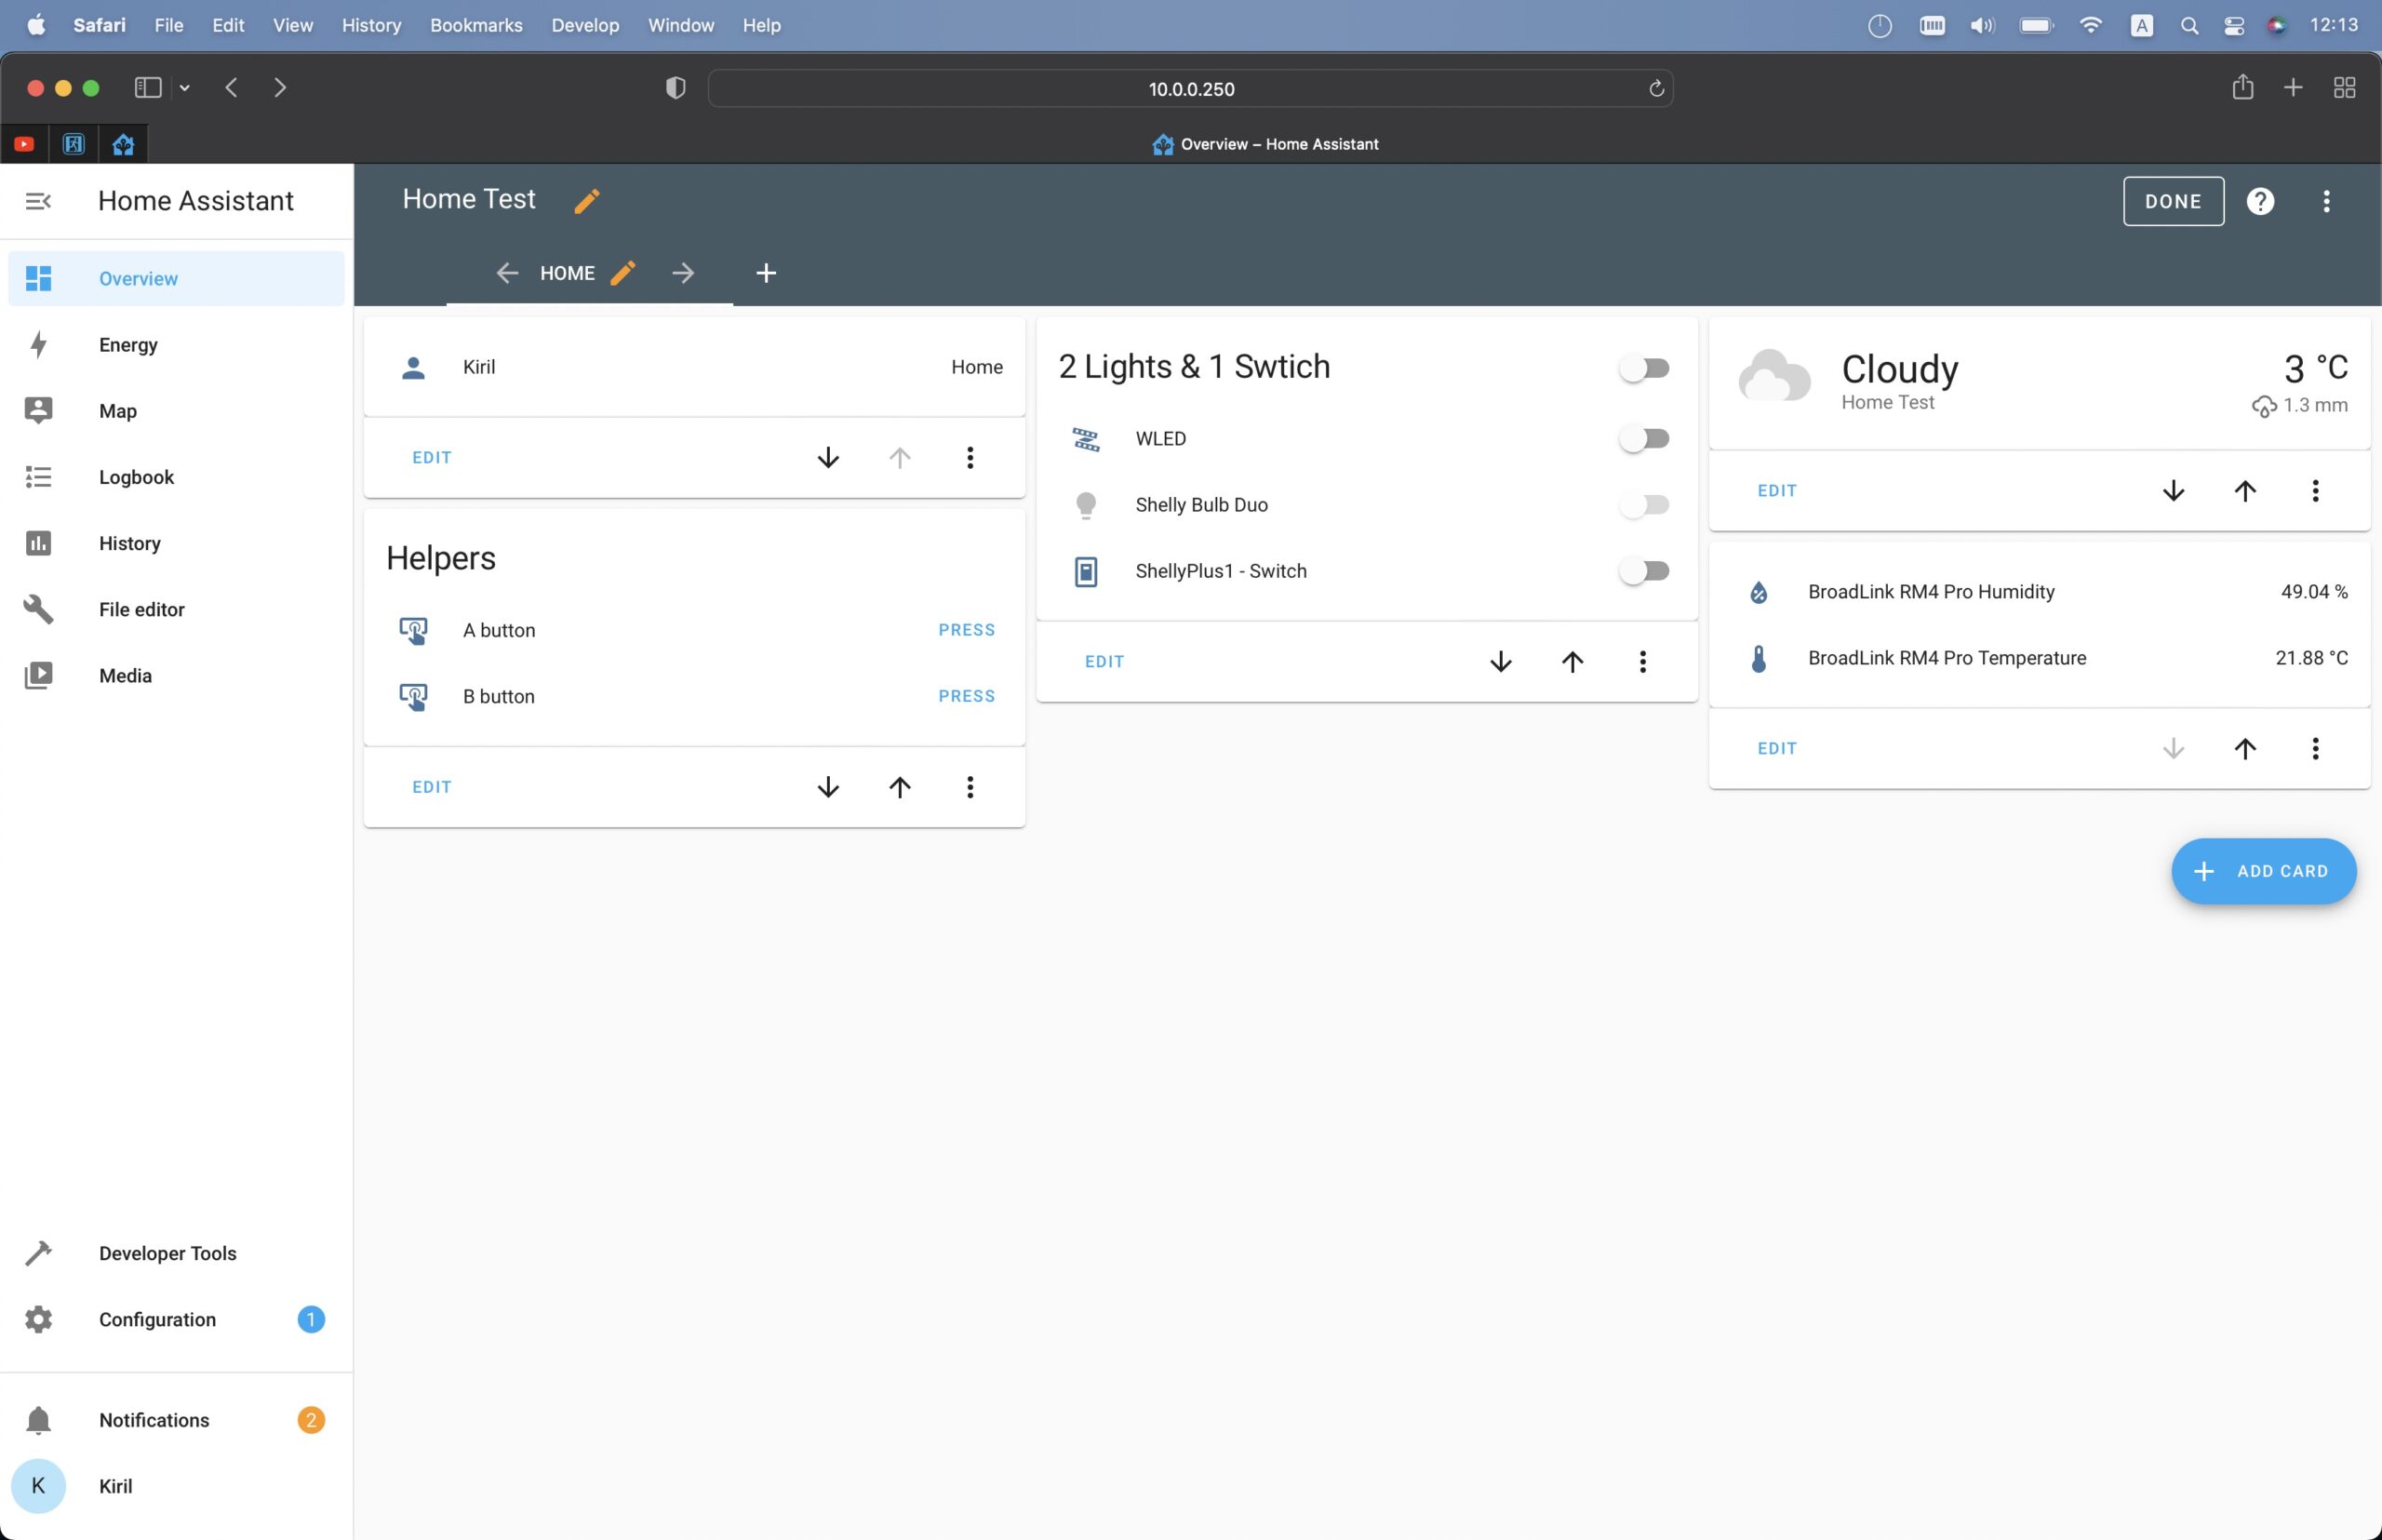
Adding a picture in the header of a Home Assistant card is not hard. Here are the steps:
Quick TIP: Not all of the Home Assistant dashboard cards have support for Header & Footer widgets. I will use an entity card for the sake of this demo.
- Edit dashboard (Click on the three dots menu in the upper right corner and select Edit Dashboard).
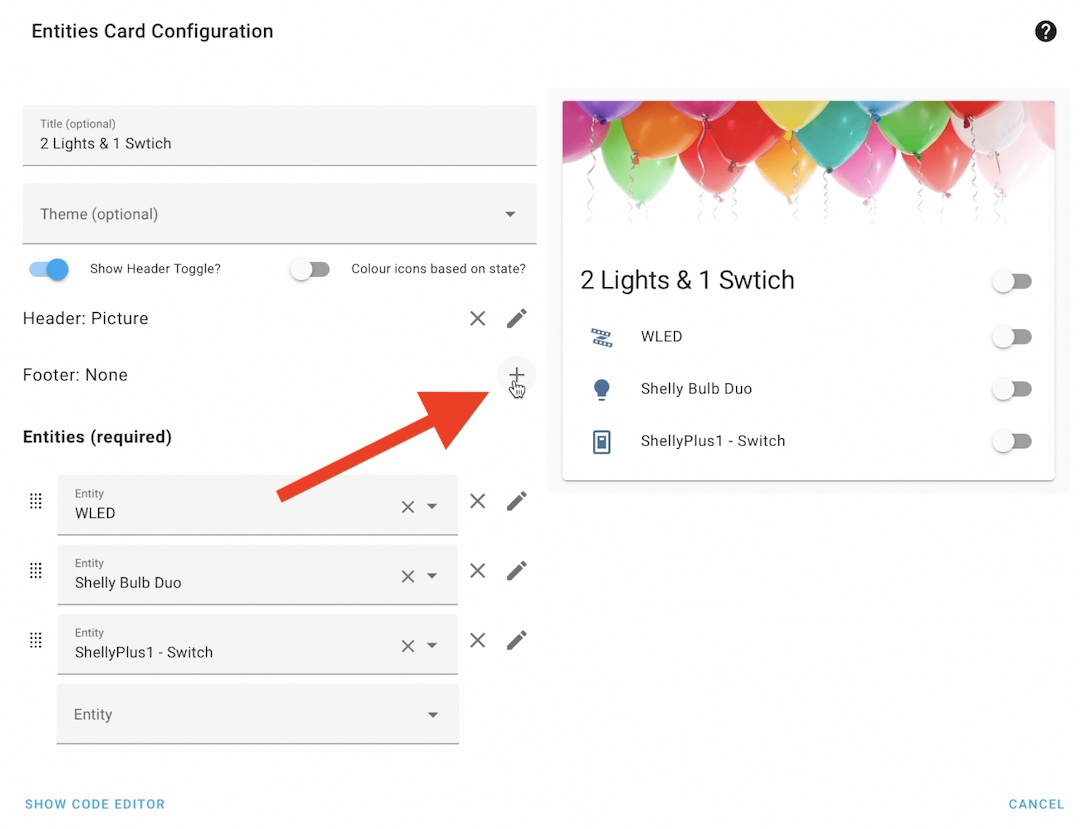
- Edit a supported card (like an entity card).
- Tap on the + button next to the Header label.
- Select Picture from the possible options.
- The default balloons picture should appear immediately.
- You can change the picture by editing the
image:URL using the card visual editor. - Click Save button.
How to add local picture in the header of a Home Assistant card?
The default Balloons picture is hosted somewhere on the Home Assistant servers, that means your Home Assistant should be connected to the Internet to display this picture. Of course, you can upload that or any other picture locally and to use it that way, which is a lot better if you ask me. Here is how you can do it.
- If you already have www folder in your Home Assistant config folder, go to step 3. Otherwise, continue to step 2.
- Using File Editor add-on or something similar – create a folder named www inside your config folder and then restart your Home Assistant. You just have to restart Home Assistant only once the first time you created the www folder and after that you can freely use it.
- Upload a picture that you wish to add in a Home Assistant card inside config/www folder.
- Edit the card that you want to add your local picture.
- Replace the
image: urlwithimage: local/the_name_of_your_local_pic.png. As example:image: >- https://www.home-assistant.io/images/lovelace/header-footer/balloons-header.pngwithimage: local/balloons-header.png - In the above case local is equal to config/www folder.
How to add a picture in the footer of a Home Assistant card?
Okay, we have a picture in the header and our Home Assistant Dashboard is looking different already. Pretty similar, we can add a picture in the footer. The only difference is that you have to tap on the + button next to the Footer when editing a Home Assistant card.
Share your Home Assistant pictures
Of course, these pictures can be anything you wish. If you find or if you already have some cool pictures for Home Assistant Cards can you please share them in the comments section below?
If more of us are willing to share something there it will become very useful resource. I will share my silly picture in case some crazy dude wants to use it on his Home Assistant Dashboard and I’m dying to see your pictures in the comments as well.
Assign actions to the pictures in the Header or Footer
The pictures that we are talking about so far are not just making your Home Assistant dashboard more beautiful and colourful. You can also assign different actions when click, double click or hold your mouse on them. The possible actions that you can use are: more-info, toggle, call-service, navigate, url & the default one none.
I will demo two of these actions, for the rest you can check the Home Assistant documentation here 👉 LINK
- Edit a card again and add a picture either in the Header or in the Footer as described in the above sections.
- Select either
tap_action,double_tap_actionorhold_actionand change the action: none toaction: something. Wheresomethingcan be any of the above listed actions (more-info, toggle, call-service, navigate, url) - Check the documentation what else is required to add in order to activate the action. As example: for the
urlaction you should define theurl_path:and the URL of the resource that you want to open. For thecall-service, you should add the exact service, service_data and entity(ies) and so on and so forth. - When you are ready, click Save button.
Here are some working examples that can help you understand this better:
Example 1: When you tap and hold on the balloon picture you will open the Peyanski.com website.
type: picture
image: >-
  https://www.home-assistant.io/images/lovelace/header-footer/balloons-header.png
tap_action:
  action: none
hold_action: # when hold on the picture
  action: url
  url_path: https://peyanski.com # open this URL in a new tab
Example 2: When you tap on the balloon picture a Home Assistant service light.toggle will be invoked.
header:
  type: picture
  image: >-
    https://www.home-assistant.io/images/lovelace/header-footer/balloons-header.png
  tap_action:
    action: call-service
    service: light.toggle
    service_data:
      entity_id: light.wled # change this entity with something yours
  hold_action:
    action: none
Options for confirmation
It is also possible to present a confirmation dialog to confirm the action and you can even customize the text in the dialog. You just have to add an additional instructions (confirmation: true for example) when you edit your actions.
type: picture
image: >-
  https://www.home-assistant.io/images/lovelace/header-footer/balloons-header.png
tap_action:
  action: none
hold_action: # when hold on the picture
  confirmation: true # this line enables the default confirmation dialog
  action: url
  url_path: https://peyanski.com # open this URL in a new tab
If you want a custom text in your confirmation dialog you can have it, no problems:
type: picture
image: >-
  https://www.home-assistant.io/images/lovelace/header-footer/balloons-header.png
tap_action:
  action: none
hold_action: # when hold on the picture
  confirmation:  # add this and the line below
    text: Are you sure?  # this line enables the custom confirmation dialog
  action: url
  url_path: https://peyanski.com # open this URL in a new tab
That was Home Assistant Dashboard Customisation by adding pictures in the header & footer.
A Smart Home Glossary for you
Before we continue with the button widgets I want to share what I did to help you further in your Smart Home journey. I’ve put together a glossary called “The Smart Home Glossary” and I want to give it to you absolutely for free.
Inside this glossary, you can find the most important Smart Home words, abbreviations, and acronyms. Each item will have a simple, but useful and understandable description.
You can instantly download The Smart Home Glossary on my other website: https://automatelike.pro/glossary
How to add buttons in the header and/or footer of a Home Assistant card?
Now, back to the Home Assistant Dashboard customization, using button widgets in the cards Header & Footer.
Adding a buttons in the Home Assistant cards is similar to adding pictures, but it have some differences at the end.
- Edit dashboard (Click on the three dots menu in the upper right corner and select Edit Dashboard).
- Edit a supported card (like an entity card).
- Tap on the + button next to the Header or Footer label.
- Select Buttons from the possible options.
- Under entities: section, list your entities that you wish to be assigned to the buttons.
- These entities can be scripts, scenes, automations, etc.
- Click Save button.
As entity you can use any script, scene, automation, etc that you wish and have in Home Assistant. For example, you can create a custom script and assign this script to the one of the buttons, so when pressed only specific lights to be toggled.
type: buttons
entities: # list the entities that you wish to have as buttons
  - entity: script.toggle_all_lights # a script that toggle all lights
  - entity: automation.new_automation # an automation
  - entity: scene.test # a scene
Adding custom icons to the Home Assistant card buttons
The button icons used in the headers and/or footers can be further customized by using any icon from the MaterialDesignIcons website. This allow further customization of your Home Assistant cards and dashboard. It is far more meaningful if you have an icon that represent the action that the button actually is doing. Below you can find some examples:
type: buttons
entities:
  - entity: script.toggle_all_lights
    icon: mdi:lightbulb-multiple # this line is adding an icon
  - entity: automation.new_automation
    icon: mdi:garage # this line is adding an icon
  - entity: scene.test
    icon: mdi:lightbulb # this line is adding an icon
The possible options are endless and I’m leaving this fun to you. Don’t forget to share you accomplishments in the comments.
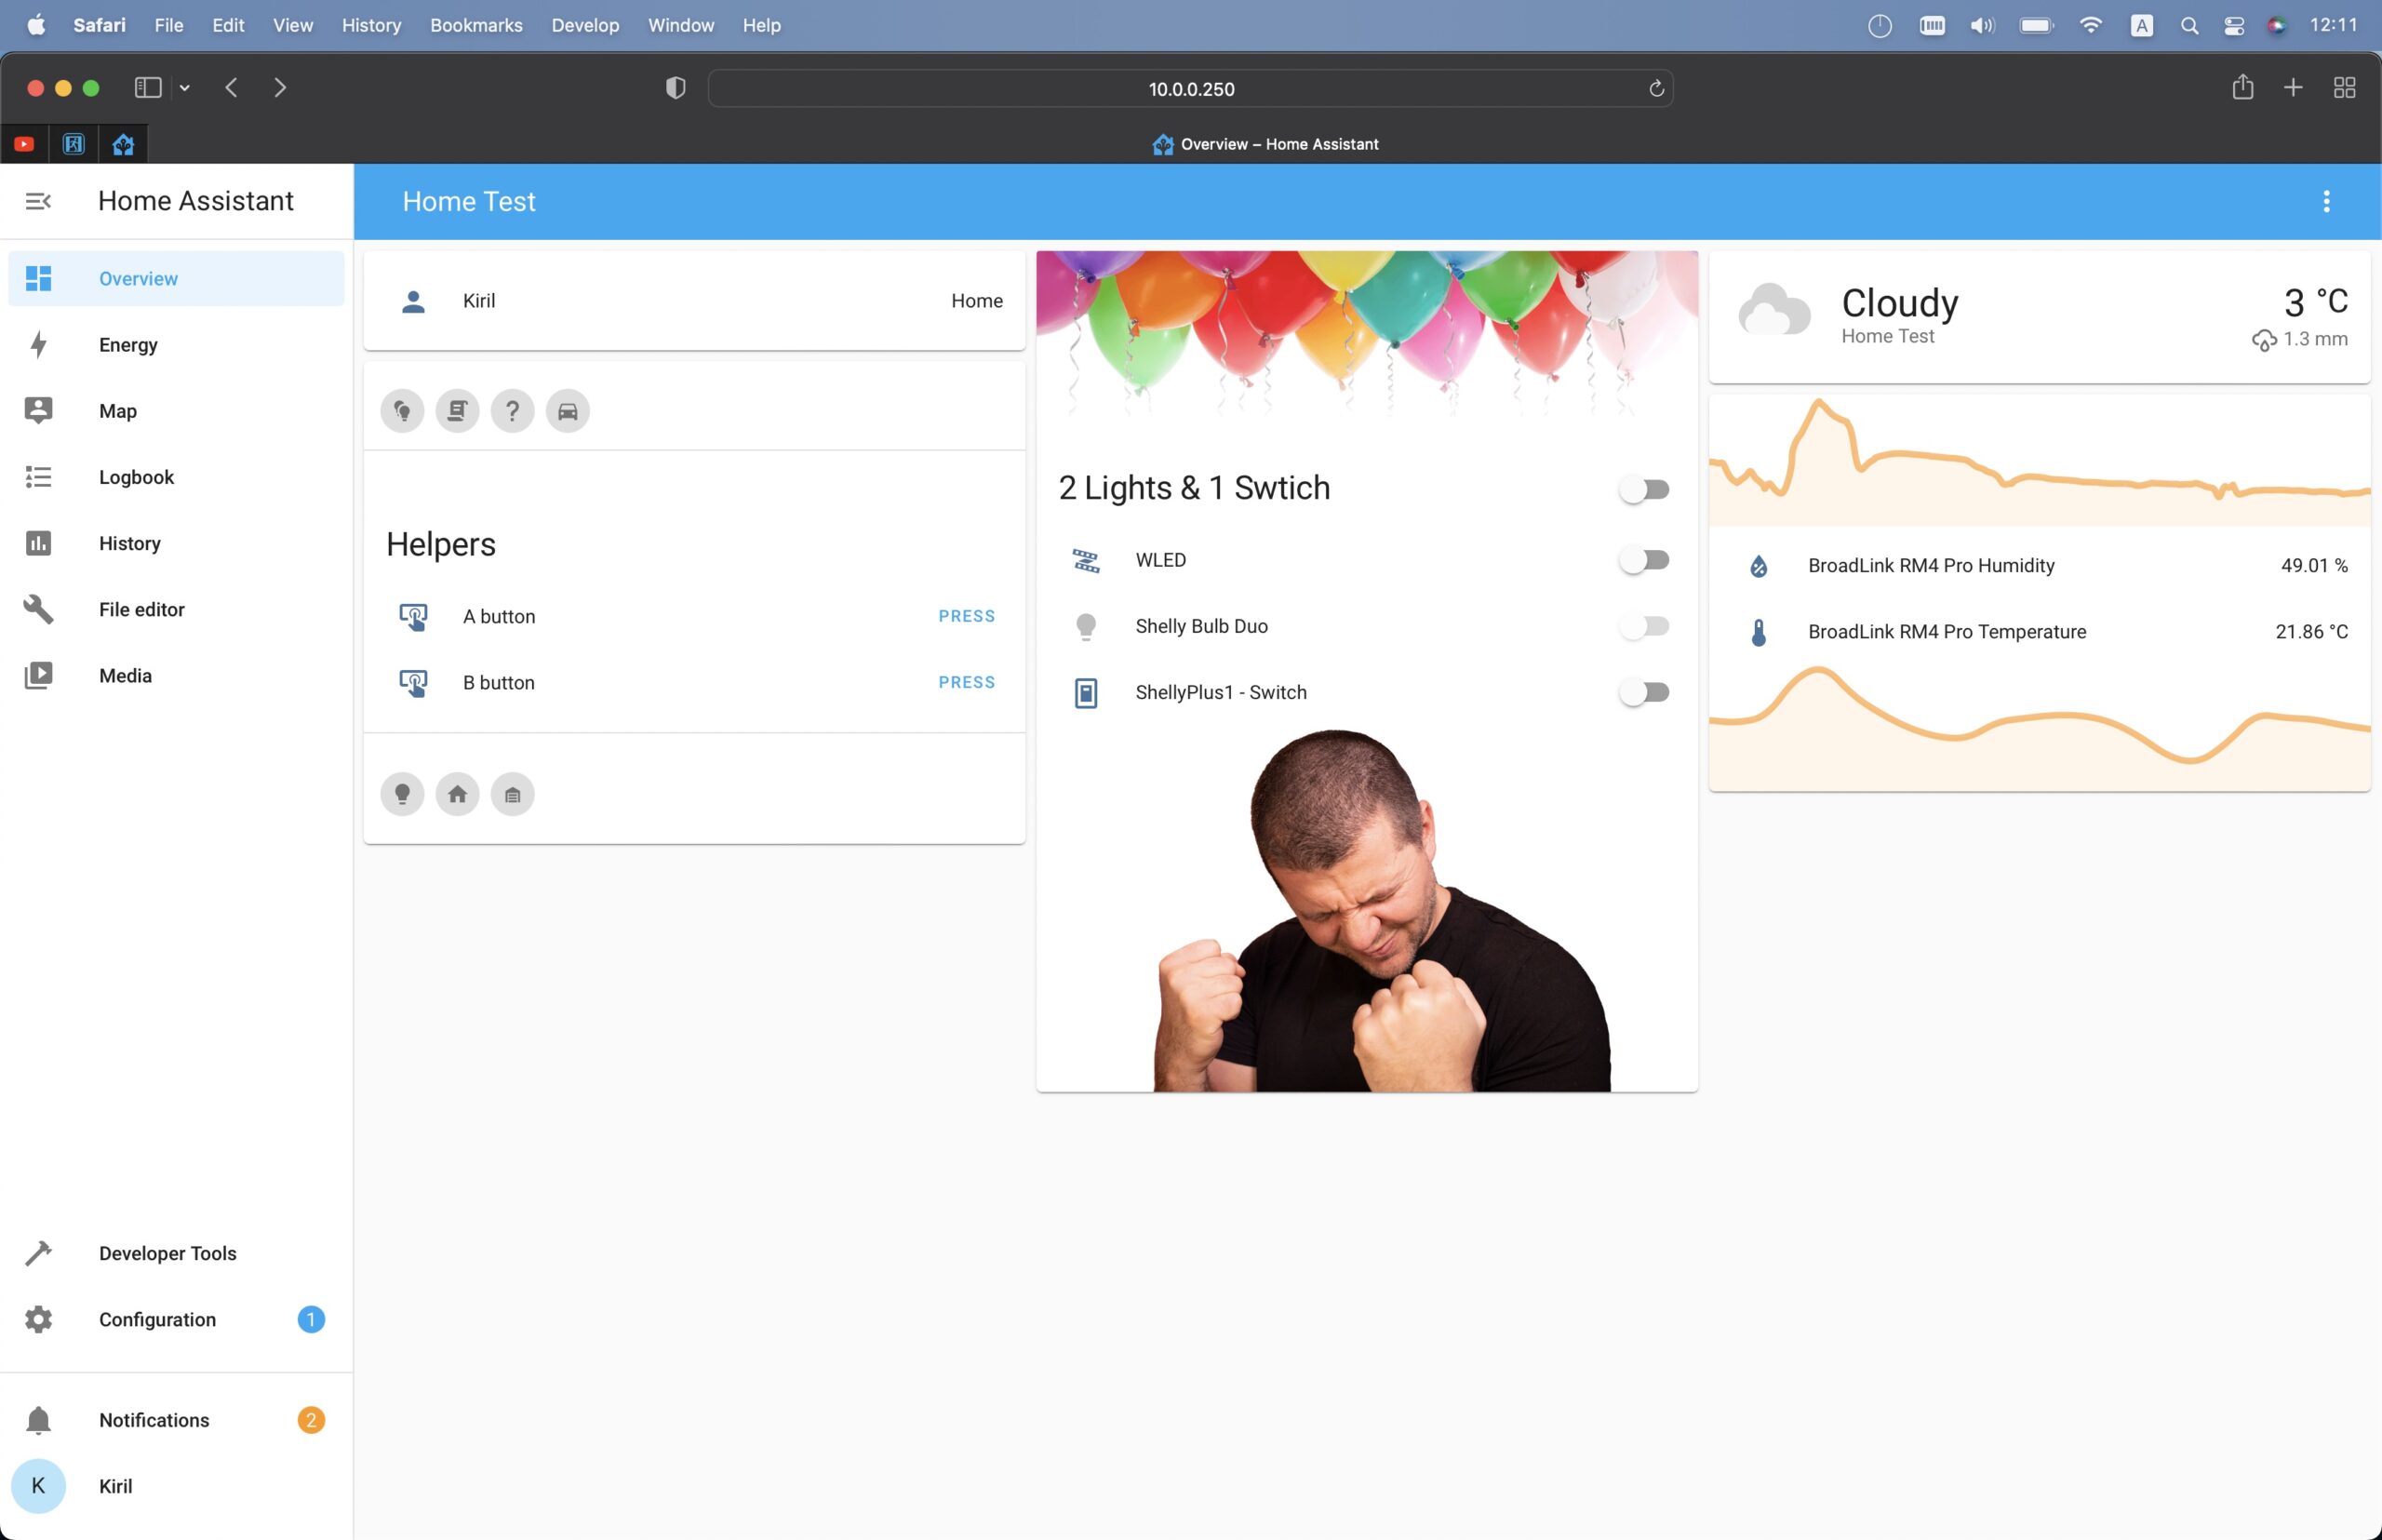
How to add graphs in the header or footer of a Home Assistant card?
I’m moving to the graphs that can be also added as header or footer of the cards, so you can see the history of some Temperature, Humidity, Power consumption, etc sensors right on your Home Assistant Dashboard. Here is how:
- Edit dashboard (Click on the three dots menu in the upper right corner and select Edit Dashboard).
- Edit a supported card (like an entity card).
- Tap on the + button next to the Header or Footer label.
- Select Graph from the possible options.
- From the Entity: dropdown, select a suitable entity that showing temperature, humidity, percentage, consumption, etc.
- Optionally, enable Show More Details switch, which will add more points to the Graph (I think 6 points per hour vs 1 point per hour)
- Also optionally, you can adjust the Hours to Show from 24 to whatever period you wish.
- Click Save button.
Exactly as with the pictures and buttons you can add a graph to the Footer of the card as well.
Free Home Assistant Webinar for you!
If you have difficulties understanding the different Home Assistant installation types I have a free Webinar just for you! In this 45minutes Webinar I’m talking about the official Home Assistant installation methods + one secret and stupid easy way to have Home Assistant.
You can register for the Webinar and you can instantly start watching it on my other website https://automatelike.pro/webinar. Again It is totally free.
Hope that article was useful.
I’m Kiril and I’m done writing. Bye!