
There is no better time to install permanent LED strip lights than right now. And not just any LED strips, but smart one using Home Assistant and WLED and NodeMCU. LED lights which you can control from anywhere, anytime with multiple effects.
I will show you what you need and how to setup and install everything step-by-step in an easy and understandable way.
Table of Contents
What will you see in this article?
It is a lot of fun for the kids and for the grown up kids to see some cool LED strip light effects. And what if you can activate such kind of effects not only during the holidays, but whenever you wish with a push of a button, automatically, remotely or with your voice?
It is all possible thanks to Home Assistant and WLED firmware installed on NodeMCU (or other ESP8266 or ESP32 based device). The end goal is one time effort and year round benefit.
I will waste no more time here and I will start this.
What you need?
I will list below the products that I used for this project. They are carefully selected, so you won’t waste time choosing components that eventually will not work at the end.
And I must say, because I want to be as open as possible with you. I’m using affiliate links where I will earn small percentage of your purchases with no additional cost for you. If you want, don’t use these links the choice is yours.
The LED strips
I’m going to use these 5v Waterproof, Individually addressable Smart RGB strips. The exact model is WS2812B. They are rated with IP67 protection, so they can work outdoors without problems in theory.
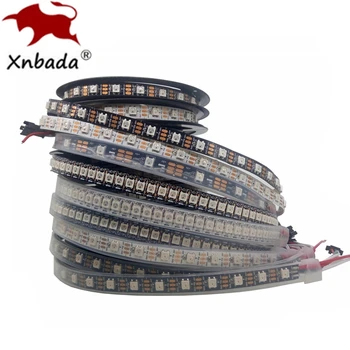
They have 30LEDs per meter and on paper they consume 9watts per meter. This package alone contains 5 meters of LED strip, so that means I have here 150LEDS with total consumption of 45watts. It is also possible to buy from 1 to 5 meters depending of your needs.
There are a lot of variants for permanent holiday lights, but I choose these LED strips, because in my opinion they have the best price/quality ratio out there at the moment.
The price may vary depending of the season and your location, but you can find them for around 12 to 20 US dollars per 5 meters in AliExpress or Amazon.
NodeMCU (The Controller)
You will need a controller for the LED Strips. That controller will send commands like what color, what brightness, for what duration, and which exact LED to be turned on or off, so you will have cool looking light effects. The controller will also connect to your home Wi-Fi, so you can control the LED Strip from anywhere you wish.
To accomplish all of these things I will use this NodeMCU which can be flashed with a the free open source firmware called WLED which will allow all of the things that I said until now. On top WLED have a big library of light effects that can be used right away. And last, but not least Home Assistant and WLED integration is a breeze.
WLED firmware is compatible with a lot of ESP8266 and ESP32 devices out there, but I choose the NodeMCU, because the price is fine and I don’t have to solder anything on it.
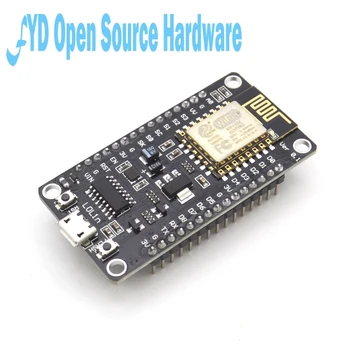
You can find NodeMCU for around 2 US dollars. One NodeMCU can control around 750 LEDs.
Power Supply (PSU)
Of course you will need a power supply for the Controller and for the LED strips. I will show you how to calculate what will be the right PSU for you.
To be on the safe side you can use this formula to calculate how many AMPS your power supply should be:
- Get the total length of the LED strip and multiply that number by 9, which is the Wattage consumption if you have Strips with 30LEDs in a meter.
- For example if I want to have 20meters of LED strip you have to multiply that by 9. The result is then divided by 5 to get the Amps.
According to the calculations you will need 5V Power Supply Unit with 36A or more for 20meters strip with 30 LEDs in a meter.
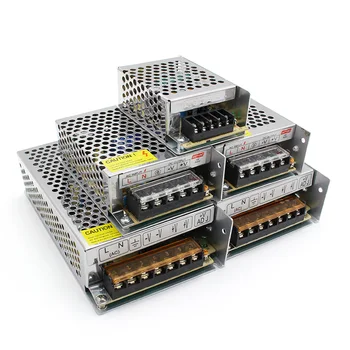
I will use this 5v, 30Amps bare metal PSU and my intention is to power 15 meters strip with 30LEDs in a meter. This one cost me around $16 USD.
Power Supply calculator for LED strips
You can use this Power Supply calculator where you just have to enter the length of the LED strip (in meters) and to choose between 5V and 12V.
As result you will receive the needed Amps that the Power Supply should have to power that LED strip length.
[WPcalc id=1]
Cables
You will need some cables as well. In order no to lose the color accuracy you have to power both ends of the LED strip if you are using strips connected in parallel and which are longer than 5 meters. But more on that later.

I will use several of these 22awg (0.34mm2), 10meters long cables. I have them from AliExpress and they cost me around $2.50 for 10meters.
Cable connectors
You can use I & T shape cable connectors or you can twist and solder the wires if you wish.
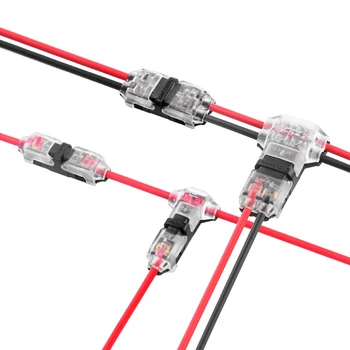
I get these from AliExpress again the I shape cost me around $3 for 5 pieces and the T shape connectors are around $3.5 USD. But as I said these are optional cause you always solder or use other connectors.
At the end I changed all of the T shaped connectors with Wago 221 connectors (Amazon Affiliate link), because it was easier for me to use them and I can add a lot of cables in the Wago’s connectors. That means to think twice do you really need T shaped connectors at all.
Mounting clips
These mounting silicone clips are also optional. I will use them to directly mount the strips outside.

They cost me around $3 for 100pieces and you guessed it I got them from AliExpress.
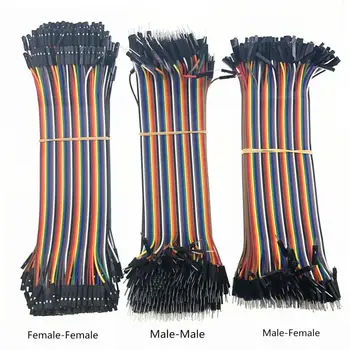
Jumper wires
You may also need several male to female jumper wires to connect the LED strip and NodeMCU controller.
These are also optional you can always cut the LED Strip connector and to use any cables and connectors that you wish and have.
I won’t say from where I have them 🤣
Products summary
This is everything I got and kind of what you will need (depending of the meters) for the permanent Holiday LED strip lights project:
- LED strips rated IP67 (4 x 5 meters, 20 meters total)
- The NodeMCU controller,
- A power supply unit,
- Cables,
- I & T connectors,
- Mounting clips,
- Male to female jumper wires, 3pcs.
The total cost of everything is a little less than 85 US dollars.
And as I said If you decide to buy them you can use the affiliate links above. This is one of the ways to support this site. The other ways are listed here.
Now let’s flash the NodeMCU with WLED firmware.
Flashing NodeMCU with WLED
That is not hard, as no soldering is required, also no specific libraries nor Arduino nor special tools are needed. You will only need:
- A computer with USB (Type-A) port,
- NodeMCU,
- USB cable (Type-A to micro USB).
When you get all of the things above, follow these steps:
- Go to the official WLED GitHub page – link
- Download the latest file that ends with _ESP8266.bin. For example WLED_X.X.X_ESP8266.bin
- Go to the python download page – link
- Install either Python 2.7 or Python 3.4 or newer for your OS. Of course if you already have Python skip this step.
- Open a Terminal/Command prompt and type:
pip install esptoolor if above doesn’t work try:
wled1234- To check that the esptool is installed correctly type (you should see a long list of esptool options):
esptool.pyIf for any reason you have troubles with the esptool.py and you cannot run it you can try the esphome-flasher which does the same job but with graphical interface.
- Next connect the NodeMCU to your Computer using the USB cable
- After that type the following command to flash the WLED on NodeMCU:
esptool.py write_flash 0x0 ./WLED_X.X.X_ESP8266.bin- Don’t forget to replace ./WLED_X.X.X_ESP8266.bin with the full path and exact name of the WLED firmware that you downloaded in the steps above.
That little smart guy called NodeMCU is now flashed with WLED firmware. Let’s try to access it’s web interface so we can connect the NodeMCU to the Wi-Fi.
Oh and if you are new here consider subscribing, for my newsletter in order not to miss the next week article, now let’s continue.
Connect NodeMCU with WLED to the Wi-Fi
After flashing of the NodeMCU with WLED is finished you can search for a new Wi-Fi network called: WLED-AP
Try to connect to to this Wi-Fi and when it asks for password type:
wled1234Who doesn’t like smily faces? You will be greeted by one when you connect tot the Wi-Fi. And this one is saying “Welcome to WLED!”
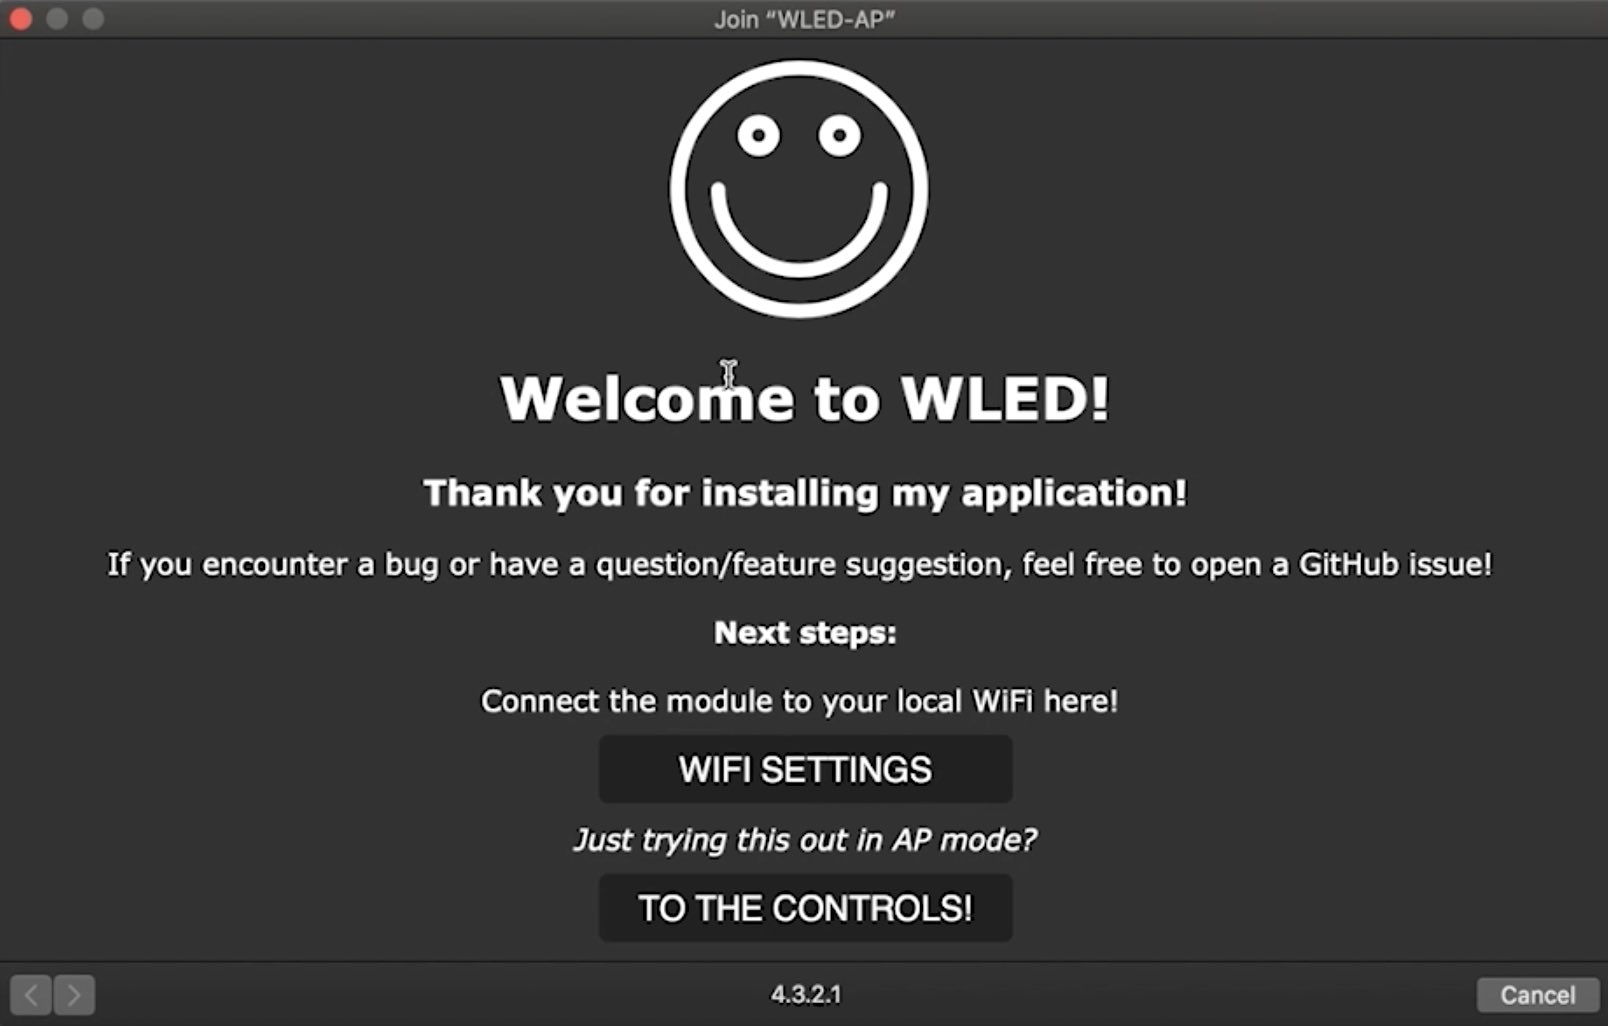
Click on the “WIFI SETTINGS” button and enter your Network Name (SSID) and Password in the appropriate fields.
Then scroll down a bit until you find mDNS address section where you can name your device and you can access it using this name if your router support mDNS.
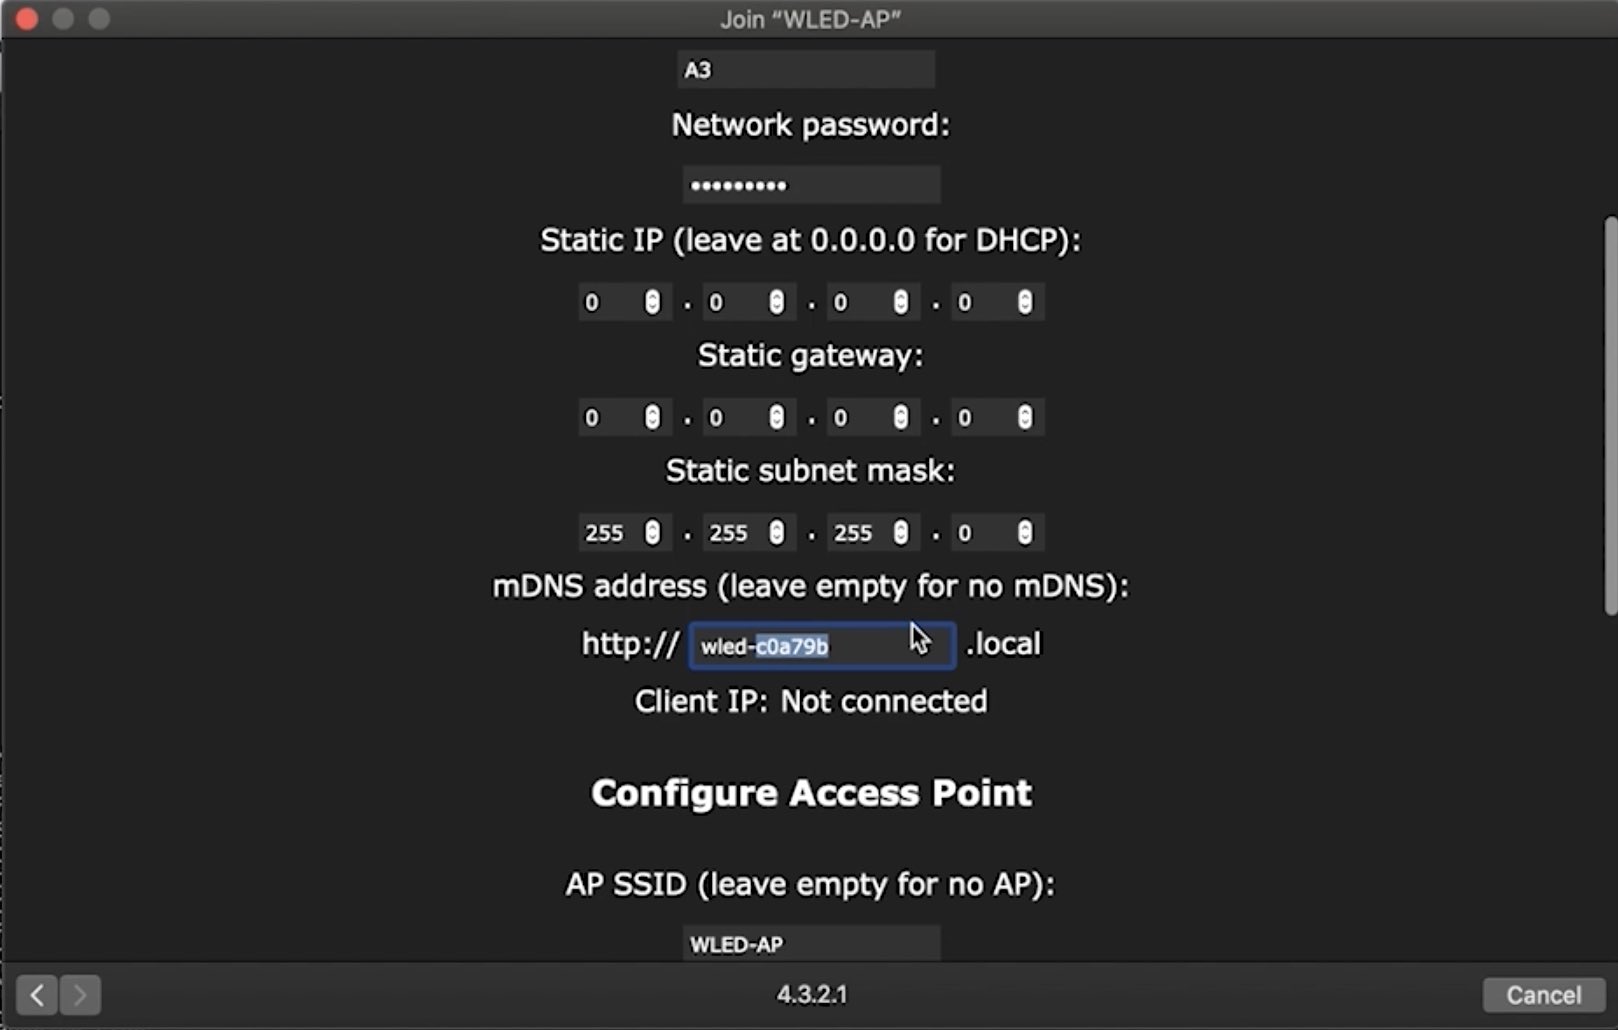
Set a name that will mean something for you then scroll to the very bottom and click on “Save & Connect” button.
Join again to your regular Wi-Fi, open a new browser/tab and directly type the mDNS name that you set in the previous step.
If nothing happens you have to find the IP of the NodeMCU WLED device in your router interface (search for device name starting with wled) and type this IP in the browser/tab.
As end result you should see something similar:
NodeMCU and WLED are now ready and waiting to be used or even abused. I will quickly test if everything is working fine on my desk and only after that I will mount it outside.
Connect and Test LED strip, NodeMCU & WLED
To test if everything is fine I strongly recommend to connect every part of the future Permanent Holiday LED strip lights on your desk/table at your home and then to install them on their permanent place.
Below is the final scheme that you want to achieve.
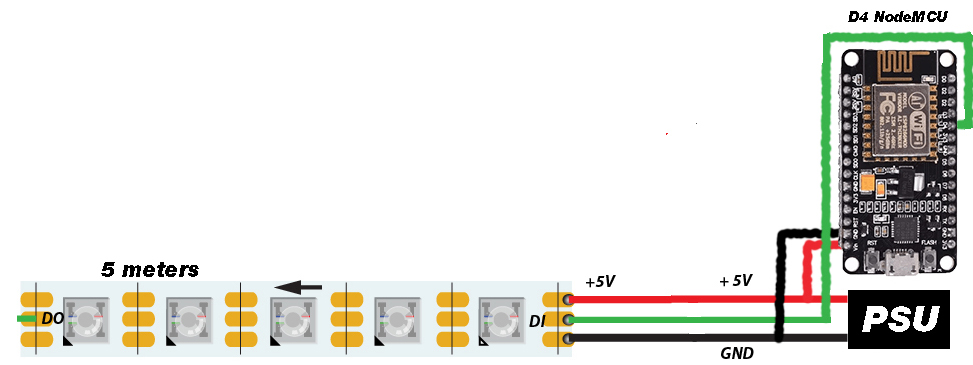
Follow these steps and at the end there should be light:
- Connect Plus and Ground of the LED strip, usually red and white wire (red and black wire on the diagram) to the DC V+ and DC V- on the Power Supply Unit.
- Connect the +5V (red wire) on the LED strip with the VIN on the NodeMCU.
- Connect the GND (black wire on the diagram, but it is usually white on the LED) to the GND pin on NodeMCU.
- Connect the Data In (green cable on the LED) to the D4 pin on NodeMCU.
- Finally connect the L, N & GND of the Power Supply to the Power Grid.
Enable all of the LEDs to work
If you connect everything correctly you should get at least 30 LEDs turned on. But wait a minute why only 30 LEDs when you may have more? What about the rest?
Do not worry it is just a default setting in WLED software to control only 30 LEDs. Although I got worried when I saw this for the first time I said to myself: “Oh man, this LED strip is defective”.
To “fix” this open the WLED web interface and click on the:
Config > LED Preferences and set the LED count (default is 30) to the count of LEDs that you wish to control and hit the SAVE button.
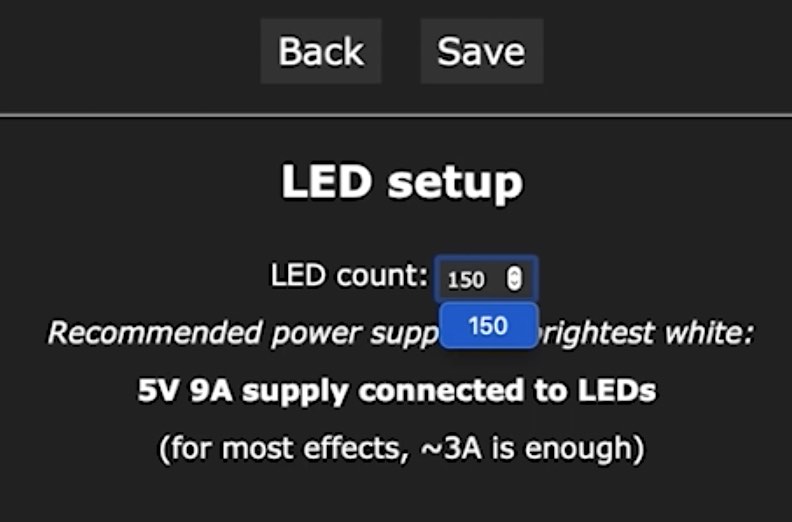
Change this setting here to the LED count that you have
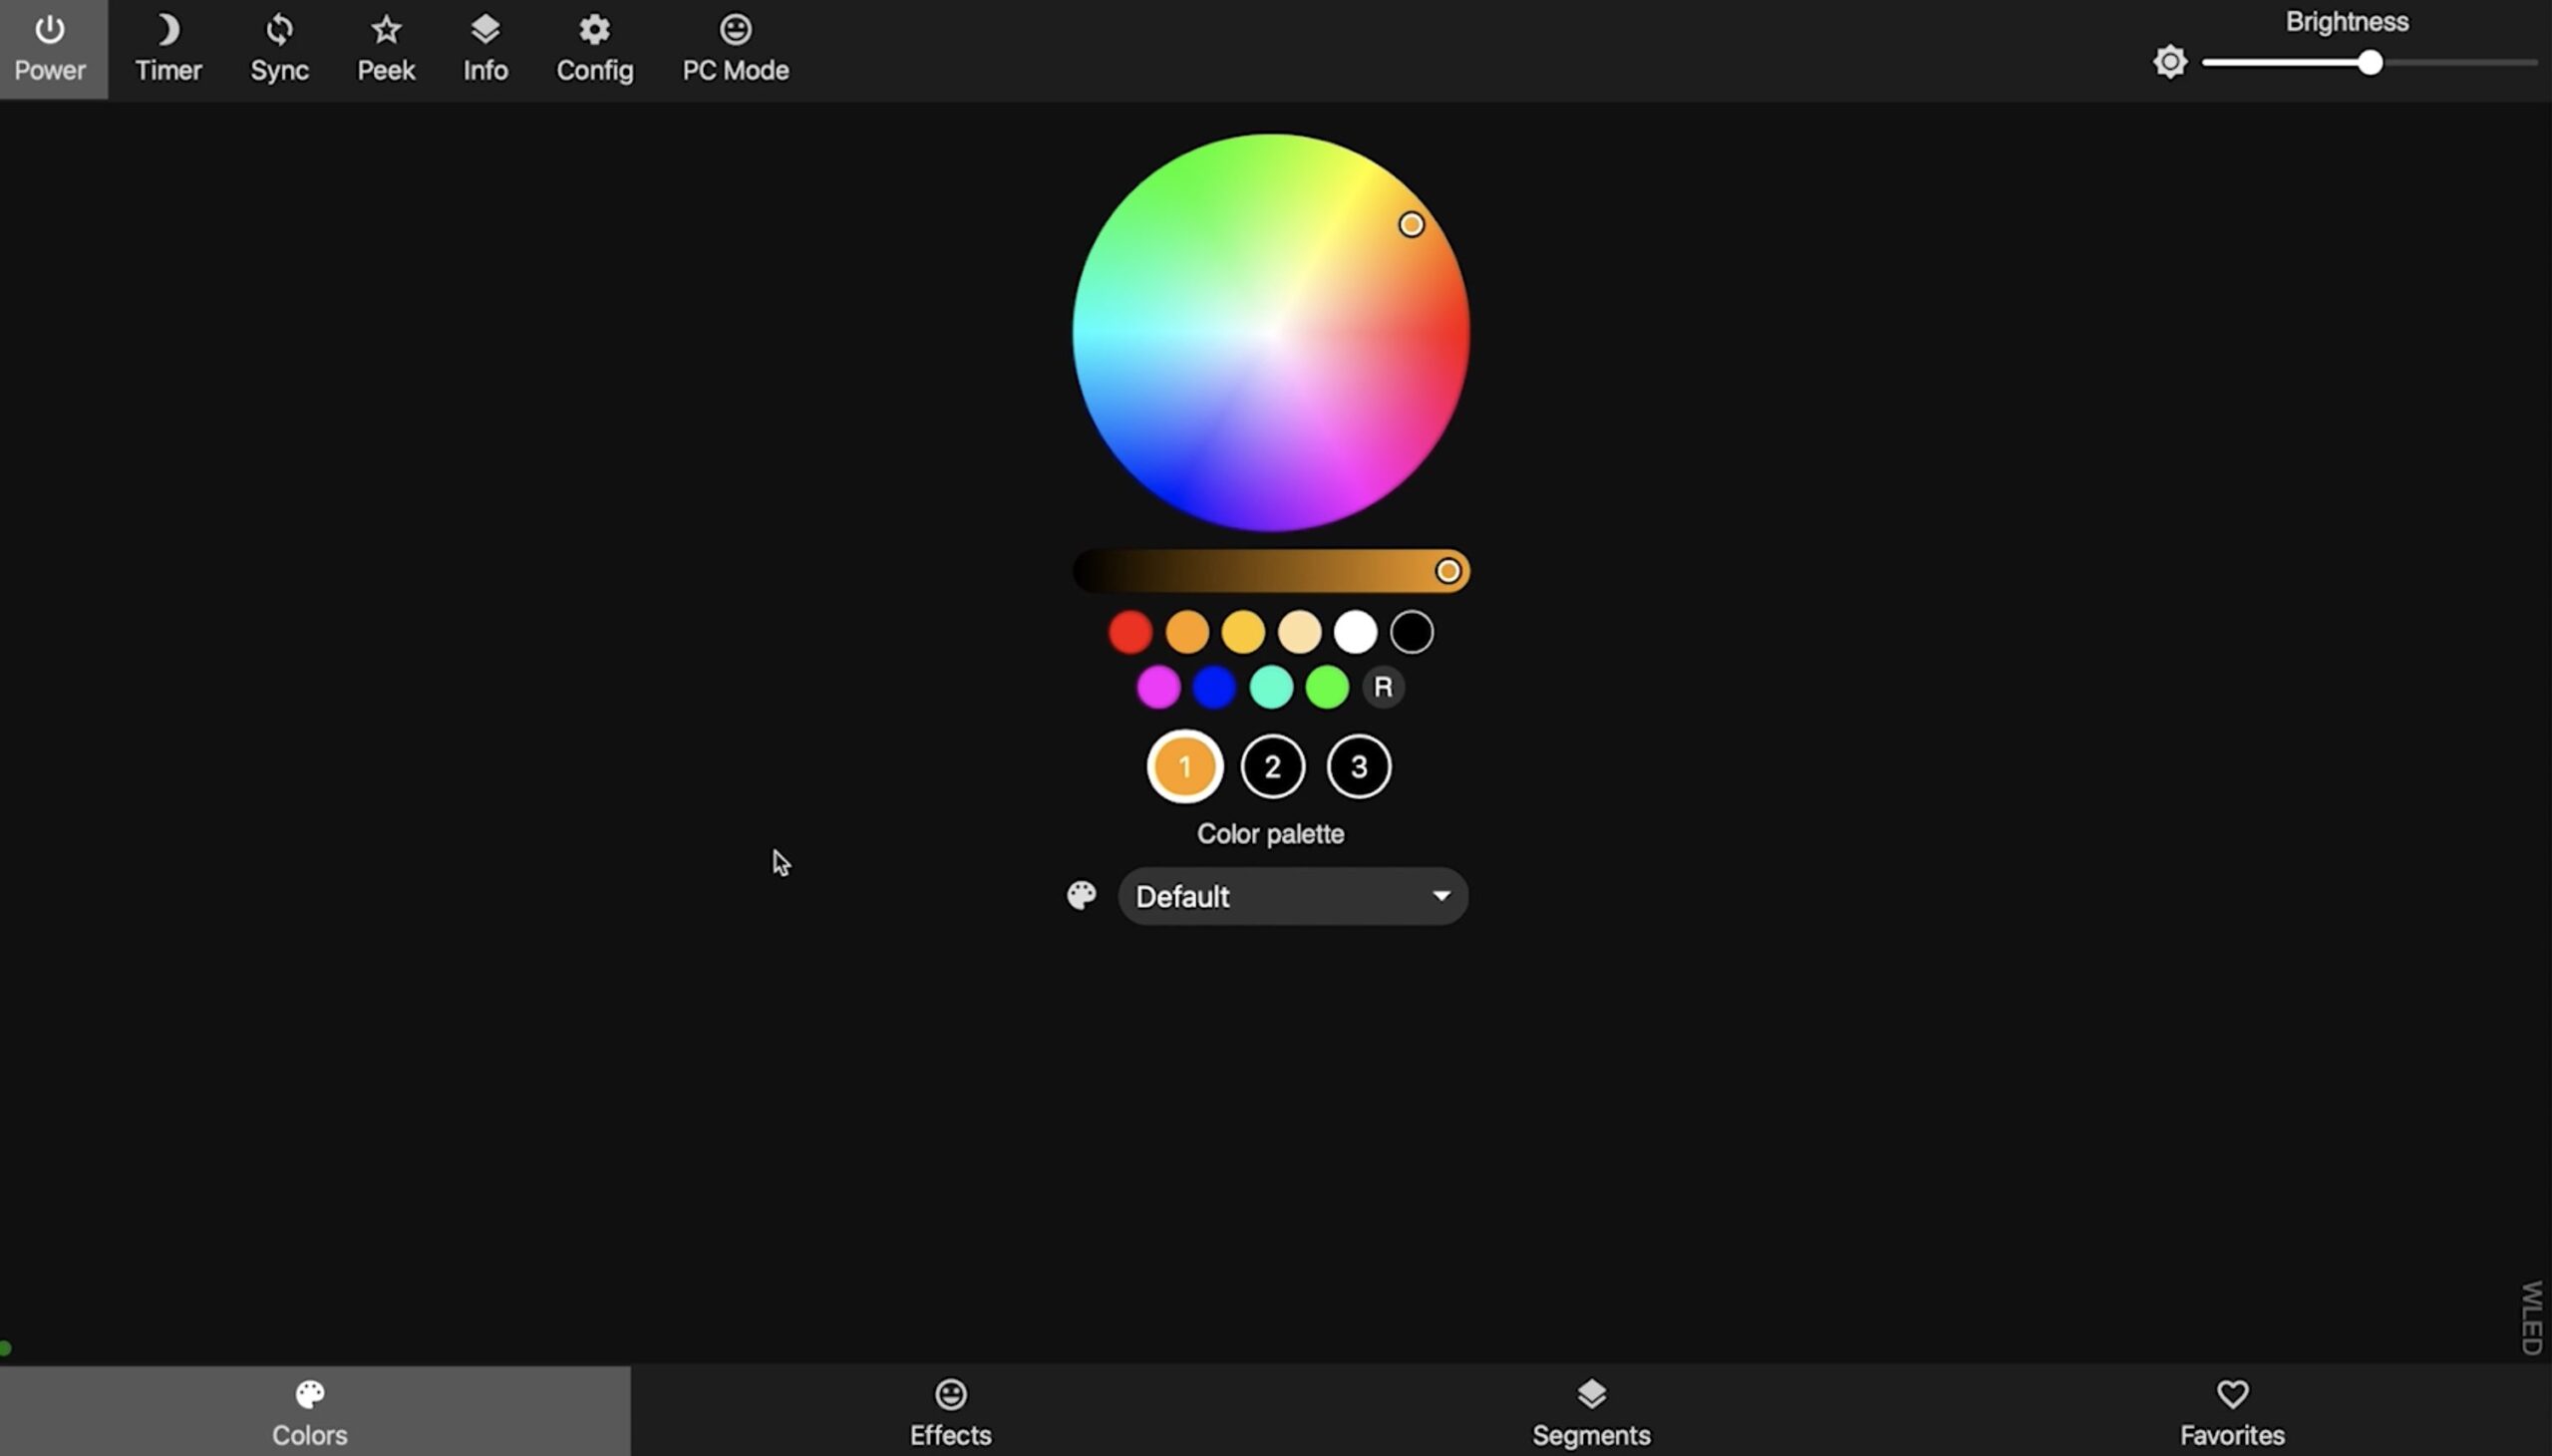
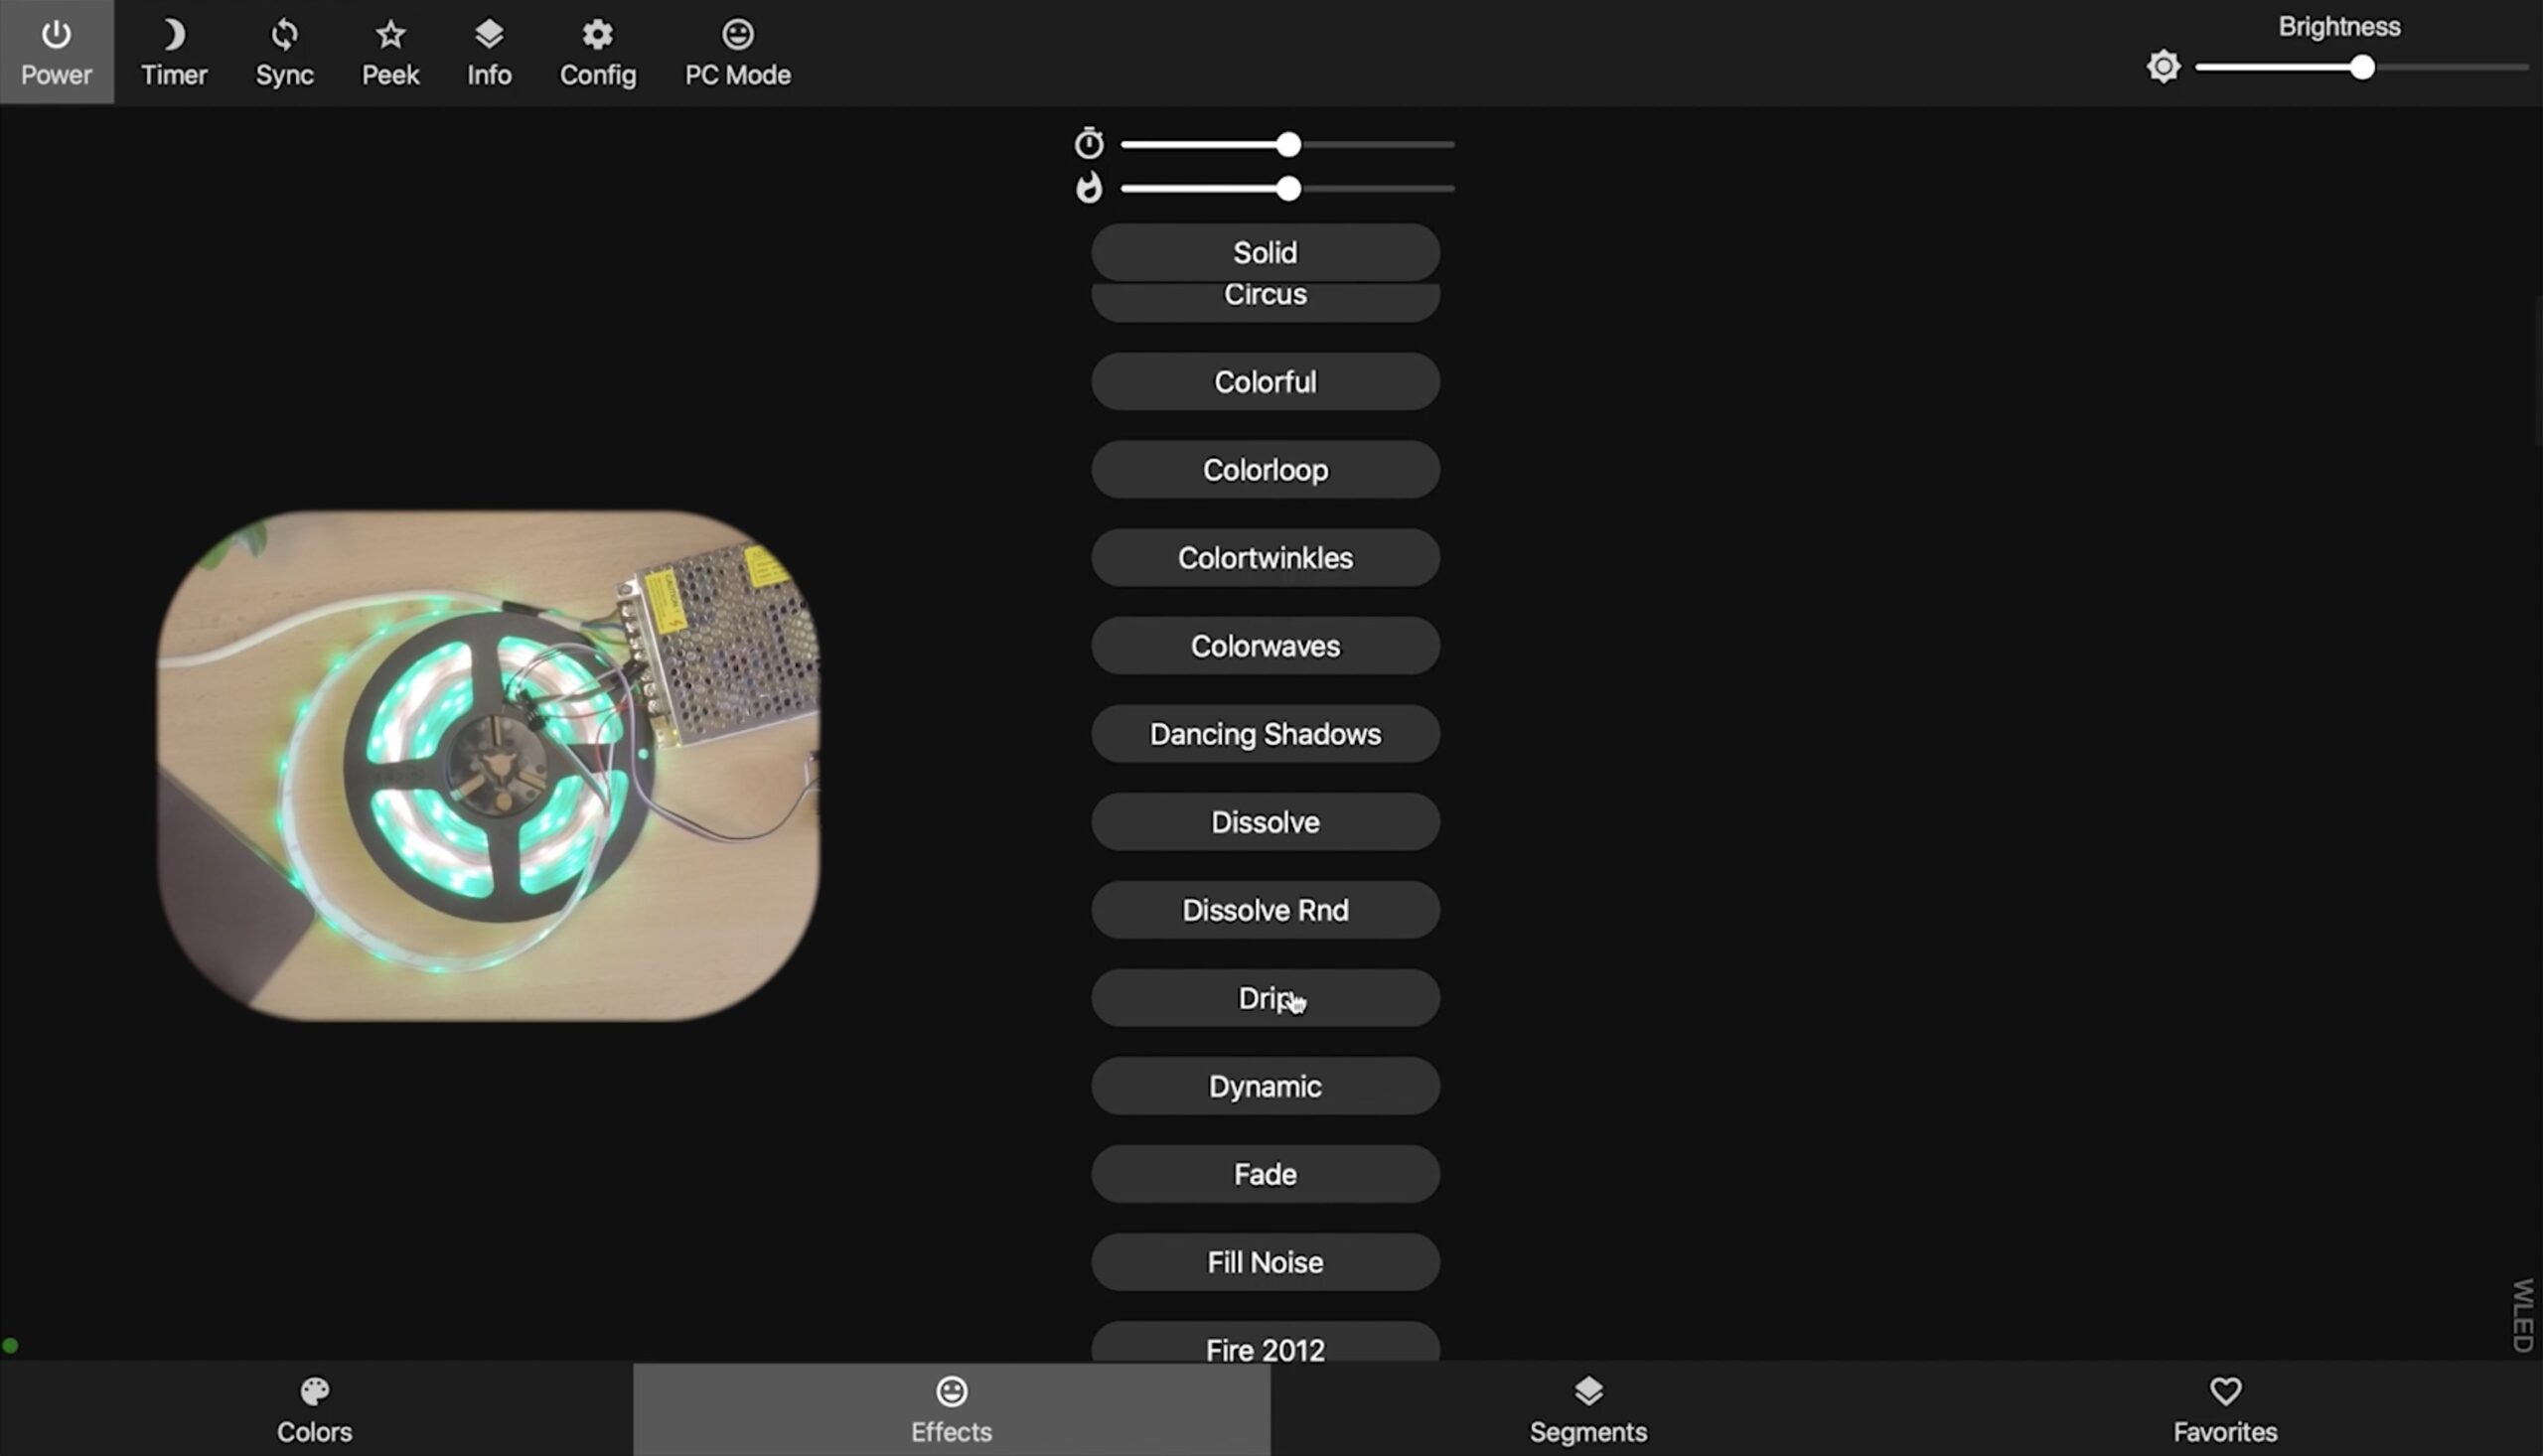
Some Fun with the WLED effects
You put a lot of hard work until now why not to play a bit with the embedded effects that WLED have?
To do that just go to the Effects tab in WLED interface and check them out.
I forgot to tell that WLED have also very nice free mobile application that you can find in your phone store.
Please, do not play too much with the effects, we have some more fun work to do 😂
What if we want more than 5 meters LED strip?
OK, everything is working fine with the up to 5 meters long LED strip. But what if we want to add more?
You have several options:
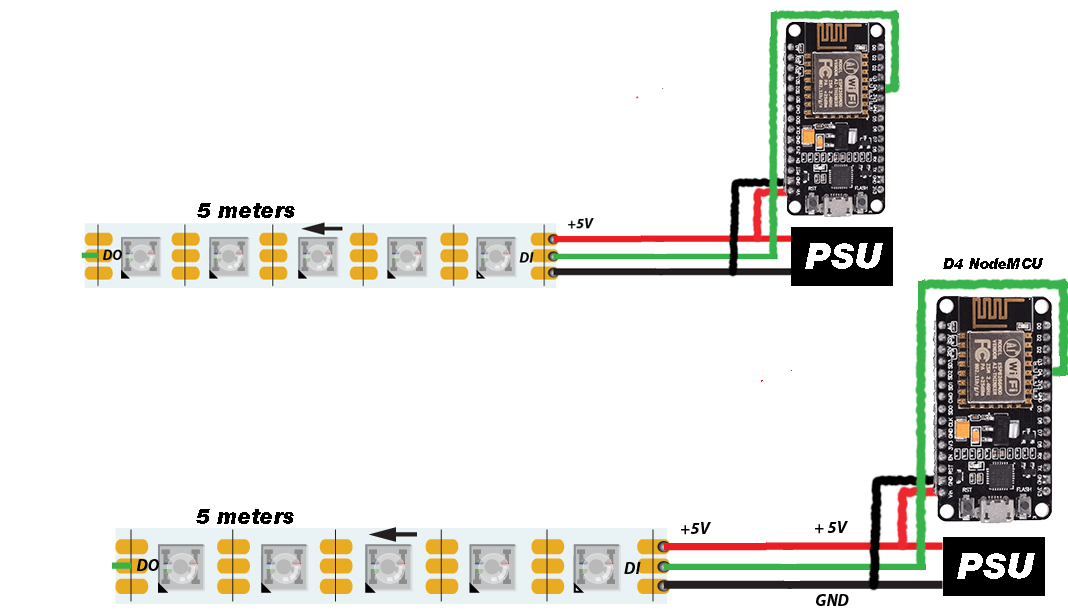
Connect every 5m LED strip independently
You can attach a separate Power Supply (PSU) and Controller like the NodeMCU for every 5m strip that you have and that way you can control them independently.
Parallel connection of the LED strip
You can connect LED Strip, NodeMCU and Power Supply in parallel/ in a chain using bus of cables and control them from one place.
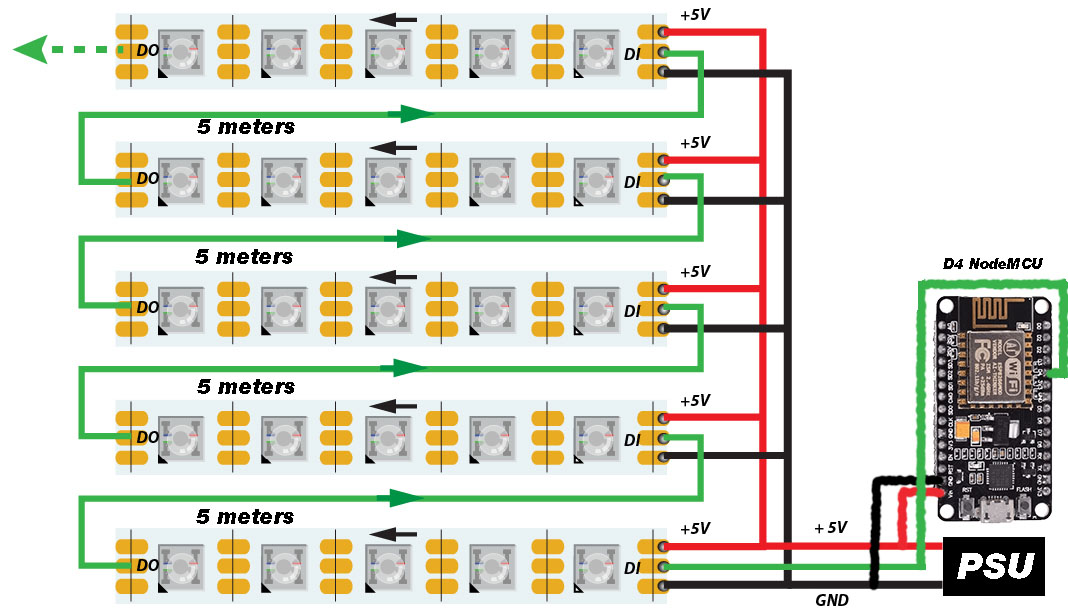
This method is a little tricky and I personally had some troubles with hiding cables and unwanted flickering of one of the strips. But the end result of this is the best in my opinion, so it is worth the trouble.
Both options are perfectly fine and it depends what do you want to achieve.
Sacrificial pixel or Level Shifter for the LED strip
If your data cable (this is the green cable on the pictures) is longer than 50cm from NodeMCU to the LED strip you may experience some unwanted flickering and wrong colors.
To fix that you may want to use a level shifter or you have to sacrifice one LED as show below.
Home Assistant and WLED integration
I was waiting for this! I will now integrate Home Assistant and WLED! Let’s see how exactly.
Open you Home Assistant and go to:
Configuration > Integrations, then search for “WLED” after you hit the Plus button in the lower right corner.
Chances are that the WLED integration will be already detected if Home Assistant and WLED device are in the same network.
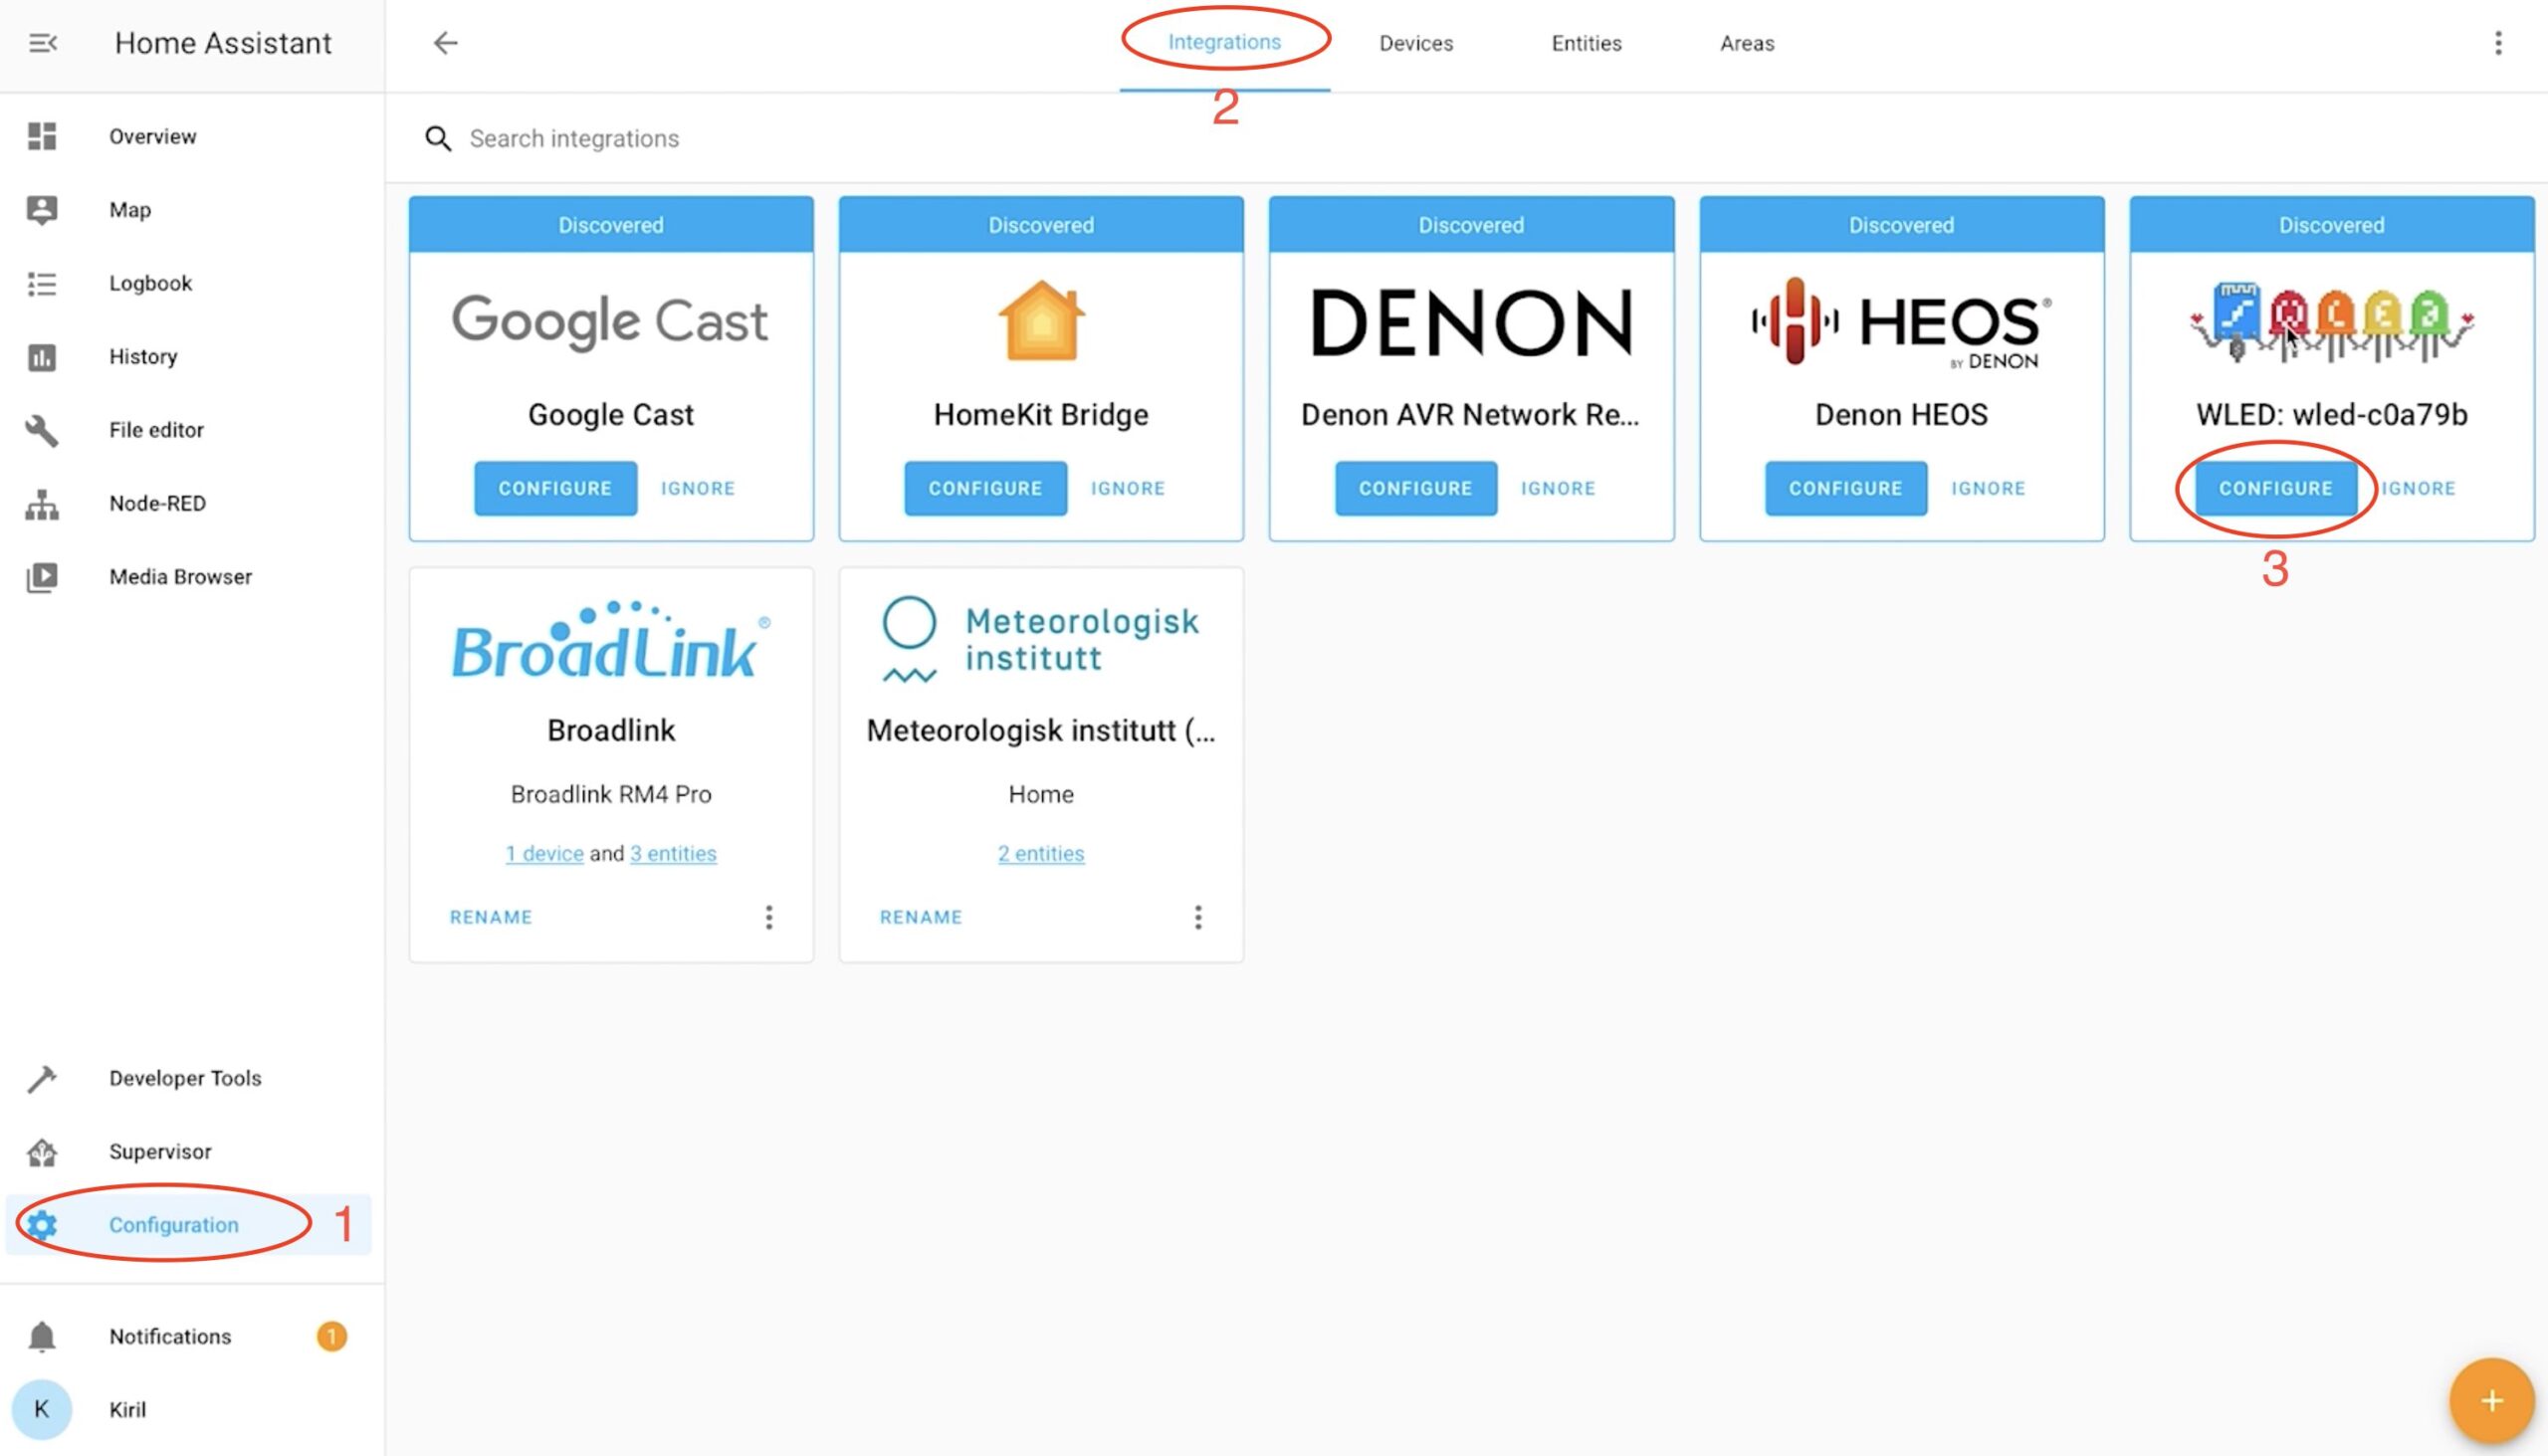
Click on the CONFIGURE button and you will see a new window that is asking do you want to add the WLED to Home Assistant – just click SUBMIT.
Home Assistant will give you the possibility to add the WLED integration into a specific Area. You can do that or you can skip it. In either way click FINISH.
And you are ready.
Adding WLED in Home Assistant dashboard
If you want to add the WLED entities in Home Assistant Lovelace/dashboard you can follow these steps.
Go to Home Assistant > Overview > Three dots menu in the upper right corner > Edit Dashboard > Plus button in the lower right corner > BY ENTITY tab.
Then search for light.wled entity and select it and hit CONTINUE button.
Finally click on ADD TO LOVELACE UI button and you will have Home Assistant and WLED working together on your screen.
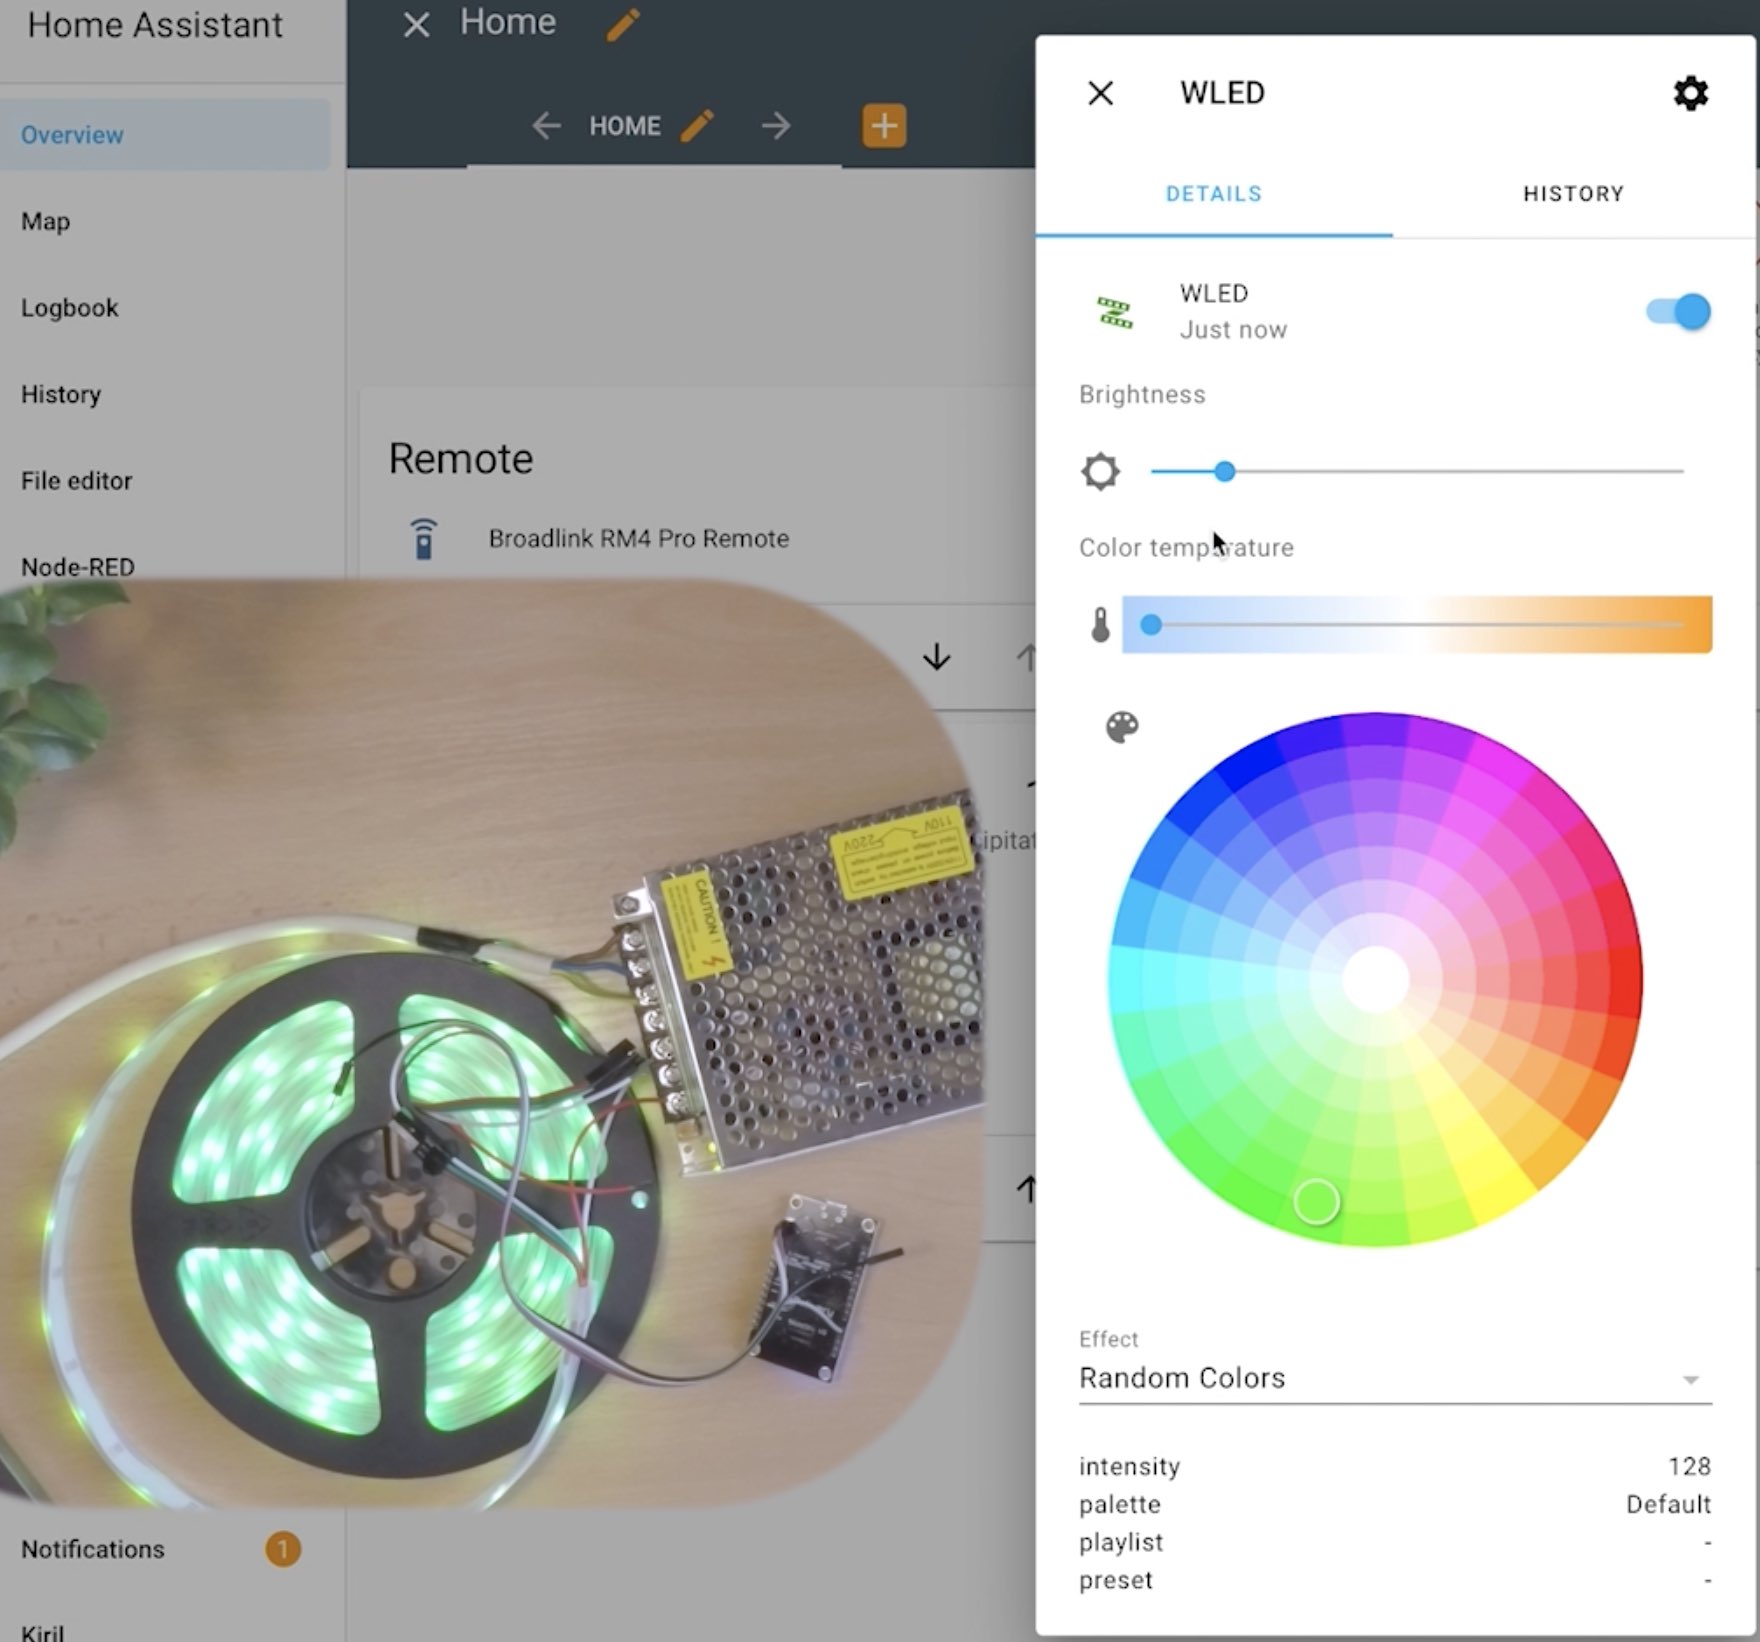
You can also click on the Three dots menu on the WLED Light card to control the Brightness and color of the LED Strip right from the Home Assistant.
Invoke effects using Home Assistant and WLED
You can control the WLED from Home Assistant using automations and scripts as usual. You can invoke the WLED effects as well.
Here is how:
Go to Home Assistant > Developer Tools > SERVICES
As Service choose wled.effect, for the Entity choose light.wled and as Service Data type the following YAML:
entity_id: light.wled
effect: NAME_OR_ID_OF_THE_EFFECT
Where you have to replace the NAME_OR_ID_OF_THE_EFFECT with the actual ID or name of the effect that you want to see. You can find them all in the WLED list of effects and palettes.
All of this was to quickly test the Home Assistant and WLED integration and the the process of invoking the WLED effects.
When you are ready and happy with the results, when you know what you want to achieve you can wrap these tests in a Home Assistant Script(s) or Automation(s).
Here are few ideas:
- Turn on LED Strips on specific effect when someone is home and it is after sunset.
- Turn off the LED Strips at 23:00h because you don’t want to leave them working during the night.
- Randomize the WLED effect every day. That one is interesting and I want to implement it when I have enough time. If you already know if there is a random function in Home Assistant scripts/automations – let me know in the comments below.
- Of course you can involve motion or/and light sensors if you have such in your Home Assistant and many, many more.
Support my Work!
If you want to secure this blog existence you can become one of my supporters. You can see exactly how in this section of my site.
Any other sort of engagement on this site and my YouTube channel does really help out a lot with the Google & YouTube algorithms, so make sure you hit the subscribe, as well as the Like and Bell buttons.
You can also buy my Smart Home Getting Started Actionable Guide right here -> LINK
Also feel free to add me on Twitter by searching for @KPeyanski. You can find me on my Discord server as well.
I really hope that you find this information useful and you now know how to connect and install permanent LED strip lights with NodeMCU, WLED and Home Assistant.
Stay safe and don’t forget – Home Smart, But Not Hard!
Thank you for reading, I will see you in the next article.
You can do the random effect with a template… I’m not sure how many effects there are, but in my example I just used 30
service: wled.effect
target:
entity_id: light.wled
data:
effect: “{{ range(0,30) | random }}”
Many thanks for the tip, Bo! Appreciated!