
In this article I will show you how to Install Home Assistant using Docker (Home Assistant Container Installation) and to make this setup complete I will also show you how to access this Home Assistant installation remotely from anywhere in the world for free using Twingate Zero Trust Network.
Table of Contents
What is Zero Trust Network?
Simply said – Zero Trust Network is a modern, secure network model based on the assumption that trust can never be implicit. Twingate is utilising this Zero Trust Network and I’m about to utilise Twingate for a remote access to my Home Assistant 🤣 Using Twingate I will not deal with any complicated certificates creation procedures and I will not open any ports in my network, which is a big plus.
More on that later, because now I will talk about Home Assistant and Docker.
Steps ahead?
I’m going to install Docker on my laptop and then I will use the installed Docker to run both Home Assistant and Twingate. You can use the same steps that I’m about to show on any device that supports Docker. So if you have a not very old Laptop, PC, Raspberry Pi, even NAS device (like Synology) or just anything that can run Docker you are good to go.
Home Assistant Webinar (Home Assistant Container)
Installing Home Assistant using Docker (as we are going to do in a moment) is also known as Home Assistant Container installation. This is one of the officially supported installation methods of Home Assistant.
However, there are also three other official methods to get Home Assistant and I’m discussing them in details in my free Home Assistant Webinar. If you are interested check it on my website – https://automatelike.pro/webinar
Now, let’s start with the Docker installation and then we will continue with the Home Assistant and Twingate.
Docker installation
Installing Docker depends of your host operating system. Fortunately, installing Docker is not difficult and not very different from installing any other Application on your Operating System.
- For Windows or macOS go to – https://www.docker.com/products/docker-desktop
- For Linux go to the official Docker page and select your Linux distribution – LINK
I’m using macOS where you just have to download a docker.dmg and to drag it in your Applications folder.
The procedure is not very different under Windows, but for Linux is. Fortunately everything is well described in the above Docker webpage. So if you have difficulties check for more info there.
To continue further – Docker should be installed and started. To double check that open a Terminal / Command prompt and type:
docker psIf you receive an error or warning similar to this one – Cannot connect to the Docker daemon at unix:///var/run/docker.sock. Is the docker daemon running? Your Docker is not running and you have to start it.
If there are no errors you can continue further.
Home Assistant Container Installation
Time to run Home Assistant Container installation which is as easy as copy and pasting some commands. Open a Terminal / Command Prompt and paste the following Docker run command:
docker run -d \
  --name homeassistant \
  --privileged \
  --restart=unless-stopped \
  -e TZ=YOUR_TIME_ZONE \
  -v /PATH_TO_AN_EMPTY_FOLDER:/config \
  -p 8123:8123 \
 ghcr.io/home-assistant/home-assistant:stable
Don’t hit Enter yet, as there are some things that you have to change:
- Replace YOUR_TIME_ZONE with your current timezone. The format is Continent/City.
For example: TZ=Europe/Paris, TZ=America/Los_Angeles, TZ=Europe/Sofia, etc. - Replace /PATH_TO_AN_EMPTY_FOLDER with the folder where you want to store the Home Assistant configuration files.
- Now hit the Enter key ⌨️
The Docker will download the latest stable Home Assistant image for you and it will start it.
- Wait a minute after the Docker command is finished (to give a little time for Home Assistant to breathe).
- Open a new browser/tab and type:
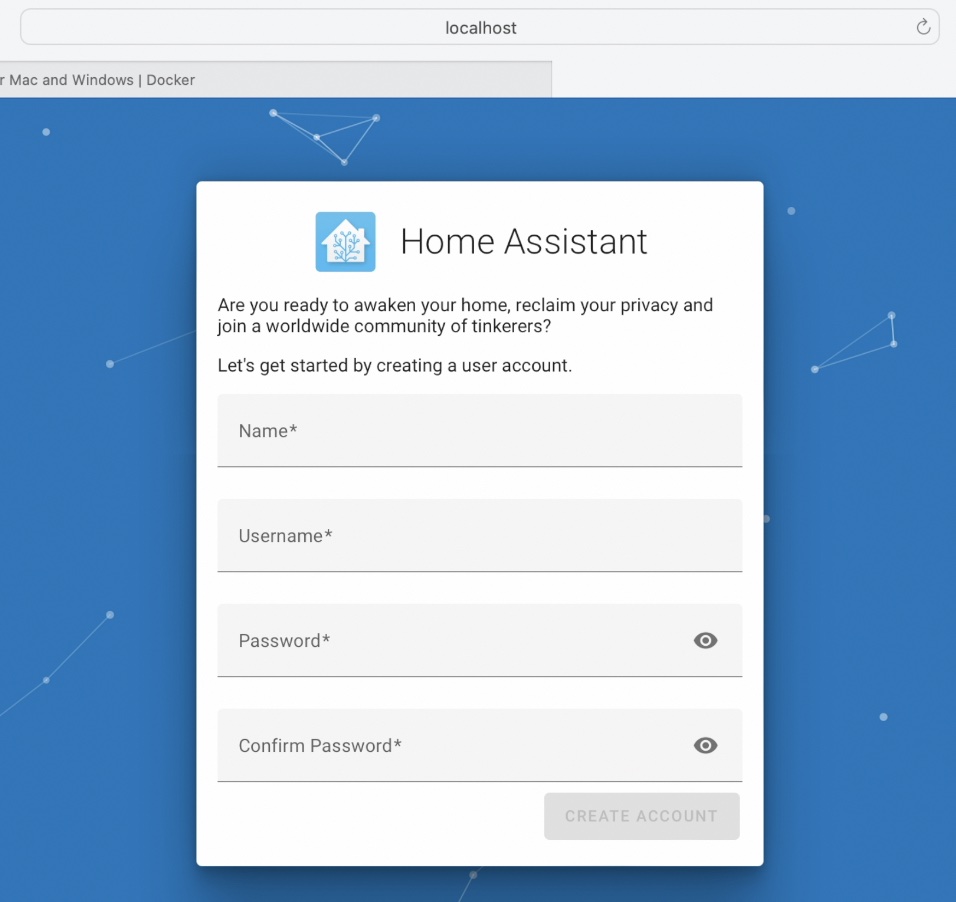
localhost:8123orIP_OF_THE_DEVICE_WHERE_DOCKER_IS:8123 - You should see the Home Assistant welcome screen where you can create an user and start playing.
Home Assistant Container Installation – Drawbacks
Installing Home Assistant using Docker was easy right? The only drawback of this Home Assistant Container installation method is the lack of Supervisor and Add-on store inside Home Assistant.
Just a few more words about the Home Assistant Add-on store to make this a bit more clear for you if you don’t know what it is. In the Add-on store there is a list of one-click installable applications that can expand the functionalities of Home Assistant. Example Add-ons are: Samba Share, Duck DNS, Mosquitto MQTT Broker, Grafana, InfluxDB and more. If you don’t need them then Home Assistant and Docker combination is just perfect for you.
If you really need them, then you will have to choose either Home Assistant OS or Supervised installation methods. And once again more info is available in my Home Assistant webinar.
How to access Home Assistant remotely using Twingate?
Now that my Home Assistant in Docker a.k.a Home Assistant Container is up and running I want to have remote access to this installation from anywhere in one secure, modern and elegant way and here comes Twingate and their service.
Twingate Plans and login
Have in mind that Twingate offers free and paid plans, I will use the Free Twingate plan, which allows up to 5 users, and 2 devices per user and it is great for individuals like me or even small teams.
- So, I will go to the Twingate webpage and under their Pricing menu, I will select the Starter plan (the free plan) , this is an affiliate link – http://twingate.go2cloud.org/SH5
- I will use GitHub to login (of course, you can select any of the other options that are listed there, e.g. Google, Microsoft, etc.)
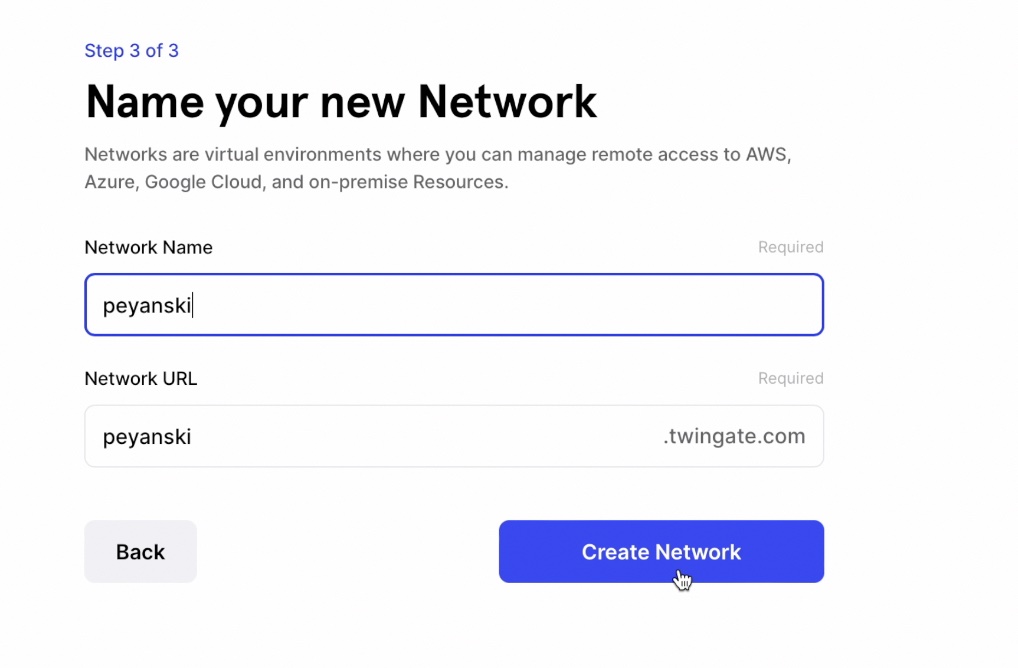
- After you successfully login you will be asked several questions by the Twingate wizard like company name, your role, etc. Answer them and continue forward.
- The final question will be about the name of your Twingate network – choose anything meaningful there and you are ready with that part.
Adding Twingate Remote Network
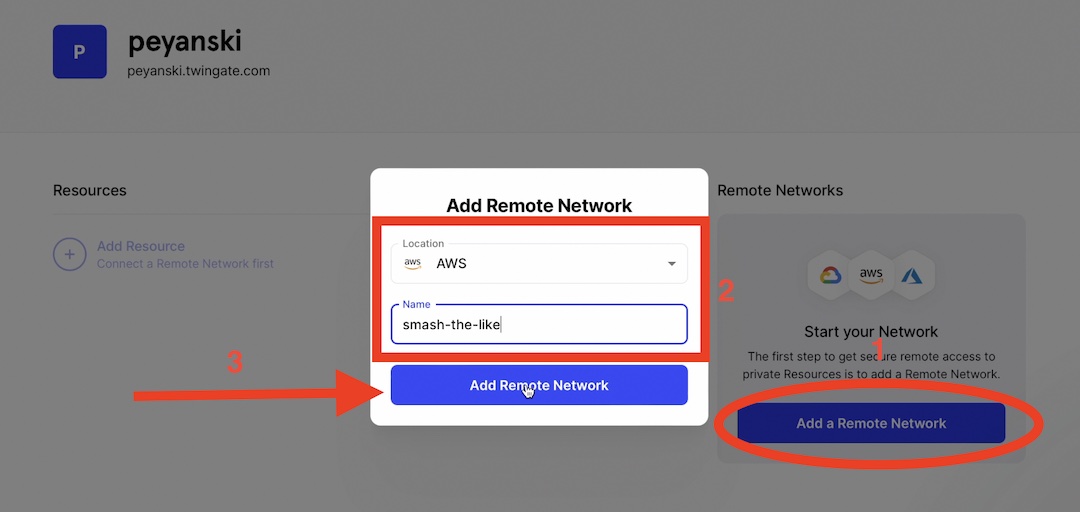
To get a secure remote access to private Resources (like the Home Assistant Container installation) a Twingate Remote Network is needed. Creating such is very easy.
- Click on the Add a Remote Network button.
- Select Location, by default AWS is selected, but you can choose some of the other options.
- Type a name, as example smash-the-like 😉
- Click Add Remote Network button.
How to deploy a Twingate connector using Docker?
Next step is to add a Twingate Connector. You can think of it like a client or a piece of software that will help you connect your device to the secure Twingate network. There are many ways to deploy a Twingate connector and they are all well described, but because I already have Docker up & running I will use it to deploy the Twingate Connector. It is very easy.
- Click on any of the Deploy Connector buttons available in the right part of the screen.
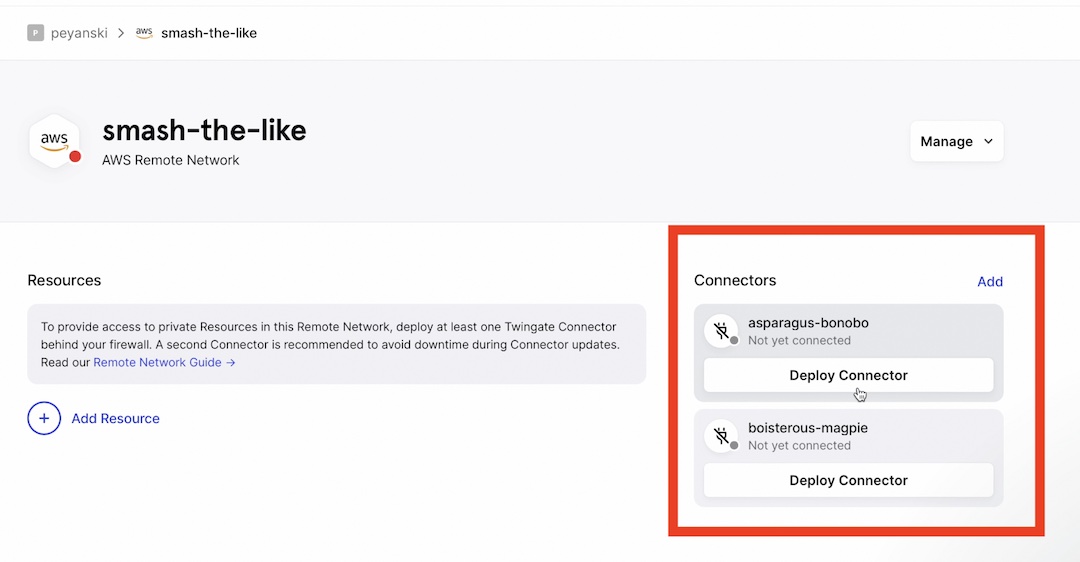
- As deployment method choose Docker (It is selected by default).
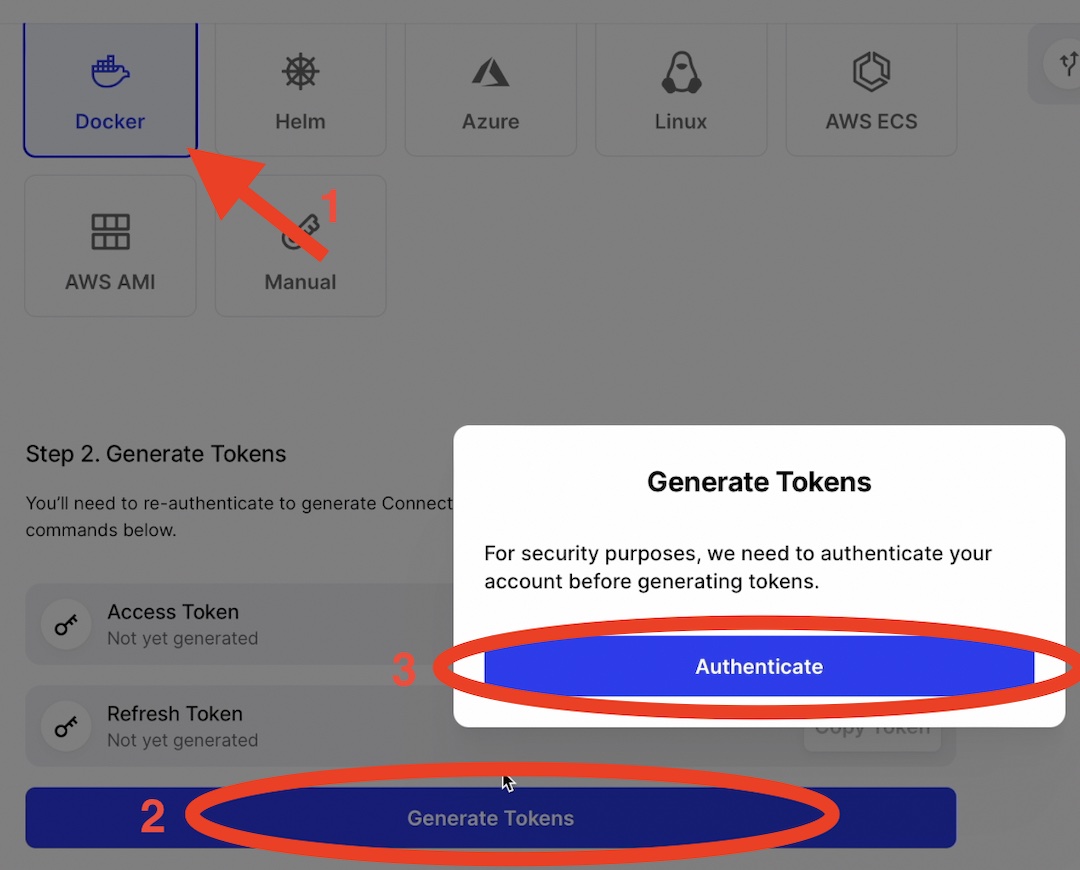
- Scroll down and click on Generate Tokens button, then re-authenticate yourself.
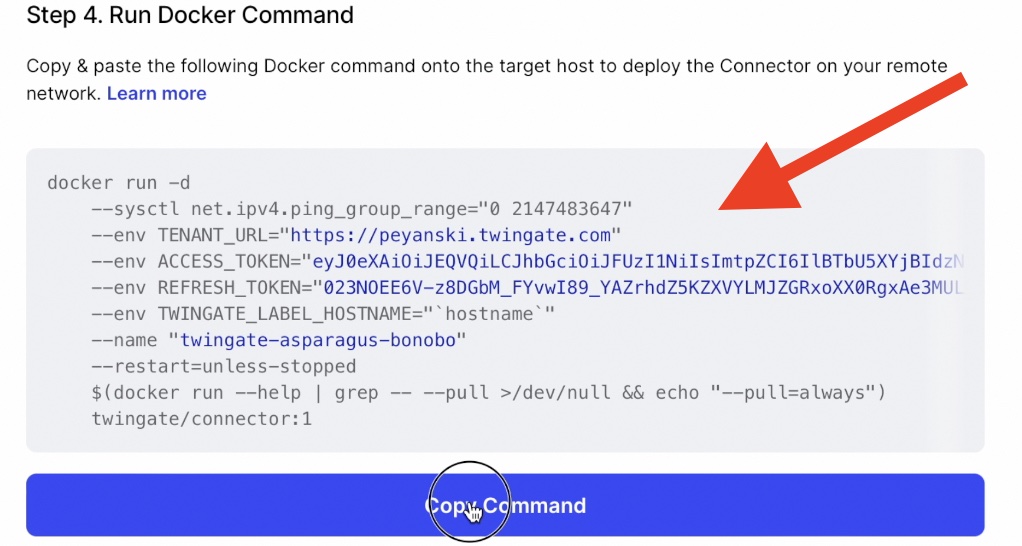
- Scroll a bit more and copy the auto generated Docker run command then just paste it in a Terminal or Command Prompt and hit Enter.
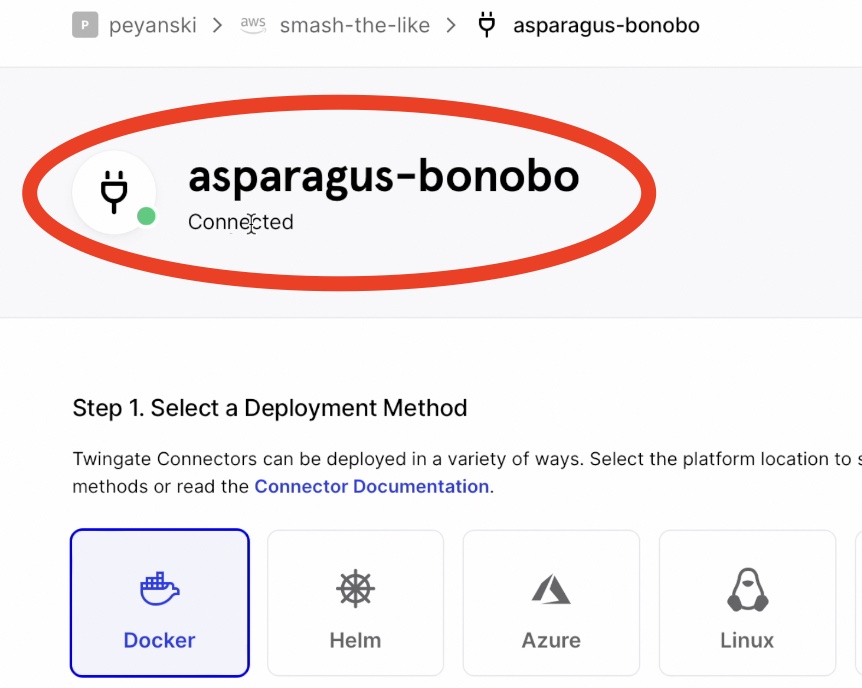
- Wait for the Docker command to finish and then scroll to the very top of the Twingate webpage, where you should see your Twingate connector. Soon after this connector should become green with a label connected.
With this I managed to set up a Twingate Connector on my laptop using Docker. As I already said the same steps so far can be executed on any device that you wish as long as it is supporting Docker.
Adding Home Assistant Container as Twingate resource
As you probably remember I’m interested in enabling remote access to my Home Assistant so I will just add it as a Twingate Resource.
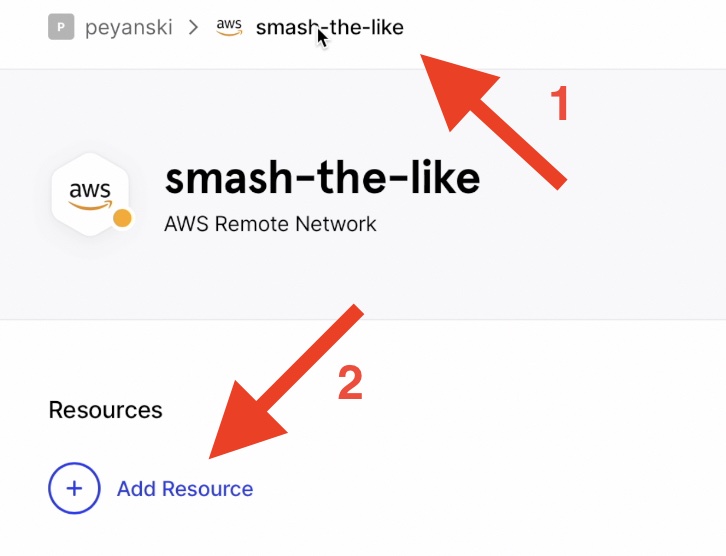
- For that, go to your Twingate remote network and click on the Add Resource button.
- Select CIDR option, enter a label of your choice, and type the IP of the device where Twingate Connector is deployed and where the Home Assistant Container is started.
- Click on the Add Port Restriction link and type the default Home Assistant port – 8123
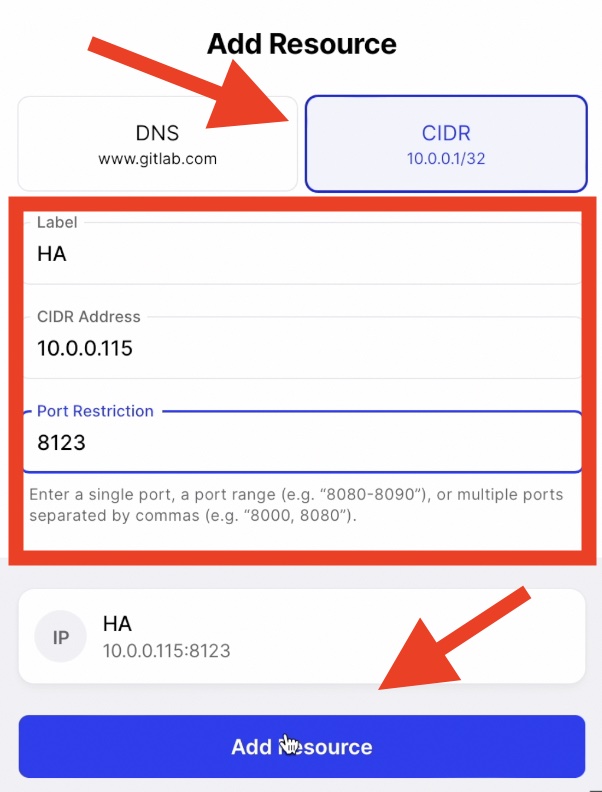
- Click on the Add Resource.
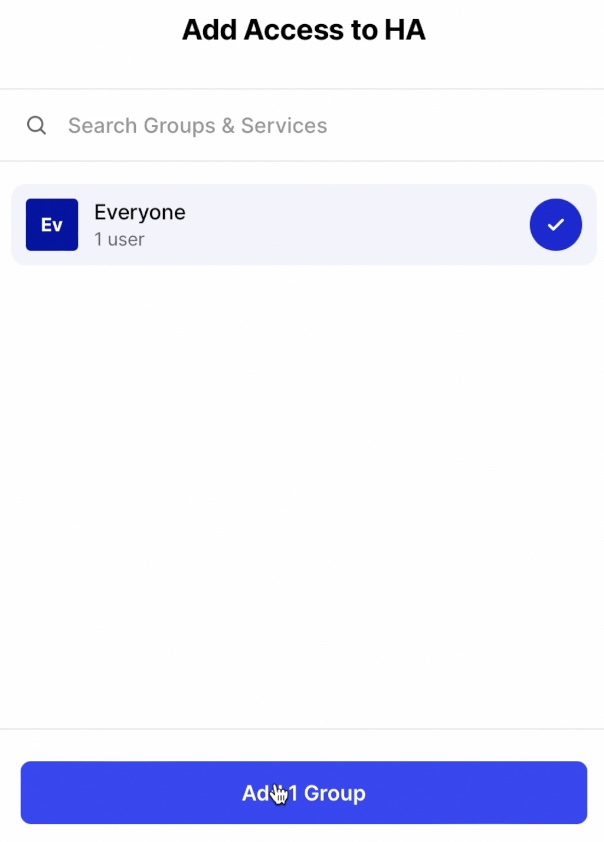
- On the next screen, select Everyone and click on Add Group button (It is possible to create separate users in groups inside Twingate network, but in this case this is not needed and everyone who have access to your Twingate account will have access to the Twingate network and resources which is totally fine.)
Twingate Clients
The final step is to download and install a Twingate client on the device that you want to use to access your Home Assistant remotely. There are available Twingate clients for:
You can use any of the above to connect to the secure Twingate network and to access your Home Assistant installation remotely. The steps that you have to do are the following:
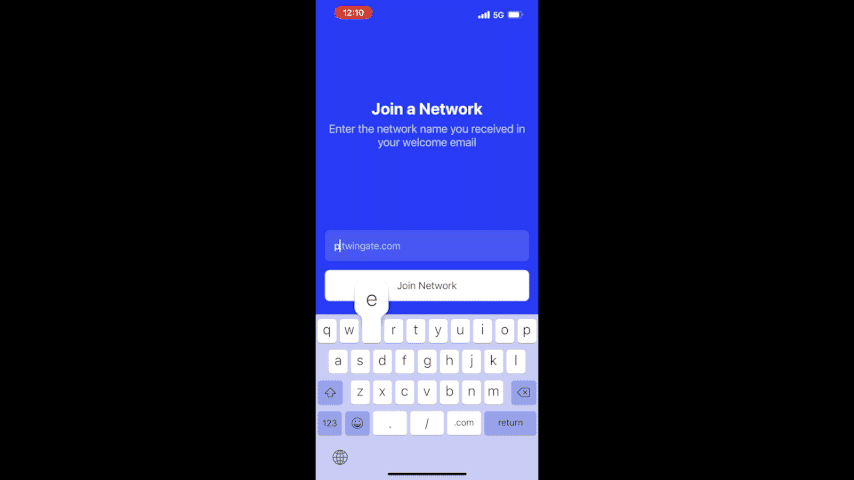
- Open your Twingate client.
- Type in the Twingate Network URL that you chose when you signed up and tap “Join Network”.
- You’ll be automatically asked to log in using the same account you used to sign up.
- After signing in, you’ll land on the home screen, where you should already see your Home Assistant Resource listed.
- When you are connected to your Twingate network, a “VPN” icon will appear in the top bar of your screen.
To test it out, stay connected to Twingate, disconnect from your local network (e.g., by disabling WiFi), and navigate to your Home Assistant instance on your phone’s browser. You should be able to access it just as if you were at home.
Now you have Home Assistant Container up and running thanks to Docker, as well as remote access to the Home Assistant thanks to Twingate.
Challenge for you!
I have a quick challenge for you, let me know what is your favourite Docker image, maybe it is a Home Assistant, Node-RED or Mosquitto MQTT, or something completely different please share it in the comments.
Free Smart Home Glossary
If you have hard time understanding some of the Smart Home words and abbreviations that I’m using in this article I have a free Smart Home glossary for you, which is available on peyanski.com/glossary just go there and instantly download it.
I’m Kiril and I’m done writing. Bye!
Is it possible to apply that on HASS OS as well?
It is possible, but it is more complicated. You better check WireGuard – https://peyanski.com/wireguard-vpn-from-home-assistant/
I setup HA on a Ubuntu server as docker container. Everything works well and I can always access from inside of my home network. Now I am trying remote access to HA but cannot to get it to work.
– Firstly I used OpenVPN through my router. I was able to access the server any services (http, ssh…), but HA. It seems that port 8123 blocked.
– Then I tried Twingate service, and was able to access the server with http port 80. But HA with port 8123 does not work and browser hangs there.
Could you help me? Thanks,