
WireGuard is an extremely simple yet fast and modern VPN. It aims to be faster, simpler and more useful than IPsec. It also intends to be considerably more performant than OpenVPN.
And I will show you how to install WireGuard using Home Assistant in a ridiculously easy way.
I don’t know if you ever try to configure OpenVPN or IPSec VPNs before. The IPSec took me literally several days to make it run – and it was no fun at all.
WireGuard on the other hand aims to be as easy as deploying an SSH server. A VPN connection is made simply by exchanging keys – exactly like exchanging SSH keys – and all the rest is transparently handled by WireGuard.
Table of Contents
Prerequisites for this Tutorial
To make WireGuard VPN to work in your Smart Home you will need:
- Home Assistant,
- Access to your Router,
- At least one client running Windows, macOS, iOS or Android.
Now let’s go:
What exactly is WireGuard?
WireGuard is a secure network tunnel, operating at layer 3, implemented as a kernel virtual network interface for Linux, which aims to replace both IPsec for most use cases, as well as popular solutions like OpenVPN.
Check this comparison for more info if you are interested.
Installing WireGuard from Home Assistant
Open you Home Assistant -> Supervisor -> Add-On store and search for “Wireguard”.
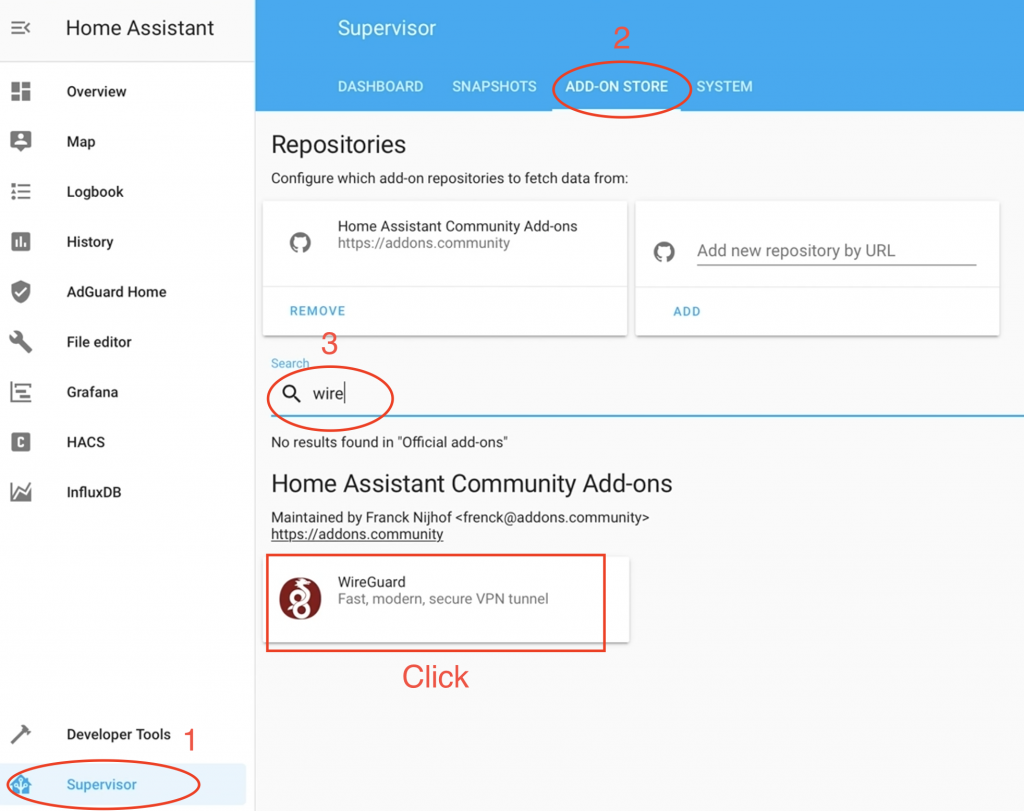
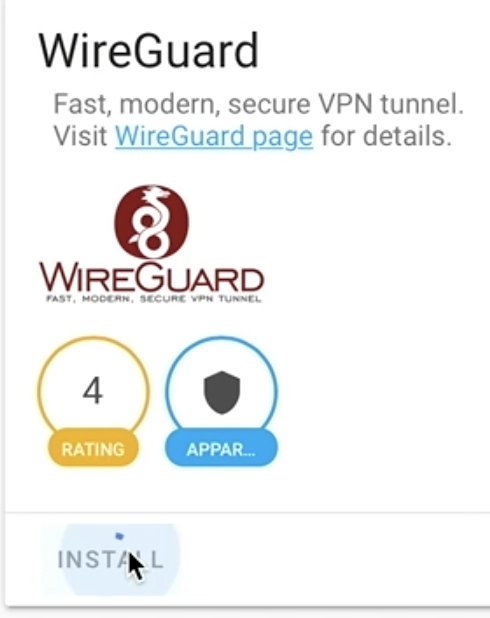
Simply click “INSTALL” button and wait until the installation is done.
Configuration of WireGuard
While you are still there on the same screen – scroll down a bit until you find “Config” section and paste the following config and adapt it to your needs:
server:
  host: YOUR_NAME.duckdns.org
  addresses:
    - 172.27.66.1
  dns: []
peers:
  - name: phone
    addresses:
      - 172.27.66.2
    allowed_ips: []
    client_allowed_ips: []
  - name: laptop
    addresses:
      - 172.27.66.3
    allowed_ips: []
    client_allowed_ips: []
For the host configuration option you have to type your Real IP address or your Dynamic DNS. I strongly recommend duckdns.org if you don’t have one.
You can also add as many peers as you like.
At the end don’ t forget to click “SAVE” button as well as to get the FREE BONUS that I will send you when your enter your mail below 🙂
[sibwp_form id=2]
AdGuard in WireGuard (Block Ads while using VPN) – optional step
You can add AdGuard so you will have no ads even when you are connected to your home via VPN.
To make this work you simply have to put the IP of the AdGuard in the configuration as DNS server.
server:
  host: YOUR_NAME.duckdns.org
  addresses:
    - 172.27.66.1
  dns:
    - 172.30.32.1
peers:
  - name: phone
    addresses:
      - 172.27.66.2
    allowed_ips: []
    client_allowed_ips: []
  - name: laptop
    addresses:
      - 172.27.66.3
    allowed_ips: []
    client_allowed_ips: []
IMPORTANT: Use exactly the same IP (172.30.32.1) as DNS only if you followed my AdGuard Guide. Otherwise you need to change this to the address where the AdGuard is installed.
Starting the WireGuard
You can now fire it up.
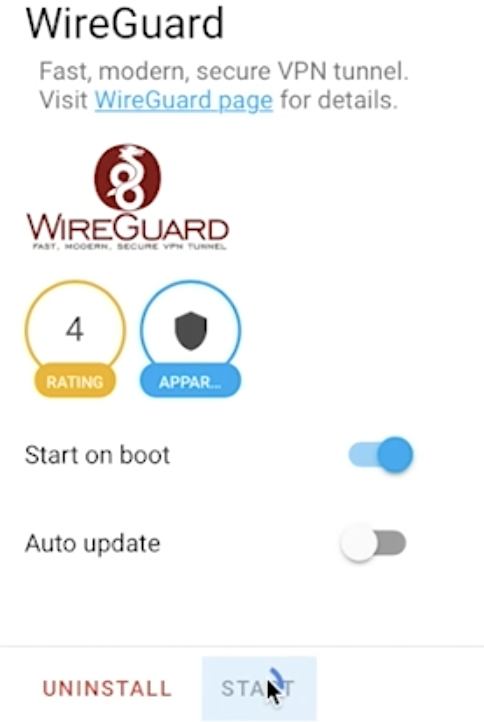
Just click the “START” button
Scroll down to the very bottom of the page and and search for “Log” section. Wait a bit and click “REFRESH” button several time to scan for errors and warnings.
Missing WireGuard kernel module
If you happen to have the following Warning in the logs.
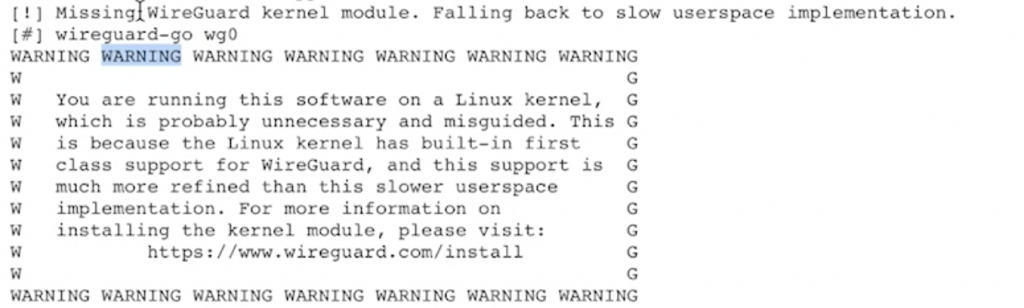
Don’t worry much. WireGuard will still work without any noticeable issues. It will just run a little bit slower.
This is because you are running Home Assistant in some kind of virtual environment like Docker or something similar.
To fix this you have to install WireGuard on your host environment as well.
I’m running Home Assistant using docker on Raspberry Pi running Raspbian OS. So I have to install it on the Raspbian.
If you are on Raspberry as well – follow this guide for Raspbian (Buster and Stretch).
If you are on different hardware and OS – check the official installation guide.
Forward an UDP port in order everything to work
WireGuard needs one open UDP port and a Smashed Like Button to work, so you have to Forward 51820 UDP port in your router to your Home Assistant IP.
I will show you how you can do this in Mikrotik router, but you have to find a way for yours, cause no router web interface is made equal.
The fastest way to do this for any router is to ask Google the following: “how to forward ports in XYZ router”. Where the XYZ is the model and/or brand of your router.
The fastest way for Mikrotik and RouterOS is terminal commands. Just connect to your Mikrotik and execute the following:
/ip firewall nat add chain=dstnat dst-port=51820 action=dst-nat protocol=udp to-addresses=YOUR_HOME_ASSISTANT_IP to-ports=51820You can double check if the port is open with any tool/command of your choice. For example if you are using Linux or macOS you can use nmap.
Just execute the following:
sudo nmap -sU -p 51820 YOUR_IP
and you should receive similar answer like the one below if everything is OK.
PORT      STATE         SERVICE
51820/udp open|filtered unknown
If you see STATE = closed, then you are making a mistake somewhere in your router config.
Configure a client and connecting to WireGuard
WireGuard is now up and running let’s try to connect to it.
You can get a lot of details to do this in my video. But in general just follow these steps:
- Make sure you can open the following folder
/ssl/wireguard/stored on your Home Assistant machine. You can use File editor or Samba add-ons. - Install the WireGuard app on your phone/computer and open it.
- Add a new WireGuard connection:
- On your phone, by scanning the QR code located here – /ssl/wireguard/phone/qrcode.png.
- On your computer, by opening, copy and paste the content of /ssl/wireguard/laptop/client.conf in a new tunnel.
Wow that was ridiculously easy! The only thing easier than this is to Smash the Subscribe button.
Question for You
Until now I was using ZeroTier and IPSec VPNs, but I recently changed my router and now I have some issues with the IPSec VPN on the new router.
In this regard I have a quick question for you: Are you currently using any kind of VPN? If yes, what exactly? Let me know your answer in the comments section.
Support my work
Any sort of engagement on this site or my YouTube channel does really help out a lot with the Google and YouTube algorithms, so make sure you hit the subscribe, Like and Bell buttons If you enjoy this video.
Also feel free to add me on Twitter by searching for @KPeyanski. You can find me on my Discord server as well.
I really hope that you find this information useful and you now know how to connect to your Smart Home using WireGuard inside Home Assistant.
Thank you for watching, stay at home, stay safe and see you next time.
Thx for this addon! One quistion, is it possible to see who is connected and how many traffic they use?
Hi,
Thank you for the great work and tutorials.
I am trying to figure out what is the main advantage of using WireGuard VPN vs getting remote access with DuckDNS and Let’s Encrypt.
Should I choose between these two methods ?
Is one oethod more secure than the other ?
Does it make sense to use both ?
Can you elaborate on this?
Sebastien
Hi Sebastien, thanks for the comment and great words. With the VPN you can access your whole local network not only the HA server, which is great and for me – must have. Remote access with DuckDNS is a must if you want to use HA Companion App and some other types of integrations like SmartThings, Spotify and so on. They are both secure, especially if you follow every step from my guides. I use them both on a daily basis and they are working great. So two hands recommend both of the options.
Hi, i followed your steps, but when i enter my local ip from my HA adguard server in the wireguard settings my internet wont work what am i doing wrong
Hmm, if you are using your AdGuard ip locally on your devices without the wireguard vpn is everything alright?
Nice guide! I have Wireguard set up now on Home Assistant, but I previously already had DuckDNS and use the HA Companion App for iOS which you mentioned requires DuckDNS.
The issue I have now is that I can still access Home Assistant using my DuckDNS URL when I am not on WireGuard. How do I only access Home Assistant through WireGuard to be more secure?
Just remove your port forward in your router to the machine where HA is installed and then access it only through the WireGuard.
I want to connect Home Assistant to my existing Wireguard server , do you have instructions for doing that?
This article was super interesting and helpful.
Glad you think so, check my other articles as well!