Let’s be honest, Home Assistant learning curve is steep. And although Home Assistant onboarding process is quite intuitive, it can leave you with the feeling that you are missing something. Even if everything is fine with the onboarding, it is possible to get stuck and to do not know what to do after that.
Table of Contents
Common Home Assistant onboarding pitfalls
With every new Home Assistant release the things got more user friendly, but also new features are introduced, causing confusion and overwhelming of the new users.
As I’m often seeing in my Discord and in the comments under my content – the newcomers don’t know where to go and what to do after Home Assistant installation. In such cases it is somehow more natural and easier to just freeze and do nothing.
Don’t do that and just continue reading this article and I will try my best to guide you through the whole Home Assistant Onboarding process. Not only that, I will share some tips and tricks and I will try to give you directions what to do after the Home Assistant onboarding.
Smart Home Glossary
To further help you, I prepared a Smart Home glossary where I’m explaining the most common words and abbreviations that are used in the Smart Home related articles and videos. You can instantly download that glossary for free on my website – https://automatelike.pro/glossary
Now, let’s start this!
Home Assistant Onboarding – User & Pass
After successful Home Assistant installation you should see similar screen.
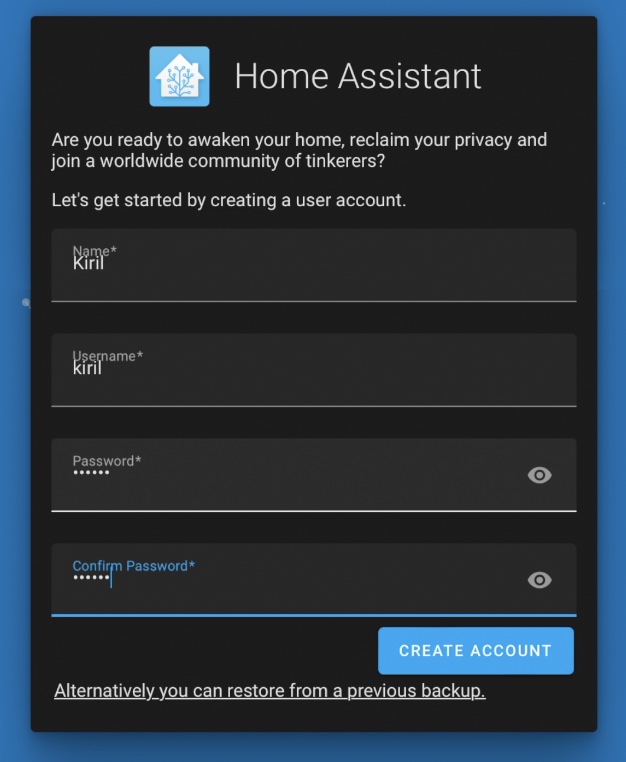
This is where you can set your username and password. No need of a lot of explanations here:
- Choose your favorite nickname or your real name and type it.
- Choose a secure password (lower & upper case + special characters), especially if you plan to access your Home Assistant outside of your local network at later stage (I’m describing this in the following article – Home Assistant Remote Access with NGINX Reverse proxy).

Did you saw this little link here?
If you are a first time Home Assistant user – you will not need this, but you may need it later, so I will try to explain it. Simply said, you can grab your Home Assistant backup file from an existing installation and using this link you can restore your installation. The best thing is that It doesn’t matter from which Home Assistant installation type (OS, Supervised, Container, Core) the backup is, you can still restore it.
Quick Tip: if you are facing some difficulties understanding the different Home Assistant installation types or you have hard time installing Home Assistant as a whole, check my free webinar available at:
https://automatelike.pro/webinar
I’m trying to show and explain everything there and it will only cost you several minutes of your time and exactly $0 dollars!
Home Assistant Onboarding – Name, location, Time Zone, Currency
Going to next step on which you can enter your home name, you can set where you live, your time zone and wether your are using metric or imperial unit system, as well as your currency. This data is not shared with anyone else, so you can freely type your real values here.
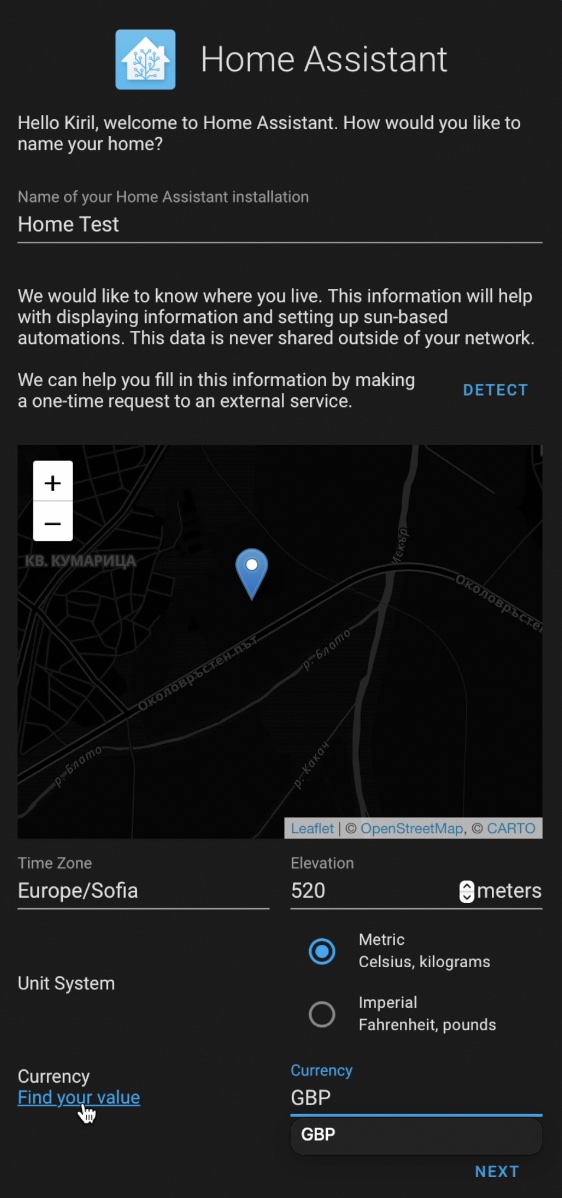
On top If you enter your exact location and elevation, your Sun-based automations will work accurately. For example you can create the following automation: when sun is setting turn on the lights now and not six hours later due to wrong location.
Home Assistant Onboarding – Analytics
From this next step you can set your preferences whether you want to share anonymized information from your installation to help Home Assistant to become better.
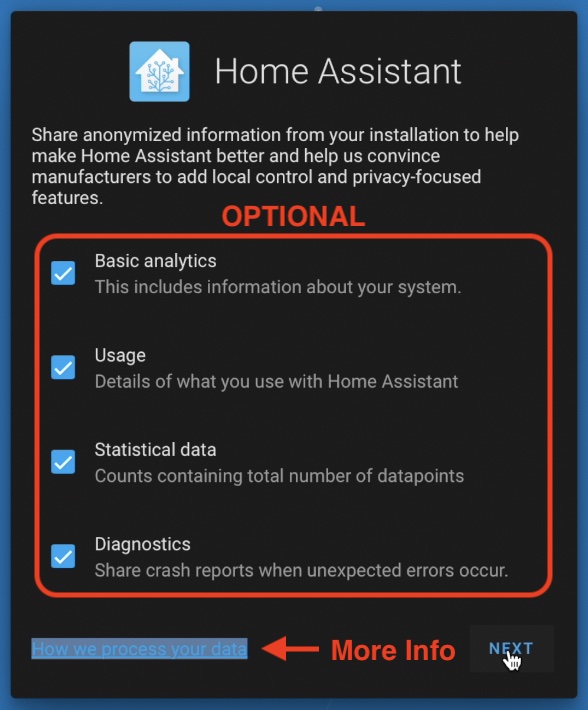
I personally always check these options, but you can freely choose otherwise. More info can be found by either click on the “How we process your data” link or by going here – https://www.home-assistant.io/integrations/analytics/.
If you are interested by the end result of these Analytics you can go to analytics.home-assistant.io where you will be able to find some very nice graphs and useful data.
Home Assistant Onboarding – Auto Discovered Devices
Next dialog is very interesting, Home Assistant may discover and will allow easy configuration on many different zeroconf/mDNS and UPnP devices on your network. These are devices that are currently turned on and connected to your network and which advertise their presence in such a way that anyone who is interested (in our case that is Home Assistant) can see them and interact with them.
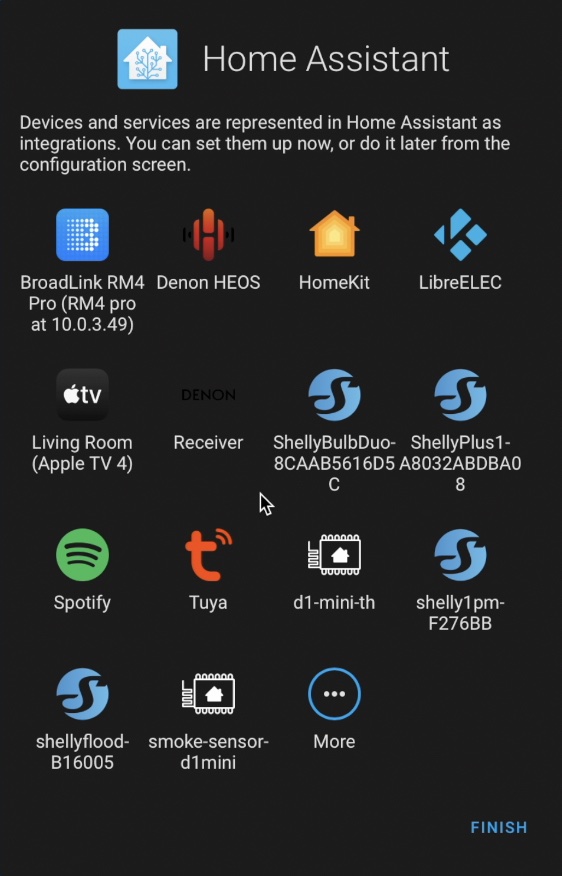
Your device list will be probably different, and that is totally fine. You can try to configure any of the discovered devices right away by just click on them or you can leave that part for later and click on the Finish button.
What if you forget something during Home Assistant Onboarding?
If you forgot to configure any of the auto discovered devices, you can do so by going to the Home Assistant > Configuration > Devices & Services and you will see the same auto discovered devices that you saw during the Home Assistant onboarding process and you can finish configure them whenever you wish.
From Configuration > Settings > General you can also change all of the things that you set during the Home Assistant onboarding process.
That was in case you missed something or you enter something incorrectly. Otherwise you may need some additional help to get started.
Where to search for Home Assistant help?
That was the Home Assistant Onboarding! From now on the real home automation fun begins. But how exactly?
Probably, at this stage:
- Option A: All of your smart devices are auto discovered by Home Assistant and you managed to successfully configure them. That case is more unlikely to happen, but if you manage to do it – congratulations you are a real talent and you are ready to start creating Home automations.
- Option B: Most probably the reality will hit you like a bus and you will face some issues integrating your smart devices with Home Assistant.
No matter are ending with Option A or Option B, you may need additional boost and you can search for help on several different places:
- First is Home Assistant documentation. Everything is well described there and it is regularly updated. You can also go to integrations section and just search for your device of interest.
- If you don’t want to read you can always try YouTube. Just type home assistant your_device_name (for example home assistant shelly) in YouTube search bar. There are plenty of good tutorials for the most of the popular smart brands and devices and if you are a visual person you can just follow them.
- Home Assistant is also having a great community of users who are more than willing to help each other out. You can go to the Home Assistant community forum where you can describe your issue and ask for help.
- Your other options are to join the official Discord server of the Home Assistant or you can join my Discord server where we have a dedicated Home Assistant channel.
- You can also subscribe for my Newsletter where you will receive new and useful Home Assistant and Smart Home articles on a weekly basis.
Hope this Home Assistant Onboarding article was helpful for you. Warm welcome from me if you are just staring out.
I’m Kiril and I’m done writing. Bye!