
Until now, it was not possible to install Home Assistant OS on Raspberry Pi 4 over the network. The process requires you to have another computer, on which you have to perform several steps to prepare your future Raspberry Pi storage. Only after that, you were able to continue the installation on the Raspberry Pi and to actually finish it.
All of that is not needed anymore, as you can now install any supported OS including Home Assistant OS using the new Raspberry Pi network installer, and I will show you how below.
The network installer will start a Raspberry Pi Imager application, which will run in memory on your Raspberry Pi. The Raspberry Pi imager can be then used to flash the operating system onto a blank SD Card or USB disk, just like normal.
Table of Contents
Requirements for the successful installation of Home Assistant OS on Raspberry Pi 4 over the Network
Here are the requirements to make the network installation possible:
#1 Requirement – Raspberry Pi 4/400
First, you need to have a Raspberry Pi 4 or Raspberry Pi 400. I know that the Raspberries are hard to find lately and you have to be patient or lucky or both to find one, but I believe this will be over soon and it will be back to normal. On top, I have a feeling that Pi 400 are easier to find and the parameters of RPI 4 and RPI 400 are almost identical, as well as the price + you get a free keyboard with the Raspberry Pi 400.
- Raspberry Pi 4 (affiliate link) – https://amzn.to/3PdGUUe
- Raspberry Pi 400 (affiliate link) – https://amzn.to/3yrzmXc
#2 Requirement – Latest Stable Bootloader
Next requirement is to have the latest STABLE Raspberry Pi bootloader. If you don’t have it you can update it using few simple commands:
sudo raspi-config # Advanced Options > Bootloader Version > Latest > Yes
sudo apt update
sudo apt install rpi-eeprom  # Update the rpi-eeprom/bootloader
sudo rpi-eeprom-update -a    # Install the latest bootloader
sudo reboot
#3 Requirement – A Monitor
A Monitor is also required, just initially during the installation process afterwards you can disconnect it and continue headless.
- Best selling Monitor on Amazon – https://amzn.to/3ypEFX3
#4 Requirement – SD Card or USB Drive
After that, you’ll need an empty SD card or compatible USB drive. Some fast SSD drive or USB flash drive will be great (but they have to be compatible with RPI). Of course, a good SD card is also not a bad option and it is the safer bet.
- Best Selling SD Card on Amazon – https://amzn.to/3PhtEO6
- Compatible USB drives – https://peyanski.com/how-to-boot-raspberry-pi-4-from-ssd/#What_you_need_to_boot_Raspberry_Pi_4_from_SSD
#5 Requirement – LAN Cable & Keyboard
And finally, you will need an Ethernet cable with Internet Access, as well one USB keyboard. The keyboard is only needed if you are using Raspberry Pi 4, for RPI 400, apparently you already have that included.
- Best selling Keyboard on Amazon – https://amzn.to/3ACu8u7
- Best selling LAN cable – I’m kidding… 🤣
Affiliate Links: If you buy something from the above links I will receive a small commission from your purchase with no additional cost for you. Thank you!
Start the Raspberry Pi Network Installer
Just quick info before we continue further: The network installation described below is also working for all other supported OS available for Raspberry Pi.
To start the Raspberry Pi network installer, you have to physically connect your Raspberry Pi to your router via an Ethernet cable rather than connecting it to your wireless network. It is possible to configure your Wireless network and remove the cable once you have Home Assistant OS up & running and I will show you that later.
- Insert a formatted SD card or an USB drive into your Raspberry Pi.
- Connect a USB Keyboard (you can remove that later).
- Connect a Monitor so you can see what is happening (you can remove that later).
- Connect your Raspberry Pi to the Internet using a LAN cable.
- Power On the Raspberry PI and hold down the Shift button until you see a Raspberry Pi Imager screen.
Install Home Assistant OS on Raspberry Pi 4 over the Network
Let’s begin the actual Installation of Home Assistant OS on Raspberry Pi 4 over the Network. Here are the steps:
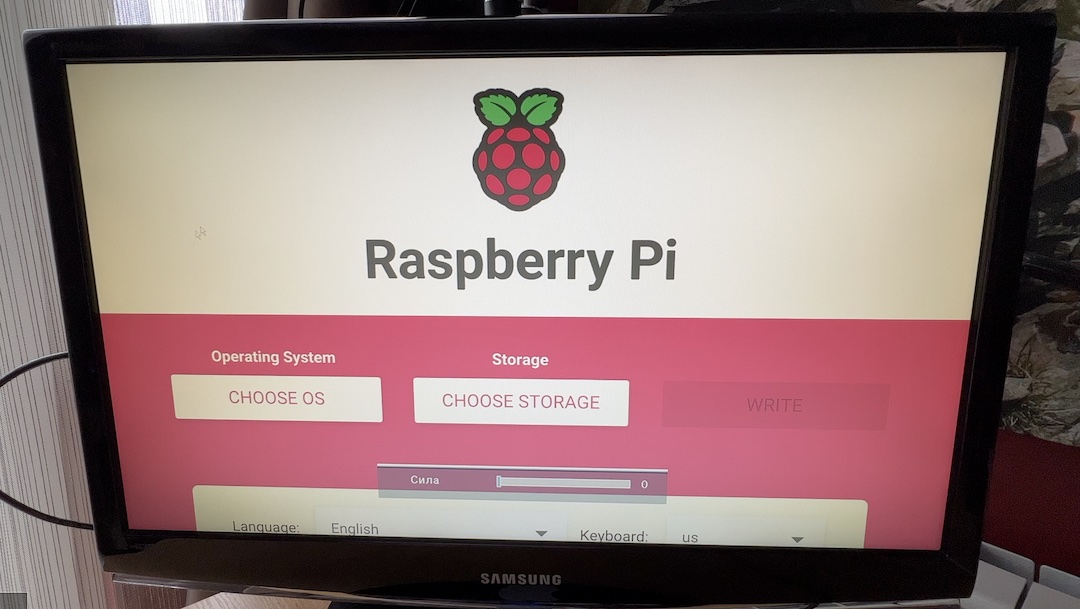
- In the Raspberry Pi network installer, select CHOOSE OS and navigate to Other specific-purpose OS > Home assistants and home automation > Home Assistant > Home Assistant OS (RPI 4/400)
- Have in mind that on the above step you could choose any other supported OS that you wish. For example, Raspberry Pi OS, but you won’t have Home Assistant OS that way.
- Select CHOOSE STORAGE and select your Storage that will be wiped out during the installation.
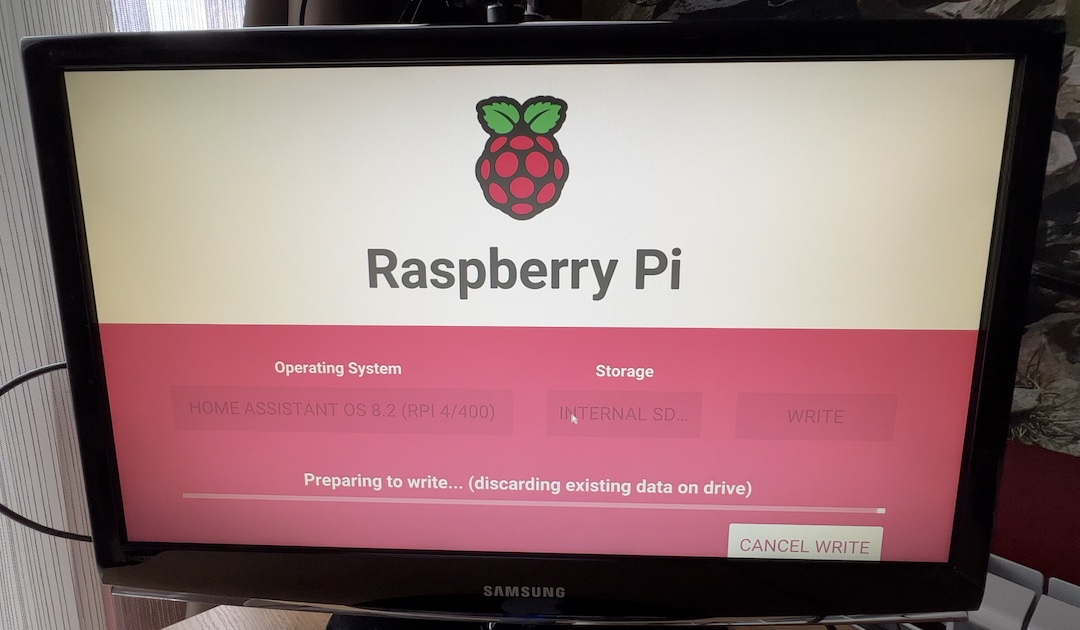
- Select WRITE and then YES on the next dialog. The installation of Home Assistant OS will begin.
Home Assistant Webinar?
In the above section I choose the Home Assistant OS which is one of the official methods to get Home Assistant, but if you want to learn more about the other 3 official methods that are available + 1 secret & super easy way to have Home Assistant in under 5 minutes you can go and check my Webinar.
The Webinar is completely free and you can reserve your place by registering on my other website https://automatelike.pro/webinar
Home Assistant Onboarding
The installation of the Home Assistant OS on a Raspberry Pi 4 over the network have to finish within several minutes. The exact time depends of your storage & Internet speed. You will know that you can proceed further when you see similar screen.
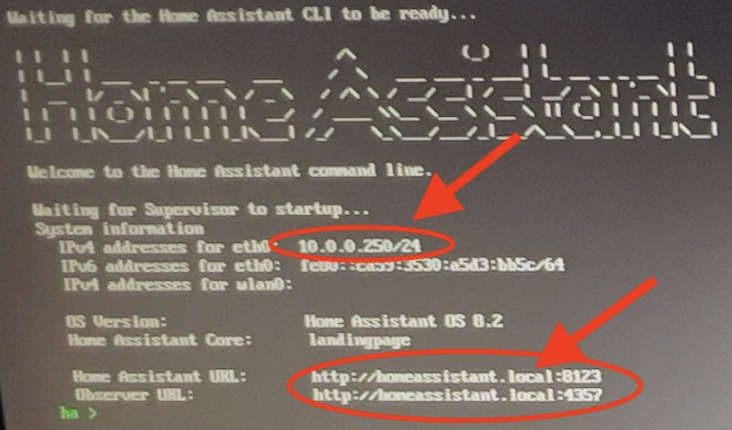
If you see something similar as above – congratulations, Home Assistant OS is now almost installed using the Raspberry Pi network installer. You can now try to open either:
http://homeassistant.local:8123or the assigned IP visible in the picture above, in my case http://10.0.0.250:8123 (Your IP most probably will be different than mine)

When you open either the homeassistant.local or your IP you should see the “please wait 20 minutes” blue screen of boredom 😉And you have to wait a bit more to get your hands on the HA.
After the Preparing Home Assistant process is finished (blue screen of boredom) you will be greeted by the onboarding wizard, where you can:
- Create a Home Assistant User and define a password.
- Name your Home Assistant installation, set your location, Time Zone, elevation, unit system & currency.
- Enable or leave disabled the anonymized Home Assistant analytics.
- Configure auto discovered smart devices.
Switch Home Assistant from LAN to WIFI
Warning, this step is optional and you can freely skip it. You can connect your Raspberry Pi to a Wi-Fi and go wireless or you can leave the Ethernet cable connected, the choice is yours. If possible, I recommend to choose the wired/LAN connection as it is still more reliable than Wi-Fi in most of the cases. If that is not possible here is what you have to do to remove the LAN cable.
- In Home Assistant, press the “c” button on your keyboard to invoke the search bar and start typing network, then select Navigate Network.
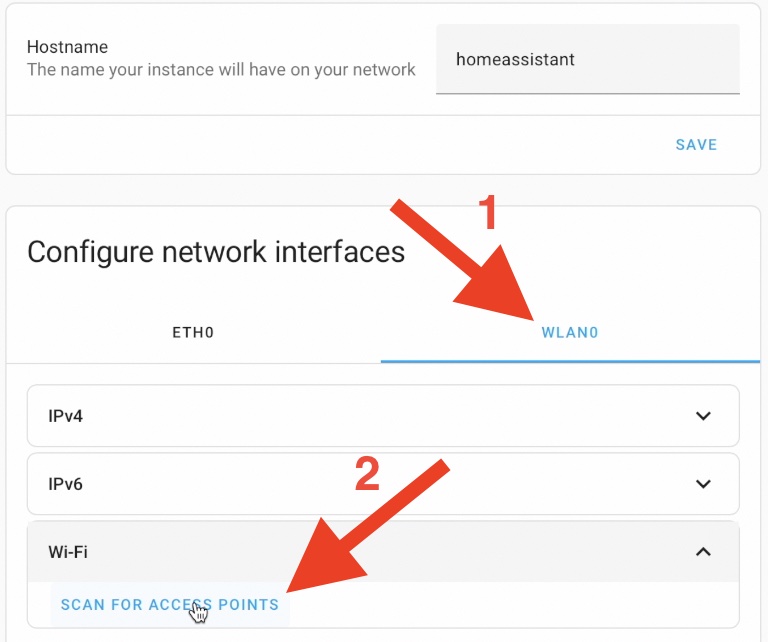
- Select the WLAN0 tab, expand the Wi-Fi section and click on SCAN FOR ACCESS POINTS link.
- Select your WIFI and scroll down until you see the wpa-psk radio button, select that button and type your WIFI password. When you are ready click SAVE.
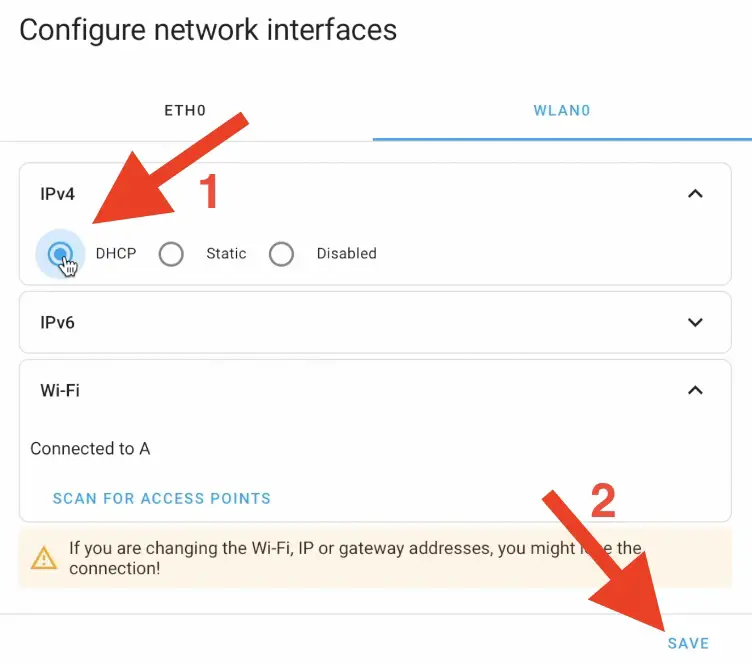
- Expand the IPv4 section and select DHCP option, click SAVE again.
- Now you can disconnect your LAN cable and you will be able to access your Home Assistant over WIFI, either by typing the http://homeassistant.local:8123 or by http://YOUR_WIRELESS_IP:8123
Enjoy 🍻
Outro
When you have Home Assistant OS up & running on a Raspberry Pi you can start making your dream Smart Home. If you don’t know what is possible check some of the Home Assistant articles – https://peyanski.com/category/smart-home/home-assistant/
Don’t forget to subscribe for my Newsletter If you want to receive new Smart Home and Home Assistant content on a weekly basis.
I’m Kiril and I’m done writing. Bye!