
Boot Raspberry Pi 4 from SSD (or Raspberry Pi 400) drive is getting way more easier than before, but it still require several manual steps. And this is exactly what I will show you in this article.
The easiest, official and stable way to boot Raspberry Pi 4 from SSD. No shuffling and straight to the point. Coming up.
Table of Contents
What you need to boot Raspberry Pi 4 from SSD?
As I already told you we are not going to waste any time here and we are going right to the things that you will need to successfully boot your Raspberry Pi 4 from SSD or of course your Raspberry Pi 400.
- You will need a microSD card just for the initial part and we will completely remove it later.
- You will also need a compatible USB SSD drive or SATA to USB adapter and SATA SSD. I have a table with SSD disks and SATA adapters reported to be working by you and me and you can find it below:
| Model | Affiliate Link |
|---|---|
| SSD HP P600, 250GB, USB 3.1 | https://amzn.to/2B7qIDi |
| Samsung 860 EVO 500GB 2.5 Inch SATA III Internal SSD | https://amzn.to/37o2hNS |
| ELUTENG USB3 SATA Adapter 2.5 Inch SATA to USB 3.0 | https://amzn.to/2MWfd49 |
| SanDisk SSD PLUS 240 GB Sata III 2.5 Inch | https://amzn.to/37AG27e |
| Samsung BAR Plus 64 GB Type-A 200 MB/s USB 3.1 | https://amzn.to/3fqJSCO |
| SanDisk Ultra 32 GB USB Flash Drive USB 3.0 | https://amzn.to/3frXg9J |
| Samsung MZ-MTD1280 (128GB mSATA) & Element14 Pi Desktop (rev 3) HAT | Reported by Steve Kowalski in the comments |
| Sandisk x110 128GB | Reported by Con Ben in my YouTube Channel |
| SanDisk 256GB Extreme PRO USB 3.1 Solid State Flash Drive | https://amzn.to/2NtLyQc |
| Crucial MX500 250GB 3D NAND SATA 2.5 Inch Internal SSD (needs SATA adapter) | https://amzn.to/2YvVAq7 |
| Samsung 860 QVO 1TB Solid State Drive (needs SATA adapter) | https://amzn.to/2YAyGhz |
| CanaKit Raspberry Pi 4 4GB Starter Kit – 4GB RAM | https://amzn.to/3eyGi9S |
| Kingspec Z3 Type C USB 3.1 External SSD (Reported by CraftSense in my YouTube) | Banggood link |
| Geekworm X825 2.5 inch SATA HDD/SSD Expansion Board (Reported by Jay in peyanski.com) | https://amzn.to/2QML60Q |
| Kingston A400 120G Internal SSD M.2 SA400M8 (Reported by Luiz Barreto in peyanski.com) | https://amzn.to/32kRR0k |
If you have a device that is not listed go ahead and try it and then don’t forget to report it in the comments below if it is working. I can confirm that the external HP P600 SSD is working without any issues so far.
- Apparently you will need a Raspberry Pi 4 with any amount of RAM or Raspberry Pi 400. If you want to buy one, you can use the links below:
- Raspberry Pi 4 Model B 4GB (Amazon Affiliate link) – https://amzn.to/3q8uCzS
- Raspberry Pi 4 4GB Starter Kit with 32GB Micro SD Card (Amazon Affiliate link) – https://amzn.to/3qaI5qN
- Raspberry Pi 400 4GB RAM (Amazon Affiliate link) – https://amzn.to/3sinz9s
- Raspberry Pi OS is also needed and the easiest way to get it is to:
- Insert a SD card into a computer or reader,
- To download and install Raspberry Pi Imager,
- To select Raspberry Pi OS and your SD card as destination,
- And to write the Raspberry Pi OS on the micro SD card.

Connect to Raspberry Pi over SSH (optional step)
After writing is completed you can create an empty file called ssh with no extension in the root folder of your SD card.
On macOS you can execute the following command in the Terminal:
touch /Volumes/boot/sshOn Linux/Windows you can use any text editor or you can copy/paste and rename one of the existing text files inside the your micro SD card. Just don’t forget to remove any file extensions and leave the file with ssh name only
This file and this step as a whole is only needed if you intend to connect to your Raspberry PI over the network via SSH and not to use a monitor, keyboard or mouse. Otherwise you can freely skip it,
Boot the Raspberry Pi from SD card
Then you only have to unplug from SD card reader/slot and plug the SD card into your Raspberry Pi and power it up.
How to Boot Raspberry Pi 4 From SSD
When the Raspberry Pi boot in its operating system, start the Terminal from the Raspberry Pi OS or connect to your Raspberry over SSH and be ready for some console fun that I’m about to show you right now.
- Update your Raspberry Pi OS and Firmware by type the following:
sudo apt update
sudo apt full-upgrade
sudo rpi-update- Reboot your Raspberry Pi 4 or 400.
sudo reboot- After reboot login again and install the latest bootloader.
sudo rpi-eeprom-update -d -a- Launch the raspi-config tool to select some important, but easy settings.
sudo raspi-configGo to Advanced Options > Bootloader version > select Latest Use the latest version boot ROM software > Reset boot ROM to defaults? select No > OK.

After that go again to Advanced Options > Boot Order > select USB Boot > OK.

You can exit the raspi-config by click on Finish button, but don’t reboot the Raspberry Pi yet, we have to create one cloning first and then we can try to boot Raspberry Pi 4 from SSD for the first time.
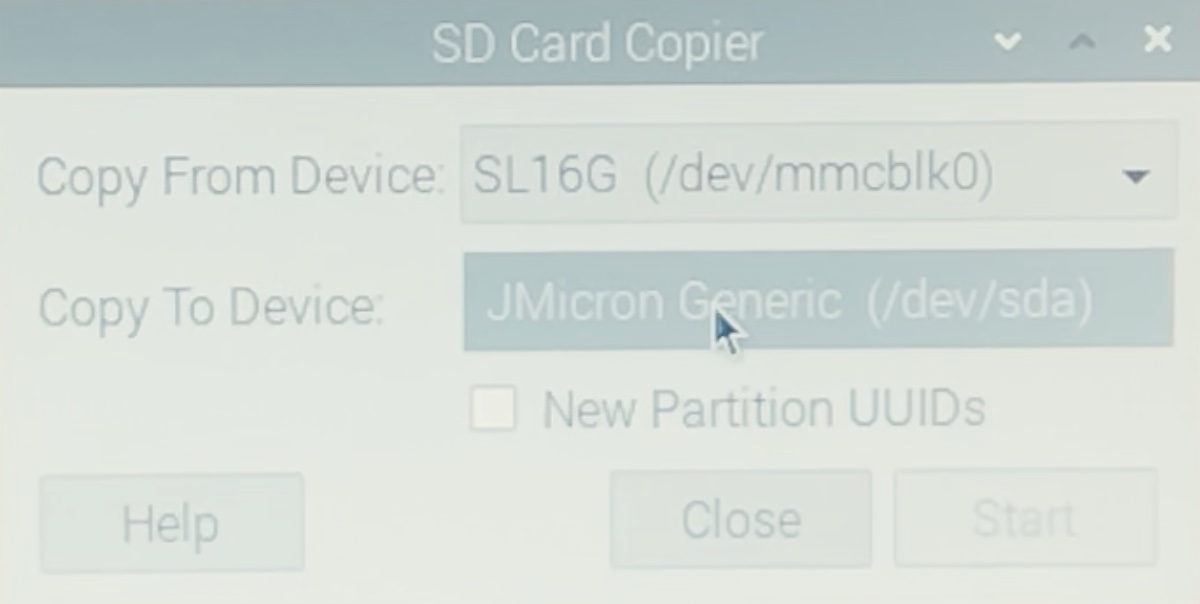
- Launch the SD Card Copier tool from the Start menu (Raspberry Pi icon) > Accessories section in the Raspberry Pi OS.
- Connect your SSD drive to the Raspberry Pi and clone the microSD card to the SSD by select the following:
- As source or Copy From Device – choose your SD card (it is usually marked as /dev/mmcblkX).
- As destination or Copy To Device – choose your USB SSD drive (it is usually marked as /dev/sda).
- Shutdown the Raspbery Pi, leave only the SSD drive connected and throw away your SD card! Actually if you want to throw something throw one Subscribe click on my Newsletter. Thank you.
- Power on your device and Boot Raspberry pi 4 from SSD successfully and enjoy your cheap, but fast IoT beast.
Support My Work!
You now know how to boot Raspberry Pi 4 from SSD drive or its brother in war the Raspberry Pi 400. The benefits of doing this are a lot: you will get faster speed, more storage and last, but not least more reliability compared to an microSD card.
I’m using such setup for over 7-8 months now and I’m more than happy with the performance and stability of my Raspberry Pi 4.
If you want to secure this blog existence you can become one of my supporters. You can see exactly how in this section of my site.
I can’t thank enough to all wonderful guys that are supporting my work already – you are amazing!
Any other sort of engagement on this site and my YouTube channel does really help out a lot with the Google & YouTube algorithms, so make sure you hit the subscribe, as well as the Like and Bell buttons.
If you are just entering the Smart Home world you could also buy my digital product called: Smart Home – Getting Started Actionable Guide 👉 LINK
Also feel free to add me on Twitter by searching for @KPeyanski. You can find me on my Discord server as well.
Stay safe and don’t forget – Home Smart, But Not Hard!
You should post this on agora road. I know a lot of users are into retro stuff over there.
https://forum.agoraroad.com/index.php?forums/video-games.36/
Hey James, thanks for the suggestion why retro? Do you mean to use the Raspberry for retro gaming?
Thank you for your job !
You are so welcome! Did it work for you?
Hello Kiril, First and foremost: thanks for a great lesson!
I managed to do almost everything, RPi 4 is trying to start with SSD, but without success.
The reason: I switched the existing SSD from the old RPi3, on which the Home Assistant OS and the whole configuration of the smart home are already installed.
So I didn’t take the last step in your manual: I didn’t clone the SD card to the SSD.
Question: Is it possible to switch an existing SSD with its installation to RPi4 without having to repeat the whole installation.
Thanks in advance.
Darko
You forgot to mention that if you are using a headless installation you need some sort of a remote desktop to run the SD Card Copy, (unless it can be run from an SSH terminal.) I tried to use VNC. I kept getting the error “cannot currently show desktop” . As a work around, I changed the bootloader from the SD card to boot to the USB. I then used your pi install and update procedure to copy PI to the USB SSD including adding the ssh file. The SSD booted first try. I eventually installed xrdp sudo apt-get install xrdp and was able to get a PI remote desktop using windows remote desktop.
Works with PNY CS900
https://smile.amazon.com/gp/product/B07Y5VDNT9/ref=ppx_yo_dt_b_asin_title_o03_s00?ie=UTF8&psc=1
Awesomest thanks a lot 😉
Glad you like it!
After running ‘sudo rip-update’ I get the following message:
‘Partition size 255M may not be sufficient for new Pi4 files This could result in a system that will not boot. 256M FAT partition is recommended. Ensure you have a backup if continuing.’
How do I get around that so that I can continue and add my SSD? I don’t want to lose everything I’ve already setup on my Pi. Thanks