
Roborock S7 is one of the best robot vacuum cleaners available on the market and for sure the best one that I’ve ever seen so far, but I will not talk about its features and capabilities (if you want to see them check the description in Amazon or AliExpress). Instead of that I will just integrate the Roborock S7 with Home Assistant.
Table of Contents
Two ways of Home Assistant Roborock S7 integration
I’m going to show you two ways for the Home Assistant Roborock S7 integration:
- The first is plain, vanilla way where you just have to execute few easy steps and you will be ready in no time.
- The second method is for the advanced users where we will extract the Cloud Token, we will configure the Roborock S7 in Home Assistant manually, we will extract the room map and we will add it in Home Assistant Lovelace as a custom card that shows and can control everything.
Do not worry here if you follow the steps you will see that the advanced method is not so complicated and it is very rewarding.
Home Assistant Roborock S7 integration – Prerequisites
First let’s talk about some prerequisites:
- The first one is obviously a Roborock S7 vacuum cleaner. You have to have such device, but the same procedure should apply for Roborock S6 & Roborock S5 models.
- The second prerequisite is to pair your Roborock with Xiaomi Mi Home App and not with Roborock app. So if you are currently using Roborock mobile App you have to reset your WiFi settings, to download Xiaomi Mi Home App and to add your Roborock vacuum cleaner inside. The app will guide you through the pairing process, so it is not big of a deal.
Quick Tip: Your Roborock S7 and Home Assistant should be in the same network. If they are in different VLANS for example there is a big chance that Home Assistant Roborock integration will not work for you.
- The third prerequisite is to use Home Assistant OS or Home Assistant Supervised installation, as they have Supervisor & Add-on store. This is only needed if you are willing to use the advanced Home Assistant Roborock integration method. On the other hand, if you are up for the simple method then Home Assistant Container or Home Assistant Core installations will be enough.
Home Assistant Installation Types – Webinar
I’m really sorry If I’m confusing you with all these different Home Assistant installation types and names, but for good or for bad these are the official names of the different official installation methods.
If you want to know more about them I’m officially inviting you to join my free Home Assistant Webinar which is exactly on this topic. You will understand everything there, plus all of the pros & cons of every method. That way you can make an informed decision what is best for you.
4 Official + 1 Secret way to install Home Assistant Webinar 👉 https://automatelike.pro/webinar
Roborock S7 in Home Assistant – Simple Method
In this section, I will demo the first Home Assistant Roborock S7 method. This is the standard, easy & plain method, but without the goodies like, room maps extracted in Home Assistant Lovelace.
- In Home Assistant, press the “c” button on your keyboard to invoke the search bar and start typing Integrations, then select Navigate Integrations > search for Xiaomi. Alternatively, click on the my Home Assistant Link below.

- In the dialog that will be displayed, enter your Xiaomi App username & password. As Cloud Server Country use the link below to find out which one is yours – https://www.openhab.org/addons/bindings/miio/#country-servers

- When you are ready click the Submit and then Finish buttons.
If everything is fine you will see the Roborock current status and lot of Diagnostic data and sensors.
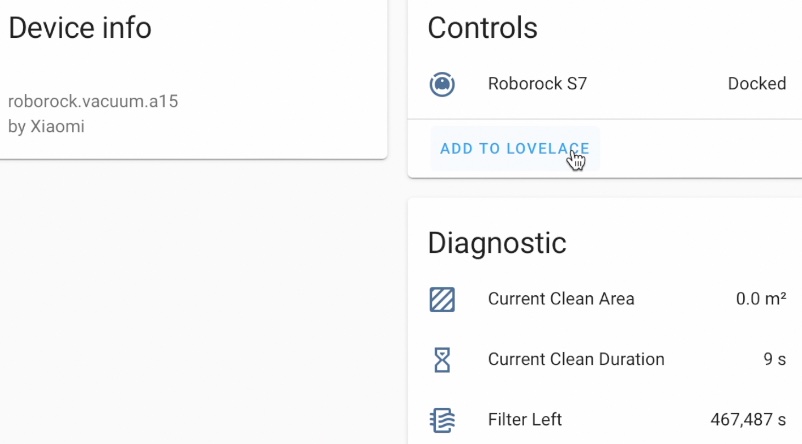
That was the standard Home Assistant Roborock S7 integration. You can now add the Roborock to your Home Assistant dashboard, you can start, pause and return to dock the vacuum cleaner, you can see most of the sensors and diagnostic data and of course, you can create Home Assistant Automations and scripts.
Roborock S7 in Home Assistant – Advanced Method
If you are eager to squeeze a bit more from your Home Assistant Roborock S7 integration, buckle your belt as we are starting with the second and more advanced method.
Roborock S7 Token Extraction
The first thing that is needed is to extract the Xiaomi Cloud token, thanks to Piotr Machowski and his Xiaomi Cloud Tokens Extractor GitHub project this is very easy. Not only that, this great guy from Poland is also the author of the Xiaomi Cloud Map Extractor & Xiaomi Vacuum Map card that we are going to use later. So all of the credits for this second method of Home Assistant Roborock S7 integration goes to him. If you want to buy him a coffee or PayPal him – find the links of his GitHub page. Guys like him definitely deserves some support.
Now back to action with the Xiaomi Cloud Tokens Extractor.
- If you are using Windows, just download and run the executable file form the Piotr Machowski GitHub – https://github.com/PiotrMachowski/Xiaomi-cloud-tokens-extractor/releases/latest/download/token_extractor.exe
- Otherwise, add the following repository (https://github.com/hassio-addons/repository) to add the Home Assistant community Add-ons, or click the My Home Assistant link below which will add the repo for you.

- Download and install the SSH & Web Terminal add-on, which is available in Home Assistant Add-on Store under Home Assistant Community Add-ons section. To get there press the “c” button on your keyboard and start typing Add-ons, then select Navigate Add-on store.
TIP: If you are not seeing the SSH & Web Terminal add-on – enable Advanced mode from your Home Assistant username profile.
- Don’t forget to set a password from the Configuration tab and to disable the Protection mode in the Info tab.
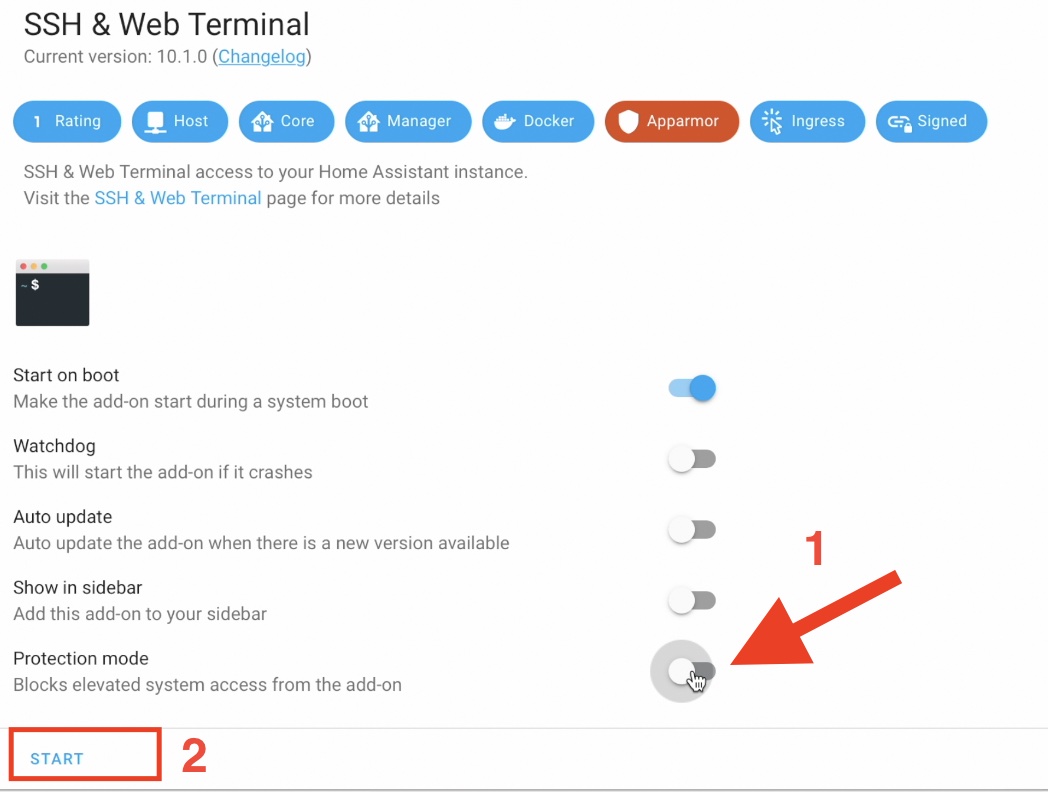
- Start the add-on, wait few seconds and then click on the Open Web UI button.
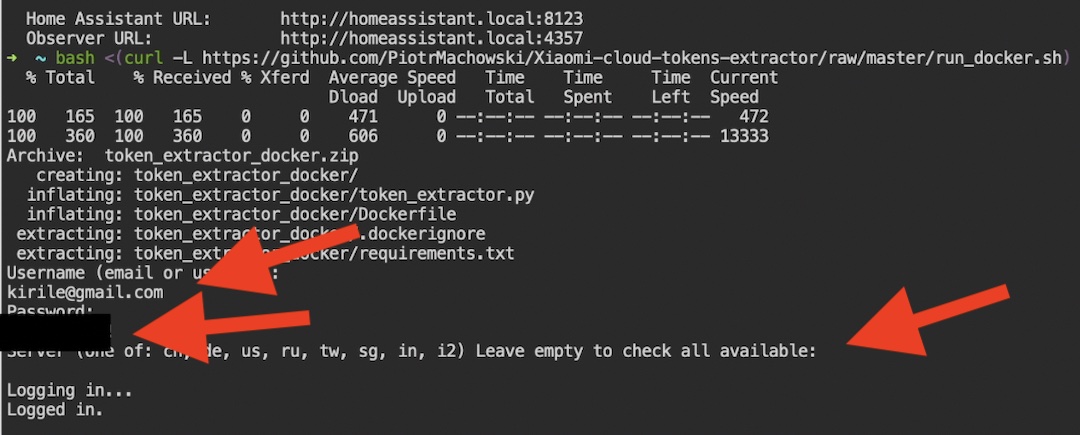
- Inside the opened Terminal, execute the following command:
bash <(curl -L https://github.com/PiotrMachowski/Xiaomi-cloud-tokens-extractor/raw/master/run_docker.sh)This command will start a simple script, that will download a Docker image for you with all the prerequisites and will start the Piotr’s Xiaomi Cloud Token Extractor. So give it some time, depending of your Internet connection speed and device performance it can take several minutes before you will be asked for your Xiaomi app username and password.
- Type your credentials, enter your Xiaomi region if you know it. Otherwise, leave this field empty and the Xiaomi Cloud Token Extractor will check all regions available.
- After the program finish its execution you will see the Token. Copy the Token somewhere safe as we are going to use it in a moment.
Home Assistant Roborock S7 – manual config
Now when I have the Xiaomi Cloud Token I can try to add the Xiaomi Roborock S7 in Home Assistant manually. The procedure start exactly the same as with the simple method described above.
- In Home Assistant, press the “c” button on your keyboard to invoke the search bar and start typing Integrations, then select Navigate Integrations > search for Xiaomi. Alternatively, click on the My Home Assistant Link below.
- In the displayed dialog, enter your Xiaomi MI Home App username & password. As Cloud Server Country use this link to find out which one is yours – https://www.openhab.org/addons/bindings/miio/#country-servers
- Check the Configure Manually (Not Recommended) option & click Submit button.
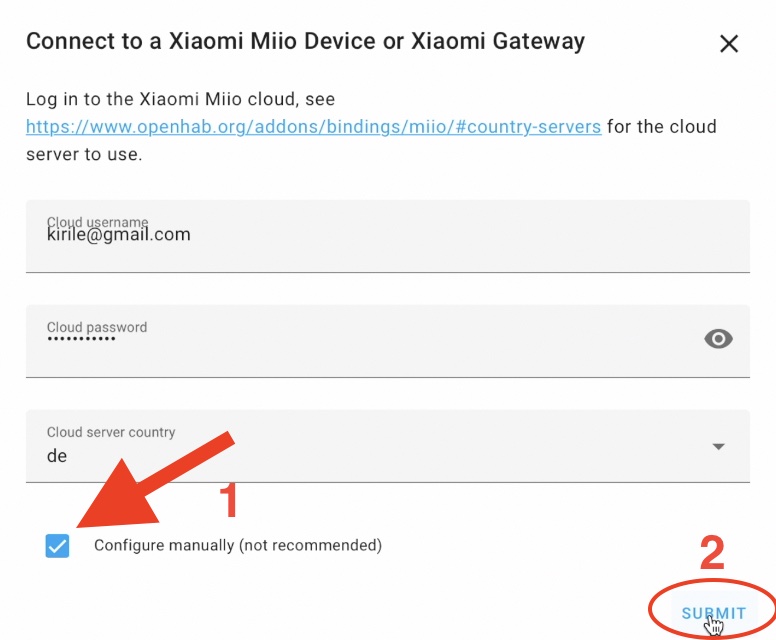
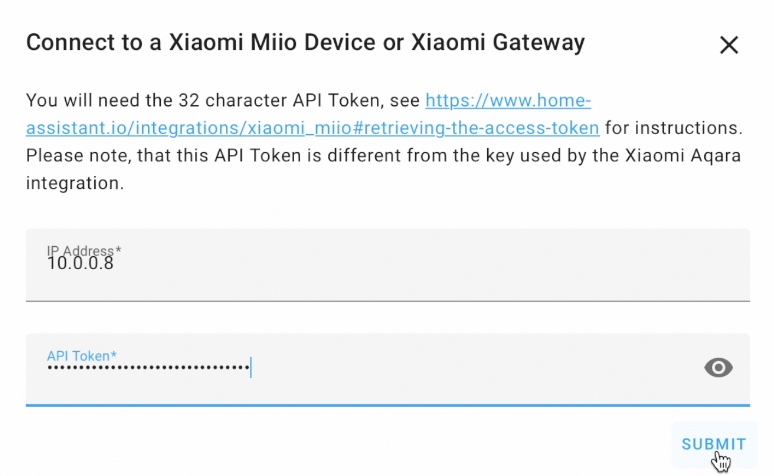
- On the next dialog, enter your Roborock S7 IP (You can get that either from Xiaomi Cloud Token Extractor tool, or from your router).
- Paste the Token into the API Token field and click Submit and then Finish buttons.
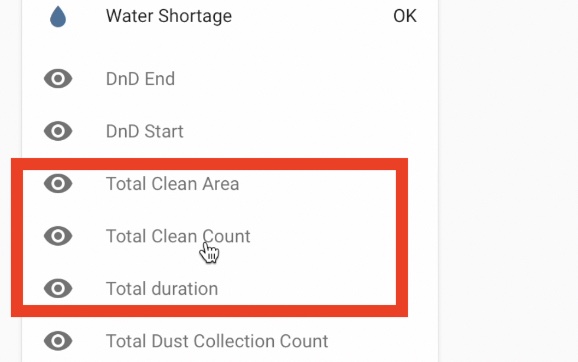
It is good idea to enable some entities that are disabled by default. For example: Total Clean Area, Total Clean Count, Total Duration and whatever else you wish.
Home Assistant Roborock S7 cloud map extractor
Time to extract the room map from the Xiaomi app. This map is not available until the first run of the vacuum, so if needed start one full clean first and then proceed. Then I recommend to install Home Assistant Community Store or HACS for short. I have a dedicated video & article with all the details and I will link it right here 👇
If you still don’t have HACS go see the above link and install HACS as I’m showing there. Then come back right here. When you are ready, do the following:
- Open HACS, click on Integrations > Explore & Download Repositories, and search and install Xiaomi Cloud Map Extractor.
- Restart Home Assistant.
- After restart, open your Home Assistant
configuration.yamlfile (with File Editor add-on for example) and paste the following lines inside:
# configuration.yaml entry
camera:
  - platform: xiaomi_cloud_map_extractor
    host: !secret xiaomi_vacuum_host
    token: !secret xiaomi_vacuum_token
    username: !secret xiaomi_cloud_username
    password: !secret xiaomi_cloud_password
    draw: ['all']
    attributes:
- calibration_points- Save the changes and open your
secrets.yamlfile and paste the following lines:
# secrets.yaml entry
xiaomi_vacuum_host: YOUR_ROBOROCK_IP
xiaomi_vacuum_token: YOUR_ROBOROCK_TOKEN
xiaomi_cloud_username: YOUR_XIAOMI_USER
xiaomi_cloud_password: YOUR_XIAOMI_PASS- Change all of the YOUR_… text with your real credentials and data, save the changes and restart Home Assistant once again.
- After Home Assistant has started, check if everything is Okay, by pressing the ‘e‘ key when you are inside Home Assistant. This will open the Entity search bar. Start typing camera.xiaomi... and you should see a new entity called –
camera.xiaomi_cloud_map_extractor.
Xiaomi cloud map extractor entity
Home Assistant Roborock S7 Xiaomi vacuum map card
Time for the final step which is to add Xiaomi Vacuum Map card inside Home Assistant. We are going to use HACS again as it is much easier that way.
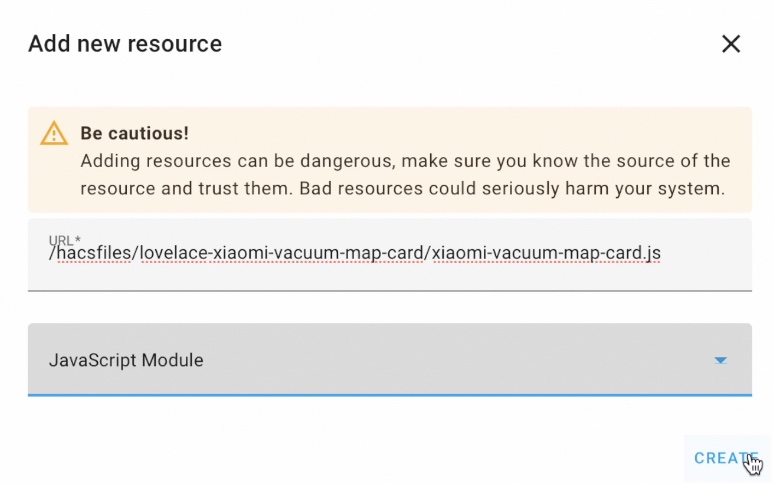
- Go to HACS > Frontend > Explore & Download Repositories > Search for Xiaomi Vacuum Map Card > Download this Repository with HACS > Download.
- Go to Home Assistant Dashboards > Resources or click the my Home Assistant link below.

- Paste the following line as URL.
url: /hacsfiles/lovelace-xiaomi-vacuum-map-card/xiaomi-vacuum-map-card.jsHit Create button and refresh/reload your browser.
From now on you can add the Xiaomi custom card in Home Assistant the standard way.
- Go to Home Assistant Overview section, click on three dots menu in the upper right corner and select Edit Dashboard > Add Card.
- Search for Xiaomi card, select it and click Save button.
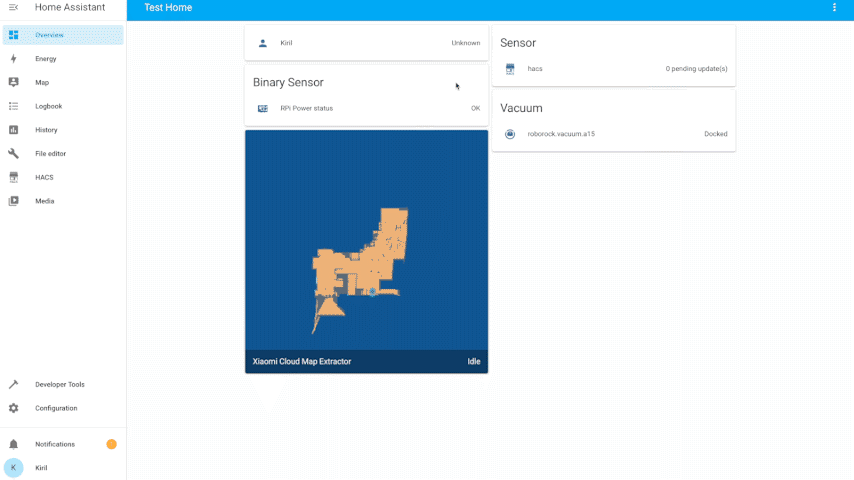
This card contains UI configuration editor, but it is limited to only basic set of features. Its full potential can be achieved by manual yaml adjustments.If you want to do that you can always refer to the Piotr’s GitHub page.
As end result you will be able to see your Roborock S7 map and sensors in one place, you can do a zone cleaning as well as Pin & Go right from your Home Assistant. Of course, you can crate automations and scripts if you want.
Hope this article was useful for you! Subscribe for my newsletter and you will receive notifications when I release new articles.
I’m Kiril Peyanski and I’m done writing. Bye!
Did you ever get Zone Cleanup or Pin & Go to work on the S7? So far the map extractor works great and I can just press start (next to locate vacuum and fan speed – pillbox bottom center of map) but neither ZC or P&G works for me.
Once you setup, either method, can you go back to using the roborock app?
I’m not quite sure, as I’m using the Xiaomi Home app, which is working flawlessly for me and I honestly never tried Roborock app.
Hello,
thanks for this tutorial!
I m facing a big problem with Mi Home APP : all my gateways, sensor are from China and i always use CN for zone.
I just bought a Roborock S7 Pro Ultra from France and the Mi Home APP said that it can etablish a connection to the CN server. If i change my server CN i lost all my sensor (i have 50 sensors like lights, PIR, contact sensors and 4 gateways (Aqara and Miio)).
The token extractor identy my roborock as CN :
———
NAME: Roborock S7 Pro Ultra
ID: xxxxxxx
MAC: XX.XX.XX.XX.XX
IP: X.X.X.X
TOKEN: xxxxxxxxxxxxxxxxxxxxxxxxxxxxxxxxxxxx
MODEL: roborock.vacuum.a62
———
so i cant do anything with Mi Home App, it just display the map, what is nice. But in roborock app i can tweak everything like aspiration setting for all mode…ect…
So i can just use the settings in HA, but not all settings.
Any idea?
I think about install a second Mi Home APP with a different account with FR server or EU perhaps…
Thats the only way in can make it to work in Mi Home app, i dont see any other solution…
Thanks if you have a better idea.
Olivier
Hello,
found a simple solution : i use a “clone APP” on Android, so i have one MiHome APP with CN region and a second one with DE region (this one only for the Roborock).
This way, i can switch the Mi Home APP that i need to.
What am I using for Cloud username when setting up the integration? I never entered an email address in the app.
This is a great tutorial on how to integrate the Roborock S7 into Home Assistant. I’m looking forward to trying it out!