
Last time, I asked you do you want me to create a Home Assistant Shelly Motion sensor integration tutorial and you said – YES, big time!
So I listen and execute. In this article I will try two methods:
- Using the native Shelly integration for Home Assistant
- Home Assistant Shelly Motion MQTT integration.
Let’s see what will happen.
Table of Contents
What will you see in this article?
This article will not be a Shelly Motion review, as I already did that and If you wish you can see it right here.
Instead I will directly dive into the possible ways to use Shelly Motion with Home Assistant. We will start with the Native Home Assistant Shelly integration first and then I will continue with the Home Assistant Shelly Motion MQTT method.
I must say that one of the methods here is not working as it should be at the the time of writing this article. Can you guess which one is it in the comments below? You will see the correct answer later in the article.
Meanwhile, feel free to smash the like button for my Newsletter at any time.
Now let’s start this.
No Home Assistant? Here is what to do!
Check this article if you still do not have a Home Assistant.
You can see there all of the official Home Assistant installation methods and I’m demonstrating one of them in details.
My Shelly Motion is brand new! Here is what to do.
To complete this tutorial you will need Shelly Motion sensor that is already joined in your home Wi-Fi network. You can do that either by using the Shelly Cloud mobile app or manually from the Shelly Motion web interface.
Both methods are well described in my Shelly Motion Unbox & Review article – LINK
Native Home Assistant Shelly motion Integration
To add the Home Assistant Shelly Motion integration do the following:
UPDATE: Thanks to @Random Boy & @Adrian Petre that commented under the video in YouTube we have a fix now. In Shelly Motion web interface go to:
- Internet & Security > COIOT > and Enable CoIoT
- As Remote address type: YOUR_HOMEASSISTANT_IP:5683
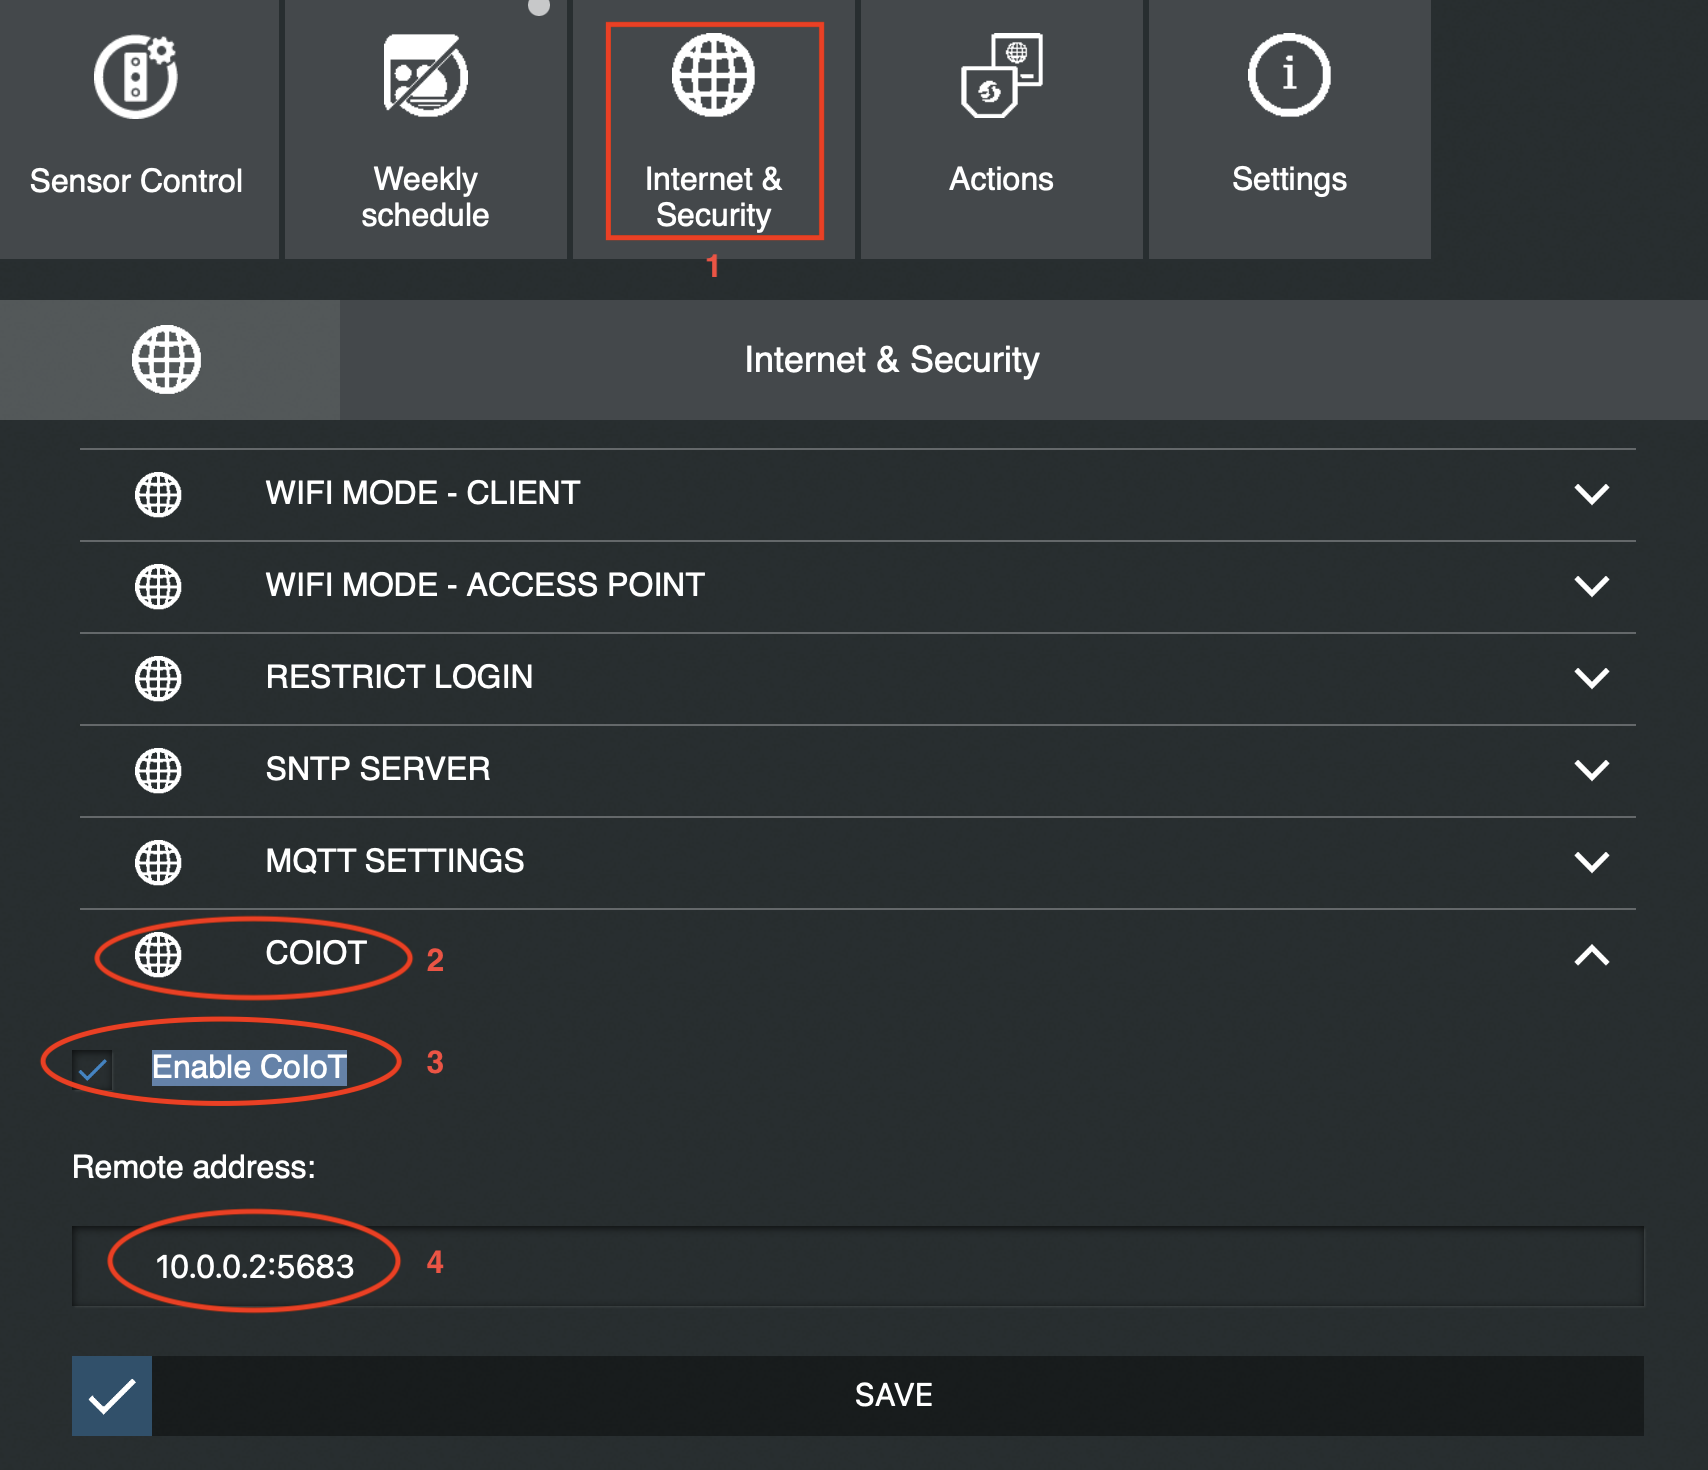
If you skip the steps above your Shelly Integration will not work as expected.
In Home Assistant go to Configuration > Integrations > Add Integration and search for Shelly
You can also use the My Home Assistant feature by just click on the link below which will lead you to the same place.

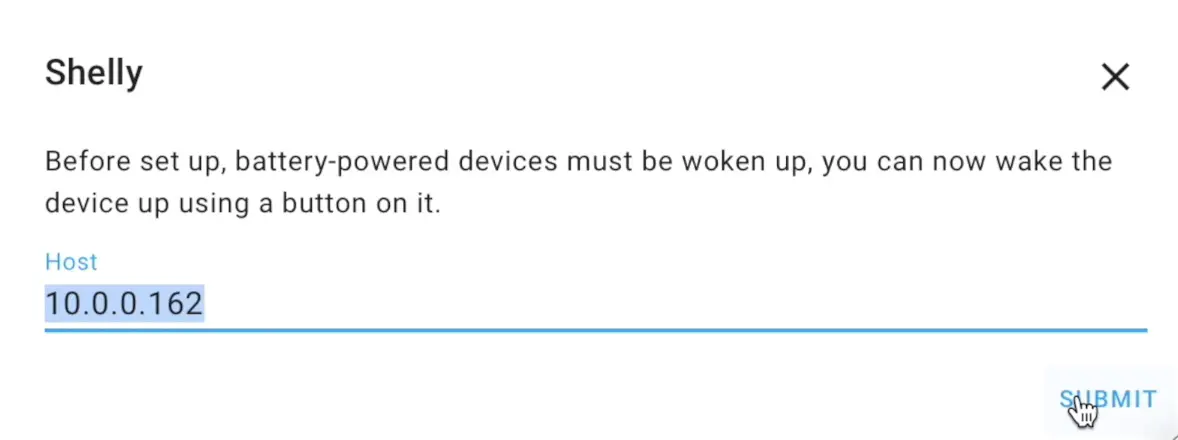
Wake up your Shelly Motion Sensor either by shortly pressing the reset button or by just move in front of the sensor.
In the dialog enter the IP of the Shelly Motion and click SUBMIT.
We now have the Shelly Motion sensor working with Home Assistant.
All of the Shelly Motion attributes/sensors: luminosity, motion, vibration & battery are only getting a snapshot of their current values and they are never updated again. To update their values you have to remove the integration and add it one more time, but then again they are just frozen. For me this integration is not usable that way.
If this native integration was working fine that would be the best option, but unfortunately this is not the case at least for now. Maybe in the future this will be fixed.
Meanwhile, If you manage to make it work somehow let me know in the comments section. I will add your solution to this Post, so everyone to see it 🙂
Home Assistant Shelly motion MQTT Integration
Home Assistant Shelly Motion MQTT integration is the other method that you can use.
Let’s see it.
MQTT Broker / Mosquitto
For this part, you must have a MQTT broker up and running. The easiest method is to install Mosquito as Home Assistant Add-On (Supervisor > Add-on Store > Mosquitto broker) or to install it standalone – LINK
Enable MQTT in Shelly Motion
Then go to Shelly Motion Web interface and under Internet & Security enable the MQTT option an enter your MQTT broker credentials. That way the Shelly Motion will connect to the MQTT broker and will start feeding it with real-time data. Don’t forget to save the changes.
Add MQTT integration in Home Assistant
You also have to add the MQTT integration in Home Assistant using the Integrations menu. That is very easy and here is what you have to do:
In Home Assistant go to Configuration > Integrations > Add Integration and search for MQTT
Or you can click on the link below and follow the instructions:
Shelly Motion MQTT Topics in Home Assistant
Edit the Home Assistant configuration (configuration.yaml file) just a little bit in order to add all of the Shelly Motion sensors (motion, luminosity, vibration) as Home Assistant sensors .
You can use a free tool called MQTT Explorer to see the available topics and to just copy them. I will paste the need YAML code below and the only thing that you have to do is to add your Shelly Motion MQTT state topic in the state_topic section for every sensor. In other words just replace the shellies/shellymotionsensor-YOUR_SHELLY_MOTION_ID/status with yours in the configuration.yaml file in your Home Assistant.
# configuration.yaml entry
sensor:
- platform: mqtt
  name: “IsShellyMotionDetected”
  state_topic: "shellies/shellymotionsensor-YOUR_SHELLY_MOTION_ID/status"
  value_template: "{{ value_json.motion }}"
- platform: mqtt
  name: “IsShellyMotionVibrationDetected"
  state_topic: "shellies/shellymotionsensor-YOUR_SHELLY_MOTION_ID/status"
  value_template: "{{ value_json.vibration }}"
- platform: mqtt
  name: “ShellyMotionLux”
  state_topic: "shellies/shellymotionsensor-YOUR_SHELLY_MOTION_ID/status"
  value_template: "{{ value_json.lux }}"
  unit_of_measurement: ‘lx’
- platform: mqtt
  name: “ShellyMotionBattery”
  state_topic: "shellies/shellymotionsensor-YOUR_SHELLY_MOTION_ID/status"
  value_template: "{{ value_json.bat }}"
  unit_of_measurement: '%'
Save the configuration.yaml file and either restart your Home Assistant or Reload Manually Configured MQTT Entities from Configuration > Server Controls.
To check if the new Shelly Motion sensors are available and working in Home Assistant you can try to add a new Home Assistant card with the new MQTT entities.
Home Assistant Shelly Motion automation
Home Assistant and Shelly Motion Sensor integration over MQTT is working fine.
Let’s create a quick Home Assistant automation that will create a persistent message when motion is detected. Open your automations.yaml file and paste the following YAML code inside:
# automations.yaml entry
- id: '1615465470665'
  alias: Motion is detected
  description: ''
  trigger:
  - platform: state
    entity_id: sensor.YOUR_SHELLY_MOTION_SENSOR
    to: 'True'
  condition: []
  action:
  - service: persistent_notification.create
    data:
      message: motion is detected maybe someone is hitting the like button
  mode: single
Don’t forget to change YOUR_SHELLY_MOTION_SENSOR with the name of your motion sensor. Save the file and reload the automations. Now, if the Shelly Motion sensor detect any movement the text that is defined in the message will appear in Home Assistant as persistent notification.
Home Assistant Shelly Motion Blueprint
I will show you how to use the latest My Home Assistant feature to import my custom Shelly Motion Blueprint that will help creating Shelly Motion sensor automations a faster and a lot easier.
Click on the following link to add my custom Home Assistant Shelly Motion Blueprint:

Now you can create automations based on this Shelly Motion Blueprint.
Where to buy Shelly Motion?
If you want to buy Shelly Motion, you can use the Shelly official store and my affiliate link below, doing so I will earn some small commission from your purchases with no additional cost for you:
UPDATE: Shelly Motion was discontinued and replaced by Shelly Motion 2 which is almost the same but a bit better and at the same price!
- Shelly Amazon Store – https://amzn.to/34d88VR
Outro
With that being said we can conclude our Home Assistant Shelly Motion journey for now. I wish you to stay safe and don’t forget Home Smart, But Not Hard.
Thank you for reading and I will see you in my next article.
If you prefer MQTT you can use Shellies Discovery.
Thanks for the hint I’ve only heart about that and I never use it till the moment 🙂
Hi all, is possible on home assistent with mqtt enable/disable motion detection?
I wolud create a button to have this task available 🙂
Tks
N
Not sure about that. The only thing that I could think of is to call a REST command from HA to do that if the Shelly Web interface support that for enabling/disabling the motion detection. You can try it and let us know the result.
My experience is somewhat different. Using Mosquitto MQTT at the command line I see occasional message sets from the Shelly Motion 1, but in fact nothing is sent for a motion or vibration event. Now on firmware version 2.17 their support has confirmed to me that “others have also complained” and they – as yet – have no firmware version that actually sends a timely motion detected event.
You cannot paste this code into configuration.yaml
It shows many error messages.
If you do not test your posts with more current versions of Home Assistant, and create failures when people try to follow your suggestions, you will lose subscribers.
The Shelly motion 1 & 2 both suck. Do NOT buy these devices.
Basically, every 1-3 months or so, the device will completely stop talking to your wifi router. You’ll need to do a hard reset to get it working again. Which includes changing all of the settings again to what you want them to be. Yes, this is the case for every single one of these motion sensors. Other Shelly devices stay attached to the network JUST PERFECTLY FINE.
I’ve recently run into the problem that none of the motion sensors are talking to MQTT at all. (again, I have 30 other devices where the MQTT is working perfectly fine, it’s ONLY these motion sensors that are not sending messages). Like, once every few reboots it will send one MQTT status update, once. I don’t know how Shelly botched up this device so hard.
BUY SOMETHING ELSE.