
By creating your own Home Assistant Vacation mode you can use Smart Lights to protect your home from thieves during your vacation.
And would it be great if you have the possibility to automatically replay your real light schedule from the past with a push of a button? Actually you can do that.
Table of Contents
Check this story if you are in a hurry

What will you get from this article?
Of course you can leave your lights turned on all of the time, but that won’t help much. On the contrary your house will scream to everyone that there is no one home to turn your lights off.
The other possible method is to randomize turning on and off your lights, and this is generally not bad approach.
If you manage to configure it correctly and to avoid disco feeling.

But there is even better way and that is to copy your lights usage history, so when you enable vacation mode in home assistant you will have exactly the same behaviour of your lights from several days ago (Up to 10 days without HA modifications) automatically. 4
And I’m going to demonstrate you how to implement this step by step right after I smash the subscribe button for my newsletter.
Now let’s go.
Creating a Home Assistant Vacation Mode button
We will need one helper/input boolean to create the Home Assistant vacation button.
You can use either:
- The Home Assistant Graphical Interface to create a Helper
- Or you can edit the configuration.yaml file and add an input boolean.
The result is the same.
Select the one closer to your heart and please don’t do them both at the same time.
Creating a Helper
Go to Configuration > Helpers > Big Plus Button > Toggle
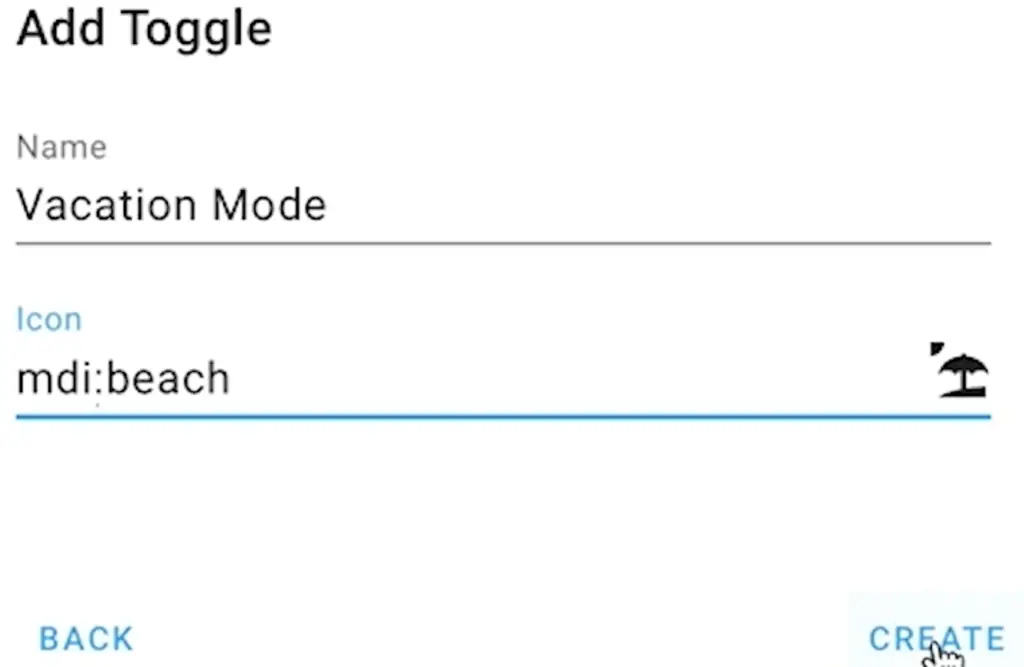
Type a name of your choice and enter “mdi:beach” as icon if you wish to use the same umbrella and sun visualisation of this toggle.
Now skip the next section where you can do the same, but in another way and go to Create a Vacation Button Card.
Creating an Input Boolean
Open your configuration.yaml file with your favourite text editor or add-on and insert the following YAML code inside:
# Example configuration.yaml entry
input_boolean:
  vacation_mode:
    name: Vacation Mode
    icon: mdi:beach
This will create an input boolean named vacation_mode that can be used to create a Home Assistant Vacation Mode button card.
You have to restart your Home Assistant after you change the changes in your configuration.yaml file.
Create a Vacation Button Card
To add the actual Vacation Mode button in Home Assistant:
- click on the three dots menu in the upper right corner and select Configure UI.
- Scroll down until you see a big Plus button in the right part of the screen and click on it.
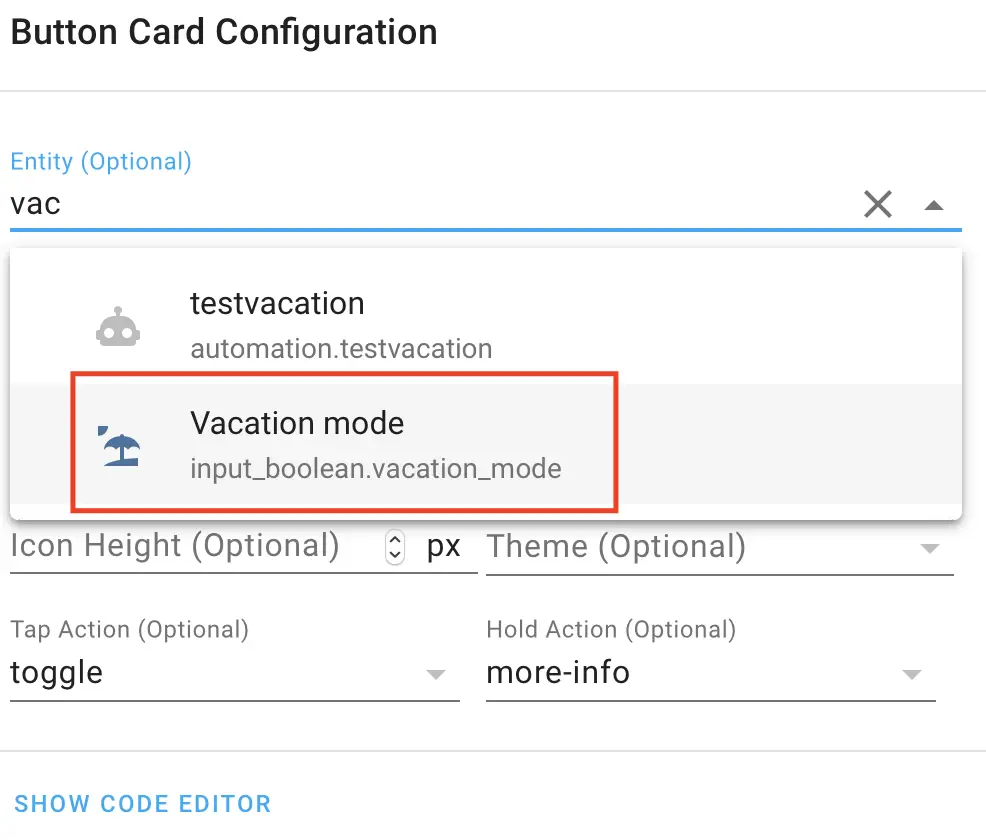
- Select Button card
- From the Entity dropdown select the Vacation Mode entity (input boolean / helper) and click SAVE.
You can use this Home Assistant Vacation mode button not only for automating lights, but for many more automations.
For example if vacation mode is on:
- set the heater to 18 degrees Celsius,
- water heater to off,
- put the blinds down,
- activate the alarm,
- and so on and so on.
Quick Q for you!
Can you tell me what is your usual procedure when you leave your home for vacation in the comments bellow?
Creating a History Stats Sensor
Now I will create one History Stats sensor that will have state 0 if my kitchen lights were turned off several days ago and respectively state 1 if the lights were on.
Add this YAML to your configuration.yaml file:
# Example configuration.yaml entry
sensor:
  - platform: history_stats
    name: "Vacation Kitchen"
    entity_id: light.kitchen_lights
    state: "on"
    type: count
    start: >
      {{ as_timestamp(now()) - (7*86400) }}
    duration: 00:00:10
Of course you can adapt this sensor for your needs and preferences.
The things that you probably wish to change are:
- The entity_id with your real one that you wish to track.
- Eventually the (7*86400) part. This is in seconds and if you leave it like that it will mean get the state of your entity defined in p.1 above – 7 days ago.
Have in mind that you have to create such sensor for every light that you wish to mimic. That is only if you wish to use more than one light in your Home Assistant vacation mode.
Save the changes, check your configuration for errors and restart your Home Assistant.
Test if sensor is available
Now let’s quickly test if this sensor that we are going to use for our Home Assistant vacation mode automation is available.
Go to Developer Tools > STATES
If you see something similar here – you are good to go.
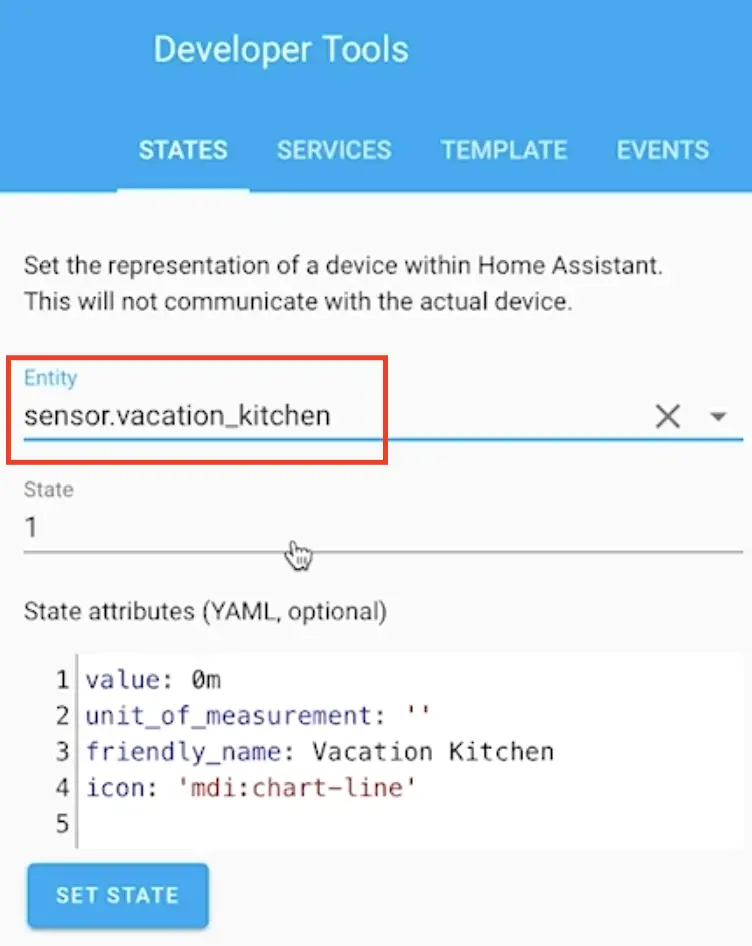
And from the Entity dropdown search for your sensor. In my case the name is – sensor.vacation_kitchen.
Home Assistant Vacation Mode Automation using the sensor
I will use this sensor now to create a Home Assistant automation that will be activated when the sensor change its state.
It is as easy as smashing the like button for the YouTube algorithm, and as hard as to hitting the subscribe button.
Now let’s continue.
Open your automations.yaml file in your favourite editor and paste inside the YAML code from below.
# Example automations.yaml entry
alias: Vacation Kitchen Lights
description: ""
trigger:
  - entity_id: sensor.vacation_kitchen
    platform: state
condition:
  - condition: state
    entity_id: input_boolean.vacation_mode
    state: "on"
action:
  - data: {}
    service: light.toggle
    target:
      entity_id: light.kitchen_lights
Again change the entity_id with yours and eventually the input_boolean name if you did choose a different one.
This is the same automation, but with choosers and it is refined and posted by Steve Cooper in my YouTube video comments. If you wish you can use it instead of the above automation.
# Example automations.yaml entry
alias: Vacation Kitchen Lights
description: ""
trigger:
  - entity_id: sensor.vacation_kitchen
    platform: state
condition:
  - condition: state
    entity_id: input_boolean.vacation_mode
    state: "on"
action:
  - choose:
      - conditions:
          - condition: state
            entity_id: sensor.vacation_kitchen
            state: "1"
        sequence:
          - service: light.turn_on
            data: {}
            target:
              entity_id: light.kitchen_lights
      - conditions:
          - condition: state
            entity_id: sensor.vacation_kitchen
            state: "0"
        sequence:
          - service: light.turn_off
            data: {}
            target:
              entity_id: light.kitchen_lights
  - data:
      message: >-
        VACATION MODE: Kitchen Lights were turned {{states
        ('light.kitchen_lights')}}
    service: notify.telegram
Save the file and reload your automations from the Configuration > Server Controls menu.
You can also use Node-RED for this automation if you prefer that.
Support my Work!
If you like what you see so far and you want more content like this you may want to become one of my supporters. Check exactly how on my support page!
Any other sort of engagement on this site and my YouTube channel does really help out a lot with the Google & YouTube algorithms, so make sure you hit the subscribe, as well as the Like and Bell buttons If you enjoy this Home Assistant Vacation Mode video article.
Also feel free to add me on Twitter by searching for @KPeyanski. You can find me on my Discord server as well.
I really hope that you find this information useful and you now know how to activate Home Assistant vacation mode for your lights.
Stay safe and don’t forget – Home Smart, But Not Hard!
Thank you for reading, I will see YOU in the next article.
This article is very useful, thank you.
Your how I set my vacation mode question… I have two ways of doing this:
1) Manually from the iOS companion app changing the input_boolean
2) When everyone in my house is set to extended away. This occurs after 18 hours for each user. I am using Phil Hawthorne’s presence detection automations – https://philhawthorne.com/making-home-assistants-presence-detection-not-so-binary/
Thanks a bunch for that comment. I’ve been using these not so binary extended states myself for a while and the idea is not bad at all. BTW I managed to test the vacation days for a week and it worked perfect.
Great, That’s a great Vacation mode and even easy to implement.
I was wondering f it is possible to integrate several light (14 in my case) into one automation instead of having 14 separated ones?
I’m not quite sure, maybe it’s possible, but it will become almost unreadable in my opinion. If I had to do that I would do it with Node-RED. It will become much cleaner and easier to support and modify if needed.
What to do with the rollershutters ? Or other devices. I only have cover open and cover close in the call service option.
thx !
kind regards