
I will show you not one, but three different ways to install Node-RED, so you can choose which one is the best for you. On top I will show you how to integrate Node-RED with Home Assistant.
Table of Contents
Check this story if you are in a hurry

Intro
You may wonder what is Node-RED and why I need this? Or maybe you are currently smiling, because you have Node-RED from years.
But It doesn’t matter what is your current Node-RED experience I’m sure that you will find something for you in this article.
If not you can always go to the next article.
And if you are still here, let’s try to answer some basic questions:
What is Node-RED?
So what is Node-RED? Node-RED is a visual editor in a browser, that can be used to wire different nodes.

And nodes can do anything.
Not just anything like the Genie from the Aladdin, but let’s say almost anything just like any modern programming language, but in Node-RED writing code is optional.
Also Node-RED is open sourced, free and initially developed by IBM.
Why I need Node-RED?
Next question that you may have is why I need Node-RED – and the quick answer is – you don’t!
You can live without Node-RED and you can continue to use Home Assistant only or any other Software or Hardware Smart Home hub that you wish and you will be just fine.
But if you are kind of a visual person – just like me, and if sometimes you don’t like editing YAML files or using the Home Assistant graphical automations editor – just like me, and you want to have full control over your work – just like me you will love Node-RED just like me!
Now let’s start this:
Install Node-RED using Docker
You will need a Docker client for the first Node-RED installation method that I will show in this article.
Depending of your host operating system you will either need Docker Desktop that is if you are using MacOS/Windows or Docker Engine if you are using Linux.
So download and install Docker, then open a Terminal or Command prompt and type:
docker run -it -p 1880:1880 -v YOUR_LOCAL_FOLDER_HERE:/data --name nodered nodered/node-redJust replace YOUR_LOCAL_FOLDER_HERE from the command above with an empty folder somewhere on your local computer.
The command above will:
- Download the official Node-RED docker image.
- Create a Docker container with name nodered.
- Map the internal container folder /data (these are where the flows and settings are stored) to YOUR_LOCAL_FOLDER_HERE
- Expose container port 1880 to your host operating system. Port 1880 is the default Node-RED port.
- Run the container with the above parameters when everything is ready.
Wait for the command to finish and you should see something similar.

Copy the URL – http://127.0.0.1:1880/ and paste it in a new Browser or Tab and you should see the Node-RED dashboard.
Updating Node-RED
When a new Node-RED version is released you may want to update your installation. To do that with Docker just execute the following commands:
docker pull nodered/node-red
docker stop nodered
docker rm nodered
docker run -it -p 1880:1880 -v YOUR_LOCAL_FOLDER_HERE:/data --name nodered nodered/node-red
The commands above will:
- Download the latest Node-RED image
- Stop the current Node-RED container if it is started
- Remove the Docker container named nodered
- and will start all everything all over again just like you initially do with the exact same command to preserve your flows and settings.
Install Node-RED using Node.js
You don’t want to use Docker? That is ok. You can use Node.js to install Node-RED here is how.
Download and Install Node.js from here – https://nodejs.org/en/download/package-manager/
Then open a Terminal/Command Prompt and type the following command:
For MacOS/Linux
sudo npm install -g --unsafe-perm node-redFor Windows
npm install -g --unsafe-perm node-redAfter the command finish, just open a new browser or tab and type – http://127.0.0.1:1880/
You will be greeted by the Node-RED dashboard.
Install Node-RED as Home Assistant Add-on
This third and final method is the easiest, but it requires working Home Assistant with Supervisor menu. These are my articles where I’m showing how to install such Home Assistant if you wish to use this approach.
Install Home Assistant on VirtualBox
Install HOME ASSISTANT – Container & Supervised methods (you will need the Supervised method from here)
So install Home Assistant or use your already existing installation if you have such.
Go to Supervisor > Add-on store and search for Node-RED and click on it.
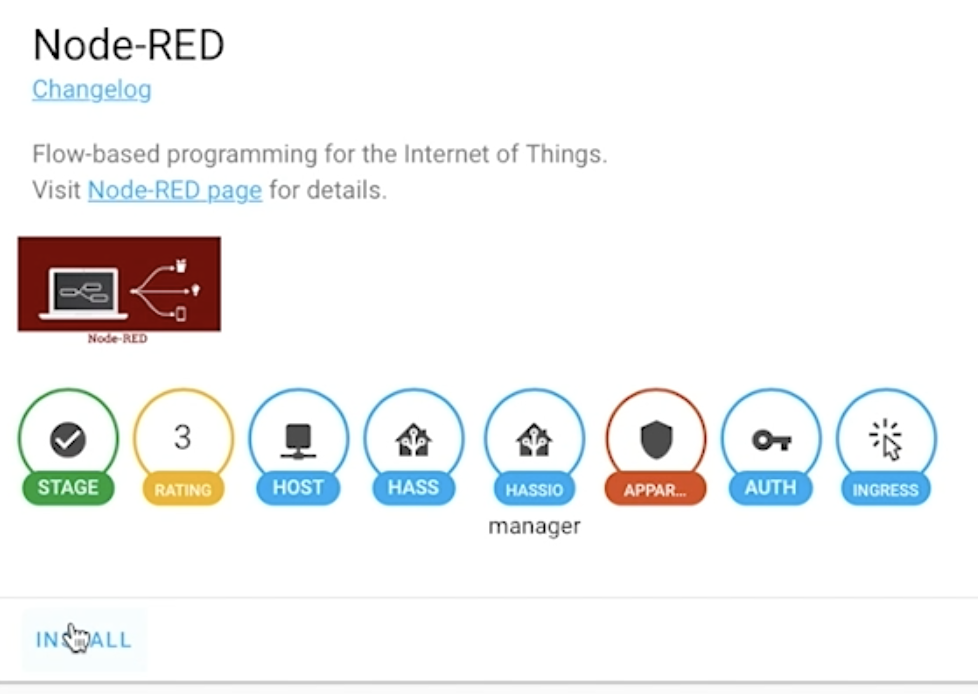
Then click on “INSTALL” button to install Node-RED.
While you are waiting for the installation to finish it is a good idea to take a look at the Node-RED add-on documentation – here.
When Installation finish a new tab named “Configuration” will appear – click on it.
Everything is almost preconfigured, the only things that I changed and probably you should change as well are these:

I added a credential_secret and I changed the ssl & require_ssl parameters from true to false.
I don’t need SSL as I will not expose my Node-RED outside of my local network. If you are planning to do so you better enable the SSL. Read how exactly in the documentation.
Save the changes in the Configuration, and then go back to the Info tab and click on the “START” button.
If everything is ok with your configuration your Node-RED will start and you can open it by clicking on the “OPEN WEB UI” button.
Question for You
For how many years you are using Node-RED? You can type digits or words in the comments bellow and I will understand for what are you talking about. And I promise to answer you back.
Integration of Node-RED with Home Assistant
If you used the Node-RED add-on (the third method that I showed here) your Home Assistant integration is already working. And you can immediately go and test it.
If you either used the Docker or the Node.js method you should execute these steps first:
- Open your Node-RED and click on the hamburger button in the upper right corner.
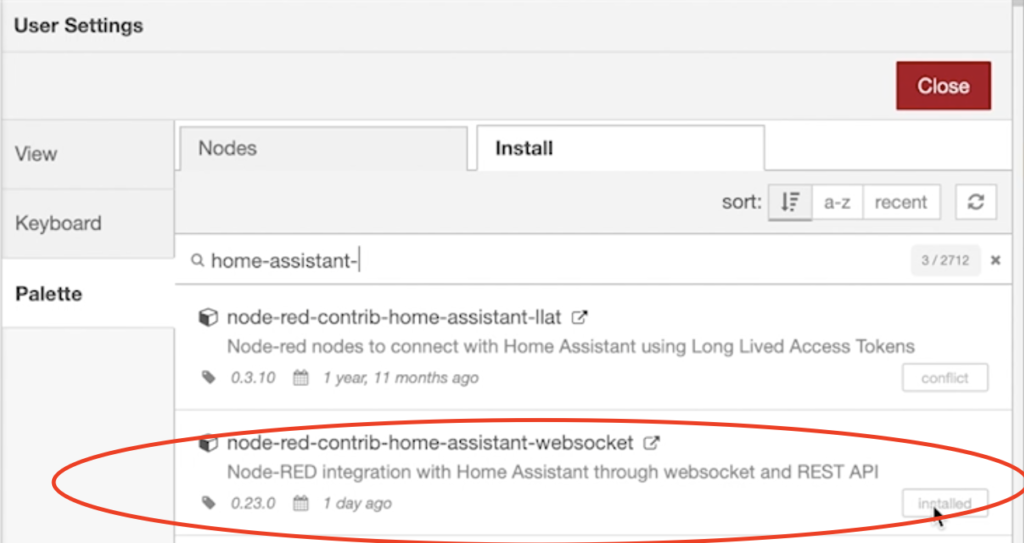
- Click on the “Manage Palette” menu and then on “Install” tab.
- Search for “node-red-contrib-home-assistant-websocket” and install it.
Then go back to the Node-RED dashboard and add one Home Assistant node to the canvas. For example the events: state node.
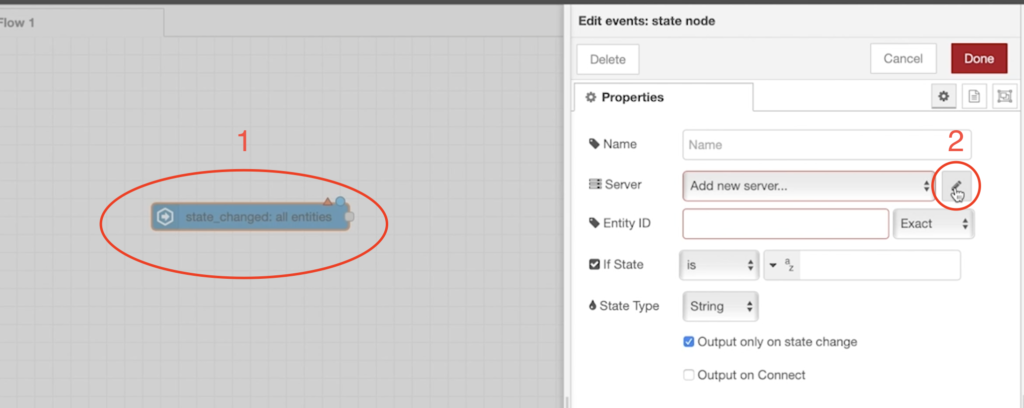
Double click on the node and then click on the pencil button next to the “Add new server…” field.
In the Base URL field enter the http://YOUR_HOME_ASSISTANT_IP:8123 and replace YOUR_HOME_ASSISTANT_IP with what?
Of course your Home Assistant IP 😉
And for the Access Token field you should open your Home Assistant.
Click on your username in the lower left corner of Home Assistant
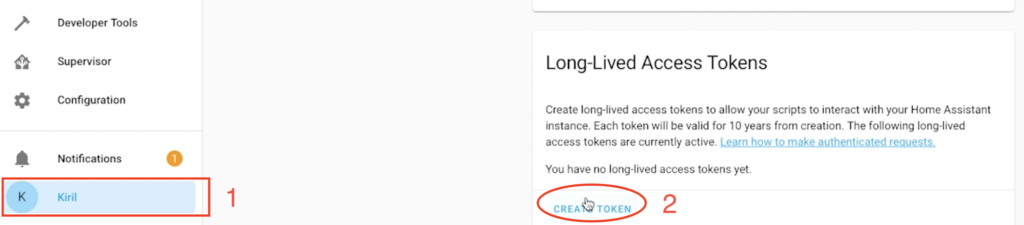
And then on “CREATE TOKEN” button.
Type a name in the dialog that will show and copy your Access Token from the next dialog.
Then go back to the Node-RED and paste your newly created token in the Access Token field.
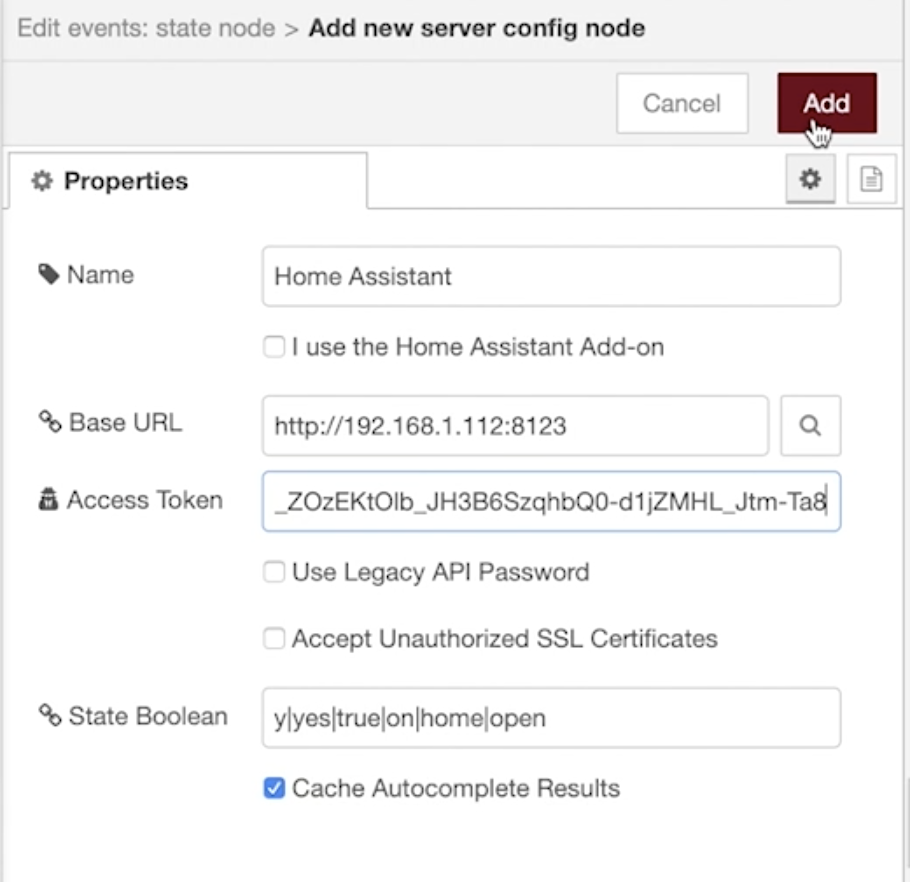
At the end you should have something similar.
Click on the “Add” button (ignore the error messages if any), then click on “Done” and finally on “Deploy” and “Confirm Deploy” buttons.
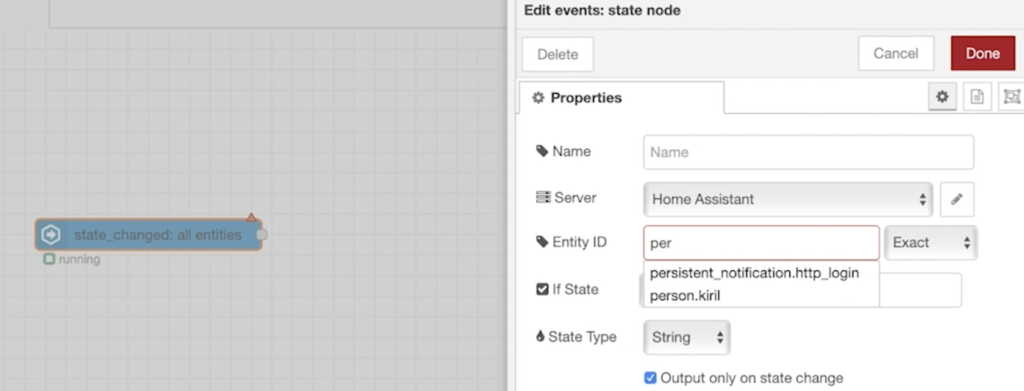
Now open again the events: state node by double clicking on it.
Start type a word like “person” in the Entity ID field and if auto completion is working then your Home Assistant and Node-RED integration is also working.
Subscribe
Hey if you liked what you see here why don’t you hit the Subscribe button? You will subscribe for my newsletter where I’m sending Smart Home related stuff weekly.
[sibwp_form id=2]
Also That will be a very good indicator for me, so I can continue making Node-RED articles. Thank you.
Node-RED is running, but what next?
Now what? You have installed Node-RED and everything is working, but you don’t know what to do next.
Don’t worry I have a Node-RED playlist with several tutorials just for you.
Support my Work!
If you like what you see so far and you want more content like this you may want to become one of my supporters check my support page.
Any other sort of engagement on this site and my YouTube channel does really help out a lot with the Google & YouTube algorithms, so make sure you hit the subscribe, as well as the Like and Bell buttons If you enjoy this Home Assistant Automation and Scripts video article.
Also feel free to add me on Twitter by searching for @KPeyanski. You can find me on my Discord server as well.
I really hope that you find this information useful and you now know how to install Node-RED, what it is actually and how to integrate it with Home Assistant.
Stay safe and don’t forget Home Smart, But Not Hard!
Thank you for reading, and see you next time.
I tried to run nodered using Docker on Synology but it kept failing. One error I came across was explained here, https://github.com/node-red/node-red-docker#managing-user-data. “To save your Node-RED user directory inside the container to a host directory outside the container, you can use the command below. To allow access to this host directory, the node-red user (default uid=1000) inside the container must have the same uid as the owner of the host directory.”
So I had to use “sudo chown -R 1000:1000 ” to get it to work.